Search the Community
Showing results for tags 'onan'.
Found 36 results
-
I have a 1996 520H Wheel Horse for sale. The tractor has just over 800 hours on it. It comes with a 48 inch deck. The deck is a 1995 and has over 1,500 hours on it, as it came brand new with my 312-8 that I sold several years ago. This 520-H has the swept front axle so it can handle a 60 inch deck. I just replaced the battery and the deck belt this summer. The engine is a 20HP Onan and it starts right up but requires the full choke. The transmission is an Eaton 1100-062, hydrostatic. The deck is in rough shape but the spindles appear to be in good working order. The right rear tire has some cracking. The original operator's manual for the 520H is included, as is the original operating and maintenance instructions for the deck, plus the installation instructions for the deck. Also included is a new PTO belt and several miscellaneous deck wheels and rollers. Additional pictures available upon request. Asking $500.
- 1 comment
-
- 1
-

-
- deck
- hydrostatic
- (and 2 more)
-
Wheel Horse Service Tool Kit Onan Industrial Engines ON-420-0556 Kit is missing oil filter tool, otherwise complete. Tools in excellent condition. Small crack in plastic case, bottom, middle. $129 plus shipping cost. Message me if you are interested in purchasing. Thank you. Joe
-
94' Toro Wheelhorse 416-H Mild Resto/Clean
Blue Delta posted a topic in Restorations, Modifications, & Customizations
Hello Everyone, First off I would like to say this is a great forum, heaps of information, helpful people and respect for machinery! This is the story of my Horse, it was traded in at work on a new machine (not sure what the customer bought but in my opinion they got the raw end of the deal), I was immediately interested in it as I have seen a lot of lawn tractors but nothing like this before, it was in a sad and sorry state it did not run but the panels were all straight and was complete. I got it home and replaced the battery and checked over the engine, it cranked and started once primed, the sound of the Onan roaring to life is amazing. I have done some cleaning on it, polishing the hubcaps makes it stand out, they are not perfect but look good still! My intent is to give it a good clean, fix anything that is on the way out or missing. I am currently tossing up having to repaint some areas around the pump and bonnet, I know since it is after 1990 'Toro Red' is the preferred colour over Rust-Oleum Regal Red, what is everyones thoughts? And here is some pics! Love at first sight! After its clean (looking good) Getting down and dirty (Probably the heaviest engine i have had to move) Yummy, frequent cleaning would have prevented this (and a air blower would help) After its clean! Will keep you all posted!- 28 replies
-
- 14
-
-
Hello everyone! I am going to replace the ignition trigger on my grandfather's 520. Any tips, tricks or important things I should know before starting? I already have the parts. I just need to tear into it. I didn't know Cummins owned Onan.
-
Okay, INTRODUCTION: So if you've problem solved all other aspects regarding your non-starting Onan engine with electronic spark control and come to the conclusion that you need to replace the Ignition module, keep reading. This is a decent step by step and doesn't require the engine to be removed the from the tractor. Although it might be a little easier to work on while on a workbench. The part numbers for the Module and ring if needed are below: Ignition Module: 166-0785 Spark Ring: 166-0767 Here is a list of the tools that I needed to complete the job from beginning to the end. They are named from left to right in the photo with the tools at the top of the photo last from top to bottom. TOOLS: [From left in Photo] 1. T25 (for the stator screws but also may be three 5/16" head screws) 2. Phillips and Flat Head Screw Drivers 3. Needle Nose and standard slip joint pliers 4. Flywheel puller with 2 5/16" x 18 grade 8 bolts and washers (mine is technically a steering wheel puller) 5. 7mm and 5/16" deep well 1/4" sockets 6. 3" 3/8" drive extension, 3/8" socket 3/8" drive, 5/8" socket 1/2" drive and 5" 1/2" drive extension. 7. 1/4" Socket Driver 8. 5/8" open end box wrench 9. 3/8" and 1/2" drive ratchets [Top of photo- top to bottom] 10. Flash light (optional but very helpful at times) 11. Pry bar (used to lock flywheel from turning) 12 1/2" Torque wrench 13. Old Tooth Brush (for cleaning of dirt if needed) PROCESS: - Obviously the first thing to do for safety sake is to shut of the fuel at the tank and remove the battery cables - Next, remove the two screws that hold the fuel pump onto the shroud, move the pump off to the side and replace the screws into their holes for safe keeping. - Carefully pull the fuel pump away from the shroud enough to work the hose clamp out and use the pliers to pinch the hose clamp and remove the vacuum line for pump. - Tie the fuel line, wiring harness, choke cable and battery cable all out of the way towards the rear of the tractor allow easy access to remove the shroud. - Next remove the air cleaner box cap, then air cleaner cap and air cleaner tray by removing the three 5/16" screws from the carb and the two 3/8" screws from the tray and put all aside and out of the way. NOTE: Close the Choke all of the way and stuff a clean paper towel into the top of the carb to prevent debris contamination. - Next, twist the air filter box bracket to the left (right side up and left side down) to clear space and use the 7mm, 5/16" and 1/4" socket driver to remove the black condenser wire, the red and black ignition module wires and the yellow ignition switch wire from the coil and then remove the coil using the 3/8" socket. (optional as it can be kept on the shroud but makes it a little more difficult.) - Next loosen the rear cylinders top shroud and engine hoist mount bolt with the 1/2" 3/8" sock and extension. (no need to remove the bolt as the shroud just needs to move freely. - Next, locate the wire retaining clip at the top of the shroud by the coil and open it up so the oil pressure sensor, stator and ignition module wires can all be removed when taking out the shroud. - Last step before removing the shroud is to disconnect the throttle to gov arm spring and the throttle cable using the 5/16" socket and driver. -Next locate all of the shroud bolts and remove using the 3/8" socket. - To remove the shroud, pull the bottom out first and then shift the entire piece upwards while working it from underneath the rear cylinder shroud, underneath the filter box bracket and over the flywheel on the left side. Work slow so you don't bend or brake anything and it will come off pretty easily. - Although everything was fairly clean in comparison to other engines at this step, my shroud was dirty and this can slightly decrease air flow which is important to maximize and keep optimal with an air cooled engine. So I took mine outside and pressure washed it to give it time to dry completely before reinstall. Shroud off... - Next, place the pry bar into the fins of the flywheel and lock the flywheel in place by placing the handle of the pry bar under the foot rest. Then use the 5/8" sock, 1/2" extension and loosen up the flywheel bolt about 3/8" -1/2" out of the hole. This needs to stay mostly in as a pressure point for the puller. - Next, remove two of the flywheel grill center bolts and then use your two 5/16" grade 8 bolts and attach the puller to the flywheel while keeping the puller parallel to the surface of the flywheel to allow equal pulling pressure on both sides of the puller while cranking on the center pressure bolt on the puller. - Now it's time to remove the flywheel. It may be a good idea to use the 5/8" open ended box wrench to stop the flywheel bolt from turning while cranking on the puller center bolt. - It should only take a 3-5 good cranks after finger tightening the center bolt and the flywheel will give a good pop and be ready to be pulled off. Don't forget about the flywheel bolt first! - Next, carefully pull the flywheel off of the crank being very careful not to get caught on the stator itself. My flywheel was pretty dirty on the inside and between the magnets so I felt it necessary to use the toothbrush and air gun to clean it out. - Now you'll need to remove the stator by using either 5/16" socket or T25 torque bit or driver. - Next, set the stator off to the side securely on a clean rag or similar. Underneath, you'll see the ignition module on the bottom side of crank. There are two 5/16" head machine screws. Remove those and open the wire retaining clip on the side of the gear cover and the module comes right off. Make sure not to lose the black rectangular insulator that goes between the module and gear cover. That needs to be there. I'm not 100% sure but I have a theory that these modules may potentially go bad from getting covered with grass and debris over time from not blowing out the air shrouds with a leaf blower or air gun after each use. This debris builds up enough to cause insulation around the module. The module being an IC (Integrated Circuit) is designed to handle only so much heat. Over time the extra heat and expansion with contraction when cooled back down causes a when point in the modules chip circuitry and eventually breaks. Thus causing the engine to shut off during operation for the first time. Once the engine cools, the chip materials contract, allowing the circuit to bridge again only until the engine heats up enough to break that signal and then becomes a cycle until replaced. - Moving on.. While everything is out, if needed (or your OCD kicks in), clean the cylinder heat syncs and general area before re-installation of the Module, Stator, Flywheel and Shroud. Mine wasn't to bad so I quickly used the toothbrush and air gun to break free any layered gunk and blew it off with air. -Next, once the insulator, module (and spark ring if chosen to) and stator are all reinstalled and screws all snugged up, carefully put the cleaned flywheel back on, install the flywheel bolt with a tiny tad of anti-seize on it and use the pry bar again in the flywheel fins but with the handle on top of the foot rest and use the 5/8" socket, extension and 1/2" torque wrench set to 55lbs and tighten up the bolt. At this point, go ahead and reinstall the Shroud making sure that the fuel pumps vacuum line is accessible through the front hole in the shroud, along with the shroud bolts, coil, coil wires (spark, condenser, module and switch) and tighten rear shroud bolt. NOTE: Yellow Switch wire, red module wire and black condenser wires all go on the Positive coil terminal (7mm nut) which should be on the right side of the coil. Only the black module wire goes on the left terminal. Connect the throttle to Gov arm spring, throttle cable, install the fuel pump vacuum line again and replace mount screws. - Lastly, re-install the filter tray, remove the paper towel from the carb, along with installing the air cleaner, pre-filter and clean cap and shroud to filter tray pipe. Then connect the battery and turn the fuel back on. This should get you going again. I think that I got everything but please feel free to comment on anything that I missed as far as documenting the steps or ask any questions about the process. Hope this helps you see that it's not that bad of process to replace the ignition module (And spark ring if needed as some recommend replacing the module , ring and coil all at the same time). I had to first remove this module from a P220G that was on my bench and awaiting repairs but the whole process took me a few hours. A good Saturday Morning task to be up and running by the afternoon for some work before the heat hits. I also ran the tractor for well over and hour after install to insure all was well. I went from a warm up process of idling and then a lap around my property. Did that a few times while repairing a cutting deck and then installed the cutting deck and mowed the lawn. No issues. Ran great! Take Care and God Bless! Andrew C.
- 61 replies
-
- 13
-
-

-

520-H Restored w. deck, snow plow, & weights. SOLD
SPINJIM posted a classfied in Wheel Horse Sold Archive
1992, Wheel Horse 520-H. Onan overhauled: New rings, cylinders honed, valves lapped, new carb., new seals and filters, new fuel lines and primer bulb for easy starts. Seat is like new. Front tires are new. All tires hold air. Some repainting, but didn't need much; was stored indoors. New decals. Other new parts. Has swept front axle and Variable Ratio Steering. Belt cover ventilated to cool back cylinder. Rear wheel weights are 55 lbs. each. -
Will the PTO work from the 312 Hydro with a 12 hp Kohler onto the 416-8 Onan? My PTO disc went today. Any help would be most appreciated.
-
Ok, So I am seeing that most of you are leaning towards the ONAN engines being crap. That said, I have 2 416's # 1 is a -8 and # 2 is a -H. Both have the -216 in them. i was thinking of rebuilding the engine from the 416-H, but I am also considering changing the engine out with a different type. What are the recomendations? I am seeing Koler, what else will fit? Thanks Dave.
-
Is there anybody who would be able to draw out on these photos which way the stator wire runs? i have it coming out at the 4:00 position right now, then all the way around behind the stator counter-clockwise to where the voltage rectifier would be on the left hand side (8:00) I put the wire holder bracket on the bolt where the breather tube is, these photos are before that. The way i have it now, the wire comes awfully close to the flywheel and I just don't want it to rub on there and I am out a stator Thanks!
-

Where to Find Gold Plated Connectors for the Dreaded 9 Pin Connector
RJ Hamner posted a topic in Wheel Horse Electrical
Has anyone found a good source for gold plated (not the thin plated stuff) male/female connectors? And/or weather proof connector housings? I’m still not sure if this was under engineered, or they didn’t think the product would last this long (couldn’t envision the Wheel Horse Collector's Club) Asking for me and a friend -
I have a wheel horse listed under Super Steve for $1,200 was wondering how I can figure if that's a good price, 230 views no offers
-
My 518-H runs and mows for about 15 minutes then stalls. It'll rest for 10, then run for 15 and stall. The oil level is right, air cleaner is clear and it has new spark plugs. Sounds like overheating, but it isn't really very hot to the touch. Onan twin. I brought it to the CT Onan dealer and he couldn't fix it, but frankly, they work on generators all day and I don't think they wanted to bother. Any ideas?
-
I have a 1991 520h and I can mow for hours on end until I turn the tractor off and then restart it. The tractor restarts nice and easy warm but when I engage the PTO (mower deck) it slowly kills the engine. If I disengage the PTO it revs right back up. It is an electric clutch. I was thinking if it was a kill switch wrong I would imagine it would kill it a lot faster than allowing me to cycle on and off the PTO. Any thoughts?
-
Recently picked up an early 90's Wheel Horse 212-5 with Onan E125v. Intake valve was sticky and it had a bent pushrod. Can anyone tell me of a source for a new head gasket and a push rod? I've looked online but the only gasket I found was a used one on ebay. Thanks.
-
I've come across a 520H with 1750 hours on the Onan motor. Assuming it starts and runs okay, is it possible to know whether the motor has been overhauled? The asking price seems good to me, but a pricey rebuild could be a few months away if those are original hours. Also it creeps forward when it neutral.
-
Hi, I was reading another thread where someone stated that P220 was underrated and actually produced 28 HP on the dyno. Is the same true of the P216? Also, I may be trading this engine for a rebuilt K341. Which one do you guys prefer? Thanks.
-
My 520H blow out a valve seat. Any suggestions on a new motor or should I have the seat repaired?
-
Hi Guys, I’m cleaning the Onan P220 carb on my 520H. It’s a Nikki 146-0479 carb. I was wondering if the main jet needs An o ring and if so which type and size? There was no o ring when I took it apart. Thanks! John
-
Good morning gents. Picked up a 516-H the other day and finally got to tinkering with it. Keep in mind it was a sub $400 purchase so the plow and the fact that it runs at all is a good thing. Now when the air filter cover came off it was dripping with a mixture of gas and oil. Seems like it was blowing out of the breather maybe? Then after the old oil was drained (or should I say the 30:1), new oil was added and it was run for a few minutes. Oil was drained and it reeked of gas. Any suggestions on how to tighten this up? Motor need a valve job and rings? As always, your input is valued and appreciated! Here's some pics of exterior motor. Thanks again!
-
Hello fellow Wheel Horse fans, I have owned a 312-8 for a few years now, and it has been very good to me. The unit was obviously purchased used, and at the time of purchase I didn't notice that the 42" deck that came with it was much older than the mower. The deck I have has always been pretty junkie, but now started to have some actual issues. The center double "D" pulley has rounded out, and a spindle has broken. I have been looking into getting repair parts, or just buying a different deck all together since i can't find very reasonably priced ones. So here is where the question comes in. I have found a reasonably priced unit in the area for sale that is a 516-H model. So a little larger engine, year or 2 newer, a 48" working deck, and hydrostatic would be a nice upgrade for me, but it sounds like this model was considered undesirable. Is this just because of the technology that was starting to exist at the time of it's release, or was it considered to not be that great of a machine? My 312 has about 1800 hours, and the mower itself runs great. The 516 apparently does not have working gauges at the moment, and burns some oil. Any opinions on what you guys would do in this situation? Any opinions between the 12HP Koehler and the 16HP Onan engines? Any help would be appreciated, Thanks.
-
Well, I put the washers on the flywheel side of the engine and that seems to be working better as far as the starter to flywheel, but the engine won't start. I have a new coil, condenser, plug wires, plugs (not sure about the correct gap though), and a new electric fuel pump with filter. The mower ran one time and mowed the yard a month ago but has not started since then. It started one the first crank when I put all that in new. Is it possible the coil has failed? I even put the old plugs back in to see if that was the issue. The were not burnt. What should I check to test possible failures of the coil or fuel? I think the fuel is going to the carb but not sure if this is enough pressure? Not ready to give up yet...
-
On a 1992-1996 520H wheel horse lawn tractor, I have replaced the starter motor and flywheel. I also replaced the coil, condenser, plugs and wires. After all that was done, the tractor started first time cranked and I mowed the 1 acre yard one time. When I went back to mow again it would not start and I see the starter motor is now chewing up the flywheel gears. The new flywheel now has severe burring on the engine side. It looks like the starter is not fully engaging into the flywheel. The mounting bolts have a thick washer. Are those washers supposed to be spacers between the engine and the starter motor, thus moving the nose of the starter closer in toward the flywheel? Am I doing something else wrong?
-

Version 1.0.0
490 downloads
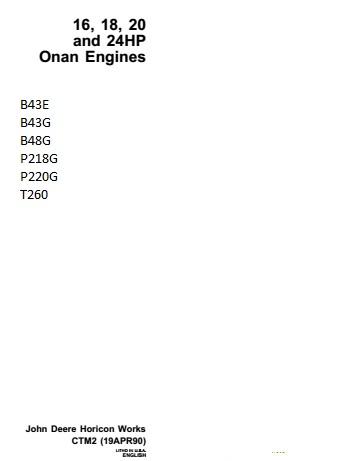
This is an Onan Service Manual written for John Deere that has much useful information, pictures, and diagrams pertaining to both JD and Wheel Horse 224 pages 3.4MB B43E B43G B48G P218G P220G T260Free
-
I got a new coil for my 1988 520-HC. I was having problems starting it when hot. I tested the old coil primary and got 3.3 ohms, the new coil was 3.4 ohms. The secondaries were open on the old coil and 21.66 k-ohms on the new coil. I got some metal bar stock with holes in it at Lowes to make brackets. I used a hose clamp to attach the brackets to the coil. I clamped the brackets to a large socket and cut a little at the bend so it would bend completely around the socket. Then I beat it around with a hammer to form the curve to go around the coil. The tractor started right up and ran great. I was about to mow with it and I noticed I had a flat in one of the front tires It would not pump up and it has a tube in it.I took the wheel off and the tire off the rim and found a big hole in the tube then I found a lot of wire coming out through the bead where it contacts the wheel I have four lawns to mow tomorrow and I desperately need a tire or tire and wheel. @ericj do you have anything I can use? I tried to pm you and it won't let me. It says " ericj cannot receive messages. " when I try to send it.
-
Hey guys, I have a thoroughly abused 520 that a buddy gave me. I've been slowly checking it out and making a list of things that need to be fixed. I just pulled the spark plugs and sprayed a little oil down the cylinders and spun the starter to check for compression (without a gauge). The front cylinder has great compression (almost sucked my finger in), the back one has almost nothing. Will I damage anything if I get it running with the bad cylinder to continue checking out what needs to be fixed? In other words would it OK to run a 520 with bad compression on a cylinder? I won't be working it or anything. Does anyone know how involved it is to replace the rings on the back piston? For those who may care, here is my list thus far: [ ] Check valve clearance [ ] Replace spark plugs [ ] Replace air filter [ ] Replace fuel filters [ ] Change oil [ ] Find air box cover [ ] Replace? Fuel pump [ ] Replace fuel lines [ ] Intake, exhaust and carb gaskets [ ] Clean carb [ ] Fix choke [ ] Replace burnt wires [ ] Replace fuel cutoff [ ] Fix compression in back cylinder [ ] Replace rear lights If there's anything else I should be checking out, please let me know. This is my first horse, my first riding mower, and my first project. So I don't exactly know what I'm doing. And like I said, this was abused. You'd never guess it has 300 something hours on it. Thanks so much.