Jump to content
Wheel Horse 3D

Custom 3d printed badges, ornaments etc.

Recommended Posts

Wheel Horse 3D

4" x 6" gotcha!

16167945596046893792295306866699.jpg

  • Excellent 3

Share this post


Link to post
Share on other sites
 
ebinmaine

I like it!!!!

Share this post


Link to post
Share on other sites
 
ebinmaine

Put me on the to-do list willya?

Share this post


Link to post
Share on other sites
 
Wheel Horse 3D

Yup, is that ok printed in the gray, or would you prefer black?( might have to order another spool)

Share this post


Link to post
Share on other sites
 
Wheel Horse 3D

I should be able to work up print times etc here in a few and guesstimate shipping.

Share this post


Link to post
Share on other sites
 
Wheel Horse 3D

For everyone thats been following along...here in a few hours @ebinmaine and I have gone from "the first thing wife said" to a completed design of a very nice WH door knocker that is over 6in tall and tailored to EBs exact needs. I included plenty of pics so if anyone scrolls up from here they can see the whole process from the original design to all the tweaks as we went along! Almost any idea you have is possible! Thanks EB!

Edited by Wheel Horse 3D
  • Like 1
  • Excellent 1

Share this post


Link to post
Share on other sites
 
ebinmaine
6 minutes ago, Wheel Horse 3D said:

Yup, is that ok printed in the gray, or would you prefer black?( might have to order another spool)

Use what ya have. It'll get painted anyhooo. 

  • Like 1

Share this post


Link to post
Share on other sites
 
ebinmaine
2 minutes ago, Wheel Horse 3D said:

Almost any idea you have is possible! Thanks EB!

It's an interesting process. Glad to help but it's really not for me to take any credit ...

I just go wide narrow big small short tall Stop!!

Print it!!


You're the one doing all the brain work.  

  • Like 1

Share this post


Link to post
Share on other sites
 
Wheel Horse 3D
Just now, ebinmaine said:

It's an interesting process. Glad to help but it's really not for me to take any credit ...

I just go wide narrow big small short tall Stop!!

Print it!!


You're the one doing all the brain work.  

Lol, but all those cues are very critical. And if youd have just gone with my brain and not shared that pic of the house front, we may not have realized we were too big to fit!

  • Like 1

Share this post


Link to post
Share on other sites
 
Wheel Horse 3D

Cant wait to see what Trina does with it!

  • Heart 1

Share this post


Link to post
Share on other sites
 
rjg854

I like the idea of the door knocker.  Can you combine that with the post topper with just the loop and not the knob?  So I could mount them to the side of my barn instead of using the post.

Share this post


Link to post
Share on other sites
 
Wheel Horse 3D
6 minutes ago, rjg854 said:

I like the idea of the door knocker.  Can you combine that with the post topper with just the loop and not the knob?  So I could mount them to the side of my barn instead of using the post.

Same as the last pic, but without the knob?

Share this post


Link to post
Share on other sites
 
rjg854

yep

Share this post


Link to post
Share on other sites
 
rjg854

The ring wouldn't have to be as fat, more like what you have on the post topper. And without the indent for the ball.

Share this post


Link to post
Share on other sites
 
Wheel Horse 3D

I can take that knocker and change the ring thickness to 8mm and make it a bit larger.Would you like to keep the ornament base like EBs or do you like the original hitch base?

Share this post


Link to post
Share on other sites
 
rjg854

I like the ornament base, but without the ball or the indent for the ball.

What you have there for the knocker is fine, don't even care about the base whether, oval or round, just not the ball or the indent in the face of the ornament.

I hope I'm explain that so you understand.  I just think I'd rather have them mount to the side of the building vs being mounted on a pole.

  • Excellent 1

Share this post


Link to post
Share on other sites
 
Wheel Horse 3D

Ok now a little more on infill. With EBs were going 100 percent solid all the way through. We can also print less dense and save a lot of print time, and thus reduce cost. The original hitch was planned for 40 percent infill. 

Also ...these are decorative hitches, for well behaved Wheel Horses, not bucking broncos lol.

Share this post


Link to post
Share on other sites
 
Wheel Horse 3D

I'll do some adjustments tonight and have somethin up for ya Randy! Printer is currently busy untill Sunday mornin' but can have somethin goin right after that!

  • Thanks 1

Share this post


Link to post
Share on other sites
 
rjg854

That's what I'm thinking also, kinda like coach lights on either side of the overhead door.

Edited by rjg854
sp
  • Heart 1

Share this post


Link to post
Share on other sites
 
Wheel Horse 3D

About 20hrs to go!

20210327_091907.jpg

  • Like 1
  • Excellent 1

Share this post


Link to post
Share on other sites
 
Wheel Horse 3D

@rjg854 here we go Randy!

16168992533123812504481422008682.jpg

Share this post


Link to post
Share on other sites
 
rjg854

Just what I'm thinking about, let's even forget about the ring, and would an oval base be asking to much?

Share this post


Link to post
Share on other sites
 
Wheel Horse 3D
2 hours ago, rjg854 said:

Just what I'm thinking about, let's even forget about the ring, and would an oval base be asking to much?

That back plate is a 4x6 oval, would you like it a bit narrower? And I can remove the ring:)

Share this post


Link to post
Share on other sites
 
rjg854

3x6 base would work better for my application, because I want to mount them between the windows and the door.PXL_20210112_203738755.jpg.562dde2303196816b225b5d6df171afb.jpg

Just as if they were coach lights. I think it would add some bling to a rather drab look it has now.

  • Excellent 2

Share this post


Link to post
Share on other sites
 
Wheel Horse 3D

3x6..lemme adjust the model!

  • Thanks 1

Share this post


Link to post
Share on other sites
 

Create an account or sign in to comment

You need to be a member in order to leave a comment

Create an account

Sign up for a new account in our community. It's easy!

Register a new account

Sign in

Already have an account? Sign in here.

Sign In Now

  • Similar Content

    • Donavon
      By Donavon
      Need ideas to convert my 1054 A Frame plow into a snow blower
      Any idea's?
    • Wheel Horse 3D
      By Wheel Horse 3D
      Welcome, and thanks for visiting our vendor area.
      We got our start in 3D printing for customers right here on Red Square!
      If you'd like to see how every thing gets developed and the contributions of Red Square members, please visit the thread that started it all and browse through our progress to date.
      We love our clients' input and work closely to turn ideas into reality. If you have an idea, request, or questions, you can post to that thread, message us or tag us here on Red Square, or visit our Etsy store and reach out to us through there.
      Greystone 3D on Etsy
    • Wheel Horse 3D
      By Wheel Horse 3D
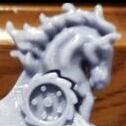
      Our customized ornaments have a base identical to our version of the original style ornament, but can be topped with 3 different styles of horse head and 3 different styles of wheel! Each is available unfinished, primed, or fully painted.
      They also include the pictured mounting hardware and the base spacer for a clean finished look. Can be ordred here Custom Wheel Horse hood ornaments..9 different styles


    • Burnerman
      By Burnerman
      I’m building a lowered 300 series wheelhorse. So far it’s a combination of 3 scrap tractors. 
      the frame, trans and tins are from a GT2500 anniversary special given to me by a neighbor with a trashed Briggs. The Kohler M12 is from a junkyard 312 that was roached. The parts tractor I’m using for the build was another older 312. I’ve got the k301 in the garage. The trans was toast. Both axles wallowed out keyways and 1 axle actually broken. 
      Anyway! I needed a project and a toy to putt around the neighborhood. I couldn’t find any other posts on how to do the whole thing. I’m trying to keep it cheap using stuff I have on hand and looking as “stock but cooler” as possible. So here we go. 
      I’ll update this as I go along. 
×
×
  • Create New...