Jump to content
sjoemie himself

512-D with sweeper, upgrades and modifications

Recommended Posts

Maxwell-8

ziet er allemaal zeer netjes uit!

  • Thanks 1

Share this post


Link to post
Share on other sites
 
Handy Don

The "Section 18" is probably in the Service Manual for your tractor (search for its SM acronym in the files!) There are two significant adjustments, parts 14 and 23.


14, a trunnion, is probably the adjustment you need. It adjusts the tension the PTO engagement lever can apply to engaging the PTO clutch. When moving the lever, you should encounter resistance as you engage it and then, once the resistance is overcome, the lever should firmly stay in the engaged position. It should take a pretty solid effort to overcome the resistance and fully secure the PTO so perhaps yours needs adjustment (think of the strength of the clutch springs in a stick shift automobile).


23, a bracket with an attached piece of friction material, has nothing to do with your issue! It moves against the outer edge of the clutch plate when the PTO lever is disengaged to stop the PTO bell and, correspondingly, stop the blades or brush or whatever is attached to the PTO. This is a bit tricky to adjust--you want no friction when the PTO is engaged and moderately firm friction when the PTO is disengaged. To get the right distance, I usually disengage the PTO, place a piece of thin pasteboard (~.5mm?) between the plate and the friction material, hold the bracket firmly against the plate with my fingers and then tighten the bolts that hold the bracket. It can take two or three tries to get it right and many folks just leave this bracket off!

Edited by Handy Don
  • Thanks 1

Share this post


Link to post
Share on other sites
 
sjoemie himself

@Handy Don thank you for your comment. Reading this tells me I'm on the right track but I'm being too conservative. I'll try again tomorrow.. that being said, every shaft and pivot on the pto-clutch is worn out so it's quite possible I won't be able to get it to work properly for the time being.

I also noticed the rubber engine mounts are so far gone the engine rocks upward when I engage the pto :hide:


The brakepad on that bracket you speak of is gone. I kinda figured that was the purpose of the bracket and could not believe it was supposed to ride on the pulley without something in between.. turns out my hunch was right.. I'll look into that aswell..


This is starting to snowball a bit.. must.. resist.. dunno if I can :ph34r:

Share this post


Link to post
Share on other sites
 
ebinmaine
13 minutes ago, sjoemie himself said:

brakepad

Don't get too concerned about that. 


14 minutes ago, sjoemie himself said:

the rubber engine mounts are so far gone the engine rocks upward when I engage the pto

This is easy enough to repair to solid mounts would your own fab skills and a tad bit of work. 

@Joe M I think made his own?


Share this post


Link to post
Share on other sites
 
sjoemie himself
1 hour ago, ebinmaine said:

concerned

I won't.. for now.


1 hour ago, ebinmaine said:

solid mounts

I'm a bit concerned about that. Since it's a one cylinder diesel, thumping the way it does I'm worried it might shake itself to pieces.

Do you have your engine(s) mounted solid?


I did find the rubbers mount but it seemed they were made of gold instead of rubber. Sellers on the Jungle site want about $40,- a piece :wacko:

Share this post


Link to post
Share on other sites
 
ebinmaine
46 minutes ago, sjoemie himself said:

I won't.. for now.


I'm a bit concerned about that. Since it's a one cylinder diesel, thumping the way it does I'm worried it might shake itself to pieces.

Do you have your engine(s) mounted solid?


I did find the rubbers mount but it seemed they were made of gold instead of rubber. Sellers on the Jungle site want about $40,- a piece :wacko:

If it were mine I wouldn't even consider flexible mounts unless specifically dictated by the manufacturer of the engine.  

Perhaps you could use flat pieces of reinforced rubber like a truck splash guard or similar?


  • Thanks 1

Share this post


Link to post
Share on other sites
 
Handy Don

Interesting about the mounts. Anything with enough "give" to absorb engine vibration is also going to move when PTO clutch pressure is applied.

The WH PTO design I'm familiar with has the upper end of the mechanism attached to the engine and the lower end attached to the frame. You may need to find a way to have that lower end also attach to the frame so that the clutching force is between the engine and the PTO and the engine can continue to "float" on its mounts. That the engagement lever remains attached to the frame wouldn't matter.

Not a perfect solution, though, because the belt from the engine to the brush is also pulling on the engine!

Many members shake their heads on the decision to use the rubber mounts and WH was not the only GT maker to do it.


  • Thanks 1

Share this post


Link to post
Share on other sites
 
sjoemie himself

@ebinmaine I'll look into the Robin manual but I doubt they specify anything about how to mount the engine, besides maybe it should be operated in a more or less vertical position :techie-eureka:


@Handy Don the clutching mechanism on the topside is attached to the engine and at the bottom it is attached to the engine mounting plate.


Here are some pictures of what I'm working with at the moment. I guess you could say it's a miracle it's even working at all :hide:

Upper hingepoint PTO

20221025_111045.jpg.1aa7259ee2cb0e6865815cdb440e5942.jpg


Lower hingepoint PTO

20221025_111107.jpg.4279021e496cdff92b68e138e1f41e4a.jpg


What once was a rubber mount

20221025_111153.jpg.73663f69f037facd51bed925a8804584.jpg


PTO clutch pressure thingy

20221025_111147.jpg.cdc1fec52bfb792166306188a93a966e.jpg


And engine mounting plate with lower hingepoint for PTO engagement lever

20221025_111214.jpg.ceec705398b55ead3c44792b0bea1332.jpg

Share this post


Link to post
Share on other sites
 
ebinmaine
41 minutes ago, sjoemie himself said:

Here are some pictures of what I'm working with at the moment

I'm thinking if you get a bushing in the lower PTO pivot and get rid of those rubber mounts it'll be in usable shape. 

Share this post


Link to post
Share on other sites
 
Maxwell-8

I have some used but good rubber mounts laying around, I will check if I can find them.


  • Like 1
  • Excellent 1

Share this post


Link to post
Share on other sites
 
sjoemie himself

@ebinmaine that is what's going to happen. Little bit of cutting, grinding and lathe work and it will be good as new.

Regarding the rubber mounts, I'll take one apart and see how they are constructed. Maybe there's a standard component on the market that I can modify a bit to make it work. Otherwise something custom has to be made.

I like @Handy Don 's idea of using something with give but also sturdy. I'm thinking a poly-urethane strip on the front and backside of the engine mounting plate. That should stiffen things up and still provide some dampening for the thumping of the Robin.


@Maxwell-8 let me know if and what you find. By the way, are all WH/Toro rubber mounts the same?


Share this post


Link to post
Share on other sites
 
Handy Don
4 hours ago, sjoemie himself said:

@ebinmaine that is what's going to happen. Little bit of cutting, grinding and lathe work and it will be good as new. With your skills, for sure! If that lower mount could become attached to the engine plate instead of to the frame, it'll be a LOT less wear and tear on the lower end of the PTO Bow and its bracket since it'll all vibrate together! Engine vibration moving the PTO bow relative to the frame is what caused the wear you are seeing.


Regarding the rubber mounts, I'll take one apart and see how they are constructed. Maybe there's a standard component on the market that I can modify a bit to make it work. Otherwise something custom has to be made. Loads and loads of anti-vibration mounting solutions out there from simple rubber washers and grommets up to elaborate muli-material stuff. Note the care taken to make sure the engine is well grounded to the frame. Check for oil resistance in whatever material you choose (heat shouldn't be too much of an issue--oil pans don't get that hot).


I like @Handy Don 's idea of using something with give but also sturdy. I'm thinking a poly-urethane strip on the front and backside of the engine mounting plate. That should stiffen things up and still provide some dampening for the thumping of the Robin. I suspect you'll be living with a compromise, right? Didn't catch the typo in my earlier post, but the engine is also being pulled by the drive belt to the transmission so factor that force in as well.


@Maxwell-8 let me know if and what you find. By the way, are all WH/Toro rubber mounts the same?


You are on it and I'm sure it'll work out nicely

  • Like 1
  • Excellent 1

Share this post


Link to post
Share on other sites
 
Pullstart

Those rubber mounts look stock to a Wheel Horse gasser.  They proved to be a mistake, that was remedied by solid mounts again.  I honestly doubt it would hurt to go completely solid… the frame of the tractor will likely reduce the amount of shake the engine gives..

  • Like 2
  • Thanks 1

Share this post


Link to post
Share on other sites
 
ebinmaine
3 minutes ago, Pullstart said:

Those rubber mounts look stock to a Wheel Horse gasser.  They proved to be a mistake, that was remedied by solid mounts again.  I honestly doubt it would hurt to go completely solid… the frame of the tractor will likely reduce the amount of shake the engine gives..


I'll second the recommendation to go back to solid mounts.  


  • Thanks 1

Share this post


Link to post
Share on other sites
 
sjoemie himself
57 minutes ago, Handy Don said:

lower mount could become attached to the engine plate

If you look closely you'll see that it is attached to the engine plate. You can blame my lack of photo making skills for the bad angle.


Good tip on the chemical resistance when choosing anti-vibration material :handgestures-thumbupright:


@Pullstart and @ebinmaine do I understand correctly that Wheel Horse change out the rubber mounts themselves at one point in time?


  • Like 1

Share this post


Link to post
Share on other sites
 
ebinmaine
2 minutes ago, sjoemie himself said:

If you look closely you'll see that it is attached to the engine plate. You can blame my lack of photo making skills for the bad angle.


Good tip on the chemical resistance when choosing anti-vibration material :handgestures-thumbupright:


@Pullstart and @ebinmaine do I understand correctly that Wheel Horse change out the rubber mounts themselves at one point in time?


Yes. 

They only used them for a few years in the 1980ish time period.  

  • Like 1

Share this post


Link to post
Share on other sites
 
Handy Don
1 minute ago, sjoemie himself said:

If you look closely you'll see that it is attached to the engine plate. You can blame my lack of photo making skills for the bad angle.

Good tip on the chemical resistance when choosing anti-vibration material :handgestures-thumbupright:

I looked too quickly! On second look, it is quite clear and your photography is just fine! :)

  • Like 2

Share this post


Link to post
Share on other sites
 
Handy Don
3 minutes ago, ebinmaine said:

Yes. 

They only used them for a few years in the 1980ish time period.  

But they also stopped using the separate plate, right? Engines just mounted direct to frame on taller oil sumps? (Onans 16-20 hp were on a separate but direct-bolted plate)


Edited by Handy Don
  • Like 2

Share this post


Link to post
Share on other sites
 
ebinmaine
35 minutes ago, Handy Don said:

But they also stopped using the separate plate, right? Engines just mounted direct to frame on taller oil sumps? 

I believe that's how they were before and after the rubber mount years. 

  • Like 1

Share this post


Link to post
Share on other sites
 
gwest_ca

Believe this is section 18

Tighten the trunion #14 clockwise to shorten the pto link. The handle should snap down with some authority when applied.  Try 2 turns.

  • Like 2
  • Excellent 2

Share this post


Link to post
Share on other sites
 
sjoemie himself

Thank you @gwest_ca that's exactly what I needed! It literally says 'screw farther onto rod if PTO clutch slips during operation'.


I'll try that and report back tomorrow. 

  • Like 3

Share this post


Link to post
Share on other sites
 
sjoemie himself

I'm happy to report that the PTO-clutch no longer slips when the going gets tough. It now actually bogs down the engine (the tiniest bit) when the sweeper makes full contact.


That being said all the moving parts still desperately need an overhaul.

  • Like 3

Share this post


Link to post
Share on other sites
 
Handy Don
1 hour ago, sjoemie himself said:

bogs down the engine (the tiniest bit

Interesting you mention this, I've come to like the little "snort" I hear from my K181 when the governor says, "more, please" on a steep pitch and the engine digs down and delivers. Tells me that this engine is well matched to the task. 

  • Excellent 2

Share this post


Link to post
Share on other sites
 
sjoemie himself

Did a little swapping around today, borrowed the wheels off my mini International 1468. Looks pretty bad #ss if you ask me.


Little backstory,  my girlfriend uses this machine to haul horsemanure from her paddock to a nearby manure dump.

Instead of having to use my car, which I take to work daily, she can use the Wheel Horse. 

Since she buried the thing last week I thought I better step up the wheel game on this machine.

Maybe I'll add the wheel weights aswell later on but for now I think it will do just fine.


20230408_175511.jpg.d70351a53fa33330745db42d62ccd8e0.jpg


20230408_175525.jpg.4c8d5ecd296d588bd406b8e9fd103723.jpg


20230408_175845.jpg.4229b400eb106616fc6b12f174a12eec.jpg


The wheels are 26x12.00-12 and fit pretty good, almost without modification. I raised the seat up by 3/32 of an inch (3mm) and cut a tiny slither of the upright part of the footrest or floorboard (purists look away!).


Still tight but fits!

20230408_175538.jpg.ca18ba682ec0a151d89faf54e2cd1ad4.jpg


20230408_175548.jpg.712c97c4902fcef1303e11b20f23d7fa.jpg


20230408_175557.jpg.33af9782459eddf8193ea5cb156f80c7.jpg


  • Excellent 4

Share this post


Link to post
Share on other sites
 
ebinmaine
2 hours ago, sjoemie himself said:


20230408_175557.jpg.33af9782459eddf8193ea5cb156f80c7.jpg


Looks great from here!


The pic above is where you'll (she'll) get into trouble.  

All that needs is for someone to lean in the seat a bit while in motion and that tire will eat the back of the seat pan.  


Might be worth doing to raise the pan more for the extra clearance there.  


  • Like 2

Share this post


Link to post
Share on other sites
 

Create an account or sign in to comment

You need to be a member in order to leave a comment

Create an account

Sign up for a new account in our community. It's easy!

Register a new account

Sign in

Already have an account? Sign in here.

Sign In Now

  • Similar Content

    • sjoemie himself
      By sjoemie himself
      A while ago I picked up a Canadiana 5hp heavy duty tiller. It features forward and reverse control and you could buy add on implements for it.


      My example unfortunately suffered a catastrofic engine faillure a.k.a. 'window' in the block. Hence it was cheap so I picked it up. The idea I had for it was to mount it on the rear of my 'Murray to IH 1568' build. However since I bought a Wheel Horse i've been thinking about mounting it on the front of that tractor.
      This is what i'm thinking..


    • sjoemie himself
      By sjoemie himself
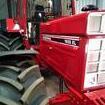
      As requested some pictures of my 1986 Wheel Horse 512-D with sweeper attachment.


    • sjoemie himself
      By sjoemie himself
      Hello, new member here. My name is Mark and i'm from the Netherlands. The tractor virus is running in my blood since I was a little kid. I have a few hundred 1/32 and some 1/16th scale model tractors. And since a few weeks my second garden tractor.
       
      Stumbled upon this goldmine of a forum after purchasing a Wheel horse 512-D with sweeper recently. Only after buying I found out that these tractors are not too common with the Robin diesel engine.
      I've already scrolled through several threads and many beautiful pictures. Hoping to learn a lot and maybe add a little of my own knowledge here and there.
       
      Greetings from the Netherlands, Mark


×
×
  • Create New...