
Search the Community
Showing results for tags 'mounted'.
Found 2 results
-
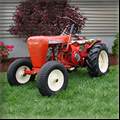 In a previous thread, several folks asked me how I painted my rims with tires already mounted. I recently did another set, so I illustrated the process as I did it. Typically, I like to paint the rims after they are mounted anyways, because inevitably when you have tires mounted on painted rims you’ll always scratch or nick them somewhere. I like to get the rims all cleaned up, blasted and primed, then mount my tires. Here’s my process: 1) Rims were sandblasted and primed with self-etching primer. Tires and tubes were mounted. Everything was wiped down with a pre-kleeno wax and grease remover prior to taping. 2) Using blue 3M tape, I go all the way around the rim slipping the tape between the rubber and rim occasionally tucking it tight with a very small standard screwdriver. 3) Then I create a wider tape ring a few inches out from the rim lip. 4) Slide the whole thing into a kitchen garbage bag. 5) Cut a hole in the bag revealing your tape ring below. 6) Tape the bag to your tape ring previously created on the tire. 7) For silver rims, I like Eastwood Silver Argent rally wheel paint and I use a Rust-Oleum Crystal Clear. http://www.eastwood.com/silver-argent-rally-wheel-paint-set.html 8) I wipe the rims down a few more times with a pre-kleeno wax and grease remover, blow them off with the gun, then shoot two coats of color and two coats of clear. I find that the Rust-Oleum clear holds a much better shine if you don’t let it set long between coats. As soon as it flashes, hit it with round 2. I do all four coats in about 20 minutes.
- 18 replies
-
- 17
-

-
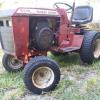
Unveiling: tub style chicken plucker implement
chipwitch posted a topic in Implements and Attachments
Finally finished the chicken plucker implement. Okay, it ain't purdy, but it's going to be put to use tomorrow. Will take video of it in action. It's a bit on the heavy side, but it attaches in two parts. The primary frame attaches to the tach-a-matic. The secondary frame slides from left to right into a receiver on the primary frame. The secondary belt is installed at this point, the secondary frame is then slid left to take up the slack in the belt. A hand knob on the bottom is tightened to secure the secondary frame and secondary belt. The primary belt is the tiller belt, repurposed, threaded from pto to the mule drive to the 10" pulley on the primary frame. The secondary belt further reduces the rpm 5:1. I designed the gear reduction to be approximately 12:1. For the C-125, that should result in variable speed of the feather plate between about 175 to 280 rpm. I put a photo tach to it and got a reading of about 100 rpm at idle. At WOT it was about 275 rpm. Low end was out of line. Either the engine is idling too slow or I've got some slippage. I'll have to check it more thoroughly as the numbers were jumping around quite a bit. I may not have had the best conditions for accurate measurement. Anyway... here it is! After I use it tomorrow, maybe I'll knock off some of that rust and give it a paint job. Or, maybe I'll just start the next project!