
Leaderboard


Popular Content
Showing content with the highest reputation since 03/02/2026 in all areas
-
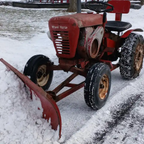
19 pointsAfter machining the C series Axle for bushings, the worn spots at the outer ends of the spindles needed to be addressed. My son TIG welded the worn areas up using a Silicon Bronze filler rod while I had to figure out the fixturing to allow cutting using the Boring Head in the Milling Machine. Rough alignment was done using a square collet block in the vise & a split sleeve in my 1" endmill holder. Final tweaking using the dial indicator. Cut the weld to within .002 of the finished size & hand filed the remainder to get a snug bearing race fit.... A tedious setup, but beats hand filing the whole thing...
-
18 points
-
18 pointsThat is exactly it @ineedanother! Thank you! I don’t think we’ve heard from @johnnymag3 in quite a while here? And yes, as I remember that Eddie Murphy tractor is in very good condition. So is @Ike’s 130hr 418. I think there was some movement in the zipper area of my pants when I read 130hrs! I’d like to see more photos of both of them. Maybe someday I can put one of them in with my 400 series?
-
17 pointsThe other night I decided to make a pixel art style crochet square of the horse head logo. This is how it turned out. If there is an interest in them I could make more to sell. It is about 12 1/2 by 11 1/2 inches.
-
17 points
-
17 pointsFollowing up on my post yesterday. Found the umbrella. Really nice condition. Don’t believe I ever opened it before. From the mid 1980’s, a gift from Wheelhorse. My office was in their HQ but I worked for the finance company who floorplanned all their dealers. Not looking to sell it but if and when will certainly offer it here. Great forum! Still using my 1996 314-H. The Best Buy ever! Got one before Toro tossed the quality units out the door.
-
16 pointsHere I just wanted to show all the tractors I've recently bought, but haven't posted about. I just didn't think it would be very interesting as most were simple carb cleans or fuel pumps. The first two images are of my Commando 6 originally purchased in Des Moines, Iowa. I bought this in October of last year for $250, it had been sitting in a semi van for 20+ years. You might be wondering why you see a Kohler? This was one of 10 or 11 sitting around the show room a few years after this tractors model year, so to make it more appealing to buyers, the dealer installed a K-181. All I really did to it was clean the carb and rebuild the fuel pump. The second tractor is my '73 no name 8hp. I acquired this in August of last year for $200. This one already ran and functioned fine. I've been using it to feed cattle with. The third tractor is my '69 Raider 10 that I spoke of a couple weeks ago. This tractor is from my recent hall, but I haven't messed with it quite yet. It sports the HH100 Techy that does turn over. This one will be for sale soon, PM me if you're interested. The next three are of my 3 D Series that are either being built or being used. The D-160 single was also part of my recent haul along with the Raider. This tractor sat for a couple of years, but fired up after I installed a rebuilt fuel pump on it. The '73 18 Auto ran and fully functioned when I bought it, nothing much on it. The basket case is this D-200 that imwe have been building out of buckets of parts. This one will have a full repaint done on it. The last pictures are of my attachments that I have been collecting. The first is this D Series tiller that hadn't been used until I bought it. The next are my 3pt mower and tub cart, nothing much on them except replacing a belt and airing up tires. I think this is my longest post EVER! This is the herd update for now!
-
16 pointsNot sure why daughters are always stealing these things!
-
15 pointsI've talked about having a black hood for years, and periodically picked up parts for just such a thing over a long while. Also, I just don't know how to have one project at a time. This will be tinkered on along side my long-lived 701 project. I have enough to get started, and the tire/ wheel combination was one part of the puzzle that I've at least solved. I'll be using another brand front axle with 1 inch spindles and 4 bolt trailer hubs with very wide front tires because I likes em wide... The engine choice is still not confirmed but I am of course leaning towards another Vanguard 14. I have a Magnum 20 that was disassembled by the PO for a completely wrong reason but I'm just not sure if I want to dive into that rabbit hole yet or not. I have options either way. I still have a few parts to pick up, and as always my stuff changes faster than my 3 daughters change outfits... The first wheel and tire got painted, so 3 more to go in the next week or so. My frame, transmission and sheetmetal are pretty typical for tractors in the south, meaning they have a generous coat of rust and faded paint to work through. But anyway, this thread might last a long time but it's finally started.
-
15 pointsMarch 3, 1931 "The Star-Spangled Banner" officially becomes the US national anthem by congressional resolution; lyrics by Francis Scott Key in 1814 are set to John Stafford Smith's 18th-century tune "The Anacreontic Song"
-
14 pointsI'm home!
-
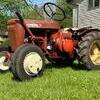
14 pointsI got it cleaned up and ready for driveway duty, Tire and wheel upgraded helped. 1975 D-200
-
14 pointsRaked the stones back to the hard road then used the dozer blade to push them to the stone road.
-
13 points
-
13 pointsHello, my Name is Dick and I recently scooped up a D160. I had actually been looking at 312-8s because they are gear drive but I recently purchased a large property with wooded land and suddenly I found my self needing a heavier machine. I camper across a D160 with the snowblower, plow, and deck. Rear 3 point hitch, running and working for $800. I had to send a kid to fetch it and when he returned I realized that I believed the deck is not the correct one and I’m in need of a mule drive. I’ve been creeping this site for a while and I figured how I need one of join.
-
13 pointsThe Sweepster C-48 broom really does an excellent job of getting the rocks out of the grass. I used to sweep them back into the road when it was dirt. Now it’s paved so and so is my driveway so I won’t be using it for that purpose anymore. I’ll still use it for light snow and if I ever get my rear in gear I’m going to add some casters to it so I can de-thatch my lawn. Or I’ll just use my EZ-Rake model 100, sorry if I got off topic. IMG_4916.mov
-
12 pointsI installed homemade hitch. I fabricated one last week
-
11 pointsTemp rose to 70* and the rain finally stopped. So I got about 3 hours seat time on the 312H rolling the lawn and cleaning out some old bluebird boxes and installing a new one. The Sunday dinner,/meeting was at my Amish neighbors farm today. Looked like about 35 buggys with a steady parade on my road.
-
11 pointsMarch 5, 1963: the Hula Hoop, a hip-swiveling toy that became a huge fad across America when it was first marketed by Wham-O in 1958, is patented by the company’s co-founder, Arthur “Spud” Melin. An estimated 25 million Hula Hoops were sold in its first four months of production alone. In 1948, friends Arthur Melin and Richard Knerr founded a company in California to sell a slingshot they created to shoot meat up to falcons they used for hunting. The company’s name, Wham-O, came from the sound the slingshots supposedly made. Wham-O eventually branched out from slingshots, selling boomerangs and other sporting goods. Its first hit toy, a flying plastic disc known as the Frisbee, debuted in 1957. The Frisbee was originally marketed under a different name, the Pluto Platter, in an effort to capitalize on America’s fascination with UFOs. Melin and Knerr were inspired to develop the Hula Hoop after they saw a wooden hoop that Australian children twirled around their waists during gym class. Wham-O began producing a plastic version of the hoop, dubbed “Hula” after the hip-gyrating Hawaiian dance of the same name, and demonstrating it on Southern California playgrounds. Hula Hoop mania took off from there.
-
11 pointsMy wife loves critters of all kinds. Because of that, I decided years ago to preemptively make a plan for all my toys: I told her for every tractor I get, she gets another pet. Seemed great until I realized that feeding and housing animals is typically far more expensive than tractors... Clearly I failed to think this through. We now live on a farm with a donkey, 5 pygmie goats, 4 dogs, and 3 cats. Of course this is a fluid list that changes regularly. Usually increasing more than not. I have 8 Wheel Horses. I'm thinking that somehow my original "deal" has been incorrectly applied here... I know, just get more tractors. We'll see I guess.
-
11 pointsLet me be perfectly clear. My wife is going to want to kill me if/when I buy another tractor! 🤣
-
10 pointsSpring has sprung! Had a couple out today for some cleanup. Used the sprayer on the fences with one machine and cleaned up some debris with the the 523H. Lots of seat time!
-
10 pointsSome 50 years ago I replaced the wood around the back door of my sedan delivery. It's been getting progressively harder to close due to sagging and a loose hinge. The suspect was the wooden door frame. Once I got into it, I found that some insect had bored holes and weakened the frame. Looks like I have a project on my hands. Of course I'm in to it deeper than I had planned.
-
10 pointsMarch 6, 1899, German company Bayer patents aspirin. Now the most common drug in household medicine cabinets, acetylsalicylic acid was originally made from a chemical found in the bark of willow trees. In its primitive form, the active ingredient, salicin, was used for centuries in folk medicine, beginning in ancient Greece when Hippocrates used it to relieve pain and fever. Known to doctors since the mid-19th century, it was used sparingly due to its unpleasant taste and tendency to damage the stomach.
-
10 pointsThat's why one has to dig through those buckets & milk crates at flea markets & garage sales.
-
9 points
-
9 pointsHey Don…sorry that I’m AWOL most of the time lately but I have been quite busy with all the travels. We just returned yesterday from a few weeks of missions work in the Dominican Republic. It was a great working with the youth through several outreaches including a Teen Conference, a Vacation Bible School, and a basketball tournament. Regarding your question…Cindy loves her wheel horse (418-A) and uses it regularly throughout the summers. It works great for the needs at hand including mowing the pasture for her horses, hailing her yard cart to do various yard chores. She told me that she doesn’t know how she got along without it all those years. She is such a sweet lady and I’m glad that the Lord brought along the perfect tractor for her and I got to be part of that process. I’ll try to get a picture of her using it sometime this summer and post it…
-
9 pointsI went the other way KP ... told her I would sell four tractors for a couple a lousy chickens. Ended up selling and no chickens yet.
-
9 pointsWe did to until we upgraded to a two man outside antenna in 1952. One person took the pipe wrench to the back porch and turned the support pipe while the second person relayed the picture quality to the pipe man.
-
9 pointsDon't sweep too early otherwise it will snow again!
-
9 pointsI noticed this morning walking to the mailbox that there was a lot of gravel in the yard by the road. We had a lot of small storms this winter and the Twp outdid itself with stone. Sweepster will be coming out early this year. My shoulder and rakes do not get along. Ed you need one and your cab would be a good thing. A face full of snow from the blower is one thing a face full of gravel when the wind picks up is another...Takes me multiple days waiting for the right wind conditions...
-
9 pointsMarch 2, 1966, in Dearborn, Michigan, the Ford Motor Company celebrates the production of its 1 millionth Mustang, a white convertible. The sporty, affordable vehicle was officially launched two years earlier, on April 17, 1964, at the World’s Fair in Flushing Meadows, New York. That same day, the new car debuted in Ford showrooms across America; almost immediately, buyers snapped up nearly 22,000 of them. More than 400,000 Mustangs were sold within that first year, exceeding sales expectations.
-
8 pointsFinally decided to check the Model No. on the Raider 12 I bought just before Christmas to see what year it was and the tag says 1-6931 which is a 1968 Raider 9 not a Raider 12. The model number decals on the hood stand were completely faded, the only thing legible was "RAIDER 6-SPEED". Apparently someone replaced the HH100 Tecumseh with a Kohler K301 and to that person I say, ! So, I will have TWO 1968 Raider 9's with 12HP Kohlers when my old one is back together. Yeah, I can live with that.
-
8 pointsMarch 8, 1950, The first Volkswagen Microbus rolls off the lines at a VW plant in West Germany. Production lasted over 60 years, with the van becoming one of the most iconic symbols of the hippie counterculture
-
8 pointsTonight
-
8 pointsShe's a roller now, I got the next two days that will be really good for painting so I should get the rest of the parts painted, besides the engine block.
-
8 pointsSlowly but surely getting at this. Motor is being real fun since parts are hard to find. Magneto coil was toast so it seemed a Briggs one would work with some slight mods. Fit the laminations pretty well but not much room to route the spark plug lead. Front end apart for deep cleaning and paint rims. Sure is different working on three piece rims.
-
8 pointsYears back I came home and handed her a snow shovel Her "What's this for?" Me "You wanted me to get rid of the tractors so I sold a couple. Now WE need to do the snow by hand" She doesn't really pay too much attention to my tractor hobby anymore! Maybe flowers would've better but...
-
8 pointsFinally got a chance to look at the 520H I brought home a week or so ago. Took breather off and safe to say PO probably hadn’t done to much preventative matainence. Taped throat up on carb and got rid of the big chuncks. Threw battery on and fired right up but has to have just a hint of choke on to not have a surge. All gauges and idiot lights seem to work but voltmeter shows just a little under 12 volts and when you unhook ground on battery it dies? Thought I would try some B12 in fuel before getting to serious on carb rebuild, might get lucky might but doubt it. Did drive around for a little while and man does that twin flat head hum no smoke knocks or weird nosies and has plenty of power. Trans seems good and stout but wants to creep backwards.
-
8 pointsThe seat on my D series is kinda like a big comfy couch. Oh wait, you said stock seat. I'm sorry.
-
8 pointsMy favorite part about 4-H. Most every activity was at least 2 girls for every guy. The odds were ever in your favor.
-
8 pointsThanks for the many special memories Coach. Rest in Peace
-
8 pointsIDK the engine probably ran for 50 to 60 years with out them before.
-
7 pointsHmm, first I've seen that. Yes, it could and should be welded. Pretty easy for that one. Jack it up by that 3/4 foot peg bar and it should close the crack gap. Weld it right to the bar inside and out and the crack too
-
7 pointsCiao a tutti, mi chiamo Andreas e vi scrivo da Treviso in Italia , ho un 420 LSE senza nome e seriale . Ho registrato le foto anche su tractor data . Hi everyone, my name is Andreas and I'm writing to you from Treviso, Italy. I have a 420 LSE with no name or serial number.
-
7 pointsMarketplace had an ad for a K321 14 hp, turned out to be a 12 hp. $50 so that’s Ok. Guy said he was rebuilding if for a Ford LGT145 but lost interest. I suspect he realized this is a wide base block and the Ford requires a narrow base block. It has been setting partially built for 3 years with no covering over cylinder. As a minimum I’ll pull oil pan and valve cover to clean it. I’ll also measure crank and plastic age it. He said new piston and rod. He sure made some marks on the top of the piston driving it in if that’s a new piston. I can just make out the o.020 mark on the piston in the middle of those marks. The bore measures 3.397-3.398 top and bottom and 90 degrees (snap gages and mic). That’s about right for a block bored 0.020 over. I’m surprised that I can barely turn it by hand on crankshaft. This makes me want to pull piston and measure ring end clearance and piston clearance. I can’t tell if anything was done to valves so I need to look closer at them. But for a price that was less the cost of a machine shop bore job, it’s a good one to disassemble and know that I did it correctly. Got some other parts. Thad a Waldorf carb, and its shafts are nice with no worn out wobble. No head, flywheel or tins, but I have them from several worn out kohler I have for parts. Also picked these weights for $80. I need to weight them. Their heavy. Stay tuned for a slow exploring and rebuild.
-
7 pointsLynn, you've given me an idea for some more clubs! Stuck Hub Stuck Steering Wheel Stuck Hitch Pin No Balance Gears Patina and many more...
-
7 pointsI'll third that. Well if knuckle heads like you would stick to the topic ...
-
7 pointsIf we partner with your wife on the insurance policy, we’ll could be the ones buying more tractors
-
7 pointsThank you Big Unit ! @ebinmaine @Achto


This leaderboard is set to New York/GMT-04:00