
Leaderboard


Popular Content
Showing content with the highest reputation on 08/05/2018 in all areas
-
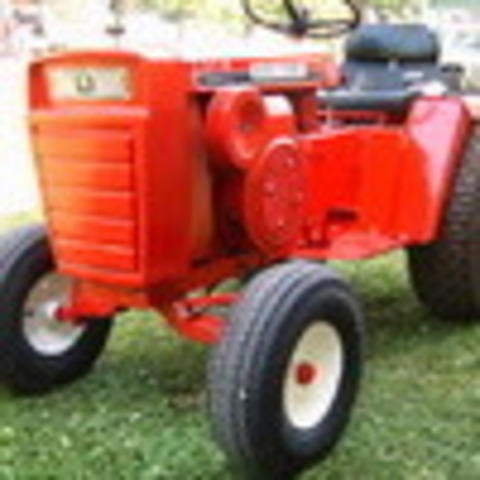
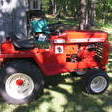
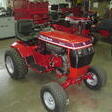
12 pointsLove my big D's. Oh yes they are 200's
-
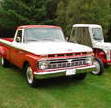
10 points@Machineguy, @PeacemakerJack, @Achto, @elcamino/wheelhorse, @dells68, Here goes I mentioned back in the spring my parents' driveway washed out from flooding, of course I have the 2 compacts with FEL but nothing to haul anything on,(FIL has a C65 dump but not road worthy nor will my tractor loaders reach over the bed sides) so I found myself a fairly decent (family owned since new) 1979 Chevy c30 Scottsdale with 11' pto scissors lift low side flat dump ,a hidden goose neck hitch as well, and get this 454 Big Block power and granny 4spd trans all original except for the paint and a few new body panels, here's a couple pics, Jeff.
-
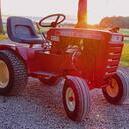
10 pointsIt never ceases to amaze me the lengths that people go to . I managed to find this Very rare to UK RJ58 , (like I need another tractor ) . But hey this one was too good to pass up . It was located in Dunfermline Scotland which is slightly east of Edinburgh and I live 470 miles away in the south west of England . I struck a deal with the chap , made him a good offer he couldn’t refuse , so he made a good few bucks . Now I have the problem of getting it 470 miles away , Och , I’ll deliver it says 🤩 ,so naturally I excepted his offer , I payed the fuel costs happily . Two Scottish chaps set out at 10 pm on Saturday evening and arrived at my house 10 am the following morning , made them a cup of tea/ coffee and showed them around some of my stuff and then we unloaded the the RJ58. Heres what they brought me from Scotland
-
7 pointsThanks to DJ Harrison, here is my new toy. D-200 with rear PTO, big plow and 5' finish mower. Got home too late to unload so I just parked trailer and all in the garage till I get a chance to unload and play.
-
6 pointsIf Kevin loaded it for me I probably could haul all Craig's @AMC RULES collection in one trip out of the Magic Shed ...
-
6 points@dells68 , @JAinVA @PeacemakerJack@Achto @Machineguy and all others we better hope he doesn't find a pocket full of money and drive the old granny gears to the BS and get @pullstart to be his loader. He will clean the place out.
-
5 pointsWe don't use bolts down here bailing wire is cheaper , we use rope for seat belts .
-
5 pointsThere's still the basement! Make sure that seat in that truck is bolted down good. If you pop the clutch in granny gear that big block will have you looking at the cab roof!
-
5 pointsI think you would need a bigger truck and a very large trailer to clean out the magic Shed . He keeps adding horses. I think Mrs. Rules is on guard duty for the shed 24/7 .
-
5 pointsIt is a 1997. You will need the rear extension kit to install plow on a 520.
-
4 pointsDeal made. Picking up the whole package later this week.
-
4 pointsWelded the 1054 “tower assembly” to the gt14 frame. Now the fun begins.
-
4 points@squonk Yes Squonky this is my part of the state , US southern rednecks can always find the BBQ without asking directions . In fact I saw @dells68 Emory , and grandfather yesterday on their way home from a haul. They are going to wear out the Dodge hauling stuff back to the western part of Ole Virginia .
-
4 pointsTractor runs pretty smooth now been mowing with it and it does great. Got some time yesterday and today to paint the rims. And a while back I also replaced the trans oil which it needed shifts smoother now.
-
4 pointsI knew it would make for a good laugh.
-
4 pointsCouldn't wait to open this thread.... Nice tractors anyway.
-
4 pointsI'm in Northwest Florida (Pensacola). While Florida is in the south, most of us north Florida people don't consider anything below Gainesville a southern state, more of a state of mind .
-
3 pointssolid looking rig, while you are checking this out, take the time to get your favorite penetrating oil ,or fluid film ,inside those doors and the lower back of cab. as the fluid penetrates the crimped door bottom, and the floor closure it will start to spread and drip, and you will have stopped future rust. very simple to do and no door rot . I also use 680 wt. gear oil on the frame and bottom floor area. bombproof, pete
-
3 pointsWelded the 1054 tower assembly to the gt14 frame. Ordered an Eaton 1100 case gasket and axle seals for the transaxle. Want to get it to roller status.
-
3 pointsTook it for a spin. The steering fabulous. May have it done tomorrow.
-
3 pointsI think I would have to go 3 or 4-53 Detroit Diesel leave the SM465 and add a gear vendors over/under drive.
-
3 pointsI’m a nostalgic and energetic fan of Wheel Horse machines. If you’re in the Southern States let me know! I’d like to get something together
-
3 pointsSomebody's got to bring the horses west Jim! Might as well be me. I'm done for now, err at least till something else catches my eye!
-
3 pointsNice! You can't be late 60's-70's Chevy pickups! Tough as nails and last forever. Enjoy your new ride and thanks for sharing Jeff!
-
3 points"Love my big D's" MEEEE To!! and boyoboy you got a couple there thats .................. well, just fantastic!
-
3 pointsMade more progress today. Still lots more to go
-
2 pointsI picked up a second Farmall Cub, a 1950, to go along with my 1947 one I bought last summer. This one runs good, but has some unique modifications that I have been addressing. It came from a buddy of mine's neighbor. He had passed away recently and his son wanted John to sell it for him. John already has 3 Cubs so he put this one up for sale. The previous owner, before he passed, had a bit of dementia, which is perhaps why the odd modifications. The generator, which is supposed to go under the hood, was relocated to the right side of the hood, and there was wires spliced everywhere. The 6V battery was connected backwards - in the Cub 6V system, the positive terminal is the ground. The front seal was leaking and there were a few other issues. I left it at John's place, and with his help, we have been working on it. First relocating the generator to it's proper place, plus a new voltage regulator, a new starter to negative terminal cable, the correct fuel strainer bowl, and are rewire the whole tractor. A new fuse holder and another light switch, was also added. I ordered a free safety gas cap from IHC and will need to still address the Woods mower issues. Here are some pictures, first the way I bought it.
-
2 pointsI started working in my 1966 L157 Lawnranger trying to see what I can salvage on it. It has a S7d Wisconsin engine that would not turn either way but maybe 3 inch's and stick solid. I turn it the other way and same thing so I thought maybe a broken rod. I pulled it apart and it has a stuck piston and stuck intake valve. I removed the valve and crank then worked the piston out. The top ring which is the compression ring was stuck solid. I tried to free it and it broke (a dumb thing on my part). I should have soaked it first but I didnt. I have 2 questions. (1) I'm going to take the piston to a repair shop close by and see it I can get a ring put on it. Can this work ? I'll hone the cylinder first a little to kill the glaze. I don't want to put much money into this engine. I know it needs a carb also but there not that expensive. (2) I need a repair manual to see how the cam and crank timing is set. It's a clean engine the bearings are good Cam and crank not warn. Nothing that bad. I think it would be a good engine if I can get it back together.
-
2 pointsThat poor thing, I feel sorry for it, well at least it has a paint can top to protect it now.
-
2 pointsThat is an awesome truck Jeff!! I'm a square body GM fan for sure & definitely a big block fan. It should serve you well.
-
2 pointsAfter looking near and far, I finally picked up a 312 8 that was found close by to me. It seems to be in good shape, with 300hrs on it, and it fit my budget. Now I need to figure out how to put a sleeve hitch on the back so I can start turning over some ground. Any advice on that or maintenance would be appreciated.
-
2 pointsHey man you can come down have all the heat you want right now brother. I'm in Nashville and right now I'm drinking tea and babysitting my new pony and what a little beast. My hats off to the boys at AZ tractors. I got this motor from him, didn't even hear it and he sent it to me, it runs runs perfect! I'm also debating whether or not to work on my 312-8 I just picked up. Suns a little hard on the cranial surface ! Cranks but no spark
-
2 pointsMore assembly completed today on the 42 Sickle Bar Mower ! I like the black carriage bolts on the sickle - look just like plow bolts!
-
2 pointsI was wondering if anybody else would catch that Jay😂.
-
2 pointsLet me just say everyone has been so helpful and I just want to thank everyone for taking time out of there day to help me!
-
2 pointsWithout question... the best W-H score I've seen in a long time Neil.
-
2 pointsTurning brakes. I was undecided on these. Should I fit them, or not. OK, I'll make a start. Bent up a pair from alloy using photo's and guesswork as a size guide. The levers ? were from 1/8" x 1/4" brass drilled and tapped 8BA. Each lever was made in two parts as attempts to bend as per the full size resulted in a break. Brass too hard. Should have tried heating up first. These levers are probably a bit narrow, 3/8" would have been better but nothing in stock. It was then decided to leave them for now and carry on with other bits and pieces. Lots of bits and pieces later, Iain slf-uk my head information provider, sent me photo's and measurements of the assembly so a restart was made. My original guesstimated alloy pedals were correct in height and the inside of the bent up lips, much to my surprise, but 1/4" short in length. This 1/4" is the model size measurement. Two new pedals were made and the horizontal brass section extended using a piece of plastic for quickness. A test assembly. All these parts were held together with 8BA countersunk bolts. Looks a bit messy on the photo's but all hidden later. A few holes were drilled in the wrong place, but not seen when finished. The pivot bar is brass tube with a plastic insert and a 3mm threaded rod. All bits which just happened to fit together without much work. The lower ends of the uprights were drilled and tapped to suit the rod and the tube notched to take the inner upright. Easier than making the tube in sections as per the full size, and as these pedals won't be working, a bit stronger. The locking bar was also fixed in position. The notch in the tube was later filled and blended in. Various other areas had the same treatment to tidy things up. The brake pull rods! were from alloy angle , bolted to the underside of the footrest for extra strength with the nearly visible end trimmed down. I had to alter my original footrest support and lay it flat with the alloy angles notched to clear, but as usual after doing all this a better and simpler solution popped up in my head, but leaving as it is. Photo below is before cutting notches for support clearance. The full size has a steel bar running diagonally under the footrest, from the outer end of the pivot tube to the chassis frame, which helps support the tube. I made up a short alloy bracket which is bolted to the support angle in front of the pedals, and to the front underside of the footrest. Not really visible without effort. Hope all this makes sense. Grip tape was added to the pedals which finished them off as well as hiding all the bolt heads. The footrests also had a covering of the same. This self adhesive tape was listed on eBay as carpet gripper tape. Similar stuff also used for skate boards. I wanted to use ribbed rubber but nothing suitable found. All too thick. The next photo's show various stages of test fits. I could have left the cranked ends straight on the brake rods ! by moving them closer together, but had previously drilled the footrest and didn't want to waste the holes. Photo below. The pins connecting the rods to the uprights were made from a bolt, turned down and drilled, then cut to length. The split pins are 1mm diameter. The threaded end was screwed into the alloy rods after tapping and held with a dab of lock tight. A fiddly job inserting the split pins, especially the inner one resulting in chipped paint, now touched up. Might have been easier before fitting to the tractor. Not too happy with the appearance of these split pins. Need tidying up and the loop made smaller. A job for another time. A few more photo's of the various parts, mounting brackets, footrest support etc plus the unit finally fitted.
-
2 pointsYes, that is a great point and I've had to weld up every C series pin and arm I've owned to get them back to their original size. I forget a lot of times of all the repairs I've done to these machines, things are just fixed as I find them and they are put back into service immediately. I seem to recall now there is also another wear area on that arm, right behind the pulley - similar to the wear issues of the older style Sundstrand arm system....? Might be the hole where the arm pivots, think I welded it and added a bronze bearing... Sarge
-
2 pointsA look at the service manual shows the oil pressure switch having a 1/16" NPTF thread which I have not heard of. I expected to see 1/8" NPT and the 1/16" may be a typo. There is a difference between NPT and NPTF in the thread design and sounds like the naked eye can't see the difference. NPT = National Pipe Thread and F = fuel http://www.cutting-tool-supply.com/TechTips/Tapping/NPTvsNPTF/NPTVsNPTF.htm The switch in the parts manual is Kohler 5209903 that is replaced by 5209905. Neither are listed as available. Did find an online reference that 2409903-S for the later CH and CV models is a replacement but don't know for sure. What I would do if it is possible is to clean the area up with a degreaser and get it bone dry to see where the leak is when you restart the engine. It could be from the switch or it could be from the threads. Maybe the switch has been replaced with one that has a different thread. All NPT threads require a thread sealer where the NPTF does not - but it probably would not hurt to add a sealer if required. Pipe threads are tapered. The threads at the end have a smaller diameter than the other end so they do not need to be that tight. The diameter of the switch threads get larger as it is turned in. Don't turn it in thinking tighter is better. You could crack the block. 1/8" pipe has an OD of .405" which is between 3/8" and 7/16" if the size is confusing you. A Kohler dealer that has been around for many years may have the answer for a replacement switch. I doubt Kohler made their own switches so there has to be a suitable replacement out there. The manual states 25-50 psi is the operating pressure. Let us know what you find. Garry Corrections F is not fine - it is fuel 1/16" pipe has an OD of .313" which is 5/16" so it must exist
-
2 pointsWelcome aboard, I will say condition doesn't necessarily mean hours are wrong, some people just have no clue about properly maintaining a ($7000 when new) piece of equipment, bought this '95 used with 236hrs a few years back from the Dealer I bought my Anniversary 520H new from in 1998, Jeff
-
2 pointsPutting my 42 Sickle Bar Mower project back together!
-
2 points@GlenPettit we met at @whfan74‘s meet and greet when you insisted on giving my girls Branded pencils, tattoos, and whatever else they were interested in, no matter the cost, for the sake of keeping kids involved in the hobby. Today they both have “their own” tractors, which they love so dearly at 8 and 10 years old. Maybe you planted a seed in them that day, and I hope you did! Happy Birthday, may you be on the mend soon, there are children coming up that need people like you! Thank you for what you’ve done, for my kids and most likely for many others as well! - Kevin “Pullstart”
-
2 points
-
2 pointsMowed the back yard... with the new REO skiff this afternoon. Not a bad cut, considering it rained all night, and today until noon. Then snatched up the high rise tub cart, just because it was there.
-
2 pointsMy new '67 REO skiff (#36)... followed me home today. Was successful in my rescue of another ... across the Connecticut state border.
-
2 pointsHey Pete, Whatcha think of these...
-
2 pointsToday I went out to my shed and looked at my old tractor. And joined. She is a 1277 Runs and has all the goods.
-
2 pointsNext, the work in progress. We should finish her up today and I will be taking it home. Hopefully, that is, and will include more pictures of it "fixed" then.
-
2 pointsI recently finished my GT-1800 it was a slow almost two year restoration. I bought this tractor new in August 1984. Here is a before during and after picture.
-
2 pointsA wheel Horse with a hydro pump for lifting implements! I use a 1961 Wheel Horse 701!


.thumb.JPG.1b2a1a39cdcedb1e001571713350b32c.JPG)


This leaderboard is set to New York/GMT-04:00