
Leaderboard


Popular Content
Showing content with the highest reputation on 06/04/2016 in all areas
-
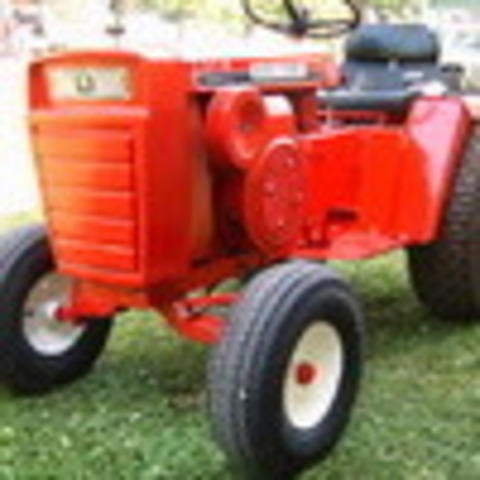
11 pointsI've not been looking to add to my collection but sometimes things just happen! On Friday I'd gone to my local garden machinery place (US - Outdoor Power I think) just to pick up a saw chain and out front was a WH. Now I've had many conversations with the guys there about WHs when ordering Toro parts and they've mentioned that they used to service lots of them at one time so I assumed it was in for a service. "You've got a Wheel Horse out front" I observed. "Yes and it's for sale!" came the reply, "We're going to put it on that auction site." It was apparently a 'barn find' that someone discovered on moving into to the area and as a non-runner the place had taken it in part-exchange for a new mower knowing that WHs are collectable. They'd got it running and discovered it was in good shape hence it was up for sale. "Why don't you sit on it, start it up, drive it round?" they suggested. Well, why not! No smoke, no nasty knocks from the Kohler, gears all worked fine and it was all so original and unmolested, a good deck for its age with no welding, even the lights still worked. Went and collected it today. It's a Belgium built Raider 10 eight speed made in 1972 I think based on the Amnor serial. It probably differs from the US spec as was usually the case but it should have the hood ornament which has gone missing - no worries I have one in stock, must have known this tractor would come along!. Here's the walk round photos... It's obviously had a replacement starter at some point and wow what a difference that makes compared with the other Kohler powered horses in the stable with their original motors. Interesting choke lever handle - its been made from a wooden door knob I think - actually doesn't look too out of place but I'll replace that. Even has what appears to be the original 70s style rear light lens - same as my D-200s have. Amnor (European) model number 1-0310 serial 126220. My Amnor serial list suggests this is probably a 1972 model but I'll get the Kohler serial tomorrow as a cross-check. The only issues that need fairly urgent sorting out are oil leaks from the drive pulley shaft seal and brake drum shaft seal, the latter making the brake band inoperable. I spotted these when I looked it over but they're minor issues in terms of cost. I discovered that the PTO bearing is 'iffy' when taking the deck and belt off and that the main drive belt is coming to the end of its life but that's about it so far. Andy
-
11 pointsDont know why. I just saved it from the scrap yard. 418-A with deck for $200. Guy said if he disnt sell by next week he was calling the scrap guy. I'll give it a good home.
-
10 pointsBought this GT 14 today, It's been setting for many years, got it running, will report back in a few days with more info, Oh it has new tires in front and a new drive belt. and almost everything for the 3-point. sn. blade and deck.
-
9 pointsI have noticed 2 things with that little 1/4" rod that Wheel Horse uses to stop the hood from tilting too far forward. 1) For some reason Wheel Horse engineers decided to have the hood tilt right onto the tiny cotter keys holding the rod in place. This makes the hood stop in different places depending on there the key is and will eventually wear through the key leading to #2 2) rod is missing allowing the hood to go forward too far bending the bottom of the hood. My solution is a rod within a tube that puts a single cotter key in the middle out of harms way and is stronger than the factory setup. Picture shows tube within tube. That works as well. I have both ways on my machines. Also in these pictures you will notice that I drilled out the holes and installed a larger 1/2" rod for the main pivot. Wheel Horse hood stop pin.pdf
-
8 points6-4-1924 Cecil Elwood Pond was born Cecil Pond was an American businessman, inventor, and entrepreneur. He was the founder of Wheel Horse Products Co. Inc., and was the primary inventor of the modern American Garden Tractor and riding mower. Pond was born in South Bend, Indiana, to Elmer and Ann Marie Pond. He graduated from South Bend's former Washington-Clay High School, and served in the U.S. Army during World War II. In 1946, Pond returned to South Bend and in June of that year, married Betty Alber Pond. Mr. & Ms. Pond were the parents of three children: son Gary Pond, and two daughters, Linda and Constance. 1946 saw the beginnings of Pond's manufacturing future. Pond joined his father Elmer, who at the time was building two-wheel lawn tractors (which the operator would walk behind) from angle iron, surplus motorcycle and automotive parts in his garage. At first, the Ponds' company was simply called Pond Tractor Company; however, they discovered another family member owned a similarly-named company. "Wheel Horse" was then chosen, and the name stayed with the company even after its acquisition by Toro. In the late forties, military veterans returning from World War II began moving to the vast new suburbs then transforming the American landscape. Their suburban homes had larger lots that demanded more attention—and the Ponds' riding mower found many ready buyers as a result. In 1954, Pond introduced his first 4-wheel lawn tractor, an event which altered substantially the lawn care manufacturing business. By 1957, his Wheel Horse Products Company recorded sales over $1 million (US$8,425,355 in 2016 dollars.) for the first time. Just two years later, the company's sales more than doubled, to $4.5 million (US$36,529,110 in 2016 dollars). In 1975, Pond sold Wheel Horse Products to American Motors Corporation. At the time of the sale, Pond oversaw over 500 workers at his plant and over 3,000 dealers were selling the brand. Cecil Pond passed away December 30, 2011.
-
7 pointsFinal update to this restore as I am calling it finished just in time for a long ride back home to the Big Show to visit. Enjoy the pics and Thanks to all who looked and those who commented.
-
7 pointsWhat a wonderful offer, your time and experience to help a fellow forum member in person. Racinbob is quickly becoming one of my favorite Red Square heros.
-
6 pointsYes. Back the lock nut up and tighten the setscrew then lock it in place. Before doing you should pull the hub and inspect the key and keyways. There shouldn't be any play even with the setscrew loose. If you get in a bind and need a hand I'm only about a half hour away.
-
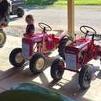
5 pointsI restored a 400 last year for myself and now my daughter wants a pink one for the local show here. I have 6 and figured I could sacrifice one to be pink. Here's the start of the project. First picture is how I picked it up. We got it apart and the parts That will be pink are on the ground, I have the fenders and tool box too. Those will be pink. Frame and everything else will be tan or black. Looking to make something like the pink one in another picture. Last picture is of my 400 I did last year but it got to cold to paint the engine. They will be done for the local show in July. I'll post progress as I go.
-
5 pointsSorry to hear. I just checked my stash and have a good 10hp block from the same era that was an oil burner before the rod broke. Somehow the block survived without damage. It's free if you pay shipping. Pm if interested and I'll send pics?
-
5 pointsI think that block is toast. Lucky you did not get hit by the pieces of metal flying by.
-
5 pointsMan that looks great. I thought you said it had been sitting for years. Sitting in a showroom window or a very large bag.
-
5 pointsThanks Doug but there's a bunch of guys here that would be willing and have helped others out in person. I've also been the recipient. There's not many opportunities down here with the rarity of Wheel Horses so when I saw Ormond Beach and a guy who may need a hand I'm chomping at the bit.
-
5 points"The Spirit of 76" will be there looking a bit different than what's in these pics!
-
5 pointsI sometimes wonder if he realized the impact he and his father had on so many people...Think of the millions of lives impacted by WH tractors - employees, their families, anyone who ever used a WH (or continues to do so), the improvements to property / lives that people have accomplished using WH products, all the users of this forum, etc... It is mind-boggling...
-
4 pointsIt isn't normal, but it is rather common. Axle oil seals leak a bit from time to time. Jack up the side that is leaking and try to move the wheel side to side and up and down; if there is no play then it is just a bad oil seal, if there is movement then a bad bearing causing the oil seal failure. Let us know what you find.
-
4 pointsThe size horse and amount of horse power you want or need will depend on what you have to plow or mow. Length of driveway, level, concrete, gravel, small lot for mowing, acres, level, etc. A short frame, square hood (8hsp) may work for you. You may want a "D".
-
4 pointsjust finished this up my new toy "RAT TRAP" RJ58 RAT ROD
-
4 pointsNot "in" my mirror but close enough...The C-105 off to help with spring clean up duty at church couple weeks ago... Disconnected the trailer from the car when I got there, hooked it to the WH and hauled all kinds of leaf bags and other stuff for the volunteers...Big help!
-
4 pointsWrapped up my sons tractor tonite so we had both out for some pics....
-
4 points

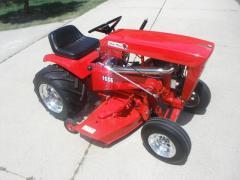
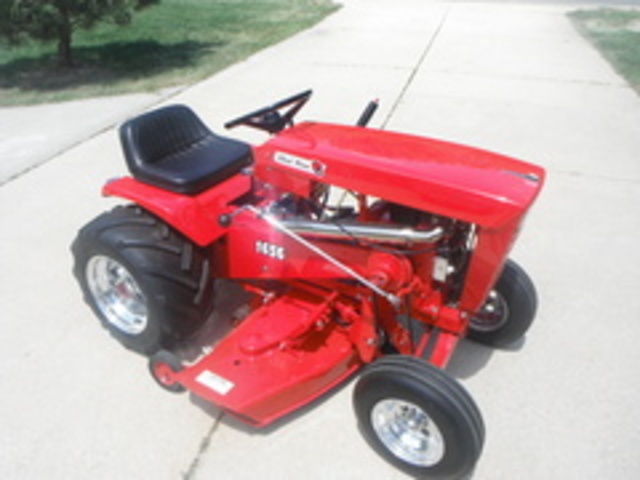
From the album: wheelhorse 1656
This is my 1656 witch is a modified 1056. -
3 pointsWas starting to mow with the 1277 today and thought to myself that the old girl sure was running good...about a half pass around the yard and BOOM threw a rod and grenaded the block...shooting a piece of the block right past me...guess I'm on the hunt for another K301 now
-
3 pointsWith the area you have described you will get the job done with any 10 or 12 HP . Chains and loaded tires with wheel weights and you will be amazed at what they will do. Here is a picture of my driveway that I plow with a 10 HP n.
-
3 pointsIt's not that I wouldn't have saved it. I had the money and just happened to be cruising craigslist when I found it. Called the guy and made him an offer and he took it. Said he wanted to see someone do something with it. So it followed me home. It just looked mad in the mirror because someone painted eyebrows on it. I figured it should be happy it has a new home kinda out of the weather. So..... I got all the water out of the motor, shot some blaster in it. Spun it by hand and got it to where it would rotate completely. Put some fuel in the carb throat and spun it over and it spit and hiccuped. So it will run but still have to clean the carb and fuel system. Unfortunately it sat in the rain for a day or two with no air cleaner. Deck is free spinning, motor turns over but it still looks mad,lol. Only missing the seat(which I have one) and air cleaner.Now I have 418-A twins pics are from craigslist ad. Post some more after a cleanup next week.
-
3 pointsbib material right there.
-
3 pointsAwww, c'mon guys... don't make me wear one of these too.
-
3 pointsHow could you not... bring that awesome home with you?
-
3 pointsGreat find. Just a little bit of cleaning and it will be ready for work.
-
3 pointsNice save. You should put this in the "What's in you mirror" thread. Oh, what's in the crate? Nosy minds want to know..
-
3 pointsThere's 4 seals. One in the end of the axle housings (sometimes they are double seals so 2 on each axle housing and 6 total), one on the input shaft and one on the brake shaft. As long as the hubs, pulley and brake drum come off it's a piece of cake to replace them. No need to open it up. Bearings would require opening it. Don't fret over that. It's really pretty easy. As I mentioned, I'd be glad to help you out. Once you see how easy it is you'll be off and running.
-
3 pointsI think the seals are easy to replace, but the transmission case has to be split to replace bearings.
-
3 pointsNot unusual to find this old sellers trick... a little grease applied to a leaky axle seal. Works just long enough for you to get it home.
-
3 pointsHad a go at doing a mock-up of the transaxle assembled with the extra long axles for duals. I bolted a N.O.S. "T" - Brake disc to the inner hub. I also added a second axle spacer sleeve, between the two hubs. Just for looks a couple items to sort of bling it a bit, the chrome dipstick and the N.O.S. rear hitch.
-
3 pointsI was a crew chief on a Huey from 1970 to 1976 in Army Reserves . We learn three things , pray that the Jesus nut on mast stayed on, hope the pilots returning from Nam left weed at home on training days and summer camp and last pray I did not get called up , being a door gunner is not as much fun as it looks. This is way off topic. Smack self in head.
-
2 pointsHello. i am not new to Wheel Horse, but am new to the old stuff before Toro got into the act. I have a garage queen 416, a well used 520H with a Predator engine, and just bought the Raider 10 for $300. The Raider is very solid and it mows and adjusts better than the 520H. I swept the barn for parts and came up with a much better seat for the raider and mounted it 4 inches higher and added pivots and rear springs to it. Unfortunately, I was mowing weeds and grass higher than the hood and the center mower drive bearing got tight. Should have greased it before use, but now I have the opportunity to go over the entire deck. I cannot say how impressed I am with the design and durability of the older machines. I like the simple stuff and the Raider looks as tough as woodpecker lips. Not perfect, but straight with all the original stuff working. The original tires were leaking from the sidewalls and they had used that horrible Fix-A -Flat on them that had hardened like glue. nothing worked as the sidewalls were too weak to support removal. An idea hit--So i got out the propane torch and heated the bottom edge of the tire through the rim in about a foot of arc. When the smoke first appears after about a minute of heating I applied the tool and off she came just as slick as you please. I then used a 36 grit segmented disc wheel and finished critical areas with wheels like this http://www.harborfreight.com/4-1-2-half-inch-nylon-abrasive-wheel-94017.html and this http://www.harborfreight.com/4-in-80-grit-nylon-abrasive-wheel-with-14-in-shank-60325.html Primer and paint and a new tire tube and she works for a fraction of what a new tire would cost. I found some nice small Led lights at Rural King for $15 and they might fit by removing the logo panel at the top of the hood. The rear of the frame where the tilting seat pan mounts was also reinforced with angle as it was in poor condition. Just minor stuff ,really on a machine of such experience. Of the two wheels, the polycarbide wheel is also a good choice to strip paint on sheet metal as it leaves not much in swirl marks and can even leave a shiny finish if used with care. Try one. . I used the 80 grit abrasive wheel to get at the tight radius areas and then finished up by hand sanding
-
2 pointsMuz 123 check out my thread started july 2015. I have an electric actuator on my clevis hitch so I can have the deck on for mowing and the rear free to move up and down for other attachments if need be. Bit of PIA to get it done but it works. Great to lift back of tractor to install chains.
-
2 points
-
2 pointsGreat Wheel Horse find. Enjoy friend.
-
2 pointsGood job!
-
2 pointsNothing more to be said than that.
-
2 pointsYipes. What can ya say. Plenty of good service till the end. Glenn
-
2 pointsMaybe create a Wheel Horse Dunce cap if someone gets caught breaking the rules. wait, I don't think we could make enough of them.......
-
2 pointsI wouldn't say no to a 418A with deck for $200 either..........
-
2 pointsA big thank you to the list! Someone mentioned RuGlide at NAPA. I'm pretty cheap - will not spend if I can find another way - so always used soapy water to mount tires. Plenty of frustration and many motorcycle tires over the years which can be a bear. I sprung for a bottle of RuGlide, applied it liberally with a brush and mounted the fronts on the newly painted (Krylon Antique White) rims in just a minute or two. I used the old milk bottle shards to protect the rims from scratches. That stuff is slick as snot. Sweetness - thank you! On to mounting the 10.5 Ags next Monday or Tuesday if I can get the wheels completed - too blasted humid out there today to continue. Mule drive painted, pulleys on order. Deck wheels as well. Happy weekend!
-
2 pointsYet another update. I've been running my 520H hoping that Sea Foam was going to cure the surging under poweer. The surging had subsided to a noticeable level. Annoying, but I was able to mow. I was living with it, but it was not getting better. This morning the surging seemed to be worse. So I pulled the carb yet one more time. This time I ground a screwdriver and removed the main jet and cleaned everything. I was really hopeful, but I had not improvement. Since I was low on gas, I refueled with non-ethanol premium gas. The big Onan seemed to run better, but the surging was the same. I was running out of ideas, so I decided to check the governor settings. The 520H governor arm has three holes to governor control arm. Mine was in the center. I checked it according to the manual and the procedure said it should be in the inboard hole. So I moved and tried the tractor, The surging got much worse. Scratching my head, I thought why not try the outer hole. Surprise, Surprise my surging in GONE. So I declare Victory, At least until I go down this path again, Thanks everyone for all the help, Kurt
-
2 pointsAnd the crowd screams,SCORE SCORE SCORE......best of luck. Glenn
-
2 pointsWNYPC, you nailed it! That is exactly I need. And, I'm just a stone's throw away in the Finger Lakes - thanks, man! Brad
-
2 pointsJess Here is what I would do. Disconnect the pink wire from the voltmeter. Replace it with a jumper wire long enough to reach the yellow wire on the seat switch but don't connect it to the seat switch yet. Connect it to the coil (+) terminal. This way you will instantly know if you have power to the ignition coil when the engine quits or you may see it faulter before it quits. If in fact you loose voltage at the coil when the engine quits move the jumper from the coil (+) to the yellow wire at the seat switch. (The reason for the long wire) Run it again. This time if it quits and you still have voltage on the yellow wire that circuit in the 9-pin connector has failed. Next step Remove the jumper from the voltmeter and hook the pink wire back up so the voltmeter works. Take this end of the jumper and connect it to the coil (+) terminal. This will bypass the ignition circuit in the 9-pin connector. Try again. Garry
-
2 pointsYes absolutely we are going to be at the show this year. The above two tractors are coming along, also an older custom narrow front that I did for my boy when he was little and I have one more fresh Articulated 4x4 build that I haven't posted pics of yet that will be along. We are also hoping there should be a minimum of 4 of our Articulated tractor builds there if everyone brings what they are telling me. Anticipating a great time !
-
2 pointsI found it more usefull like this though.....


This leaderboard is set to New York/GMT-04:00