
Leaderboard


Popular Content
Showing content with the highest reputation on 11/24/2015 in all areas
-
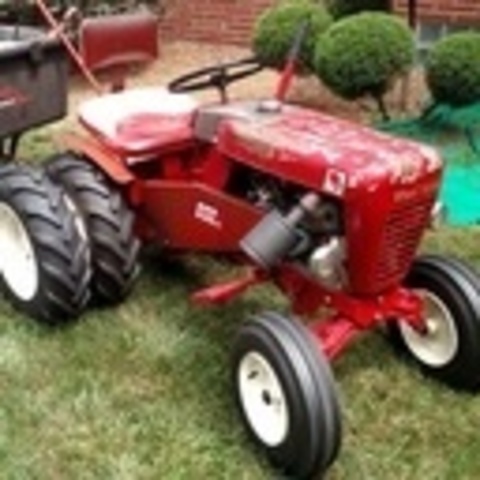
12 pointsBrought this one home last night. Pretty solid tractor minus the correct engine, seat, belt guard. Actually bought this one as a home to a Kohler I have sitting on a shelf in my garage. It will be a "802" with electric G/S. Will go back to original push button ignition as well. Deestone Tri Ribs on the front and maybe a stack? That's a Tecumseh overhead valve 5 horse in there now. I will be needing a correct belt guard and square pan seat if anyone has one. Also-is the no name amp gauge correct for this? I've always seen SW gauges in WH. And-Is the seat spring wrong for this tractor? I know the "riser" is an add on, but it looks like the seat spring should have been as tall as the fenders. I think they have the wrong seat spring.
-
9 pointsI spent some time in the garage getting my new 314 into winter mode. Added 50# cast iron outer wheel-weights and cast iron pipe flanges to the inside of the rear wheels for about 64#'s each wheel. A brand new battery and a 48" plow up front and she's done! My GT-1600 will get its winter dud's on next weekend.....then its just sit back and wait for the white stuff1 Mike..........
-
7 pointsWith Thanksgiving coming up, and some of you going out of town, I figure that this is as good a time as any to let you all know about my upcoming surgery. I debated putting this in "Bumps & Bruises" since it is sort of related, but I don't think it is going to qualify me for the Red Hard Hat award at next years show. You know what they say about being careful how you lift things? Well for 65 years I ignored that. Not to mention, rolling tractors over on myself. Now I am paying the price. On Monday 11/30, I will be undergoing lumbar spinal fusion surgery. I have had this planned and scheduled since August. To be more specific, the process is called "L3 thru L5 decompression and instrumented fusion". In layman's terms, I am having a laminectomy (the removal of the facets and boney part of the back of the lower spine to relieve pressure on the spinal cord, then the bone will be grafted to the vertebrae with titanium screws, rods and wires installed to stabilized the vertebrae while they fuse together. The recovery is long, but having watched @953 nut go through the same surgery back in June, and be back in the saddle again, I am very optimistic. Thanks Dick for all of your encouragement. My VENDOR store will be closing on Saturday 11/28 and will reopen when I feel up to it again. Okay, enough said.
-
6 pointsHere is a great memory to take with you...:)
-
5 pointsI got myself a plow for this coming winter season. It wasn't pretty so I decided to clean it up and paint it. Then I decided to Pimp it out with an electric actuator for angling the blade. Works pretty nice now but we'll see if it can stand up to the potential beating it might see. IMG_1441.3gp
-
5 pointsNice pictures, keep all that snow west of here, we got a couple inches. So that's it for this year, I'm putting the deck back on!!! Going to mow snow this year!!! I wonder if anyone has tried that??? It would work good as long as it not wet an heavy, I think, Lol
-
5 pointsThanks Ed I got the actuator from amazon, here is the link http://www.amazon.com/WINDYNATION-Actuator-Maximum-Mounting-Brackets/dp/B012EFMPRE/ref=sr_1_9?ie=UTF8&qid=1447244536&sr=8-9&keywords=linear+actuator+4+inch+stroke. Planning to control it with a momentary toggle switch similar to what did with the electric lift kit for manual tractors, amazon has let me down with that one though it was supposed to be here last Wednesday. The mounting turned out easier then I expected. I utilized the brackets that came with the actuator and only had to drill 1 new hole in the plow frame, which is the fixed end. The other end, the one that pivots, I utilized the existing hole on the top side of where the 1/2 rod of the original linkage used to attach. I used a 5/16 bolt with a series of washers and nuts to get it up high enough to clear when turned and used bronze washers on top and below the bracket to aid in the pivoting. Red the actuator is supposed to be able to withstand harsh conditions so I expect it to hold up fine in that regard. My concern is the fact that the actuator is whats going to hold the angle of the plow, I had to drop the lock pin. Its a nice feature because I now have infinite angle positioning instead of the 3 fixed positions but it started to creep into my head if there's potential of back-driving the actuator enough to break it? John it is pretty heavy duty for its size with over 300lb static force and I have a feeling with the way I mounted it utilizing the brackets it came with(which aren't heavy duty) that the brackets will fail before the actuator....hopefully at least Doug and everyone else I will take and post some close up photos of the actuator and mounting. I never seem to think of my forum thread making while im working so I never step back to take the photos that will help tell the story.
-
4 pointsI like the use of the flanges for weights. That should be pretty good!
-
4 pointsIve been quiet on here for a while. The tractors have been pushed aside for most of this year, too busy with home projects and other things that are pulling at me. Only just recently have been working on a tractor or two. Saturday, i spent some time fixing a hydro system leak on #1, the hard line (pressure) that runs from the lower part of the pump to the lift valve was rusty and damp right where it runs along the top of the frame rail. I also found a crack right on the last bend before it gets to the pump. So got that done and today i had some time to finally put on some redesigned decals that Terry printed up for me about 2 months ago. Some of these were for the hydro 416 (#1) and some were for the 8 speed (#3). I haven't spent any time with the 8 speed since the Mo. meet and greet last year, more than 12 months ago. It had been put away straight off the trailer (drove home in the rain) so it needed some tlc before i could do the decals. i felt ashamed of myself after spending so much time building this one and putting so many hours into it and then i just left it like this all year. I know its only a tractor but usually i look after things so much better than this. Anyway, enough crying, heres some pics of the cleaned up 416-8 and the new design decals....... almost forgot about these ones too..... Terry made these two up for me must have been 12 month ago and have never got around to putting them on. Thanks for all your work making them right, Terry. @Vinylguy The air cleaner one only ever gets seen if you have the lid off, but there was one there originally, so i wanted to put one back there. The engine spec decal has all the correct numbers as the original and finishes it off.....
-
4 pointsGood luck, Bob! Remember what I said on Saturday, call anytime! I should have Terry come up with a "Titannium Club" logo! There seems to be a number of members that can claim membership.
-
4 pointsa few clicks in paint.net with a forum photo
-
4 pointsLike I mentioned at the show, my dad went through similar surgery last spring - he got the bar(s) and screws. He came out well and followed what the doctor told him. He was off script meds in a few days. Good luck and wishing you the best! Fortunately my 552 has a strong Tecumseh so I can pull around what you'd normally be pushing
-
4 pointsThe other guys summed it up pretty well. I had original paint and wet sanded it with 320. Wash/dry/clear coat. Lasts for years. I used this tractor on a regular basis. It was just hauling a firewood cart Sunday! Had the seat resewn too, but that's not in the photo.
-
4 pointshere are pictures of a recently bought 854
-
4 pointsWhen the temperature gets to half my age it is still above freezing!
-
4 pointsI enjoyed doing some night plowing this past Saturday! Ok I am ready for spring now!
-
3 pointsThe teal and white looks great.
-
3 pointsPrayer has been sent for you Bob and I will keep you in my thoughts. God speed to you and we all hope for a speedy recovery. If I can get to the show next year I look forward to seeing you again.
-
3 pointsBest Wishes Bob. I'm certain you will be back on a horse soon. It's been 15 months since Mrs K had the same decompression and fusion of L3-L5 and 12 months since my son Mike had his crushed leg/knee rebuilt with bands, straps and screws. They are both doing well although both were a pretty long recovery.... about 3 months for Nan and 7 months for Mike. So listen to the therapists and doctors. It is amazing what they can do. Looking forward to seeing you at the SHOW.
-
3 pointsYou know we'll all be thinking of you Bob! Take care of yourself, and don't hesitate to let us know if you need anything.
-
3 pointsI thought I would do this to you now, rather then wait until it might hurt to laugh. I spent some of the day going back and looking at the 2010 show pictures...great pictures and memories. Good luck my friend. Question:: Am I going to be taller then you now??
-
3 pointsFocusing mostly on all things loader and subframe related, I've sort of neglected counter weight for when this project is complete. The 5xi loader manual indicates that 280lbs is required as counter weight. Rather build a ballast box from scratch, I figured out a way to get a dual-use ballast box solution. I have a Quiet Collector Leaf Vac for my 522xi and that vacuum, came with a heavy duty rear quick attach mounting bracket that looks something like an upside down 3 pt hitch. A couple years ago I welded up a custom receiver hitch that bolts onto the rear vac mounting bracket with (4) 3/8" bolts. When I do fall cleanup, I just remove the receiver hitch. Here is a photo of the tractor with the hitch and without: I plan on using one of these 500# rated cargo racks to hold as many cinder blocks as I can fit. That might be as few a (6) 8" x 16" cinder blocks at 28 pounds each. So that gets me to 168 pounds, and the cargo rack itself weights 32 pounds. If I can't find convenient sized heavier construction blocks, that just leaves me with 80 extra pounds to come up with to meet the counterweight requirement. That may be made up with a set of 55# wheel weights if the price is right. When the cargo rack isn't on the tractor its available to use on our van for trips to my in-laws cabin in central Wi. That's a win-win.
-
3 pointsBob, these words of prayer were a comfort to me prior to my surgery and I want you to share them with you. We all look forward to seeing you at the Big Show in June and wish you a speedy recovery.
-
3 pointsAll our prayers Bob...and you better be able to wiggle your toes after surgery.
-
3 points
-
3 pointsIt would be a 1973 model....Just a period of time when Wheel Horse changed the number/name thing so 30-40-50 years down the road everyone would ask ....Why....
-
3 pointsMe thinks the fumes from the R & R have more to do with warding off the little bugs than drinking it! Kinda like a citronella candel!
-
3 pointsMy 1045 for your consideration
-
3 pointsYeah... and they're red.
-
3 pointsUS marine Corp
-
3 points
-
2 pointsI'm going to start this in TRACTORS...knowing I'm going to get out the 702 in the morning for pics. This is the 1st snow of the season...it is always special. I once again get to move snow and not just go around in circles cutting grass. I was out there in a T-Shirt 3 hours ago. Shot these tonight...
-
2 pointsGood luck and a speedy recovery with your surgery.
-
2 pointsGood luck to you Bob. Hope it all works out for the best, god be with you....Wayne
-
2 pointsTake a look at the exploded view in this manual, it appears that the pipe thread fittings that screw into the cylinder hold the ends in place, a rather clever idea. http://www.wheelhorseforum.com/files/file/1859-lift-hydraulic-1962-1963-hy-2-a-7140pdf/
-
2 pointsGood luck Bob! If you need any help carrying cookie bar pans around, just give me a call
-
2 pointsHopefully the surgeon will keep my dimensions the same.
-
2 pointsGood luck and get well soon Bob.
-
2 pointsGood luck on your surgery. I hope you have a short recovery time. My wife had spine surgery this month so I have been nurse , cook and lowly minion. Back surgery is not fun , I hope you get use to the back brace, that can also be a big pain. You will be in my thoughts for a quick recovery.
-
2 pointsOur prayers and all the best to you Bob. I'm looking forward to seeing you running around at the show next year.
-
2 pointsThanks for the notes and for not being too brutal on fella... The machine is set up for flux core (electrode negative, positive ground clamp). I have the voltage tap set according to the chart on the inside of the welder for quarter inch mild steel (second tap from MAX) and the wire speed set within 1/2 of one step from the chart suggestion as well. I'm at 2.5 and the chart indicated 2. I'll try dialing that back to 2 and see what I get. Also perhaps I'll try removing the gas shield nozzle too. I have read many folks remove that if using flux core. That might help me keep a smaller electrode stick out and arc length. The fillet welds on backside of the bracket look somewhat better. They actually resemble a small stack of coins knocked over but still a lot of spatter BB's. I'll keep at it and hopefully the look will improve
-
2 pointsDoug, the yard looks great!!! Was born an raised in IOWA I lived to the N.E. of you in a town called M'ville, I went to SEP high school. I know that country quite well. Do they still have the balloon races there? Headed back thru there this weekend during my new escapade!! Are you a Hawkeye, Cyclone, Bulldog or Panther fan? Anyways nice looking place, keep up the good work.
-
2 pointsI agree with this post here. My daugher is almost 4 and loves tractors. She wants a pink one. Color can always be changed but the quality time and memories you make are what's important and can't be replaced. You can also buy another tractor for her and do that one first. Either way like i said it's just paint. This one is not mine but is how my next one will look for my daughter
-
2 pointsINGREDIENTS 1/4 cup all-purpose flour (spooned and leveled), plus more for rolling dough 1 recipe (2 disks) Basic Pie Dough for Apple Pie 2 tablespoons freshly squeezed lemon juice (from 1 lemon) 4 pounds (8 to 10) apples, such as Empire, Granny Smith, Gala, Cortland, Winesap, or a mix 3/4 cup sugar 1 teaspoon ground cinnamon 1/2 teaspoon salt 2 tablespoons unsalted butter, cut into small pieces DIRECTIONS Lightly flour a large piece of waxed paper; place a disk of dough in center. Rolling from center outward, form into a 12-inch circle. (Use paper to rotate dough, and flour rolling pin and paper as necessary to prevent sticking.) Transfer dough (still on paper) to a baking sheet; cover and refrigerate. Repeat with second disk of dough. Preheat oven to 450 degrees with a rack set in lowest position. Remove first circle of dough from refrigerator; wrap around rolling pin (discarding paper), and carefully unroll over a 9-inch pie plate. Gently lift edges and lower dough into the pie plate so it hugs bottom and sides. Avoid stretching the dough, which will make it shrink during baking. Refrigerate. Place lemon juice in a large bowl. Peel, core, and cut apples into 1/4-inch-thick slices; halve crosswise, and add to lemon juice (to keep them from turning brown) as you work. Add sugar, flour, cinnamon, and salt; toss to combine. Remove dough-lined pie plate from refrigerator. Fill with apple mixture, gently packing apples and mounding slightly in center; dot with butter. Lightly brush rim of pie shell with water. Remove remaining circle of dough from refrigerator. Lay over apples; press along moistened rim to seal. Using kitchen shears, trim overhang to 1 inch. With floured fingers, fold overhang under itself to form a thick rim; pinch between thumb and forefinger to form a uniform edge around the rim of the pie plate. To crimp edges: With thumb and index finger of one hand, gently press dough against knuckle of other hand; continue around pie. (Deep indentations anchor dough on rim and prevent it from sliding down sides of pie plate during baking.) With a floured paring knife, cut 5 to 6 slits in top of pie, radiating from center; place pie plate on a rimmed baking sheet. Bake 20 minutes; reduce heat to 375 degrees and bake until crust is golden and juices are bubbling, 50 to 60 minutes more. If edges brown too quickly, cover with aluminum foil. Cool completely, at least 6 hours, before serving.
-
2 pointsOh my! Thanks for posting, that took courage......lol
-
2 pointsSmurfs own wheel horses too?
-
2 pointsThanks guys!! Here are some close ups of the actuator. I had to cut the corner off the bracket closest to the blade to clear the spring
-
2 pointsThat's a nice Suburban. Definitely do what you and your daughter want. It's a great project for you two and I'm looking forward to following along.
-
2 pointsTeal is kind of a BLUISH green though. I say go for it. Sounds like she has her reasons and it will only make her like that little tractor more. It can always be changed again. I've seen pink and purple and yellow Horses on this site. I only wish my daughter had the same interest in my hobbies. Enjoy the time spent with your daughter and give her what she likes on this one.
-
2 pointsEleven O Clock at night. Plowing snow in the dark. Woke up neighbors. Neighbors think your talking to your self can't see you are making video. Neighbors think you're crazy, and avoid you like the plague next day......... What a great idea..... I'm gonna try that myself! I had a neighbor when I still lived in town that would mow his lawn about dawn on Sunday mornings......... I can't tell you what I did to him.......This is a family forum....


This leaderboard is set to New York/GMT-04:00