
Leaderboard


Popular Content
Showing content with the highest reputation on 04/01/2026 in all areas
-
26 pointsGood news, guys. The name Wheel Horse and the logo will live on, with new Wheel Horses tractors and implements being built. MTD has purchased the Wheel Horse name and logo from Toro, and will start building new equipment with the famed Wheel Horse name and logo. Ridney Dongerfield, a spokesman for MTD, said, "Wheel Horse never got the respect. MTD is proud to announce that Wheel Horse will be joining our line of garden equipment, joining names like Troy Bilt, Cub Cadet, and Bolens." The new Wheel Horses will be built using MTD's reputation for quality products and is expected to look similar to a Yardman, but with the famed Wheel Horse logo, name and color scheme. Prices to be similar to a new Cub Cadet, with several models being planned. Models will include tractors with various deck sizes, engine sizes and features. Expect new tractors to start appearing February 30 of next year.
-
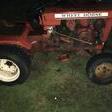
13 pointsPut the new shoes on the horse today since the wheels were good and dry. Wheel weights back on tomorrow. And a nice straight hood is in the works. Some minor body work and then prime and paint. Old one has major damage.
-
7 pointsApril 1, 1965, The Sound of Music first came out in the USA with its world premiere in New York City on March 2, 1965, as a limited "roadshow" release, with a wider nationwide release on April 1, 1965, marking its debut in theaters across the country.
-
6 pointsIt needs to be put back together.
-
5 pointsI see it came with a boat anchor for your next lake trip.
-
5 pointsHORSEFIXER ON YOU TUBE
-
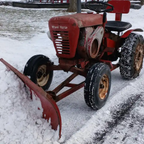
4 pointsI found a chunk of 1/2" thick x 2" wide steel bar and made two more spacers. I now have the rear hitch spaced down 7/8" I now have 4-1/2" of lift on the blade and still have some down float when fully lowered as well. Not a lot when compared to my big tractor and it's cat 1 three point hitch but better than it was. Hopefully now I can move it around the yard in the summer without ripping up too much sod.
-
4 pointsI have 3/8" thick spacers. Maybe I need to make thicker ones.
-
4 pointsWishful thinking but MTD??? Should be JD that will reaally get blood boiling!
-
4 pointsA bit of a shocker for sure. I can remember when Duke was VERY active on the forum. I pray his family is comforted during this time. Regardless of what his health was, this was way too soon!
-
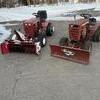
4 pointsToday I put the 417-A with blower away for the year, so I had to move some tractors around. Figured I’d snap a few pics, couldn’t wait for side shot Saturday to post 😂 Sorry for the grease on the front wheel of the 418-C I removed it immediately after I took the picture 😂 I figured I’d say that before one of you wise guys said something about it!!
-
3 pointsHere we go, got them both done. Going to pull the front axle to check on the axle pin and spindles see if I can tighten things up.
-
3 pointsGo to Tractor Supply and get a 5L820 and a 5L810. Use the one that fits best and return the other and you'll be fine. It's a Hydro so you don't have to worry about clutching.
-
3 pointsThe external characteristics for “6-speeds” are: - 1-2-3-R shifter - Hi-lo shifter - No top-side hole for a dipstick - A 1” pipe extension on the oil fill at the lower left rear of the transaxle (allows filling oil to a higher level) - 5/8” (0.625) input drive shaft but it’s shorter than later 8-speeds’ (corrected 6Apr26 -- thanks @kpinnc) - A brake drum that brings the brake band to within an inch of the rear axle housing casting - A brake drum that turns clockwise when the tractor is moving forward There was at least one “8-speed” that also had a LSD--I think it was the 5073. This had a topside dipstick port and the brake drum was farther from the rear axle and turned counter-clockwise and had a ⅝” input shaft making it externally indistinguishable from an open-differential 8-speed. As for the rest, the link to the thread in @953 nut’s post (above) has the relevant information.
-
3 pointsActually, the seat shown looks like the one I put on all of my builds. These have several different armrest mounting points. I get these now at Princess Auto but I used to get them at tractor supply before they closed. Arm rests are very hard to find new now it seems.
-
3 pointsAbsolutely beautiful machines, and a little grease will just earn you a pass from Pete!
-
3 pointslol I appreciate that. I was contemplating buying another one for my 73 WH because it needs a new seat bad but I don’t wanna drill new hole in the fender, I was also thinking of using the U-shaped seat spring mounts which should bolt up, and making a cross bar and bolting a ford 8N seat to it because I like the red and white seat covers available for them. Just haven’t decided yet.
-
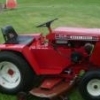
3 pointsPut new seat on the newly acquired 312-8. This seat was not a direct fit for this tractor. It had a bunch of holes but they were about a half hole off . Easy enough to fix because the previous seat already had an adapter on bottom and it fit new seat great. This is a very late model tractor and dont really know if all the 300 series has the same seat bolt pattern. I am very pleased with the seat it has the heavy rubber type cover and sets very good.
-
2 pointsThere fixed that too...
-
2 pointsNot a real Lead Sled but a lead plow horse for sure
-
2 pointsEXACTLY. HAHA. 😂
-
2 pointsIt does 😀
-
2 pointsGlad you said something Cleat. Thought maybe we have to have another ungly seat contest Black duck tape is all I can tell ya Don. Sometimes hard to find a replacement that takes those arm rests. I've learned to live with ugly seats.
-
2 pointsI didn't take it that way, no problem. The "give up" corner is full for now, so keep
-
2 pointsLooks like it should be a 1971 Workhorse 800
-
2 pointsEven if this was true I don't think I'd want to buy them since they would be made by Made To Die
-
2 pointsIf anyone has any pictures of Duke please add them to this topic . Pictures of either the 520 - H or the C-120 Snowchucker projects would be nice. He also had a nice 417- A he did a refurb on . I know he had a lot of older WH tractors as well. I will try to add pictures as I come across them if I can. I think he would like that. Thanks Guy's.
-
2 pointsApril fools
-
2 points
-
2 pointsHa Ha, I'm glad that terrible mess was taken care of. The poor seat needs some love. On a positive note, I like how high your blade lifts on the 418. My 520HC does not go that high before it contacts the tractor (where abouts I can't remember right now).
-
2 pointsI made an @Achto, Wisconsin approved bench mill/lathe combo out of a death wheel on a hand grinder and ran it atop a skill saw blade. I trimmed up a yank start ring and installed it on top of the cooling fan screen. The larger diameter makes starting easier and the recoil has given me fits since we put this tractor together. In preparation for the plow day next weekend, I replaced the clevis hitch with a slot hitch, so I can run a longer plow that I have available.
-
2 pointsDefinitely has more traction than the right wheel I had on it.
-
2 pointsThey finally caught it. It's all safe & sound. I ever mention that I can't eat kangaroo meat? It makes me jumpy
-
2 pointsSo sad to hear. I really need to finish the front end loader he started, I’m so close. He was one of the first few semi-local guys I met in this hobby, and we talked for about 2 hours it seemed while I was picking up a tiller from his house. Momma wasn’t quite impressed with our ability to never end the discussion, and neither were my young kids in the Suburban
-
2 pointsThe only guy I ever knew that had a Hula dancer in the cab of his snow chucker.
-
1 pointSee if you can get the engine pulley too. Hydros have a larger engine pulley than gear jamers.
-
1 pointI recommend getting out a voltmeter and start testing. Battery first and then onward.
-
1 pointA six speed would be an easy swap because the brake linkage is the same. If you have an extra GT-14 axle and differential around they could go into the six speed for the limited slip feature.
-
1 point
-
1 pointJim thanks for starting this post. I like looking at all the members being there.
-
1 pointthank you guys as always
-
1 pointTo all Vietnam Vets and Vietnam Era Vets, thank you for your service. Today is Vietnam Veterans Day. I was reminded of this by an email to pickup a free sandwich at Mission BBQ today. Just walk in and show a copy of the email or your credentials.
-
1 pointI never had the pleasure of meeting Duke but wish I had. May God be with his family and comfort them during this time of loss.
-
1 point2 strokes are pretty simple engines and fairly easy to revive if they weren't abused or run without oil in the gas. No need to take them somewhere because you definitely have enough skill to go through them yourself. Quick search on the Jonsered. https://www.ebay.com/sch/i.html?_nkw=Jonsered+CS+2171+rings&_sacat=0&_from=R40&_trksid=p4624852.m570.l1313
-
1 point
-
1 pointYes. Sometimes I use rubbing alcohol and a few drops of black India ink with a drop or two of liquid dish soap to help break surface tension. I have used thinned black paint from the small bottles Walmart sells. Often times, the guys who know what they are doing, use chalk to streak below windows and represent rust down sides of buildings--and I may try something like that this time. I think they spray it with clear matt sealer to keep the chalk from getting disturbed. The ink and paint fill in the depressions helping give contrast. Below is a train tunnel. The brick are the same foam board the building is made from. I used a wash over the brick and the mountain the tone down the brighter colors. The white that represents sunlight is white paint dry brushed to give it highlights. Grass is greening up and I've spot mowed this week after I did my annual check up of the mowers. I'll likely spend less and less time on the building as warmer weather arrives. It will likely be next winter before I complete itl
-
1 pointOne of the advantages of using styrene is that "too late".... isn't. I can definitely add another piece to the back here. I knew about the ability to mold the sheets (That's likely how I'll make the front and rear fenders) but not what to "wrap" on to. I'd need to create something with a different convex in the up/down and left/right directions. It would also need to be such a slightly and thin taper I'm not sure how to accomplish the task. Wood would be to thin I think 🤔? Perhaps it's a @Wheel Horse 3D job?
-
1 pointGot the project tanker trailer back on the desk this morning. Last week I used a black marker to accent where all the visible defects and mold lines were in the plastic. Wet sand those marks off. Wash & dry, then recheck the surface. Mark more if needed. I found this method on YT. Seems similar to the way @Achto uses different primer colors to find highs and lows. Works excellent.
-
1 pointI just looked up a 512 D. I need one!!!
-
1 pointHere's an excerpt from one of the engine builder guys: The 12 and 13 fin 16hp Kohler blocks - The 12 fin Kohler K-series and Magnum engine block models K341/M16 (16hp) have an indentation in the cooling fins (clearance for a straight oil fill/dipstick tube) and a threaded hole towards the bottom of the cylinder. This block have a thinner cylinder wall than the 13 fin block. This block is most common, and used mainly for light duty lawn and garden equipment applications, and can be safely bored up to a 3.825" [pulling] piston without danger of seriously weakening the integrity of the cylinder wall. But the 13 fin Kohler engine block model K341 (16hp) have a thicker cylinder wall. This block is somewhat rare, and used mainly for heavy duty industrial applications and can be bored for a much bigger [pulling] piston, up to 4-1/8". Both blocks originally have a STD cylinder bore of 3.750


This leaderboard is set to New York/GMT-04:00