
Leaderboard


Popular Content
Showing content with the highest reputation on 01/29/2026 in all areas
-
9 pointsAnyone heard from @953 nut ? I'm missing his daily post.
-
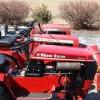
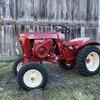
8 pointsWow, $400 for the hub caps and a free 416H.
-
7 pointsThere was this big WH auction years ago. Mostly rollers and attachments and a pile of engines Plus some office stuff was sold. Amongst the office stuff were 2 tractor trailers. A Nylint WH truck and a Goodyear truck. Both in the box. The bidding started for "choice " of the trucks. I was bidding against another guy who looked like he was buying one for his small boy who was there. I think I went up to $60. and stopped. So I figured the boy wanted the WH one. He chose the Goodyear. The auctioneer stared the bidding again for the WH and I bid $20 and no one else bid!
-
7 pointsEvery valve I have pulled had a partially clogged and collapsed screen so I always remove the screens so any dirt can pass thru the valve to the inline filter that I can easily replace. I have thought of replacing the valve and grommet with a 1/4"NPT bulkhead fitting that would have a much larger opening that would allow the dirt to exit the tank to the filter. May have drill and tap the tank boss to accept the bulkhead fitting. I have an inline filter near the tank and near the carb. with the epump in between the two filters. The plastic tanks are not as bad as the metal tanks, but they still get dirt from the funnels and cans used during filling.
-
6 pointsNot a darn thing, it's too cold, BUT, with the advice of 2 members I consider my mentors, I bought a 416H for $400 and the front blade rear axle bracket for $40. @ 55lb wheel weights for $50 & 2 smaller Sears lawn tractor weights & chains for $55. Only issues with the 416His the seat strut. screw missing from fuel pump & hydro creeps. Now I need ideas how to mount the smaller weights on the draw bar. Is something missing from the parking brake lock lever. Seems awfully short? Ordered the missing seat bracket.
-
5 pointsI sent a text to the number I have on file I will let you know if I receive a response.
-
5 pointsEatons in particular, act very different from cold to warm. It's best to drive it around for 15 mins or more to warm it up before jacking the rear wheels and adjusting the cam. Even then, I have to set my brake just to be sure it won't creep. Looks like a solid tractor. Rare to see hubcaps nowadays that are relatively rust free. That tells me it was stored indoors at least. I certainly would have grabbed it for the same price you paid. Well done! Change all your fluids and filters and put it to work!
-
5 pointsFender ready to be installed. Fender hardware and seat gas lift bracket ready to be installed. Tractor ready for fender to be installed. Tail light connectors greased. Tail lights plugged in and fender sat in place ensuring no wires are pinched. Seat gas lift bracket loosely installed so fender can still be moved around. Electric tooth washer sat in place to ensure good ground for tail lights. All fender bolts loosely installed. Fender then properly aligned so the seat mount bolt holes and fuel fill locations are lined up. Fender bolts torqued to 120 in/lb. Fender installed. Fender installed tail lights turned on.
-
4 pointsI've been getting back into scale model building a bit. I started when I was 8 and did quite a lot for 5 or 6 years. After that I've been poking at them every few years since. For several decades I've been collecting and storing the future projects. I'll be keeping this thread as a record of what I'm up to. Please do feel free to post your own. One of the things I've wanted to build for many years is a model of what my Ole Man drove from back in the mid 1980s. Oil tankers that delivered #6 factory oil. 3 years ago this April I bought an IHC 4300 tractor by AMT and Testor's reissue of a 1960s tanker trailer. I got to measuring the trailer. It's designed to be built as either a single axle short tank or add the extension and use 2 axles to make a longer trailer. Still..... really not that long even for 1960s rigs. Then I got to wondering.... what if I had two trailer kits.... If the tank rear is meant to glue on either the front section separately or the rear section in combination - why can't I use a second kit for a rear extension?? So here's something neat. Look at the tank tops here. The left side is 8.25" long. The 2 right pieces are the back half of TWO trailer model kits. If I add the second back half to the first back half added to the front half ... It comes out to a scale model size of 21.5 inches total length. I remember pretty well that Bruce's oil trailers were 45 feet long. An odd length even back then. This model scale adds up to 44 feet and 10 inches!! This is the model kit of the tractor that I have. My Ole Man drove International S2500s. This is a 4300. Same basic shape but this model is a little longer nose. That was IHC's fancier road tractor back then. The 2500 series was the worker of the fleet. I'll take the chrome off the grill and only use one exhaust stack. The sleeper will be removed in favor of a large hydraulic pump. That basically turns it into an S model. I'd like to go weathered & worn. Never done one.... Tank will likely be a faded aluminum with stains. Internet find picture: This was one of several late 70s IHC S models that the company had. At least 2 were green on a red frame. That's what @Qball drove. Odds are almost 100% he drove THIS TRUCK. Stay tuned.....
-
4 pointsDone
-
4 pointsWith the supporter program, I have most addresses and phone numbers. Anyone can opt to add their contact information into the system, even without being a supporter. This doesn’t answer your question exactly, but I do have many phone numbers and addresses. The other thing that could be done is to create another forum similar to the talk to the moderators where anyone can enter their contact / emergency contact information and it would be viewable by only admins. If this is something which people would like, we can make that happen. Hopefully we hear from Richard soon. https://www.wheelhorseforum.com/clients/info/
-
4 pointsYes, he had it in a garage, I was like a kid in a candy store. He has tractors & parts out the ying-yang. 45 minutes from me, We're gonna be best buds,
-
4 pointsYou may already know this but the U-shaped clip to retain the link must have the U-end facing the direction of chain travel. If not a piece of ice can easily push the clip off never to be seen again.
-
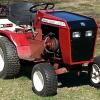
4 pointsMy wife surprised me with this for my birthday.
-
4 pointsWas at a horse auction and there was a NIB one there. Says Jim you gotta bid on this. Bidding went up to 25 and was already thinkin of where to display it. Suddenly bidding took off and ended at over 100. Did I mention I HATE auctions.
-
4 pointsI have that truck too. along with the box.
-
4 pointsVentilation for a belt guard ala @cleat with a Greenlee punch. Bit different pattern Cleat but should work. Coulda had the spacing a little closer. Deburred with a step bit. Speaking of step bits... @Pullstart was here...
-
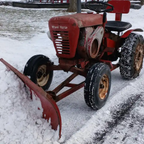
3 pointsAfter the walloping we got Sunday into Monday I used Mongo to clean up. Mostly it did great but it started running rich. I think the snow was so fluffy it was getting in the air cleaner. Wanted to use it the next day to clean up the plow berms at the end of the driveway and the bendix wouldn't engage. Took the cover off and there was a nice chunk of ice in the tin. Cleaned that out and still no engagement. I ended up using a propane torch on the end of the starter for maybe 10 to 15 seconds. That was all it took.
-
3 pointsWill be watching your progress on this Eric. When I was younger my fascination with cars & trucks was lived out through scale models. At one time my collection included every year of Corvette from '53 - '86. My big passion laid with the 30's - 60's though, specially 55 - 57 Chevy's. I do have to admit that there is a particular Ford that also held my interest, that would be the '53 - '56 Ford truck. These fat fender beauties are just a work of art. A gave most all of my models to my wife's brothers. Honestly I haven't seen them since. Don't really want to know what happened to them.
-
3 pointsYes, I would like to see this happen.
-
3 pointsPer @WHX??, I'm going to let the snow threats blow over and then crack the head for a peak inside. I'll post pics. I'm hoping I can get enough measurements from the cylinder to give me some confidence in it's condition. As is, the tractor run's like my grandfathers '74 c160 did in the early 80's. Hydro appears to be very solid. Appreciate the heads up on the balance gear. Thanks to all.
-
3 pointsHow big a deer did you get? My 1967 Lawn Ranger upgraded to a 7 hp HH70 hauls a 750 lbs wagon load of coal up a hill in third. Traction is the issue not torque.
-
3 pointsIt might be easier to seek out a six speed transmission or an 8 speed transmission. The six speed is a direct bolt in except for the little hole you have to drill for the hi-lo lever, the 8 speed you have to do a little more modification for the brake linkage and still have to drill the hole. Another benefit of the 6 speed is that it has a limited slip differential, the 8 speed does not. We put a six speed in our 854 and I love it, @Handy Don and @ri702bill have experience or at least some pointers. Or, depending on the model of roundhood, I can speak from experience that the 7 and 8 horsepower Kohler engines already have a crap ton of torque and my 8 horse can move the D.O.T snowpiles at the end of the road and barely even grunt. The main thing you need is traction. If you don't have traction that's when you'll have trouble. *Edit, I reread the topic post and realize that this is for an 854.
-
3 pointsWel Well played. Fair prices for a good machine. If you can, avoid adding weights on the drawbar. It’s a pulling hitch, not a lifting one. Lots of examples here of stronger rear hitches using the rear plow mount bolts. Couple pieces of angle iron and some simple welds (or even bolts). Even those of us without dedicated snow machines tend to leave the plow mount on year-round.
-
3 points
-
3 pointsI hope all is well.
-
2 pointsYes. Just drop the pan. The bottom gear can be reached with snap ring pliers. Top one depends on the throw of the crank as to how much of a pain it is. Probably easier to break that one. Just don't leave any debris in the case. But both shafts will (can) be left in place.
-
2 pointsAre we installing microwave ovens and moving color tvs now?
-
2 pointsHere is a Receiver Hitch I made for my 520 with a Eaton Hydro. That was back eight years when I could still see to weld, It's built with 1 1/2" x 1 1/2" x 1/4" angle. The braces down to the transmission are loose (not welded to the hitch, once in place they can't move.)
-
2 pointsYes I have remove them from 2 engines. The lower gear I could get the snap ring off and remove. The other I split with a sharp rap on a cold chisel. I was soft of amazed how easy it split with a sharp cold chisel and a solid, but not pounding blow. Some like to drive the shafts inward to remove them, then reinstall the shafts. To each his own
-
2 pointsI still listen to 50’s,60’s,70’s,80’s,90’s and some recent stuff that changes daily. It depends on the day.
-
2 pointsYes, no response yet.
-
2 pointsI can assure you that the #40 chain I had in garage did not fit on the sprockets. And....the #40 master link I had didn't fit either.
-
2 pointsI guess it's true we (meaning me) can learn something new every day!
-
2 pointsThey went to #40 chain in 1971 for the 32" snowthrowers.
-
2 pointsIt's been a few months since I put a new starter on the K-181 for the reborn B-80. I purchased the rebuild kit for the old one but have yet to find one with the correct bushing on the gear end. The brush end was correct. This morning I just decided to clean it up, lube the bushings and put it back together. It's just going to be sitting on the shelf as a spare. I cleaned up the important stuff, put new brushed in and reassembled it. Leave it to an old electrician to use a 4" sq cover to whip up a hold the brushes down while you put the end cap back on tool. It worked great. Tested and It's good to go.
-
2 pointsYour pictures and story remind me of an Eskimo joke involving a brown spot on an igloo blanket. Long story short, when peeled off the blanket and thrown into a fire, it made a PPPFFFTTT sound...
-
2 points(Uses #2175 - # 41 chain Pitch 1/2" and roller width 1/4")
-
2 pointsWork on a 520 Ed Dog entailed taking out the gas tank. Full tank so drain it into a gas can and barely dribbled out. Took a day to let it run out. Pulled the rusty gas cock to check & replace an aged grommet and found @Bill D 's plugged strainer. I have been known to take off the strainer Bill figuring the inline filter will do it's job. Maybe not a good idea but the replacement valves have no screen.
-
2 pointsThis assumes you did a good job getting nearly all of the old oil out. There is a “hump” in the bottom of the transaxle that’ll hold back as much as a cup of oil unless you lift the front of the tractor at least a foot off the ground (safely) while allowing the transaxle to drain.
-
2 pointsI second the removal of the balance gears. On an automatic tractor you'll need to keep the RPM just below the normal 3600. I run mine at 3200, 3300 and it does well.
-
2 pointsWell it does look pretty, but personally I worry about function a lot more than appearance. 😁
-
2 pointsTwo theories on that one: First- Kohler installed them in K301, K321, K341. Then in M12, M14, and M16 engines to reduce vibrations associated with a single cylinder flathead engine's combustion cycle. Secondly- When the before mentioned engines reach a certain amount of wear, the gears work well for opening ventilation "windows" in the block. AKA "grenade gears" as they are commonly known. All that being said: When the bearings and shims are replaced as per the service manual (and properly timed), the chances of them failing is greatly reduced. But many don't keep up with the wear on an old Kohler and don't rebuild it until the engine is just about worn out. Those tiny needle bearings don't always last as long as the rest of the components. So to prevent worry in the future, some folks just remove them. I've done it myself and while it will be evident on a K341 it eliminates the worry of destroying the engine if a balance gear decides to change places with the crank.
-
2 pointsThe snow blower wouldn’t fire so it was all up to the charger.. never skip the beat!
-
2 pointsThe 520H had been acting like it was starving for fuel during the tail end of the last storm clean up. I actually had to leave the warm cab and brave the cold to finish with the 312H. I had installed an epump last fall and she had been running fine till now. Time to find the problem before the next storm that is coming this Sat. I pulled the line off near the carb and turned on the epump and got barely a dribble. Nice thing about the epumps..you don't have to crank the engine to check for good fuel supply. So, I went to the other end and pulled the line on the fuel tank petcock....not even a dribble. from the tank. The petcock was clogged with dirt. A good cleaning of the petcock and flushing the tank and back together and running like a happy ONAN should. When installing this I like to coat it with vaseline then just start the valve in the grommet before pushing the grommet into the tank then push the valve barb into the grommet.
-
2 pointsLED tail light ready to be installed. Cover has been removed for assembly. LED tail light showing how wires had to be routed. Wires will pass through the outside set of holes in the fender. Tail light hardware ready to install. Fender ready for tail lights to be installed. Tail lights loosely bolted to fender with wire out through the outside holes in the fender. Tail light ready for ground lug to be soldered on. Tail light ground lug soldered on. Tail light ground lugs heat shrink installed then they were bolted on. All four tail light screws tightened. Tail light wire soldered then heat shrink installed. Tail light wires soldered together and wire installed that plugs into tractor wire harness. Heat shrink installed. Tail lights powered up using a test battery. Tail lights covers installed.
-
2 pointsReal nice ... wife got any sisters?
-
2 pointsFront wheel greased then the hub cap was installed.
-
2 pointsLooks like it came with the super rare cutting board belt guard !! 😂👍🏻
-
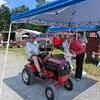
2 pointsLast night I replaced the transmission drive belt with what I believe is the proper one P/N 7473 on my 417-A. Today I took it out to blow the driveway and it worked fine for about 15 minutes. Then I heard a noise and knew something wasn’t right, so I headed back to the garage. I found the belt had jumped off the pulley and was wedged between the transmission and the pulley. I’ve never had this happen before? There’s two different part numbers given for that belt, I want to confirm this is the correct one? As I was investigating this problem my pager went off for a mutual aid fire call. This was in the height of the storm, to a neighboring department. A department that rarely calls for our help, stating a garage and multiple structures on fire. I am one of the senior members and truck drivers so I was the operator for this alarm. We actually had to follow the town snowplow to get there. The young man in the passenger seat got on the siren, so I yelled at him and said you idiot do you want me to pass him so we can get stuck and not get there? He apologized and I told him in this case slow and steady wins the race. We didn’t get done until dark so my driveway will have to wait until tomorrow, I wasn’t going to have trouble with the tractor in the dark with it still snowing and sleeting. That’s me in the blue coat, I don’t wear turnout gear when I’m driving as I find those big clunky boots unsafe to drive with. IMG_4058.mov


This leaderboard is set to New York/GMT-04:00