
Leaderboard


Popular Content
Showing content with the highest reputation on 01/14/2026 in all areas
-
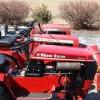
12 pointsEarly birthday present for myself. Not perfect, but for the price I couldn’t resist.
-
7 pointsGot it apart, what you think? A little JP Weld might work. Got a cat scan done, confirmed, cam fubar.
-
6 pointsFront tach and hood pivot ready for assembly. Front tach lock assembly ready to install. Front tach lock and shaft partly inserted then E clip installed. Front tach lock spring slid onto shaft then shaft full inserted and E clip installed on opposite end from spring. Front tach lock slid over on shaft then the final E clip installed. Front tach lock release grip installed. Front tach latch assembly ready to install. Front tach latch pin has one E clip installed and is greased. Front tach latch pin slid into place and second E clip is installed. Latch shown in open position. Hood stop rod of my own design ready to install. I think Wheel Horse dropped the ball a bit on this design as the cotter pins get hit by the hood brackets. I use a solid 1/4" rod (you could use the original for this) slid into a piece of 3/8" tubing that has one hole drilled through to accept a cotter pin that holds everything together. Mine are all stainless steel but that is not required. Hood stop rod installed ready for cotter pin. Hood stop rod fully installed. Hood pivot assembly ready to install. There was some wear in the original rod and pivot brackets so I drilled the brackets and housing to 1/2" I then made up a 1/2" rod with holes drilled to accept cotter pins. Hood pivot shaft partly inserted and Right pivot bracket slid onto shaft. Hood pivot shaft partly inserted and both pivot brackets and washers slid onto shaft. Hood pivot shaft fully inserted and pivot brackets and washers slid into place on shaft. Hood pivot cotter pins installed. Front tach and hood pivot assembled. This is the tool I use to install the E clips.
-
6 pointsJanuary 14, 1952 "Today Show" premieres with Dave Garroway & Jack Lescoulie on NBC-TV.
-
5 pointsToday I took a portable train layout for an assisted living facility for show and tell. I had some pictures projected upon a screen of how I made some of the items and a video of my layout at home. Talked about how I got into trains (wife's uncle passed and left them to us). Answered questions how I made mountains, buildings and other items. I anticipated spending 30 minutes or so and ended up over an hour. The residents (some 20 of them) seemed to enjoy and appreciate The activities director asked who and where they rode trains. Interesting stories. Lots of laughter and memories for these folks. One funny part. I normally run my trains pretty slow--just looks more natural. Someone asked "will it go faster?" Another "Yeah, lets see it go fast." So I opened up the throttle and nearly all of them cheered! Not too bad for a 79 year old engine.
-
5 pointsI was settin' in the shed havin' my 1st coffee & a cigarette. A reply in my original post about the exhaust valve kept eatin' at me. "Looks like a food fight goin' on in there". I got to thinkin', carbon is black, this crap is brown. I got a pick and poked around; it crumpled. I have never seen carbon crumble. I remembered the homemade muffler had some big holes in it so I removed it. Fired up the air compressor, put on a 12" blow nozzle, stood back & blew around the exhaust. Crap went everywhere, then a mud dubber nest came out.
-
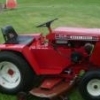
5 points$300 is what I gave for this C-141 Auto - and it came with a mower deck. Have patience and seek out a better deal.
-
4 pointsVery nice. I use a combo platter of hammuh 🔨 ⚒️ screwdrivah 🪛 and call BBT.
-
3 pointsI like trains.
-
3 pointsYah she's a humdinger, she has to be right in the middle everything. Found the camshaft, cleaned it up, should work. Will clean up the block, new gaskets, couple seals, I already rebuilt the fuel pump, and carburetor. Had to make bushing NLA, come out great, new shaft and made some foam gaskets out of a pre air filter .
-
3 pointsMy grandma used to say "all the Lord's creatures serve a purpose", but I have yet to uncover what some of them are...
-
3 pointsNo doubt. What a fantastic documentation and resource.
-
3 pointsNice catch CD
-
3 pointsThe "food fight" comment was mine. I'd say that if not cleaned, the exhaust would have been a mite restricted. Best to find that stuff now. And luckily none of the winged critters were home.
-
3 pointsI have mine still in the box. Pd $20 at an auction!
-
3 pointsYeah I saw that. I picked this one up on eBay for $41.
-
3 pointsLove the CAT scan
-
3 pointsAnd can be used to set the seat back a couple extra inches.
-
3 pointsAll used same hydro. This manual cover it pretty well. You should also look at the D series manuals as the manifold system show up better there than in this manual. Also look the the pinned post at the top of this forum for o ring and seal numbers for Sunstrand hydros
-
3 pointsLooks like a 78-79 C series going by the hood stand. But who knows, it’s been built with all sorts of parts. Worth $300? Nope
-
3 pointsFinally got a chance to take the rear end apart had one bearing from the outside looked iffy talk to a few of you guys said split the transmission took it apart needle bearings fell out found all but five I believe went through the pump before I got the pumps rebuilt cleaned it all out put a new gasket on redid the transmission filter and back together. Thanks for all the guys for the help sure appreciate your input over the years.
-
2 pointsMy new C-145 Auto came with a real nice seat. It’s new or like new, made of rubber and not vinyl so it’s still flexible in the cold. Would love to find another, but can’t figure out who made it. The only clue is the word PERSONS in the rubber (see picture). It even has the correct bolt pattern for our tractors!!! Anyone know who made it? Or does anyone have the same seat that might have a brand name sticker under it.
-
2 pointsOther day I was helpin @Achto with a K91 and there were dauber nests in the head & engine fins. I tried digging them out of the head with the jack knife and they were like concrete. Them devils can be worse than mice. I've got outlets in the overhead of the lean to on the warehouse for battery tenders and every one the ground hole was filled with a nest.
-
2 pointsSold one just like that at the show last year; it came out of the recycling yard at work. It came off of a Wal-Mart jazzy scooter, had the correct 7 x 7.5 bolt pattern.
-
2 pointsMe too.
-
2 pointsUpdate: $250 for seal kits and fluid (might still need a little more fluid) and a week (8 days from order to receipt of parts) of twiddling my thumbs, but I think it's fixed: This is actually the second trip up, I put it up last night too, so far no leaks found.
-
2 pointsThey provided targets for my Red Ryder in the pole barn i had when we lived in Ky. Got pretty good at knocking them off of the rafters that way.
-
2 points@jsoluna That post is THE definitive reference for your front tach o matic.
-
2 pointsHmmm. is the cam the source of the problem or is it the victim here?? Did you break the connecting rod?? I ask because I bought two C81's years ago. One ran but was tired; the other broke the connecting rod, snapped the cam in two and blew out the back cam mount. And ventilated the block bigtime. I did save the head, flywheel, tins, oil pan , points & coil though...
-
2 points1.5” square tube can also give the seat a bit of extra height for us folks with longer lower limbs.
-
2 pointsNot that I am admitting The Squonky is right but ... yeah some so us are as pure of tractor as we are of mind ... It's a procedure where you have a piece of plate glass with a sheet of say 400 grit or better wet /dry emery paper taped to it. It provides a surface that you can sand the halves flat . Note KP's pic where the half is slightly warped. Glassing removes them. I prefer to do it wet as it floats away particles. Same procedure for glassing a head & plenty of you tubes on doing it. If you overtighten the the screws it will squeeze the diaphragm too much at the corners leaving a gap where those warped areas are. Extreme overtightening can even warp the halves further. On doing a head ... same principle headgasket.pdf
-
2 pointsI absolutely love these tractors. I will enjoy following along on this one! I just realized, I’m in trouble. Now I want one. 😇
-
2 pointsSure can. I've used plate steel and square bar stock in the past. I'd also recommend getting some proper sized good quality fender washers for the bottom of the pan/fender to help spread the load.
-
2 pointsLooks to have a Honda or Honda clone on it. I don't think it's worth it because it's missing lots of OE parts.
-
2 pointsLooks to be a mutant. Incorrect engine, questionable front wheel modifications. The biggie - no belt guard. Missing one or both foot rests. Only worth it if ALL the OE parts come with it - in useable condition. My
-
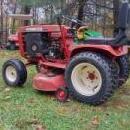
2 pointsMy wife recorded me plowing snow on Dec 11 but I just got the video from her now to post it. The 520HC worked well as always.
-
1 pointDid you take the keys? Be prepared for some folks to slip in and run it!
-
1 pointMe three
-
1 pointWe got one a couple of years back for the camp tractor and then my sone decided to swap with the one on his 312-H--claims he’ll get more use out of it. A huge advantage for us was that the rubber cover was easily removed/reinstalled when installing & wiring the rear-facing work light attached to the upper part of the steel seat back.
-
1 pointDefinitely the C160 if you're planning on a hydraulic setup at the rear. My Bronco is basically the same, and I just added a D series spool valve to control the rear separately. Plus the Sundstrand has 4 bolts on to to work with attaching fabrications to. Not sure if that black hood has an Eaton or not, but those only have two bolts to work with. I just fabbed a 1/4 inch plate steel toolbox and added pivots for the upper lift arms and a seperate cylinder. No way that same design would work with (1) a fuel tank under the fender and (2) no room with an Eaton.
-
1 pointIm a C160 With the k341 Kohler fan so my vote goes to it.
-
1 pointWe drove over to the Grand Rapids area for my post op appointment for last week's eye surgery. All is well, restrictions are off, just continue the eye drop regimen for 3 more weeks. Got back to my temporary winter tarp porch enclosure for the lake house. Got the framing to where I think I need it, then started hanging the first tarp. Had a pretty good breeze today. Didn't help at all hanging the tarp, but it did point out that my initial idea to hang the tarp wasn't going to work. Going to try plan B tomorrow.
-
1 pointHere is a good source for pulleys. You will need to know the outside diameter, shaft size & belt width. Then find one that matches. https://surpluscenter.com/search.php?search_query=pulleys
-
1 point.No point touching it until the “Why?” and “If removed, then what?” questions had sensible answers, right? Like the Aswan--either the planning never really fully grasped the silting situation or addressing it wasn’t sufficiently remunerative to the decision makers economically or politically.
-
1 pointWhat, no hydrogeology study? Not even a perc test? Yikes. I guess that’s what you get for surmising in lieu of testing.
-
1 pointTodays adventure - rebuild the steering system. To start off I turned a portion of 5/8" stock down to 9/16" and threaded it to 12 pitch. Next drill a hole in it and tap the inside of it to 3/8-24. Then use a parting tool to cut it to length. OK, what am I building here ?? Remember the fan gear that the PO messed up by welding the drag link to it? The hole in it was too large for a heal-a-coil. So I tapped the hole in it to 9/16-12. What I made was an insert to repair the require 3/8-24 hole in the fan gear. Inserted with Loctite plus I peened the edges to ensure that it does not move. Next - take a peace of 5/8" x 4.5" stock, turn a 15/16" length of each end down to 7/16" and thread it to a 20 pitch. One new drag link. Now for the tie rod that was butchered up. First off, position the front axle and spindles so that everything is held strait. Then cut a 1" x 5/16" flat bar to length. Use a transfer punch to mark the outer holes. Drill the 1/2" holes in each end and the 3/8" hole for the drag link and test bolt things together. Looking good, now it was time to turn the two 1/2' bolts into part #3949 clevis pins. Cut to length and then drill an 1/8" hole 1" deep into the end of the bolt. Drill & tap the end to 1/4-28 to a depth of 3/8" for a grease zerk. Drill an 1/8" cross hole to meet up with the 1/8" length wise hole so that grease can get to the pivot point. Front end repaired & almost ready for some paint.
-
1 pointMy apologies to Richard for pirating his Betcha Y'll didn;t know #9. But, when mentioned Aswan High Dam, you opened 47 years of memories in this old brains storage shed.
-
1 pointhttps://www.amazon.com/Ciuouient-230675-Diaphragm-Rebuild-Compatible/dp/B0F1XYDS4B/ref=sr_1_4
-
1 pointGot only 6.5” and the blower made quick work on clearing most of the driveway, followed it all up with the plow and viola, all clean! Definitely need the sun to come out
-
1 pointHmm.. I find all that to be too much work for R&R the deck - I always just slid it in from the side (which side depends on which side the deck height adjuster is on) far faster than hooking up a lift... As far as a lift for service work, I've been thinking to make one (out of wood, who needs steel.. other than the hardware and lift screw) just so I'm not bending over my tractors for extended periods (hard on my bad back) but as infrequently as I'd work on my tractors, I just can't justify the shop space one would take up..


This leaderboard is set to New York/GMT-04:00