
Leaderboard


Popular Content
Showing content with the highest reputation on 01/10/2026 in all areas
-
17 pointsI figured I should get in a ride while the getting is good because of the uncertain weather conditions nowadays. I used the Side x Side to pack roughly 6 '' of snow on the ground. The 418-A is my mowing tractor and it's nice to get behind the wheel with no mower deck and wind it up some. This was on Thursday after lunch.
-
11 pointsSo as may of you know in September I bought a 1257. We fully rebuilt the transmission. I got a new ignition switch a few weeks ago and put that in. Then we got snow so it got pushed to the back. Today we finally brought it back in. Cleaned the points and it fired right up. More to come later today. IMG_1453.mov
-
10 pointsJanuary 10, 1899, The invention of the dry cell battery and miniature incandescent electric light bulbs made the first battery-powered flashlights possible. Patented by David Misell the first flashlight was powered by “D” batteries laid front to back in a paper tube with the light bulb and a rough brass reflector at the end. The company donated some of these devices to the New York City police, who responded well to them. Keep shining a beam of light into the history of this bright idea. If a flashlight malfunctions it is known as a @Sparky
-
9 pointsHey folks , I haven't been as active here as I once was ( apologies ) . I have been busy . This happened to me this week and I remembered there are "birders" on this forum . Last Wednesday while at work , myself and two coworkers were just shooting the breeze out in our drop lot when something caught our eyes . It was a seemingly injured bird hopping along the fence line. Birds of prey are very common in the city . They hunt the pigeons that nest nearby. We decided to call the SPCA and they forwarded us to the DEC. About 1/2 hour later a woman from the DEC shows up and she can't catch him. My 2 coworkers had left and I decided to help her as she was about to give up . She threw a blanket to me over the fence and told me what to do . I managed to toss the blanket over him and get ahold of both his feet .I carried the bundled injured little guy over to her Jeep and slid it into a pet carrier. He looked in pretty rough shape to my untrained eye . I gave the woman my info and asked if she would keep me updated. This afternoon I get a call . The bird was taken to our SPCA and is doing "quite well". She sent me a pic . He's about a 1 year old Coopers Hawk. He's gorgeous.
-
7 pointsTodays adventure - rebuild the steering system. To start off I turned a portion of 5/8" stock down to 9/16" and threaded it to 12 pitch. Next drill a hole in it and tap the inside of it to 3/8-24. Then use a parting tool to cut it to length. OK, what am I building here ?? Remember the fan gear that the PO messed up by welding the drag link to it? The hole in it was too large for a heal-a-coil. So I tapped the hole in it to 9/16-12. What I made was an insert to repair the require 3/8-24 hole in the fan gear. Inserted with Loctite plus I peened the edges to ensure that it does not move. Next - take a peace of 5/8" x 4.5" stock, turn a 15/16" length of each end down to 7/16" and thread it to a 20 pitch. One new drag link. Now for the tie rod that was butchered up. First off, position the front axle and spindles so that everything is held strait. Then cut a 1" x 5/16" flat bar to length. Use a transfer punch to mark the outer holes. Drill the 1/2" holes in each end and the 3/8" hole for the drag link and test bolt things together. Looking good, now it was time to turn the two 1/2' bolts into part #3949 clevis pins. Cut to length and then drill an 1/8" hole 1" deep into the end of the bolt. Drill & tap the end to 1/4-28 to a depth of 3/8" for a grease zerk. Drill an 1/8" cross hole to meet up with the 1/8" length wise hole so that grease can get to the pivot point. Front end repaired & almost ready for some paint.
-
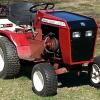
7 pointsSoft start clutch controller works well for this issue. I've used one for 8 years and it works great. I didn't use hydraulics on this one but it can be done! Not a C-series but has alot of those parts in it.
-
7 points
-
6 pointsDepending on the implement being driven by the PTO, the instantaneous engagement of an electric clutch may be an issue; better done with the traditional lever type where you can ease into it. All I use are lever style. My ...
-
6 pointsExhaust covers and air deflector ready to be installed. Engine ready for exhaust covers to be installed. Right exhaust cover tucked under side cover as it was originally. Right engine lifting lug loosely bolted through exhaust and side covers. Both lifting lug bolts have never seize applied to threads. Left engine lifting lug loosely bolted through exhaust and side covers. Note the exhaust cover is on top of the side cover on this side. Both engine lifting lugs loosely bolted through exhaust and side covers. Air deflector sat on muffler and loosely bolted to exhaust covers. Chrome muffler cover attached loosely with the two center screws. Chrome muffler cover attached to muffler with all 6 screws, this also firmly attaches the air deflector to the muffler. Note, all screws have never seize on the threads. Air deflector bolts tightened making sure that there is no contact between the exhaust covers and the intake manifold. Exhaust covers and air deflector installed.
-
6 pointsSmall improvement: I made a very simple 'thrust bearing' for the end of the puller's center bolt. I bored a 5/16"+ hole in the end of the 3/4-16 grade 8 center bolt, squared off the end of the bolt, cut the threads off of a partially-threaded grade 8 5/16 bolt, and added two 5/16 SAE washers. If I wanted to get fancier, I could have cut a groove in the shank of the 5/16 bolt for a small O-ring to retain it in the center bolt, but I figure enough is enough. A dab of grease will hold the 5/16" bolt in the end of the center bolt while the puller is being set up, and a bit of grease or anti-seize or other EP lube (ZX1?) on and between the washers would be a good idea when using the puller.
-
5 pointsWow... give a guy indoor plumbing and the lectricity and bam - you are so much more than a fried cheese curd... Beautiful work!!!
-
5 pointsAbsolutely beautiful trails in the snow! Always good to take the horses for a brisk walk on occasion!
-
5 pointsI've always just used crosbys whenever I use wire rope but it just isn't a 'clean' look so a couple days ago I picked up a swaging tool and some ferrels. It never even crossed my mind until I saw this thread this morning. Just might do it, huh guys? I've always done whatever seemed appropriate at the time when it comes to the larger wire terminals. I'm thinking that if this can crimp wire cable ferrels with the strength they do it will be fine on electrical connectors. I've got some speer-menting to do.
-
5 pointsPeople simply don't learn / understand that regardless of what form it takes, you can't get energy for "free". All energy transforms and comes at a great cost. Dams are but one example. Pick your poison. It is remarkable how many times I have discussed EVs with people who think that they are completely emissions free. No understanding of how electricity is made and transmitted. Same with wind, thermal, etc. I'm not anti EV - I love my little A-60 ...! But it ain't "green". And I don't mean JD green...
-
5 pointsas some of you may know ri702bill makes an 'F' plate reinforcement kit with gussets. top notch machining, welding and fitment. pricey? the way i look at it when your 'F' plate cracks and it will eventually if you plow how many hours does it take to strip the tractor and repair? what is your time worth? to me his kit is a bargain because it addresses a flaw in the wheelhorse design. it was easy to install and the 'F' plate will not crack now. by being proactive i headed off a repair that would require lot's of time and money to fix properly. .
-
5 pointsBattery showed up today
-
4 pointsI ran into DJ this morning, and he even bought me lunch and a coffee! Thanks @hcminis, it was great to run into a familiar face after a 4 hour drive for some car parts!
-
4 pointsI didn't tell you I installed a 6-71 blower on it ??
-
4 pointsGood looking rig! I’ve got a soft spot for the 60’s square hoods
-
4 pointsthe 520 hc is either 88-89 model -- has various features different than the H -- we located 2 a few years ago - one we sold, the other went to my grandson after we did some cleanup, rehab, fresh paint some places, plus maintenance on it - carb, manifold gasket, fuel pump etc - he uses to mow and plow snow plus decided to drive to school one day - typical of onans they need some TLC but it is an impressivce machine. Tractordata.com or toro online has some info - i have also attached some photos of the WH brochure from 1989 that includes the HC model - eg: the HC was 1.1 mph faster top speed than the H -- enjoy, Bill
-
4 pointsThey are cool birds ... used to have a couple around here and they did a good job of keeping black birds from raiding my sputzy feeders.
-
3 pointsSince I’ve got TONS of extra parts, I have been thinking about what to do with them. I had this idea that I could make a C-Series hybrid tractor. I’d like to have electric clutch, hydraulics, forward swept axle and gear reduction steering, Eaton 1100 or 5091 8spd? Maybe C-195 3pt? I don’t know what else I could do, but my end goal is to have a tractor I can plow, till, harrow, and snowblow with. I’ll get pictures soon of my parts selection.
-
3 pointsI built a hub puller a couple of weeks ago, which worked great (see below), but I thought I could improve upon it, so I fabbed up a new version, which has two advantages over the first one: It has a cavity for the hub spigot, so it can be bolted flat against the hub flange, which can add some rigidity to the flange, and it can be used with hubs that have been retrofitted with studs, as well as those that are still using lug bolts. Mine still has lug bolts, but I used a separate set of bolts and washers with the puller, rather than the lug bolts, in order to prevent any damage to the puller plate or to the tapered part of the lug bolts. The center bolt is longer than it needs to be, but that's what I had on hand. I put a dab of anti-seize on the center bolt threads. Previous version of hub puller: New version: Back of puller (I dressed the weld a bit, just for the heck of it): Front of puller:
-
3 pointsA buddy who is a scrapper called about this hood he picked up with some other scrap metal. Thankfully he called to see if we wanted it. I don't have a use for it but couldn't see letting it get crushed. Pretty straight, no latch or wiring.
-
3 pointsI have a soft start module on a Magnum 18 with an electric PTO. It makes a huge difference. I originally ran it with a manual PTO so I knew exactly how much of a difference it made.
-
3 points
-
3 pointsThanks for the help guys transmission is back together and everything is working great.
-
3 pointsMe too, as I would pass you on my 418-C that is 1.1 MPH faster 🤣🤣🤣
-
3 pointsAgree with Bill. I addition to bringing gold prices if you can find one this was not a good Wheel Horse idea. I understand the need for idiot safety switches, but IMO, the original PTO engagement lever used on the Raiders was the best. Looking forward to seeing this build.
-
3 pointsWell said Jim. Today around 70% of the US electricity is produced by steam turbines that are fired by gas, oil, coal, and nuclear. Solar, wind, and hydro share the production of the other 30%. These steam turbines can not be turned on and off to meet power demands. When I joined the Allis Chalmers Hydro Turbine Division in 1964 most of my work involved developing reversible pump turbines that would become the battery for these steam turbines. These machines would pump water to an upper reservoir during weekends and nighttime hours when power demands were low and drop the water generating electricity during weekday daylight hours when demand was high. I spent thousands of hours in the '60s and '70s developing these pump turbines in the model test lab. They included TVAs Raccoon Mt., Californias Oroville, Duke Energy Bad Creek. And after spending millions Con Eds proposed Cornwall project that was stopped by environmental concerns mainly about the migration of the striped bass. We have a local proposed Cuffs Run pump turbine project that has been delayed for years due to environmental concerns. The first 25 years of my work in hydro was developing efficient high HP turbines that were cavitation free. The last 20 years had the same goals but also much time and dollars were spent addressing the environmental problems. We spent a lot of time with the US Army Corp of Engineers developing fish ladders, fish bypass systems, and fully spherical gap free Kaplan runners for the Bonneville project on the Columbia river. All these efforts were to improve the salmon migration and reduce injuries. Also worked with TVA to develop the first Francis runner that naturally injected air thru the discharge edges of the turbine. This was done for the Norris Dam project in Tennessee. This greatly improved the DOL (dissolved oxygen level) of the downstream water and eliminated the cost of air compressors. Also developed self-lubricating bushings to replace all grease and oil lubricated bearings. IMO, the long-term answer for the all-electric movement will be Nuclear fired steam turbines (TMI is coming back online) with Pump / Turbine storage batteries. The nuke waste will probably be given a one-way ticket on a disposable ship to a distant black hole.
-
3 pointsKeep us posted on what you come up with. This one's in the shop now for multiple hydraulic leaks. Maybe try and clean up some hose mess. I think it was @Handy Don was asking about hard lines once and at the time I thought he was nutz. He ain't lookin too crazy now. Also fuel delivery issues including either electric pump or your route.
-
3 pointsThe hydro gearing on a HC is 22 to 44 reduction is 2 to 1. The 520-H is 20 to 46 reduction is 2.3 to 1.
-
3 pointsEnough for the seal and a bit extra. Seals after assembly...make sure yo cover the key way with some electrical tape to protect the seal
-
3 pointsJust don't get you "Hooby Dooby " caught in it!
-
3 pointsI have always considered that the earth's rotation was kind of like a car/truck tire. When out of balance you feel it and compensate with strategic weights distribution. Earthquakes and plate shifts plus vvolcanic events seem to be moving the earth's "wheel weights". Pole shift, that's a good point too. Guess I'd best be really careful next time I drive my Social Security check to bank, HA!
-
3 pointsDry-fitting assembly continues to check for assembly issues. I had to put all the pieces together, just sitting on top of each other just for some instant gratification.🤣
-
3 pointsThank you for the battery cable link. The controller charges when off the throttle coasting which won’t be much on a tractor. The battery came with a charger you can mount onboard or offboard.
-
3 pointsYah you don't wanna know Sylvia. Curiosity got the best of me and apparently they are used for high end performance golf carts and other apps probably including EVs. When I was told $$$$$.$$ for replacement batteries for her Prius I know why now.
-
3 pointsYes, just pump it a few times and you will see the fuel filter fill up then you can start the tractor. It should start quickly at this point. You can then remove it and install the regular fuel cap. And as a bonus, you only need one so long as all your tractors use the same fuel cap.
-
3 points@Blue Chips your work is nothing short of impressive!
-
3 pointsWell if you heavy weights wouldn't bottom them out ...
-
3 pointsAgreed 100%! Did the same thing on my last tractor! Got mine on the Jungle site.
-
3 pointsWhat, you don't attach it to a dedicated "Mule" engine to set the mix screws while running too?? You hack!!!!!
-
3 pointsSanta Claus dropped this set off for me, but I haven't had a chance to use it yet. https://www.amazon.com/dp/B0FD2MGBZV/?coliid=I2OHFXC6N18XC2&colid=E9BKT8EPBLKD&psc=1&ref_=list_c_wl_lv_ov_lig_dp_it
-
3 pointsI’m not opposed to either the pincer or hammer style, but I’ve gone to the soldered on style of lug for the relatively few times I need to make new heavy cables. And, by the way, keep an eye out at tag and garage sales for jumper cables. A good set (heavy, flexible, stranded copper wire) can yield some great battery/starter cables.
-
3 pointsPulled the trigger on some axles they have like new keyways and snap ring grooves. But unfortunately they had surface rust which for most of it doesn't matter but the bearing and seal areas are what I'm concerned about. This first photo is of one I cleaned up about halfway compared to the way I got it on the other axle. All the way cleaned up sanded and sanded with 2000 grit sandpaper and then Dremel polished the bearing and seal area. What do you think? The extra shiny area on the left axle is were some paint was.
-
2 pointsNot much. Still on a 20lb weight limit from Wednesday's surgery. Walked 1 1/2 miles with the dog, lost, a game of cribbage to Mrs 8n, played some solitaire, watched the snow fall, ran some laundry, and watched the FIRST Robotics reveal of the 2026 game. Looks like it is going to be a fun one. It involves shooting 6" foam balls into a target and climbing the robot up a 3 step ladder.
-
2 pointsYou just had to go there.
-
2 pointsI have the same cab and snowblower, a squeeze bulb or an electric pump would be a pain. Of course I could eliminate the rear lift on that tractor but I hate to do that in case I need to change the duties of it. I did see on here that someone attached a squeeze bulb to the gas cap and pumped air in to push the gas, that may be my answer.
-
2 pointsAhhh the nut cracker suit... I just always ground off that lilttle flare & soldered & shrink with no issues so far. If I need a nice set for a cherry resto I just put in a job order at Dan's work. Trolling motor wire works good too... very flexible. They say many small conductors carry current better as the electron flow is greatest on the perimeter of the conductor.


This leaderboard is set to New York/GMT-04:00