
Leaderboard


Popular Content
Showing content with the highest reputation on 01/07/2025 in all areas
-
10 pointsI have two nodding dolls, Mrs K and her Mother after 8PM.
-
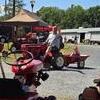
7 pointsI bought these from a seller clearing a boneyard. Goal was (and is) to keep them from going to the metal scrap yard. They have been outdoors for years and it shows. Since my knowledge of these models is practically nil I cannot add insight beyond my observations. I have no interest in working with these--I’d simply like to see them go to someone who will put the parts to use. I’d prefer not to get involved in parting the tractor or the frame. The mower deck possibly. Here they are on the trailer. First is a pretty much complete but extremely rusted Suburban/400. Rotted rims & front tires; rear AGs have some sidewall cracks but might be usable. Does not roll (it was hoisted onto the trailer). Engine does not turn. Mower deck is there but spindles are locked. Hood is not cut or dented and the throttle/choke levers are in place. The hood hold-downs are rusted out. Seat is excellent. Frame, front axle, spindles, tie rod, and steering appear solid. Three-piece transaxle seems stuck, but there was a shifter boot so probably not too bad inside. Casting code is visible but I don’t know how to read them! Has the mower deck lift adaptor in the slot hitch. Lift arm (and cable!) are there. Kohler K91T engine with carb but no air filter. Gas tank is attached under the hood. The second item is a frame & three-piece transaxle only and a different model (it doesn’t have the notched arch for lift height adjustment but it does have the lift lever with the button.) The rear hubs are there and both axles turn with no grinding so the diff is working. The shifter goes into all four positions but I think the brake drum is rusted to the band lining. Frame, front axle, spindles, and steering all seem complete. No wheels. The mower deck is a 32” with, I think, the mounting brackets for a Lawn Ranger. The gears seem ok but only one spindle is fully free. The shell is remarkably solid. The gauge wheels are definitely replacements. No detailed pictures. Full Tractor FRAME ONLY
-
7 pointsWe all need a hydro and hyd. lift. Just takes some of us longer to realize it.
-
6 pointsCenter of rear fender marked on a piece of masking tape. Center of rear decal also marked with masking tape. Rear fender cleaned and sprayed with water mixture then decal applied lining up centerline marks Decal squeegeed and fully applied. Before VS after picture.
-
6 pointsPlowing all day!
-
5 pointsyou're bad Ed, if they see this post you'll be getting coal next Christmas
-
5 pointsYou could always add a little insulation to the walls and ceiling if you need to quiet it down. If you have access to electricity, a ventilation fan might not be a bad idea. to dissipate heat.
-
5 pointsIf you can not find regular shear bolts, then I would suggest using some grade 2 bolts. I like to call them "butter bolts". These are the ones found in the bulk bins at hardware stores. They will have no markings on the heads at all.
-
4 pointsWe got about 5" of pretty dense snow from this mornings storm. So I decided to video the 312H with foot pedal motion control. The video is 7 minutes long, so get comfortable. It took 7 minutes to clear one of the 5 paved driveways about an hour total for all fiveand another 30 minutes to clear the stone road. You can see the speed and ease of raising and lowering the plow and constant changing of direction. This would probably take an hour with a gear drive and manual lift. The stone road cleared in 30 minutes. Sorry, 5" snow wasn't enough to justify firing up the Ber Vac Deuce.
-
4 pointsCaution decal applied to rear side of hood. Overview as of today.
-
4 pointsFront hood decal applied.
-
4 pointsRight side of hood ready for decal. Right side hood decal ready to apply. Right side hood decal applied.
-
4 pointsnice job Ed -- i love to see a grown man who knows his plowing technique and looks like he is enjoying himself - sweet WH video!!! ------------ got my 312 - 8 new in 1989 -- plowed with it till 2 yrs ago -- did awesome job -- but then switched to c175h -- my lumbar lower back couldn't take the stress of the manual lift anymore -- my L4 disc is much happier now with driveway plow chores using the hydro lift on the c175h
-
3 pointsWell, between general consensus, my opinion, and my wife's vote I decided on the TWIN decals.
-
3 pointsMy 97 K3500 Sierra got 10mpg, loaded, unloaded, highway, city...that 37g tank had a range of 370milew no matter what🤣 My Vette gets 32mpg hwy, 23city...its my 430hp fuel miser🤣🤣
-
3 pointsRelativity tells us that the observed behavior can be either the motion of the observed or the observer!
-
3 pointsThis was in the mirror yesterday. Today it’ll be in the classifieds.
-
3 points
-
3 pointsI vote "Twin"... But redundancy experts may disagree... But redundancy experts may disagree...
-
3 pointsOne more vote for all you Work or Wheel Horse experts. Should I use the period correct "TWIN' decal or slightly newer "HYDRO" decal. Keeping in mind the hood decal already says HYDRO.
-
3 pointsI think I'll ask lowell and see what he thinks. Maybe I can send mine to him for a refresh. I've had it apart enough times lol I need to order some other things from him anyway.
-
3 pointsTook a couple of pictures - tractor resting in garage, no more snow since plowing. Next time I'm out I plan to buy some 10w-30 synthetic and do a complete oil change in the trans. If that doesn't help, I guess I'll swap the trans. Maybe after it gets a bit warmer, going down into single digits this week.
-
3 pointsThis geared shaft is the shaft the pulley for the belt runs on outside the casing. The shaft wears and this one does show some wear . A new gear reduces the wear gap on the shaft which one or two seals won’t seal. It would be a great assistance to have some machinist make some of these and sell through Lowell at wheelhorsepartsandmore.com
-
3 pointsLucy has a new job! Guard dog at the Montauk Point Lighthouse at the eastern most point of Long Island, N.Y. This is as far as one can get away from New York City while on Long Island. (Just the way I like it!!) This lighthouse was commissioned by George Washington in 1792. I was in Montauk for work and decided to take a ride out there. Once I saw the guard dog sign I knew it was a good photo opportunity! Ten minutes after I took these pictures it started snowing like crazy!
-
3 pointsFinally a little seat time.
-
3 pointsIt means let go of the lever....its done ......travel is complete !!!
-
2 pointsSome engines have an optional diode in the ignition wire. I can only guess it is on the engine side of the engine/tractor connector. Will feel like a small lump under some electrical tape. Some models also have a diode in the other wire to rectify the charging current so don't get them mixed up. If the diode has failed in an open state grounding the ignition wire after the diode will not kill the ignition.
-
2 pointsThis is how a leak down tester does work. The pressure gauge shows how much air pressure you are pumping into the cylinder. The instructions will have a recommended pressure to set the regulator to. The percentage gauge shows you the amount of air loss that you have. Any percentage in the green is good, yellow = marginal, red = you got problems. Remove you air filter, crank case breather cover, and muffler as well if it comes off easy. Lock you flywheel so that your piston stays at TDC. While tester is hooked up you will listen in 3 spots for air leakage. Hear air through the carburetor = You have a leaky intake valve Hear air through the exhaust = you have a leaky exhaust valve. Hear air through the crank breather = you have bad/leaky piston rings. ( If this is where your air is leaking, then the bang is blowing past the rings and into the crank case when the engine fires. ) Note: you will always have a bit of leakage to the crank case, if the percent gauge is in the green it is acceptable. A leak down tester is merely a tool to tell you how much compression and bang power you are loosing and where it is going.
-
2 points@Lane Ranger That gear was not part of the shaft on the Hien Werner pump that I took apart. In the pic below you can see that my dumb a$$ shattered that gear when I took my pump apart. Never tap on the shaft to remove the belt pulley unless the gear cover on the inside is removed. Lesson learned. This gear was held on by a roll pin that drove into a blind hole. The hole for the pin is in between two of the gear teeth. I would have absolutely no idea how it could ever be removed with out damaging the gear. Lucky for me. Lowell just happened to have a replacement gear. Otherwise my pump would have been scrap.
-
2 pointsWhen shopping for hoses ask how many wires are in the hose and what brand fittings. There are expensive ones and some cheap junk. I made Weatherhead brand hoses at Napa. 3 wire hose and quite stiff. I bought a cheaper pair of hoses online for my C-160 and they made it a year. I'd rather spend the money than spray my shop and clothes with hyd. fluid.
-
2 pointsYep, Right hand on steering wheel, left hand on lift control, right foot on motion control pedal, and left foot available to push neutral/brake pedal. Efficient non-stop snow removal.
-
2 pointsAfter a couple hours of operating this even at 44, I definitely wouldn’t mind a hydraulic/electric lift.
-
2 pointsMine squeaks full travel. Not as bad as it was before, but it's there.
-
2 pointsSee the wear on the shaft!
-
2 pointsThat looks like a standard pan (4 pints).
-
2 pointsOne thing to know about the TSC blue belts @bassJAM is they shed blue dust. Seems they have a break in period.
-
2 pointsOne of the fixes is a new geared shaft. They use to be made by the International Cub guys and sold as an after market part . I have not seen them on for a while but that part in a new original spec is a good corrective option.
-
2 pointsK301S 2 quarts K301AS 1 quart I still think the reed valve is installed wrong.
-
2 pointsI lived my first 37 years in Nebraska. Great beef if you eat that. Nice zoo, Same obese humans as everywhere. not worth a visit. NO inspection there except commercial vehicles. They are pretty particular about the dually dump truck etc etc. Over this weight big deal...Under this weight vehicle just regulatory. nonsense! I am seemingly the only person who resided there that cared about preventative maintenance. The mind can race about the things that can be on the highway. Been a first responder. Pay attention please! I moved to NC in 2013. Personal vehicle inspection seemed odd and like many things it can be exploited. I cannot be exploited. Many other wonderful folks can be. My point.. IDK where it gets cold and salty probably (question mark) a good idea to have another set of eyes on the rotten junk rolling around at speed on the roads??? AND pay attention. We all have to all the days we are here! Many are not
-
2 pointsWe've seen that a few times over the years. Up here we have almost no Lake Effect snows. Every once in a while we get a bit of enhancement from Sebago Lake but not on any regular basis like @1940willys Our is more like "Mountain Effects" where the storms will actually stall against the hills and just DUMP snow or rain in some areas.
-
2 pointsRight... I read that thread awhile back, but didn't see anything regarding if anyone has seen them on a 44" or where to get 3" long shear bolts for the two augers. It mentioned cutting grooves in regular bolts. I've looked online for 3" long by 5/16" Shear bolts , Nada. I would feel better with shear bolts in there, since I am refurbishing all of the moving parts right now and would hate to see the impeller on the 2nd stage get mangled again. (still trying to straighten it out).
-
2 pointsThe original soft seal that goes in from the outside was a little thicker or had a thicker casing. The replacement oil seals are narrower. I use to sell them several years ago. Lowell at wheelhorsepartsandmore.com. sells them now. But the thing to know is the shaft often has worn to the point that one of the new type seals won't stop leaks! I have recommended two of the new type seals if you have a leaker with one. There is just enough room to place two seals.
-
2 pointsYou can tell you have some hours under your belt plowing snow. Those 312 's are a really great tractor for many tasks with super fuel economy. Nicely set up rig. Great job ED !
-
2 pointsSo when you here about Lake Effect Snow Hitting Buffalo,N.Y. and it's South Towns this is what they Mean !
-
2 pointsWell I was 5 minutes into plowing snow this morning and slipped a drive belt and upon inspection it was shot, and probably the wrong size to begin with. Took 45 minutes to run to the local TSC that's only 6 miles away and replaced the belt and finished my driveway. 10" of snow is a once every 10 year event for us in Cincinnati!
-
2 pointsActually, that silver relay beside the start solenoid is the low oil relay that prevents the engine from cranking over if the oil level is low. After building wire harnesses for the 520's that 312 harness is fairly straight forward. If you follow the wires from the circuit board and just remove those then what is left will not be too bad to follow. The 312 does not have too many safety switches, main ones are the clutch, PTO, oil level, and seat. Here is the harness from my 312-8 with the warning circuit board wiring removed. You will notice the seat switch wires are also removed. That is because to mow steep hills and ditches I sometimes need my butt off the seat for stability.
-
2 pointsSpent the weekend prepping the new shop up grade. recently purchased a large gas powered air compressor and had to set up an enclosure for it. Day one, put the 4x9 shed together. This would not have taken all day had every single painted piece not been covered in protective plastic. Spent half of our assembly time pealing that crap off. Finished assembly on the second day and then it was time to move the compressor and shed to their new home. Wheel Horse parts came into play with moving the compressor. Slid a 3/4" bar through one of the fork pockets and installed some front wheels from one of my Horses on it. Then used some hose clamps to attach a bar to one of the handles. Then two of us could easily move the compressor into place. After the compressor was in position we slide the shed out to it. We lifted one end of the shed and slid it in to place. Compressor and enclosure in their new location and spiked down with 5/8" x 30" rebar. Even a little room left to store a few extras. A bit of plumbing left to do inside the shop and we will be ready to do some winter resto's.
-
2 points
-
2 pointsGot my Horse ready for its first snow removal job. Southern Pa could get 5-8 inches which is alot anymore these days in this area. 312-8 with the Kohler Magnum.
-
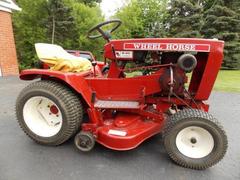
2 pointsLast year I decided to try duals on one of my modified machines. Quickly grew tired of it and went back to singles today. Was going to just remove the outer wheels but didn’t like the look of the single 6x12 either. Had an old pair of 23x8.5’s in the shed that look better in my opinion. She’s a 657 with a Kohler Magnum 8HP pull-start.


This leaderboard is set to New York/GMT-04:00