
Leaderboard


Popular Content
Showing content with the highest reputation on 03/17/2024 in all areas
-
16 pointsMy wife went with our daughter and granddaughter to a one day dance competition in Fort Wayne yesterday. As a team (6 girls) they did great with a Platinum award. Our 7 year old granddaughter, Ilyssa, performed a solo routine called the Stray Cat Strut. The results The entire team is now eligible for a national competition in New Jersey later this summer. Fortunately I was able to watch it live via an app called DanceBug.
-
15 pointsHello everyone, I am an old member here, most will know me as wh1257, but after forgetting my password for a long time, I created a new one.
-
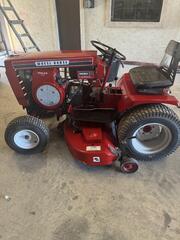
11 pointsGard’n Mast’r Since this is St. Patrick’s Day, I figured we should see a green tractor, but not that green tractor. Garden-All Company of Liberty IN has very little reliable internet information available. They came into being and left the scene in the 1950s and made some rather nice looking two-wheeled and four-wheeled garden tractors while they were around. The little bit I was able to find is from a couple of tractor sites and primarily from sales brochures. Gard’n Mast’r had some nice sales literature but the posts on various tractor sites conflicted with one another so weren’t much help. Garden-All has a Wheel horse connection because Harold Pond’s brother Elmer and his son Cecile were the founders of the " Wheel Horse " line of tractors in South Bend IN. Harold's brother-in-law Glen Heilman was responsible for developing the " Garden-All " line of garden tractors. So, you could sort ‘a say that the Wheel Horse and Gard’n Mast’r were cousins. The two-wheeled Model “D” had a very stylish hood but was very similar to others on the market at the time. Five models of walk-behind Garden-All walk-behind tractors were offered from 2 HP to 4 ½ HP. The Garden-All Pup Model “P” was a small four-wheeled riding tractor offered with a 2 ½ or 3 ½ horsepower engine. Pricing of the Pup riding tractor was comparable to that of other two wheeled walking tractors. It had semi-pneumatic 12 X 3.00 front wheels and 5 X 12 agricultural rear tires. Its transmission had three forward speeds and two reverse gears and weighed 290 pounds. One of its unique features was a hood that resembled a mailbox! The Gard’n Mast’r model “JR” was a six-horsepower riding tractor which was substantially beefier than the Pup. The JR had pneumatic 4” front tires and 6X12 rear agricultural tires. The Gard’n Mast’r model “G” was the top of the line eight horsepower featuring “Roto-Lok” tool lift and being rated to pull a 10” plow. It weighed 810 pounds and had 4.00 X 8 front tires and 6 x 12 rear agricultural tires.
-
10 pointsFor years I've been wanting to build a pto driven leaf blower but just never got too serious about it. I did have a blower in Florida but for some reason it stayed in the garage attic when we moved I've had my eyes peeled for another one but it's been more like if one stumbles in front of me I'll grab it. That hasn't happened yet. I decided to go ahead and rig up a frame to mount it. I made a couple modifications to a frame that I've had since the Big Show in 2018 and I'm sure @squonk will recognize it. The weather has been exceptionally warm recently so I had a chance to throw some paint on it. My wife asked me what it was for so I told her and she said 'you don't have a blower'. I said I WILL have one before the leaves fall again. With the frame complete and having options as to how I mount the blower I will be real serious about finding a blower now. BTW, the bar that fits up into the front mount is 5/8". I didn't have a rod that size and I was just going to get one when I happened across the original tie rods (worn out) for this very tractor. A couple of cuts, a 3/8"-24 rod coupling and a perfectly good 5/8" rod.
-
9 pointsEngine parts arrived !! Before throwing parts at the engine I figured that I better check the valves for leakage. Filled the valve depressions with some some WD-40 & then applied low pressure to the intake. This resulted in all kinds of bubbles around the valve. Pulled the valves out & gave them a good lapping, after that the second test resulted in no bubbles around the valve. Because I am untrusting of aftermarket parts, I always check them. First check was the rod to crank clearance with some plasti gauge, .0015 as it should be. Piston to cylinder clearance checked out at .008" clearance. Remember the cylinder head? What it looks like now. To make sure that there is no clearance issues, I got to play with Play Doh today. Some strategically placed gobs, bolt the head on, spin the engine over, take it back apart, and measure the thickness of the Play Doh. Finished up the day with a mostly complete engine. Switched out the quiet line tins for the older tins as well. Fuel, wiring, plus a few odds & ends left.
-
8 pointsBeen putting this project off since 2009. My significant other decided to take a vacation far away for 7 days. This was her Birthday present when she returned home.I figured with the amount of dust etc it was an ideal time to get the hard part out of the way. For now using the 2nd floor bath. Decided to go with a walk in multi-piece fiberglass shower with seat and remove the 1980 Kohler 1 piece tub and shower unit. Still some work to go till the finish line.
-
8 pointsProgress! Thanks to all the members for the help found here. Anyone know of any WheelHorse events in Upsate NY this summer?
-
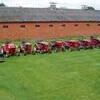
6 pointsThe annual Airville Fire Company mud sale was held today. 12-15 Amish auctioneers selling everything imaginable.
-
5 pointsI have been moving more stuff to containers for storage on the new shelves. I am one container short to have them full. I also got the adjustable battery drill holders built and installed. The drills set far enough from the wall so bits do not have to be removed.
-
5 pointsIt’s dried up just a wee-bit…and I made a new path to get to the wood I cut that wasn’t so mucky. 315-8 earning its keep
-
4 pointsWheel Horse 753, has 8hp engine, runs and mows good. Can bring to Pullstart's plow day in April if paid in advance.
-
4 pointsWheel Horse issued a technical service bulletin calling for a switch to 40w in the early 60's when they first started using the two piece transmission cases. It was in hopes of alleviating the 'suctioning' effect that the shift rails caused. A very short time later they came up with a better fix in the form of flats on the shift rails, a deeper neutral detent combined with a 3/4" stop pin vs the previous 11/16" (another TSB). The 40w was overlooked in the owners manuals for a bit. The reality is that so many of these transmissions have survived years running with watered down sludge keeping them lubricated that you can just choose whatever oil/lube you want and you'll be fine. I'm not endorsing the watered down sludge though.
-
4 pointsSeems I never fully complete anything. I'm always going back and tweaking stuff. The footrests of all things on this tractor stumped me. I found some great aluminum tread plate for them, but knew they would hold all kinds of dirt. Drilling the footrests to match would be a chore, plus they'd be weakened considerably. So today I finally finished the left side. Drilled a heckuvalot of holes, and welded a 1 x 1/8 steel reinforcement to make up for all the holes. Tuned out pretty good. Probably do the right side tomorrow...
-
3 pointsBig Red and O'l Rusty Red's dedicated to winter. Rusty mows, hauls the trailer(s), the splitter as well as skidding logs out of the woods.
-
3 pointsDepending on how "Original" you want to keep it. Key switch is a simple on/off Cole Hersee 95597 Light switch Napa PP6020 Starter button Napa ST 6 Tractor supply SKU 236643
-
3 pointsThat's why I use Mobil 1 in my Hydro's that take motor oil.
-
3 pointsThere are all kind of thought when it comes to oil in gearboxes. Of course the 80-90 has the kind of anti wear additive, or extreme pressure additives and allows good even flow and sling per say. I can remember at work having a large gearbox, close to 200K in cost, suffering from an internal leak between the hydraulic circuit and gear compartment. The hydraulic seals had a slight bypass into the gear area. Not having a spare ready and production behind, a decision was necessary. Of course it landed in my lap. Run it with diluted gear oil or shut it down and loose weeks of production. None of the oil and gear engineers would even want to discuss it. They error on the safe side of turn it off. I knew the hydraulic oil had some mighty fine anti wear additives but not so much extreme pressure. Ran it 4 months draining out 10 gallons every morning and refilling with gear oil. Upon rebuild inspection, the gearing looked good as new. The same boxes spec heaver gear oil at first then it was reduced to the next level thinner. The lubrication and cooling of the internals was the reason. So, I fill 80W-90 is the spec, going to a heaver oil of 90w-140 might not improve anything. If your looking to spend more on oil, and get some bang for the buck, go semi synthetic or full synthetic. The synthetics transfer heat so much much better.
-
3 pointsWhatever you do Bob, regulate the the speed at which it will turn and how much air flows thru it or it will blow apart like @87 416-8 horse blower did. These belt drive blowers are getting harder to come by with most home units going to direct drive years ago. Most of the ones you will find are well past their service life with rusted worn out vanes
-
3 pointsMaw, that would make too much sense for Americans to have!
-
3 pointsPaint chimes... Decided to go full Black Hood Wannabee on the wagon... Ordering decals from Terry today... Edit: All but decals... Edit 2: Done: Thx vinylguy!!!
-
2 pointsSuch a simple concept. We have none around here I've ever seen. Imagine the space savings if we didn't have untold acres of empty dumpsters to store... 🤯
-
2 pointsI was coming back from a pheasant shoot at M&M shooting preserve in New Jersey yesterday and decided to take a few pictures for those who have not seen the NYC skyline. I was on the lower level of the busiest bridge in the world.
-
2 pointsBest thing to do is download the RJ-58 Manual and read up on the transmission manual that Achto (Dan) posted! Plus the tutorial “ So you want to Rebuild Your Three Speed Transmission “. Our your best bets for learning how to redo your transmissions.
-
2 pointsThat’s quite a blood blister under your thumbnail 🔨 💥
-
2 pointsVery nice. My daughter has been dancing since the age of 4, she is now almost 34. She holds a nice full time job and now with a partner working their own Dance Company plus one other studio. She just can't stop. She teaches kids your Granddaughters age. @Racinbob Congrats
-
2 pointsCorrect. 40 Weight engine oil has the same viscosity as either 75W or 80W gear oil. The extra 10 to 15 wouldn't seem like much but it would certainly make a difference.
-
2 pointsBack in the day WH used ( I think) 40 wt. motor oil. I remember as a kid draining the trans oil out of our 604 and putting in 90wt. The next winter you had to have that Tecky warmed up and singing before letting the clutch out in neutral to warm up the trans.
-
2 pointsYou talkin about this? No idea, but it was worth 80 bucks to someone!
-
2 pointsIf you have an ammeter it is wired in the wire that takes power from the battery to the ignition switch. It must not be grounded. You have a dead short. It measures the current flow in the wire. A less expensive option that tells you more is to use a voltmeter. You can wire it like you have the ammeter wired now. Monitors battery voltage and is turned off by the ignition switch. This gauge requires a ground.
-
2 pointsOn Trina's lighter tractor it makes the machine act like it's in low low unless it's warmed up a little bit. I figure the reason it seems okay in my bigger heavier machine is that the extra weight of the tractor compensates for whatever push the oil is trying to give.
-
2 pointsI've used this in all my 3/4 and 6/8 speeds for decades.
-
2 pointsMost small 5 yard dumpsters on this side of the pond do look like they could be stacked - but how do you unstack them????
-
2 pointsCool tread! I bet a couple dimple dies on the holes in the step would strengthen it significantly too!
-
2 pointsIf you replace it, and add a 1/16 roll pin it will last for years. I've done this on the three tractors I have with this throttle setup, and they've worked great.
-
2 points
-
2 pointsThe Thrifty Farmer Tractor Conversion Kit The Thrifty Farmer kits sold by Sears, Roebuck & Co. in the 1930s promised to make your old Ford Model T or Model A into a tractor for less than $100. Later, kits became available for the 1929-31 Chevrolets. The kits were listed in Sears spring and fall catalogs from 1932 to 1941. By 1935, Sears had added kits for newer Ford V-8 powered cars along with Plymouth, Dodge, and Chevrolet autos with 6-cylinder engines. The kits were produced by Peru (Illinois) Wheel Co., A 1932 Sears Thrifty Farmer booklet notes that, “With the Ford body removed, and without drilling a single hole, you can in a few hours convert the old Ford into a tractor that has the pulling power of two to four horses, depending on the condition of the motor.” The working speed of the engine after the tractor conversion was 1,200rpm. The motor in a new 1928 Model A was rated at 40 brake horsepower at 2,200rpm. The final drive system on the early kits was somewhat complex, employing a jackshaft and a series of four gears on each rear wheel. The gears are mounted “high off the ground away from loose soil and trash” and are “covered on top and sides by a strong steel hood to keep out mud and protect the operator.” Within two years, Sears released a less complicated version of the kit. Transferring power to the rear wheels now employed nine-tooth pinion gears, attached to each rear axle, which engaged large diameter ring (bull) gears mounted on each wheel. The rear end (differential) of the car had to be flipped, end for end, as part of the assembly process. If it weren’t flipped, there would be three reverse speeds and one very slow forward. Peru Wheel Co. also supplied kits to Montgomery Ward & Co., called a Utility Tractor Unit, a few years before they began supplying a very similar kit to Sears. The main differences in the two kits were the diameters of the bull gears and rear wheels. The Sears gear measured 37 inches in diameter with 108 teeth, while the Wards gear was 40 inches and 120 teeth, mounted on 45-inch and 50-1/2-inch wheels respectively. Since Montgomery Ward part numbers were cast into the bull gears and the axle clamps used by both large retailers, people were often misled as to which kit was used to build a particular tractor. Early conversion kits were sold before 1920. Ultimately, more than 100 kit manufacturers operated coast to coast. Some of the brands available in the U.S. and Canada included Staude, Knickerbocker, Shaw, and OTACO. The front wheels, supplied in the kit, had non-skid attachments. The two attachments were formed of arc-shaped sections of 1-3/4-inch angle iron, each covering half the wheel. When bolted on, they formed a narrow steel rib in the center of the wheel. That made steering easier, especially in loose soil.
-
2 pointsMy radiation treatments have been put on hold with 7 more to go. My skin is so burnt the Dr wants to give it a long weekend to heal some. Tuesday was the last treatment and will resume on Monday if I heal enough. Good news is my oncologist is pleased with the blood work results. No additives needed yet.
-
2 pointsKind of along the line of the Fire Extinguisher hanging on the wall in the shop.... "Better to have it and not need it than need it and not have it"
-
1 pointLowell @wheelhorseman can fix you up with everything you need. https://wheelhorsepartsandmore.com/product-category/manual-transmissions/
-
1 pointSouth Mountain Fairgrounds, Biglerville, PA
-
1 pointThanks Ed. They are getting harder to find but they are out there. I was basically waiting for one locally but now I'm gonna get serious about it. I didn't have a frame for one before but now that I do I'm more motivated.
-
1 pointI drove such a dump Truck several years ago for a while, because it seems to be a funny Job. On all Truck ridings i ever did, definitely it‘s the funniest because of it’s maneuverability. Not much stress, just do your thing but the roadtraffic is your hardest enemy. Deliver is simple get a Container put one into another stacked (max. 3into ) put it together on the Trailer plus 3 more on the flip side of the Trailer - again 3 on the Truck and you can deliver 9 containers Quick on bigger Construction sites. easy going. Unstack is also that simple, first place the both or three containers from the truck, change the chains to the next inserted one, lift it up, drive as close aside the first container and you can set it closely to the first you delivered and so on. Stacking and unstacking is just a thing of the Hydraulics speed. With a well dimensioned hydraulics you can stack them in less than 30 sec. just a few onsite tries and you see how easy that is. just change the chains to the Buck you like to move. Dump you can with a Truck max. 1 Container, with a tandem axle trailer 2 and with a trailer for adults maximum 3 Containers in one ride. Exception was a 4 row containertrailer as a sideloader, but they be here to wide for road leaglity and just used on big Construction sites. Dumping itself is also dang easy, just flip the switch for the hook and swing it out to rear - and pray before you do that, not any idiot drains it‘s concrete rests into it on the floor and hide it with some light trash above. Never forget the safety feets on the rear before lift a heavy container, otherwise you can test, if the Frame on the Truck is fine and the whole construction site know it 😂 see a lot‘s of rookies on the dump without the safety feets out and with lifted Frontaxle. rookies been forbidden to drive onto the dump too close, several forgot the feets an learn it the hard way , that mistake will result in a backflip. - if you see such an rookie, give him a secret on the Way - greasing of the frontaxle couldn‘t be made easier...😂 upright standing.. that safes backpain..😎 If a rookie does that, you can hear the Container definitely „smack on the ground“... here we where allway‘s amused when a rookie do it and honor it with Applause...😇😎🤪
-
1 pointInitially they had nylon gears on plastic ring gears riveted to the flywheel, designed to be very quiet, but the nylon gears still wore out...and usually took out the ring gear too. So they went to an aluminum ring gear, and offered retrofit kits to swap the plastic ones. Then as engines got larger they went to hardened steel gears...usually still on a nylon bendix.
-
1 pointLove pics from the "other side of the pond. " The buildings, landscapes , modes of transportation.
-
1 pointNothing like two good tractors to get the jobs done right. Enjoy the ride..
-
1 pointI take my tires to the Mennonite shop down the street. If they can't get the tire off, they call in the women to do it!
-
1 pointIt's been a while but I remember an April fools day with a foot of snow. March weather in New England is about as unpredictable as day trading the stock market. Don't get too excited about a couple of 50 degree days.Not like you need to swap to a mower deck because the grass is getting tall so hold on for at least one more surprise! LOL
-
1 point
-
1 pointYour memory is working fine Richard. You talkin bout these ? One buck for the entire weight machine.
-
1 pointI'm ready for warm weather so I can dig the collection out of hibernation. This is a picture of my 12 automatic from last summer

.thumb.jpg.7a4e25552dfae5ebd8fc449880c1e864.jpg)


This leaderboard is set to New York/GMT-04:00