
Leaderboard


.jpg.8ca755f0175140fd974a8b033d7f3501.thumb.jpg.71f06ed90f3a14a3b565d8387e418b61.jpg)
Popular Content
Showing content with the highest reputation on 11/13/2021 in all areas
-
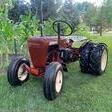
10 pointsI made this up for the ole ball n chain today.
-
9 pointsThanks to Lowell Wheelhorsepartsandmore the E 141 and C 105 got new tie rods this morning! Denali the shop dog was more than happy to be in the garage and not out in the rain snow sleet slime coming down at the moment… (he’d be a lot more help if he had opposable thumbs but hey, can’t get good help these days…)
-
7 pointsCleaned out properly and rigged up the right way it's also a 007 style rear oil dispenser. Could also be a small flame thrower and in some rare instances a spitball launcher.
-
6 pointsThanks to @ebinmaine I am going to make a separate topic on the fabrication of my Front-mounted air compressor, that will be driven by the PTO. We do have a huge compressor in the shop, but we often have had the need for compressed air on the propriety. And often this is out of reach with our big shop compressor. Like our concrete air hammer. So the idea came up to simply mount one on the front of a Wheel Horse, expanding it's utility-range. I found this big 1983 two cylinder compressor. All cast-iron and big enough to have a high CFM for running the concrete hammer. Coming in at 25kg or 55lbs, it weighs more then our little compressor(with thank and hoses included).
-
6 pointsSince I am starting the reassembly, I thought I would share it here. It's not a but some may still find it interesting, and in the end, it will be red.
-
6 pointsHeres what they look like without the weights (before i painted them WH red)
-
6 pointsFabbed up a front "bumper" to hang some suitcase weights on...
-
5 pointsIf i had a seat like that, I would be afraid I would fall asleep while I was cutting the grass. Looks comfy!
-
5 points...and made my own wheel weights from a $40 walmart free weight setand some steel stock i had in the shop. 50lbs + about 5lbs of hardware per wheel.
-
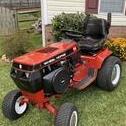
5 pointsGot a new seat installed on the 418-A. Just kidding! Here's the new seat. Very nice quality.
-
5 points
-
5 pointsHahahahaha. Like she needs a flippin' tool.... Here's her Martial Arts wall. Black belt Certificate upper right. Upper left are a pair of Sai. (pronounced "sigh"). Literal translation is "hairpin". The stick now... That's her favorite. That's a Japanese Bo. Translation is "staff". A bō (棒: ぼう), pang (Cantonese), bang (Mandarin),[1][2] or kun (Okinawan) is a staff weapon used in Okinawa. Bō are typically around 1.8 m (71 in) and used in Okinawan martial arts
-
5 pointsI see an appropriate assortment of cast iron management “tools” hanging on the beam… easy reach for BBT to keep you in line when necessary…
-
5 pointsFabbed up a belt guard tonight. Did alot today, but not much to show. Welding sheet metal is tougher than I thought it would be. But it turned out decent.
-
5 pointsBonus pic by The Photography Department.
-
4 pointsI never gave em up.....
-
4 pointsSpitballs. Oh the memories of Bic pens and spitballs in 5th grade!
-
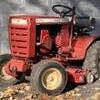
4 pointsReassembly has begun…
-
4 pointsI'll have to show this to my wife! She don't believe that Another tid bit is if you rotate the engine to make sure the points are closed you can check spark without touching the starter terminal and or cranking the engine over. Just connect wires as before and click open the points with a screwdriver and let them close. Basically simulating the push rod doing it when the engine is cranking over. Be sure not to ground out the screwdriver while doing it. A small dental pick works great. You should see a nice blue spark jump the plug gap each time you snap open the points *** Don't leave power to the coil for long periods of time if the engine isn't running. That can burn out the coil
-
4 pointsGive a man a spanner and he can tighten his own nuts. Give a woman a spanner and she can cause havoc for a lifetime. I think that's how the saying went.
-
4 points
-
3 pointsI got a new 48 plow. can’t wait to plow!!
-
3 pointsThis will have to do for the day. Time for supper. The hydraulic cylinders, hoses, and valves are something I have never messed with before this tractor, I hope I don't regret it. I guess I just have to figure out how to purge the air when the time comes. I haven't done anything with the wheels and tires, as I don't know what I am going to do yet. All in all it's going back together pretty well. A little slower than taking it apart, but it's a lot cleaner work. I only had to back up once. Got a little ahead of myself. I hate it when that happens. Tomorrow is another day.
-
3 pointsGot the chipper vac wiring repaired and all put back together. Used it for about 2 hours today. Runs great! IMG_0785.mp4
-
3 pointsThanks buddy! Definitely good to get second opinions / set of eyes on a project like this though! Don
-
3 pointsThanks for the vote of confidence Snoop-Don, but ah hain't got nuffin what hain't already been said!
-
3 pointsYou should let the dog have the mat instead of using t for a tool rest
-
3 pointsGot the "new" crab boat ready for paint. Now just need one more 70F day.
-
3 pointsI wonder if @Jeff-C175 has any ideas for you on this... in the past he has made some helpful comments / ideas on projects like this? Not trying to throw you under the bus, aye Jeff... just seeing if you have any thoughts! Don
-
3 pointsNow almost a year later I remounted the generator. With a new perspective I was able make it simple and by doing so the attachment become one with the tractor.
-
3 pointsEB80 makes a good point. Bob, What about a curved flat bar section? I know you don't weld so a new section can be bolted on by drilling 4 holes. I have a curved piece from a snowblower attachment you can have.
-
3 pointsI modified a narrow frame Cub Cadet mower carrier CORRECTION snow plow frame
-
3 pointsCouple more suggestions for the cut off Electric PTO pulley utilizing a jack shaft? Air cylinder for belt tensioner with a regulated pressure? Or how about a pressure relief valve or two or 3 on the tank? The compressor can run continuously but any extra pressure is exhausted out the relief valve. Probably not bad idea to have a relief valve on the tank no matter which way you go
-
3 pointsWe moved it from it's build position to get closer to the door last night. The wheels do turn a healthy degree from straight. The entire fan gear is well used lock to lock. It's looonngg compared to a stock tractor. I had to "double back" twice to clear the couch and I can do that in one swing with a short frame. I don't know what the actual full turning circle is yet. It'll be fine for the forest paths but there are some corners that will need trimming of the surrounding trees.
-
3 pointsAbout the only thing I've ever run that I liked more than my WH's was a very oddball Bolens from the 1990's, had electric cruise, power everything, a tilt wheel, etc.. Pity it was so problematic. Even had the same faux leather seat of the old WH LSE. I run my WH GT-1848 before anything else. Funny enough.. gramps bought a X500 new, to replace the LT150, which replaced the venerable Electro 12 Horse that started it all. ..Which is still working for me almost every day. We both despise the thing, and it spent most of the first 2 years of service in the JD dealer for the most ridiculous things. Seems to have settled out these days though, has about 400 hours and slowly falling apart mowing a 2 acre yard. Kinda a shame to admit that old LT150 was built just as well, if not better than, the X was. And after 52 years the old Horse is clattering along, no sweat. Even after 52 years of continued service, one motor swap, and various upkeep.. I'd wager the Horse still cost less to own overall too.
-
3 pointsUhm… Red?
-
3 pointsStill plenty to do 'round here as always but we should be able to focus a little more on it now.
-
3 pointsI finished up the other tie rod by cutting off the end to the correct length. Drilled it and tapped it. I had no 1/2-20 nuts around so I drilled and tapped a couple 7/16 just to keep things tight for the time being. Installed both the rods after measuring about 86 times. And the Colossus beast is a rolling chassis.
-
3 pointsIt is not my WH, but is the neighbors new to him 312H. I fished up the fabrication on the rear receiver hitch and carrier for his sand. Put the Kenda Tera Trac winter grips on and test fit the carrier. He is working toward getting ready for the snow.
-
2 pointsAnyone make a killing here? I had a bid on a couple of them, but I got beat out. Just as well, I don't have any room any way. Several Wheel Horses in here. Some went for < $150.00. Auction
-
2 pointsOdd? No… Frugal? Cheap? Thrifty? Efficient? Yes… Cuts down on future parts costs / repairs…
-
2 pointsThis is about how far I got on the reassembly…
-
2 pointsYou know what they say about gettin old! But I'll cut you some slack nORM, I can't remember what day it is more often than not!
-
2 pointsYes, supposedly the springs are settings for the pressure... so you put different springs in for different pressure settings... I haven't ever used them, but a welding buddy of mine told me about them... Don
-
2 pointsHah hah... That's more like... uh... Don
-
2 points
-
2 pointsMy attachment is very heavy. When not in use It sits on a dolly, then I can roll it in position to mount it.
-
2 pointsThat makes 2 of us. Maybe I could plagiarize EB's work and say it's from a doctor!
-
2 pointsDecent?? Looks excellent!
-
2 points@fullchoke make up a small cord with a clip , for that key , my tractor keys are all clipped to the throttle lever , like a braided fishing line , don.t ask me how or why i do this , pete


This leaderboard is set to New York/GMT-04:00