
Leaderboard


Popular Content
Showing content with the highest reputation on 10/24/2020 in all areas
-
5 pointsDid some fine tuning on the sweet 16 today. All the adjustments needed to make it all come back together.!
-
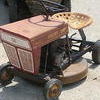
4 pointsGot a little time this afternoon to get a little work done on the Lawn Ranger. Got the front spindles on (new ones from A-Z) with new 6" front wheels and tires. Got the rear wheels off and the new ones on. 8-1/2" neutral offset wheels, with 18-9.5×8" Superlug tires. Wisconsin parts are coming in, got some new throttle linkage parts, head gasket, points, condenser, S/G belt, and a couple other little things. Still have to figure out a throttle and choke cable. The Wisconsin Amp Meter and Start Button bolted right into the old holes in the WH tank and center column. I know she's not the prettiest thing, but should be pretty fun once its completed. I need to re-make a tool box, as the clearance between the rear tires has shrunk. The old box is 14" wide, and i only have 12" between the tires (old skinny tires had 17" clear space). I have Steering Wheel coming from @76c12091520h and a new drag link for the steering. Should pretty it up at least a little. And I do plan on running a Jim Kemp stack, this one was borrowed off my Commando 8-8 for test fitting.
-
4 points
-
4 pointsCleaning up the old Power King.
-
4 pointsThis manual will give something to work from. If in doubt you could replace the switch and clean the terminals that connect to it. Take a look at other electrical connections to be sure they are clean and tight too. I would remove the fenders and the cover for the tunnel where the shifter so you can clean up whatever is in there, you will be amazed at how much junk accumulates there. removing the engine tins to clean the cooling fins is a good idea too. If you run into any problems give us a shout.
-
4 pointsNew fuel lines...
-
3 pointsStart it, run it forward and backwards, operate the lift up and down. Stop the engine and recheck.
-
3 pointsAgree with pulling the engine tins off. Not a bad idea to expose the cooling fins to clean them on the hydro too. Especially if the machine ever ran a rear discharge deck. I like to add inline filters so I can see what a going on with fuel delivery. Other than that, do the maintenance and ride!
-
3 pointsHi, my name is Brian, I'm new to Red Square not sure if I'm doing this in the right place. With that being said, I was wondering if there is a way to check a Wheel Horse for matching serial numbers, like the way it can be done with cars, I have a '77 C-160 that I got from my dads estate, I have owned it since the late '90's, not sure when or where he bought it. I think it has most if not all the original factory parts still on it and was wondering if there is a list from W.H. that would tell me if it is all factory original. just starting to get it back in shape and finding all these numbers, the plow, mower deck, transmission, tractor the motor all have serial numbers, just a curiosity on my part to know what I have.
-
3 pointsPull the breather to clean and inspect it, if a previous owner assembled it poorly that could be the problem. Check the compression to see if the basic engine is healthy. Hold the air filter element up to a light and see if it is clogged, a restrictive air filter will cause a vacuum.
-
3 pointsLeaf Duty here
-
3 pointsDecided to come down here to the shop to sit with the lights out and the door is open and listen to it rain and thunder. Of course I am surrounded by my heard. Side by Side! How sweet it is!! IMG_9039.MOV
-
3 pointsMy apology to the group and BAM1. Where do I send the fine for posting WRONG INFO. When I get it wrong,...it's REALLY wrong.
-
2 pointsI made an old MTD snow blade (square peg) fit on this Raider 10 with Tecumseh HH100 (round hole) by fabbing a bracket to mount it on until I find the proper wheel horse blade. I have changed the oil, gas filter, and transmission oil and tires. Put a rebuild on the LME 29 carb but still seems a little sketchy. I put a new spark plug in it and it felt a little "off" going in and felt like it wouldn't get completely tight, like it was stripped. Started it up and it ran for 5 seconds and blew the spark plug 20 feet out into the driveway. Oh man, that sucked. So I put the old plug back in, it seemed to go in fine and snugged right up. Don't know what's going on there, now I'm scared to try and change it again. Right now it runs pretty good. Seems to have a slight miss, can't tell if it's the carb or plug. Have started running seafoam in the gas. Hope it snows tomorrow.
-
2 pointsThis horse followed me home today! I think its in good shape even though its ready for a good maintenance rundown. Came with a 48" deck that needs some maintenance as well. One question: The previous owner said the ignition switch has a bad connection and will vibrate off? Is this a known problem? Should I search for a new switch or can I clean it up or do you think its a wiring issue? I plan to change: Oil Air filter Transmission oil and filter Spark plugs Grease as per manual Battery terminals have some corrosion It might have a transmission leak. Going to have to clean things up and take a closer look. Anything that you would do before I put it into service? I will spend a week or two fixing things then store it for the winter.
-
2 pointsWe'll need to see the coil to really know.. they had THREE ignitions on that model. Magneto usually is a 1968, SSI and battery/electric seem to switch around together in 69-70. Manual clutch is wrong. The original electric likely failed and this was the standard repair process, as both then and now, an electric PTO was rather expensive. Manual is better on the implements anyway.. If you see no coils at all and the plug wire goes behind the shroud, thats a magneto. A short, squared looking coil is the SSI, and a generic round 3 wire coil is a points fired battery ignition.
-
2 pointsShould I put an in-line fuel filter in?
-
2 pointsThanks this is kind of what I was looking for, it was just for pure curiosity, and maybe bragging rights if/when I do get it redone.
-
2 points
-
2 pointsI did that once and I had a garage full of chickens, ducks and peacocks! And I live in town!
-
2 pointsYou just rebuilt an engine on a restored tractor. Make sure you have good grounds. You may have paint somewhere creating a bad ground.
-
2 pointsHeres just some pics of him riding it before it broke down. When we get it fixed I'll post a video of it and see how it runs and how fast it is!
-
2 pointsIf I did that the garage would be full of toads...
-
2 pointsI like it.
-
1 pointI intentionally went with wider, neutral offset wheels. I wanted fatter tires on the back without making the tractor much wider overall. The width only grew by about 3" total (30" now vs 27" stock).
-
1 pointSee my edit above. I really hate this phone, I usually use a laptop. The diagram shows I & G terminals on the meter, do you have the positive on the I terminal?
-
1 pointI haven’t seen reference to the c-series heavy front end kit in a long time. Used to be a common discussion topic 20 years ago. It was a great value and came with two reinforced spindles as shown above and a new set of tires mounted on wheels. I think it was priced cheaper than just buying two tires. It was available for a long time. I’ve seen them with both linen beige and silver painted wheels. Always intended for when a tractor was equipped with a loader. I bet there are still a bunch of these kits on old dealer shelves. The d-series axle kit is interesting too. The 1973 18-automatic and the earliest D’s used 3/4” spindles and front wheels. They were marginal for such a portly machine so were upgraded in ‘74/‘75...don’t remember exactly. The kit you have was the factory retrofit kit to fix the marginal design. I don’t think there was a “recall” for the upgrade, but I am pretty sure I recall the upgrade being free to customers that had a problem. The difference between 3/4” and 1” doesn’t seem like much, but it represents about a 78% boost in load capacity for the front axle and wheels. it isn’t unheard of for front spindles to bend severely and even snap off on the early D’s. I knew of one that broke while mowing when the front wheel of the 18-auto hit a Small rut. Wheel snapped right off cleanly. putting a loader or snow thrower on a 3/4” spindle D is a gamble. I know they have their followers, but I’m not a fan of the D-auto series. They were physically big, but didn’t really bring much to the table in capability compared to the C-series. regardless, you’ve got a neat find there. steve
-
1 pointGot it figured out. Had to adjust the f relay contacts. Charges at 13.5 volts full throttle. Thanks guys.
-
1 pointOh and getting a new belt!!
-
1 pointwow now I know why guys flock to the tables at flea markets where Milwaukee tools and batteries are sold $220 for two batteries is ridiculous - even for lithium ion sheesh - get a decent extension cord and corded drill and then with the extra money get your wife a nice present or dinner out (in the future / post COVID panic) ... I use an older DeWalt with NiCad batteries - it's been great ... think I paid under $100 for it and it included two batteries and a charger ... kinda clunky / heavy though ... my one kid uses a newer smaller DeWalt with Lithium Ion batteries - smaller / lighter and it was also not too expensive ... but I often just grab my old Sears Craftsman drill and an extension cord ... old habits are hard to break ...
-
1 pointI dont think I've ever seen a list from the factory showing what engine serial went with what tractor serial. We can tell you what spec motor should be in the tractor (as has been done), but that just tells the type of ignition / profile of the crank etc. I dont think these are like classic cars in the sense that all the body panels are stamped and can match the exact hood etc.
-
1 pointThe beginning of the disposable car. My father had a 61 Falcon with the 200 cid, 3 on the tree, round trip to work and home 144 miles, I had just turned 16 when he retired and often used the car for dates. Ya gotta know the girl your dating likes you when the ride your using reeks of cigar smoke and she accepts a second date. I drove them both hard. Tuff little car and she married someone else.
-
1 pointThe wires you have running from battery to ignition switch and Center post of ignition switch to A on the genny appear to be way under sized. They have to carry full starting amperage. Should be 6 ga wire.
-
1 pointKind of reminds me of a Johnny Cash song. Eye got it one part at tyme......
-
1 point
-
1 point
-
1 pointwas around 30 minutes from you today stopped by buttermilk falls on the way home from rogers flea market
-
1 pointVery nice. Almost to pretty to use.
-
1 pointSpent some time with the 551 dialing in the carb, got her purring like a kitten now! I am actually really impressed with 5 horse Lauson runs and sounds good
-
1 pointChanged the seal on the other side. It could have waited, but in surprise the hub came off within minutes. The other side took hours.
-
1 pointHesston Frontrunner 200. The story I got on it was the original owner’s wife was using it to mow and the fuel line from pump to carb split. Sprayed fuel on the engine and caught on fire. It burned until the wiring harness melted together and shut off the engine. Luckily the fire burnt out and did no more damage other than melting all the wiring. So hence the name “Blaze”. It was sold at a yard sale after the owner passed and bought by the guy I got it from. It has been in a barn since 2002. He has 12 more of them. Hope to get it going again soon.
-
1 pointGave the 854 a bath today and then a ride around the property. I decided this year to retire it from grass cutting duties. I cut alot of grass with it.
-
1 pointTo the outside world, but it is under the bedroom. I gotta make a set of ramps someday and pull it out.
-
1 pointI say, “build it”—“drive it like you stole it”—if it breaks, build it stronger. You have nothing to lose... of course unless it breaks when you are doing about 25mph and you hit a tree...😬 make sure you have an updated steering system
-
1 pointIndeed ...all day long Rotella 30. With Zinc additive Have used Castrol GTX 30 with a zinc additive...makes things smooth !!! In a pinch
-
1 pointMy grandpas well cared for C-160 Automatic IMG_5925.MOV
-
1 pointwhen my oldest kid was finally heavy enough to satisfy the seat safety switch he was able to cut grass with the tractor but one time he was moving fairly well - and the seat switch activated momentarily when he hit a bumpy part of the yard the tractor quit for a second - and then quickly resumed after a huge backfire the backfire scared him and he jumped off the tractor and ran into the house lol
-
1 pointThink now i‘m understand what is meant with Dancing Queen ...😂
-
1 pointHere is my rj58. She purrs!
-
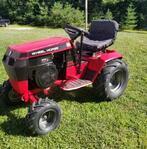
1 pointThats better! Heres the main worker- 520H, factory exhaust with a 1 3/4 stack added. LOVE the Onan snarl!

.thumb.jpeg.8bdd6995142db7fbcf4df2d7b452df33.jpeg)
.thumb.JPG.0a576c56b1addda41188734982b5b485.JPG)


This leaderboard is set to New York/GMT-04:00