
Leaderboard


Popular Content
Showing content with the highest reputation on 01/12/2020 in all areas
-
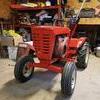
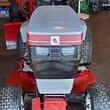
12 pointsFor those who didnt catch the other restoration thread- this is my first red tractor, and first tractor restoration. I did not go TOO crazy, as this baby is going to get used as it should. Attempted to make it look like an older horse, and tried a little mild patina as well. BIG THANK YOU to you folks here who helped me along, especially when it came to research and mods to keep that big Onan cool down here in the south. It now has an oil filter relocation, belt guard vent, and blocked off air intake tube in the shroud. This was a lot of fun, and have a feeling it wont be my last Horse in the stable. How did I do for a tractor noob?
-
10 pointsI bought this beautiful 603 from @Shynon last summer. I’ve been thrilled with it. The carb got some gunk in it the last time I had it out, so I figured I’d bring it home to the garage while I have a chance to work on it. One of Tom’s stipulations was that I not paint the tractor. I agree that it would be a shame to mess with such beautiful patina, so I thought I’d try my hand at enhancing it. I’ve honestly felt like cr_p today, but thought it might perk me up to mess with it a little. I put the carb in the tank to soak, so I took a few minutes to sand 1/2 of the hood with 800 and 1000 grit and then oil to see how it looks. Man does it pop! Ear in mind I will buff it down and it will dry with more of a mat sheen, but retain the beautiful color. The only other thing I’m going to do to this tractor is clean and paint the wheels with a fresh coat of Rustoleum almond. I do have the original hood, but decided to keep this one on for now as I love the look. Hate to admit it, but I think I’m really on board with this patina thing!
-
8 pointsWe should be showing pictures of our plows and blowers, not drives in convertibles!
-
7 pointsI just went down and wiped the oil down. I’ve been letting it sit overnight, but this will give you an idea of the sheen it leaves @The Tool Crib. It’ll dry down a bit more, but will still keep a luster.
-
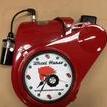
6 pointsI thought the weather was very unusual yesterday and last evening when my significant other came home from work I mentioned spending the night in the Bunkhouse. This would be the first overnight stay. Loaded up the old ice fishing sled and Allagash wooden packbasket with essentials, donned the headlamps and trekked into the night looking forward to lighting the Jotul stove and enjoying Happy Hour. It was 40 degrees upon entry and within 2 hours a comfortable 70. I hope you enjoy the pics of my 2018 Christmas present from my sister, even family likes to play jokes on me regarding my occupation. The thermometer is located in the screen porch and questioned if it was accurate, just seems odd.Woke up a 4 am and opened the windows to let some heat out. Spent from 8 pm to 8 am this morning and had a great time, looking forward to Spring but with just a little bit more SEAT time.
-
6 pointsWelcome to Red Square. That RJ sure is a nice find. If you are leaking by the rear axle bushings, you will want to replace them. You have to open the transmission to do that. Another reason to open the transmission...you stated that it was 1/2 full of water for quite a while. Pull out the shifter (loosen the lock nut and back out the 1/8" Allen Head set screw) then lift the shifter out. Keep transmission in neutral. Loosen and take the 2 bolts out of the spring holding it to the transmission. Look down the 3 holes with a good flashlight. If you see anything like this...all the flushing in the world is not going to clean all that out. You should also pull the hubs off and carefully tap off the seals (they are already leaking anyway), then you can see the end of the axle bushing. You are looking to see if the bronze is equal in thickness all the way around the axle. Move the axle up and down and side to side to see any play. Play should be little to none. Tap off seal Bad bushing...see how thin it is near the bottom? How to pull out bushing.
-
6 points@WHX24
-
6 pointsI tried mowing with my 656 engine swap project but sprung an oil leak so i put the deck back on the 312-8 to finish...i know its the middle of january in western pa but it was almost 70 today and the grass was left long enough when it got cold to bug me
-
6 pointsI made an attempt to try and polish the rims today. The results that I was getting for the time that I had invested were less than satisfactory. So.. on to plan B. 80 grit sand paper and a DA sander made short work of the clear coat that was on the rims. Then a couple of coats of self etching prime, some black paint to high light the "deer track" looking recesses, Silver base coat followed by 4 coats of clear. Not the bling that polished aluminum would bring but I'm happy with the out come. The plan for tomorrow is to throw the old wheels on and move it out side and then get the fenders and ramps adorned with some red paint. Then unfortunately it's back to the salt mines on Monday so there will be no progress until next weekend. I will how ever, get the new tires mounted on the rims some time during the week.
-
5 pointsHere is the one that got things going for us....in more ways than one...theses are my ma and pa back in mid 60’s.Can anyone I’d that horse....we can’t .....so any guesses or observations are welcomed.
-
5 pointsThe paint department was able to throw some brown with pretty sparkles on the frame today. Zoom in on this one to see sparkles:
-
5 pointsMost of us have some type of bearing/pulley puller in our shop. The down side is that most of them will only work on a bearing or pulley that is about 4-5/8 and smaller. I have few different types that I have purchased over the years. Recently I was trying to find one for larger pulleys because as you may know most pulleys on garden tractor are 4-5/8 and larger. Well this was no easy task. Not many available and the ones that are, are expensive. And then I found this!!! Pulls 5 to 7" pulleys. AutoZone (online) Was a bit pricey, $100.00-free shipping and the wife went online before placing the order and found a coupon code for an extra $20.00 off. About 85 bucks to the door. Fairly heavy and well built. Worked like a dream. This pulley was on pretty tight and came off without any damage. POP. Next. Couldn't be happier. So easy. I may make a set of flat half moon wedges to go between the jaws and the outer edge of the pulley for lightweight meatal pulleys to keep them from bending.
-
5 pointsUpdate on Scottie: This past Monday Scottie and I went to his two week check up to do a urine flow procedure and to figure out what our plan for the future. What we found out was we only have three options left at this point in the recovery process for Scott. The first one is to allow time and medications to work in his favor and hope that his urethra will not close shut with scar tissue like it did before. Keep in mind that his urethra completely shut after 3 months that is why we had the unexpected surgery in November. The second one is to do the appendix surgery and have the surgeons create a mitrofanoff trough which is taking part of his appendix and attaching it to his bladder and attaching it to his belly button and that is where he will have to catheterize himself every three to four hours. With this procedure, he will be looking at in vitro later in life if and when he chooses to have children. If we do this procedure there is no going backwards and this is the last hope for him to urinate. The third procedure is to do a urethral graft. This procedure has only been done in the US two other times. Both procedures that were done came back with no drawbacks and no rejections. Scott's surgeon said that Scott is an ideal candidate for this procedure and he will be the first adolescent to have this done in the US. Talking this over with the surgeon and with Scottie and Lowell we have decided to go ahead with the urethral graft and we set the surgery date on January 31, 2020. Scottie, Lowell and I did not want to take our chances with the medication and time to allow his urethra to close. We do not know if this procedure will work for Scott or if Scott's body will reject the foreign object in his urethra. Scottie will be in the hospital until Monday and he will have two catheters when he comes home and he will have to retrain his bladder once again and the typical recovery time is 8 to 12 weeks but the surgeon told us that his recovery time will be longer since he is an adolescent and has been dealing with this for over a year. Scottie is continuing with his home bound school and he is not far behind his class at all. He is maintaining his 6 class course load and he is right along with his class mates. He will be starting 3rd quarter the end of the month and so he is finishing up his assignments and projects before quarter end. Please keep our family and Scottie in your thoughts and prayers as we prepare for his upcoming surgery. Thank you for all of your support and love to our family and to Scottie. Lowell and I do appreciate you all!
-
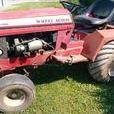
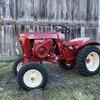
5 pointsIntroducing “Lil Red” I think it’s a Hesston but can’t find any numbers on it. Wonder if I could badge it as a wheelhorse so I could bring it to the big show?
-
5 pointsA little of both. We have a workshop in the basement and also a 16 x 20 outdoor workshop. During the cold season we do most of our stuff downstairs but chemicals like gas and paint stay out. Also the wood and metal cutting tools are outside so the mess stays there. All of the assembly will be done in the nice toasty warm basement.
-
5 pointsRemember - linseed and tung oil soaked rags can self ignite if left wadded up. It is best to hang the rags or lay them out until the oil cures before disposing of them. I was using linseed oil to finish some red wood a long time ago. I left the oil soaked rag wadded up in the sun for 10 or 20 minutes. When I came back and picked the rag up, the center of the rag was hot to the touch.
-
4 pointsThat's just another day in Michigan... Don't like the weather? Wait a few minutes...
-
4 points@Oldskool You're gonna get skooled on that tranny now! Once I tagged Steve about the trans in the above post, he's gonna be all over this like Oprah on baked ham! Follow his direction and it'll end up good as new.
-
4 pointsIf the Temps not too cold, that could still be a funny day. Get Skiing Wear, hang a old Truck Tyre tube with a 10 m rope on the End on the horse and..... Wheeeeee... 😂😎 here the Weather is also very, hmm, very ... Unfair.
-
4 pointsWe got all that slop yesterday here in Michigan...lots of water everywhere!!! Better put a life jacket on the ‘s...
-
4 pointsI've built stretched tractors and noticed the difference immediately for the better when the angles were corrected for the longer wheel base. It would drift in the front and the turning radius was ridiculous. Seemed like it needed a football field to turn around. The angle doesn't need to be 100% accurate going that slow like it would going fast. Does it need to be done, without a doubt no, but it will definitely track better and make a difference if it is done. Correcting the angle made mine steer noticeably better, then I ground off the stops so it could get an even tighter turn. Do the front angles last and try it out first without changing them, If you're not happy then correct them to match the wheel base and see if it makes any difference.
-
4 points
-
4 pointsIt probably will take a colossal amount of time for a project like Colossus, just thinking out loud
-
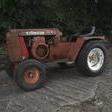
3 pointsfinally got started on this tractor tore it down little over a year ago haven't had to to mess with it stated sandblasting it and like a dummy i didn't use a respirator (face shield only ) used the black blaster sand from menards it is recycled coal slag time i was done i inhaled about a bag of it and face was black from it . felt the effects latter that evening hacking around from it. bought this blaster from harbor freight worked pretty good sat down and did the dash panel and strg wheel cap that a little tedious to do when wife talking at you asking questions paint be here for it next week and have one of the guys at my work going to paint it in our paint booth at work should look better than new i hope will have more pics to come
-
3 pointsLooks great 👍
-
3 pointsHave to give the moderators due credit for that. Good folks.
-
3 pointsSunny balmy 65 here today. A couple days ago...
-
3 pointsYou may have to produce a notarized copy of it's birth certificate and/ or a federal compliant ID drivers license.
-
3 pointsDeer print... on a Horse trailer...
-
3 pointsJust got back from visiting with @kitkit for a nice set of front wheels for the RJ! More forward progress!
-
3 pointsJeff isn't here Jim, so I'll do it.
-
3 points
-
3 pointsMuck boots, the ground has thawed and turned to grease. It's almost as bad as ice. My shepherd is the only one enjoying this mess, she's 4/4ing. Mud everywhere.
-
3 pointsBill, I don’t plan on going that fast... but if my girls get behind the wheel.... that’s another story.
-
3 pointsI have a Stickler screw splitter (which you can still buy) and thought about adding a hydraulic motor to use it on the end of the back hoe. Another crazy idea never gotten too. Something like this but on a smaller scale. Just poke the logs on the ground instead of lifting them to the splitter
-
3 pointsIf you make a longer set of tie rods and go to the back of the steering triangle the inside wheel will turn sharper.l
-
3 pointsAlright made some small progress got my new front tires and some cleaning done.
-
3 pointsMechanics that put bacon on the table when folks have problems with ethanol love it.
-
3 pointsI sanded with water first. Then, I coated with boiled linseed oil cut with just a little mineral spirits. After it’s wiped down the finish will be more soft and aged looking. It just brings out the beauty of mother nature’s work.
-
3 pointsTrina and her mom spent a few hours moving the rest of the firewood from the upper yard in the shed to the basement. 5 loads in the Ohio Steel brand trailer tugged by her 867. I spent a lot of the day in the outdoor workshop moving/organizing/cleaning then took apart the 1267/1287 mongrel so I can shelf some of the stuff and use the 8 speed transmission for the Colossus project.
-
3 pointsToday I managed to put a fresh coat of red paint on the garage floor and accidentally got some on my trailer frame. I picked up a set of rims from a Ford Ranger that I'm going to use for my trailer. The factory clear coat has pealed off in quite a few spots leaving the aluminum oxidized pretty bad. I'm considering sanding them down and painting them. Unless any body knows of a good way to get them back to their original state.
-
3 pointsThose screw type splitters are very popular in many parts of the world. They are only dangerous if you're not mindful of how you use them. Think of them like you would felling a tree. Be very conscious of every move. Keep all human limbs away from it and the wood. Clear a path around it. Be prepared to disengage the PTO. Keep everyone in the area away from it and out of your concentration as well. Have someone make a video in operation!!!!!
-
2 pointsAfter my son left here to go back home in Anchorage it was -15, just talked to him and it's still below zero.
-
2 pointsSpent a bunch of time organizing and cleaning up the outdoor workshop the past two days. Some much needed space cleared out. Got the 1267 mongrel taken apart. Needed some of that for Colossus and some for this Charger. I was able to work on the Charger a little bit this afternoon. General cleaning, a little disassembly. A little spray penetrant. Oiled up the hydro control. I removed the nasty seat, bad coil, and frozen carb. Any thoughts on why this is bad? Carb and coil gone. Some surfaces cleaned up. Here's the frozen carb. I'm going to put it in the carb soak kit for a week or so and see if it frees up. It appears to be an original Kohler carb and I'd like to save it. Rodent hotel between the gas tank and ignition switch. This under seat box was literally half full with nuts and seeds. Some squirrel is really gonna be peaved when they see I have it all.. Seat is nearly ..... A moss farm? Water and rust stains from the almost new seat. When I get freed up again I'll take out the gas tank and clean back there. I'll need to find a key and test this ignition switch. Throw a few new wires on then see if I can find some spark.
-
2 pointsfinished up blasting today i mounted new tires up on the fronts got theses tires last summer from a vendor at a show i was at last summer. they are 8 by 6.50 thought they would look at little wider after i mounted them theses rims about the same as my 857 has.the front end was damaged sometime in the past it has a newer spindle on one side which has cotter pin and other has a bolt holding wheel on and one rim is a little diff. than the other. the rears on this here must be original i never knew WH had this option talking to my dealer and he sold this tractor new with this rear tire option and i found the original owners name on this when tearing it down and i actually know the guy went to school with his son from k- 12 grade . I bought tubes and putting them in theses rears they have some dry rot but still hold air this was sold new in late 1975 with 48 inch side discharge deck which i have and a rear mount tiller which don't know what happened to it so that why it has bar tires instead turfs this is my other tractor i restored about 12 yrs ago and been working it ever since and when done with this one will be using to to mow with and maybe get rid of my green one
-
2 pointsFigured I would share the wealth.
-
2 pointsFriday at 6 PM it was 72 degrees, with tunderstorms and tornado warnings. Saturday morning there was snow on the ground. Today, it's back up to 57 degrees. Almost warm enough to go outside!
-
2 pointsManaged to get the pump pulleys aligned, head bolts in with spacers. Got to get hose clamp for tank and another 90 elbow. Time to remove and paint for when a warm snap happens again this winter. I think a rubber hose will still be acceptable for the tank to pump what do you guys think?
-
2 pointsI stuck Chief up in the rack, making room to start working on the dump box tractor!
-
2 points


This leaderboard is set to New York/GMT-04:00