
Leaderboard


Popular Content
Showing content with the highest reputation on 12/15/2019 in all areas
-
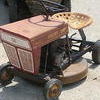
9 pointsJust got back in town. Had a buddy at work telling me that one of his family members had a 520 that they wanted to get out of their barn, I'm game I said! What I did not know was all the attachments he had that needed to go as well. I was very lucky to drive away with a 900hr 520, 60in deck that is very clean, tiller, and blade (small frame) as well as a bag full of filters fir the low low price of $200. Cant wait to get started on it
-
9 pointsNice Tom .. an Xi came up around here on CL awhile back but need one like another five holes in the head! Couple more pics of that 854 and yes it certainly have a story to tell. At one time you can tell someone loved this tractor. It hasn't been hacked on real bad in a mechanical nature but the paint job certainly has character! Pin strips and all. I duuno maybe the guy was a blackhood fan too! It runs and drives nice but has real bad axle needle bearings in the tranny which is no big deal. I eventually would just like to do Mike's @prondzy mechanical resto but leave the paint alone. Maybe clear coat or somethin. I orginally scored this with a 753 that Dan @Achto now has and a '67 LR that Denny @dclarke took home at the Portage show.
-
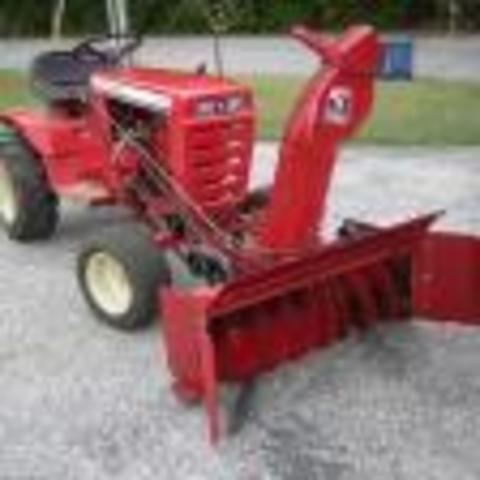
8 pointsGot everything ready for snow today. Finally got my rear weights on the C195 and the ag tires look good on the 520-8 loader
-
7 pointsJust jumped on
-
6 pointsI'm a little late to this thread but here it is - 416-8 I picked up in September is ready for snow . Hunted down set of 50 pound each wheel weights, went over wiring , new oils , flushed tank , fixed hood stand , new bushings , headlight bezels , points , plug , condenser, head gasket , coil ...the works . This year I'm tackling it with the 416 and a 315-8 . Hoping for some seat time with this 416 and the blower .
-
6 pointsCouple of these were in my harem once before. Rest assured they will never leave again!
-
6 pointsOkay, big update today. I met with the previous owners of the 3 tractors yesterday. Notice I said "previous". So yes, all 3 of them are mine now! Let the games begin! Probably lost my mind a little I think. Went down expecting to make a deal for one of them, not all three. So I went from owning 0 Wheel Horse's to 3 in one day. Also got the plow for one of them too in the deal which is nice I think.
-
5 pointsMy snow movers have been ready to go for over a month now and haven't moved an inch. I started them up yesterday just to warm everything up. I shouldn't speak too loudly though, the snow will come to Chicagoland soon enough.
-
5 pointsAny Xi that wants to just jump in, can just jump on in. 👍 I’d add to my numbers too if that came along.
-
5 pointsOr go electric with a 12v dc motor. I used a power window motor for mine and made a bracket to mount it to. It's covered with a piece of membrane roof material just to keep ice out. That's a piece of 1/2" copper pipe to link the 2 shafts.
-
5 pointsYou can make one out of a 4ft length x 3/8 steel rod, a small piece of pipe and 2 cotter pins
-
5 pointsLittle bit of a haul today fellas....
-
4 pointsWell folks @JCM Jim stopped by the house today and graciously put up with me for a bit. @Stepney here's the carb info... We removed the throttle shafts from my old C160 carb and his C165 carb as well. Both were some floppy & both were broken at the top linkage. Here's a video I made awhile back that shows the carb I have. Jim's was not quite as bad but broken in the same place. We soldered the top joints back together. Cleaned his up some and pressed the 2 bushings in place on each carb. On his carb I used a dead blow hammer with a 1/4" pin through the carb body to hold the 1st bushing straight. Then press-fit the 2nd one on in with the vise. On my carb I just used the hammer for both. Each method worked out fine. We put the throttle shafts and plates back in with new 3-48 x 3/16" button head Allen screws. Added loctite for good measure. See the above video or the pic a few posts back for a "before"... Here is my C160 carb after cleaning. If you look carefully under the linkage you can see the spacers we installed. @WHX24 This method turned out to be FAR easier to do than we thought. I have 2 other carbs that I'll be repairing the same way. I now have another reason NOT to buy a Chinese clone cheap carb.
-
4 pointsA bit of trivia: Reo Lawnmower Company was started in 1946, with their first offerings being a 17" push type reel mower and a powered 21" reel type mower. In 1954, Motor Wheel Corp. bought Reo and ran it until 1963, when Reo was sold to Wheel Horse. Due to the MW prefix on the part number, I'll guess that the part belongs on something produced during the years that Reo was owned by Motor Wheel.
-
4 pointsGuys I honestly tried to give him more, I showed him the value of the ones sold recently. Told him I would value the tractor alone at 1400. Very nice guy who hooked me up for sure!! Funny thing is my buddy who I work with that put me in contact with the man with the 520, has a neighbor who has a c160 in his garage that he wants to part with. I'm working out of a 24x24 garage and I have a 12x12 shed so only one project at a time for me. I will be back for that c for sure
-
4 pointsLiterally... just allowing it to charge more solved the problem! It was interesting as when the battery wasnt charged enough, the starter turned when I hit the ignition but it didnt turn over the engine. Enough charge, starter worked as normal and engine cranked and started right up.
-
4 pointsThese are 43 and 53 years old so I guess they have had it. I'm the same age as my oldest tractor, so I guess I'm past my expiration date also.
-
4 pointsAgain.. many thanks! It just fired up!!!! Love my horse! But will go by store and pick up some distilled water to top it off and put trickle on it just for good maintenance.. Bring on the snow!!!!!
-
4 pointsYou have to remove the little WOODRUFF key (item # 3) before the shaft will come out thru the side of the hoodstand. It is inside the friction cone # 7.
-
3 pointsHere’s my Reo 44-46, tiller steer one of few known to exist! Was NOS when I bought it about 15 years ago from a dealer.
-
3 pointsWell some things on Big Red are lookin new again, gave the block a cleanen, the head was just caked, so cleaned it all up, ran thread chasers through all holes and dies on all bolts, installed head and torked her up. I was always wondering why she ran hot...those stupid mud wasps had 3/4 of the block fins and 1/2 the head fins caked with there mud nests. Almost half a cup of there spit mud.....i forgot how deap the cooling fins are in the block, long bycycle spoke was my saving tool to get all there mud nests out. Wew this ol farts had it for today, night all.
-
3 pointsI thought you were reducing your numbers....
-
3 pointsYou sure did that guy a big favor by getting that out his barn for $200! One man's trash is another man's treasure. REAL Nice score!
-
3 pointsAhhhhh Chevy, I love working on all engines but the chevy is closest to my heart. At 8 years old I tried to clean the body on my paws 1961 Silver Hawk with a dry rag, Paw caught me and blew a fuse, he felt bad afterwards and explaining why you dont use a dry rag on candy apple orange paint, and said if you like to help with the cars then lets get started, so he baught a used 283 smb chevy. And instructed me to on how to rebuild it. We installed it into a 66 malibu convertable. Last i heard it was still running and on the road near Brockville Ontario.
-
3 pointsThanks Mike! Very good and detailed information. The chute on this snowblower I bought is so clean I just could not believe it was a 1985 model! I will get that one lower spot painted when warm weather returns in 2020! Looks like we may get some of the snow today and tomorrow in Central Indiana . We are seven miled north of I-70 which generally is a dividing line between snow and ice during storms from the west. North and northwest storms into Indiana tend to have the lighter, fluffier snows. I use Sno-Jet on my chute as a coating. Used it for years on my Lawn Ranger Snowblower chute. It was the recommended product the Ariens company recommended for snowblowers (this Wisconsin Company was one of the first snowblower manufacturers). Sno-Jet works very well when the snow is wet too.
-
3 pointsThey are not an item that you want to grease. The friction cone and sleeve control your ground speed, lubing them will cause a lack of friction and your tractor will speedup and jerk around while in motion and this will cause you to get pissed off.
-
3 pointsThe best way to ward off a snowy winter is to buy a new snowblower (or rebuild and install on your WH). Your friends and neighbors will thank you. My 520-H is rigged and ready but not one flake yet.
-
3 pointsI was going to suggest HF too for entry level. If yer gonna turn my girls into full fledged grease monkeys tho I would also suggest a cheapy tool chest? Unless you go with a set in the blow molded case. The Home Cheapo thing ain't a bad idea for a stocking stuffer. HC used to have Jimmy Johnson selling Kobalt so they can't be all that bad. For 15 bucks they leave a socket under the hood on the plow field like Dan's wallet, I never do that, nothing lost! I think you need to snuggle up to the Missus and produce a few boys tho! That way they can come spend a summer here and I can teach them proper shop organizational skills!
-
3 pointsThank you Maynard. I have sent a message with my info. I have been hovering here in background for the past year+. This site is the best that I have found on the subject of tractors. Dick
-
3 pointsSo she starts, she runs, but I cant get her to idle properly. Keep using the choke to keep her going, but if I lower the throttle too far she dies out. Need to play with carb settings I hope. I have not disturbed the governor so I hope that's ok. Did the decals this afternoon.
-
3 pointsWell this is probable as close to pushing snow as my C160 will ever come here in Central Texas. The Chains made a huge improvement on dirt traction. it now has two 33 lb Sears rear wheel weigts per side and loaded tires. What a beast!
-
2 pointsI recognized those stripey rear fenders on the trailer! Welcome home boys...
-
2 pointsYes Garry
-
2 pointsBasically i know it and did it mostly this Way, but sometimes i don‘t, especially in last Winter with my FEL Actions i had some situations i needed urgently a stronger Brake. So i have to missuse the Gear sometimes as „Brake“ when the original Spring doesn’t work strong enough. This bricks are tiny and a regular adjusting sometimes once a day must be done with original Spring. Even if the brick are thick enough, i just loosin massive Brakeforce and must readjusted to stop. The whole mechanics is well maintained and works very easy (can be moved with a lightly fingertip) The shifting with released Clutch allway‘s work noisless and forceless in my case if i release clutch. The Pearless disc brakes ain‘t wear pretty fast but they must be readjusted very often, even a Wear on the Bricks was not really measurable. ( just fracts of) a 1/10 mm wear was allready a disaster at the Brake and ends up with nearly completely loss of brakeforce, so i decided to go this Way. I changed simply the original spring with a improved much stronger Spring that was able to push easily 18Kilos. ( yes i know a lot of force but i didn‘t want it without springload) I guessed it must double the original size, but the spring i buyed optical it was tripple the size in diameter of Wire. I attach it with a short Threaded rod on one Side screwed with a Balljoint and on the other side with a squarejoint. So i‘m able to adjust it, that it engages later than with the Original spring, but with the improved Spring, i have a even more efficient Brake than before at smaller Shift on the Lever. Another benefit of that Action was, that i have more active work length ( means less adjusting needed) about the same Lever with that small changings and i can roll with released clutch than brake on one Pedal at the same lever as before. The new adjusting was done as follow: The whole Pedalway i can use was measured completely at 12cm The clutch releases completely at less than half Pedalway, what i verified at the Gearspindle with on tyre on floor. i can rotate the spindle and the bigger Pulley runs free in the Belt. After that was happen, i give it another 20mm Pedalway and fix the Pedal temporarily at this setup. i also marked that setting for future purposes to readjusting. now i adjusted the New Preloadspring that it begins lightly to grind on the Brakedisc. i repeat this marked settings 5 times and it seems to work perfectly At least i did a Testdrive with that new setup and Whow, impressive Brakes now. curious how long they last before next adjustments will be needed. Basicly i planed before to split the both systems, once a „new added“ Pedal on the left from a gt14 i had here allready and the Brake separately on the original pedal similar to a Car. but after that rework, i found no longer a need for.
-
2 pointsall three tractors look solid - and appear to be well worth the investment ... $ and time once you get them going again you can age gracefully with them
-
2 pointsok now that you are an official wheel horse owner we gotta come clean wheel horse tractors do not last forever some at least after 20 or 30 years an engine can require service - and some even expire (gulp) seats sometimes only last for 20 or 30 years and then will show wear or cracks mower decks - if not maintained - will only go 20 or 25 years before rust holes appear mower blade or bearing can be damaged when attempting to cut 3-4" saplings tires will show cracking after 20 or 30 years wheel horse oem belts will only last 10 ... 15 ... (20 or more ?) ... years ... for some reason batteries do not last a lifetime when installed in a wheel horse tractor ... (very annoying)
-
2 pointsAs you rotate the engine you will see the points open and close, rotate to the maximum position and adjust the gap to specification. Rotate the engine with a piece of paper between the points till the paper is clamped, then pull the paper out to clean the points. You seem to be dwelling too much on points and timing, the engine will run with those being a bit off, of course try to adjust as best you can.
-
2 pointsWoo hoo! Seems I do recall back back in the beginning... some wise folk telling yo not to stop with just 1!
-
2 pointsI would begin with a new spark plug and clean or replace the ignition points and then set the ignition timing. This thread will show you how.
-
2 pointsFinished painting the hood, just the decals to fit when its hardened off.
-
2 pointsI got a chance to use my newly acquired 312-8 today to clear about 4" of very wet and heavy snow from my 75' double-wide driveway. she did admirably- but was screaming through the entire thing unless i crept along in 2-Low. i thought it was the belt but turns out the PTO clutch was pretty loose... I absolutely love how adjusting that was completely tool-free and took me all of 30 seconds to turn in the adjuster 2 full turns. in the background you can see my POS 9hp Craftsman walk behind. just for shites-and-gigs i tried it out, and no joke it was completely clogged within 3 feet of trying to throw this wet snow. i think i might have made a good move on the wheelhorse here! One question i have for folks is- i didn't find that the blower was getting all the way down to the asphalt without adjusting the wheels all the way down to their lowest setting and then pushing my foot downwards against the lift lever while moving. is this common to have to give it down-pressure like that to get down to the asphalt?
-
2 pointsOf course here in the mid south we don't get a whole lot of snow but when we do I will be ready !
-
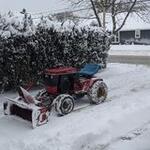
2 pointsHope you guys don't mind some more action shots. 520 with a single in 14" of fresh powder day before turkey day in northern WI deer camp. Busting the initial trail through 2 ft drifts in 30 mph winds was the worst. Got a real quick lesson on keeping the chute turned with the wind! Doing good till I lost the pin that holds the attach keeper up into the front attach. A tie down lashed the blower back to the tractor and ran a 1/4 mile backwards in my own tracks to camp for repairs. Luckily I found the bracket in the snow and a piece of all 3/8 all thead for a new pin and back in business. Finished clearing a 1/2 mile of road plus parking areas. Four hours of seat time not counting down time for repairs. 6 gallons of gas. Guys are right about needing to keep a single loaded up. Onan never missed a beat other than being thirsty.
-
2 pointsStill snowing a bit so I will wait for tomorrow to plow down to the barn. #1 Plow Charger 12
-
2 pointsSorry guys , no attachments for the Wheel Horse . Only the poly dump cart . All I have is this semi-restored and re-powered '66 tank .
-
2 pointsThis is available if needed
-
2 pointsHere’s my snow removal fleet.
-
2 points
-
2 pointsJust finished leaves, loader is ready but the other two will take a day or two, so this is an old photo.
-
2 pointsHere's my team


This leaderboard is set to New York/GMT-04:00