
Leaderboard


Popular Content
Showing content with the highest reputation on 11/10/2019 in all areas
-
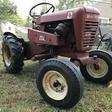
13 pointsWell the Ferguson is home. Runs. Drives. Lifts. Lowers. And it's ROUGH. Like 24 grit sandpaper rough. It's all good though. I bought it from my parents specifically because they've helped me out ALOT over the years and it's my way of paying them back a little now that I'm in a better place in life. It has a 6.5' plow and 2 buckets. It's been updated to 12v. The front tires have been changed to 16" rims from the original 19" knife edge. Great for steering with the loader. The bucket/ plow has had an additional hydraulic circuit added so it's power up/down. Not a trip style. Before winter: There's a few loose wires I need to move, remove, or recrimp. Likely an oil change. But it'll get Trina/BBT after it when spring comes... That tractor will never know what hit it.
-
11 points
-
9 pointsI know it's a day early, but many of us celebrate Veteran's day on the weekend before. It's impossible to mention all of our veteran's by name, but I hope you have all added your insignia to your profile indicating your branch of service so we all know who you are. To our allies, you are included in this as well. If your insignia isn't listed, please post it in the Talk to the Moderators area and I will make it available for you. Thank you to all veteran's regardless of your tractor preference! As always, you can revert your theme back to RedSquare, the theme change may be located on the right panel instead of the bottom of the pages, apologies for the inconvenience for this.
-
8 pointsI modified the stock cart , added a plywood floor extension (fast install and remove with 2x 5/8 bolts with wingnuts) ) added sides and a front secured , by stakes and this baby holds aslily 2 or 3 large tarps of leaves. Easily compressed as well . The Tractors love this cart. I don't mind leaves duty, blowing raking or loading, its the hauling that I hate. Thats heart attack city ! Wet or dry leaves the Wheel Horse Tractors doesn't care . I dump them in the back woods over old branches and logs, and the Rabbits thank me ! Load the cart to max and the reward is a nice drive into the back woods ! Today it was the 1986 / 310-8,
-
8 pointsGetting ready for winter had make a make shift shed for 6 tractors. Also got the Xi ready, new aluminum bumper, aluminum grill, and got the plow mounted
-
8 pointsStretch Modifications I removed the old bumper (1st pic) and installed new brush guard. Also moved the air tank to where the battery used to be. Added air pressure gauge. Installed another set of horns on the right side to better match left side. New aluminum wheels & tires. Hope Karl Storhy will approve.
-
8 pointsThis thread is way outside my area of expertise but is something that I have had an interest in ever since I was a kid. During the Cold War era, there was always an attitude of “one upmanship” between the Russian Bear and the American Eagle. Tensions were almost always high and there were a variety of military technological advances made on both sides with an eye towards the other. As the story goes, a high speed recon jet was flying over Russian airspace when it was shot down. This caused more tensions between the USA and Russia and was also a source of embarrassment. So...it was time to roll up the collective sleeves and do the American thing—built a bigger, better, faster jet! Little did anyone in the late 50’s know but there was an aircraft in the works that would defy reality and almost literally—TIME! It is important to interject here that when the building of this bird was commissioned, it was barely 60 years since the Wright brothers had made their first successful air voyage of 20’ above the sand dunes traveling a distance of about 120’ in December of 1903. It is staggering to think that in just 6 decades we went from flying an apparatus like this... barely 100’ to one that would set records of flying around the world in only a handful of hours. To fully understand the reality of how advanced and amazing the SR-71 Blackbird is, you have to frame it by the time period in which it was made. WHILE was building the 854 (a well built machine as well—no doubt) Lockheed had a secret division designing and building the coolest aircraft to ever fly in the skies... The Blackbird was designed to fly at an altitude of 85,000 feet and at speeds of Mach III or about 2,200mph! Ironically it is nearly impossible to find a factual top speed of this magnificent machine. Often the best answer that you will get from a former pilot is Mach III “plus”—whatever that means. I do know that I was at the EAA Air show in 1989 when they brought in an SR-71 that was about to be retired. I was there when it took off. It was an amazing experience watching that bird fly out. It did a couple of flyovers before heading west. 45 minutes later they announced over the loud speakers that it had already landed in Miramar CA which is over 2000 miles from Oshkosh, WI! Now that is moving!!!! What impresses me most about this machine is that allegedly the last Blackbirds were grounded in 1999 but yet it still is the fastest manned jet in the world history of military aviation. https://www.google.com/amp/s/www.cnn.com/style/amp/sr-71-blackbird-spy-plane-design/index.html I was reminded of this aircraft when it popped popped up in my news feed a few days ago. I thought that maybe someone else on here shared my interest in this very special and unique aircraft. Does it look outdated or vintage almost 60 years after it was first designed—I think not! It still looks cutting edge even though it has been officially “grounded” for more than 20 years. What is often said on this forum? Necessity is the mother of invention!!! The Blackbird was born of necessity and became an overnight sensation.
-
7 pointsPut the head back on the K181 on the 854. Finished putting the HY-3 pump back together and got it and the cylinder mounted. Test fit the hood stand fittings for my HY-3 rockshaft build.
-
6 pointsMade back home around 6:15 and other than refueling the trip was mostly uneventful... Besides figuring out the average size of my wood load (roughly 2 full cord) I wanted to see how much weight I possibly had on there as well Google says on average 2 ton per stacked cord or this other site where you can pick species so basically 50/50 load of cherry and black (yellow) locust...https://forestry.usu.edu/forest-products/wood-heating... So about 6900 lbs or 3.5 ton and one part of the wood shed is nearly full now and I still about another full load yet.
-
6 pointsOk so it doesnt take long to strip down a tractor just ask the Mafia! Today I drilled out the spindle holes on the axle, I didnt take measurements but they were sloppy enough to warrant a bushing job. I did not bore the hole all the way through I left a lip inside for both the top side and bottom side bushings to ride against. The bushings I used were 7/8od x 3/4id that I picked up from the hardware store and I turned them down on the lathe to fit flush. Everything is nice and tight in the axle I even opted to use these bronze bushings for the thrust washers between the axle and spindles I got the steering shaft back in and shimmied it to the steering gear here is where I am for the end of this weekend.
-
6 pointsPics "going over the mountain" and half unloaded by 10:00, all went well so far...
-
5 points@Bear G good to see you on here! I bet @Shynon ... can’t wait to hear the (horn) changes comin’ comin’ ‘round the horse stalls, he ain’t heard the horns since last July in Portage WI that was a poor rendition of a good country song I know! I bet Stretch sounds as good blowing steam as it does revving up!
-
5 pointsUnfortunately, most of my favorite screwdrivers are long gone. When I was in the office equipment business we only used high quality tools, and most of them were metric to fit the Asian screws used in imported machines. Most came from Ames Tools. Of what I did keep, many are gone, what with a son and grandsons who find other tasks for them. But I will say that I still have some screwdrivers that I bought from Western Auto in the 1960's that are still as good today as they were when new. As a matter of fact, while excavating a place for my new Wheel Horse barn (oops, I may have let the cat out of the bag), I unearthed my beloved Western Auto BIG screwdriver. Has to have been buried there since my son (now 44) was playing in the woods in the 1980's.
-
5 pointsThis good? 7:00 am on my way to WV just about half way there...
-
5 pointsEarlier in the year, the Horse was not happy and then eventually stopped running completely, it had a replacement ignition switch (the old one had loose terminals) and a carb service and it is good as new Just did some odd jobs around the garden, can't say how good it is to have the Horse up and running again It has quite an easy life but beats pushing a wheelbarrow around all day
-
4 pointsSo my 856 is has been my go to tractor for a since i started into WH. The last 4 years it has been my dedicated mower, which it does an amazing job on my 3/4 acre lot. About 5 years ago i rebuilt the k181 and starter/gen and rewired it. I have never done anything with the transmission which had me thinking i should tear it apart, and rebuild it this winter while its out of service. Then i thought lets go through the whole tractor, more of a mechanical restoration, i am NOT going to repaint this tractor, i want to rebuild/bushing/repair all the worn/wearing components without harming any paint. Today is teardown day and im making a list of things to repair as i find them. All of the yellow is pollen, the weather changed a little fast this year so she didnt get a bath before coming in. Ill clean it up as i go. Off with the hood and fender pan Will need to repair the front hood pins And weld the crack in the fender pan bracket This is going to be a slower process i will try to take pics as i go and keep updates
-
4 pointsI have had this screwdriver for at least 20 years, I think it came from a set that my Dad used. It seems to be my go to tool. I use it for everything, from mixing paint, to removing seals, and of course turning screws. I think I would be lost without it!
-
4 pointsThis is the story of how I removed a broken head bolt from the K181 in my 854. I am posting this up as it may help some of you in the future with your own issues. Use it at your own discretion, it may not be the best way of approaching this situation, but it worked well for me. A little backstory on the situation, I purchased an 854 before last winter intending to use it as my worker in the garden in the spring. Unfortunately that didn’t play out the way I had anticipated. The motor would run for 10 minutes or so and then seemingly shut off like you turned the ignition off. Mind you the only motors I have ever worked on have been Cummins diesels. Never any small engines or gas motors for that fact so this was a new adventure for me. I originally chocked this up to being a vapor lock issue caused by the fuel line heating up and boiling causing a lack of fuel in the pump/carb. After installing a longer fuel line to move it farther from the exhaust this did not solve the problem. I moved on to the fuel pump. Upon removal of the fuel pump I found a decent amount of corrosion, enough to significantly reduce the volume coming from the output. A short disassembly and cleaning later and I was shooting gas several feet from the pump while cranking. The issue persisted. Moving on to the carb, I found the carb decently clean, but disassembled and cleaned it just to be sure. With the carb reinstalled and adjusted the issue persisted. With my issue still persisting I removed the head to check for any issues I may see internally with a quick inspection. I found a piston that is obviously loose in the bore, which I expected with the blue haze this motor has while running. However I do not think that is causing the 10 minute run time, I since believe that the issue is electrical, likely coil related. But on to the real meat of this, the broken head bolt. While removing the head I broke the bolt closest to the exhaust port. This seems to be, from some of the other posts I have read here, quite the problem area. Luckily the head bolt broke approx. ½” or so above the deck of the block so I thought I could get it out. Several attempts at removing it were tried: - Apply heat with a MAP gas torch until bolt was red hot, followed by plenty of penetrating oil. (Before each attempt) - Vice Grips (Simply rounded the bolt) - Cut slot in top of bolt, use impact screw driver (Remaining bolt broke off on either side of the slot) - Welded a Nut on ( Broke 3 nuts off) I finally stopped these approaches when the bolt was approx. .125” tall for fear of damaging the deck of the block. At this point I resigned; it was time for a professional to work on the motor. I would have it bored and have them drill the bolt at the same time. So there it sat taking up space in the garage for several months, a monument to my failure while I saved some spare money to have it fixed. While my plow, disc, and cultivator gathered dust behind the shed and my garden mockingly grew up in weeds. While at work one day the thought hit me as I watched someone use a drill bushing on a tool to transfer a hole from a mating part. Maybe I should try another attempt after all that motor runs strong when it’s running so I could live with the blue haze from the loose rings. I really don’t think the issue that’s causing the motor to stop is internal since it runs so good when it is running. So I went home and measured the size of the clearance hole in the head, and armed with that information I had a friend make me some homemade drill bushings. Using some O1 rod we turned three bushings with .340” OD’s and 5/32”, ¼”, and 17/64” ID’s. I purchased a set of left hand drill bits at Harbor Freight and a center drill. I also purchased a 17/64” left hand bit from MSC. (MSC PN 81127177) and a 5/16-18 plug tap (MSC 77430080). Here are all the tools I used. The first step was to install the head back on the motor to use as a guide block. In hindsight I would have cut a 5/16 counter bore on the back side of my drill bushing to fit over the broken stub of the bolt and be sure I was lining up perfectly. However hindsight is 20/20 and I will do that next time. If your bolt is broken below the surface of the deck you could thread the end of a shaft that fits in your head and use that as an alignment dowel as well so there are several viable approaches. With the head loosely bolted down I carefully adjusted it until the gap around the bolt looked even and then cinched the head down tight. This is the last time the head will come off until the bolt is removed and I was ready to tap. After the head was situated and tight I installed the .250” ID drill bushing in the head and tapped it down gently until it contacted the bolt. A healthy shot of oil was shot in the bushing, I would recommend tap-matic or another cutting fluid but I had WD-40 at hand so I used that. The compressed propellant also works well to blow chips out if you do not have access to compressed air. Using the #3 center drill, which conveniently has a shank diameter of ¼” and the ¼” bushing I drilled a starting hole to keep subsequent drills on track. This only needs to be .050” deep or so. I quickly found that the top of my bolt was very hard. Since this was my first time using harbor freight drills, I was unsure about using the 5/32” drill, and there was already a .250” bushing in the head so I skipped that step and started drilling with the ¼” drill. I would drill ¼” deep or so slowly with moderate pressure, I found after the first ¼” or so the drilling became much easier. I must have quenched the bolt with the penetrating oil with my original attempts at removing it with heat and penetrating oil. I would periodically check my depth by marking the drill with my thumbnail and then putting the drill bit down an open hole in the head until I was sure I was deep enough. Although, the hole would if drilled too deep end up in the exhaust opening, which should not harm anything, but wouldn’t be ideal. I expected that the drill would “fall” through the dead space at the bottom of the hole, but I never experienced that even after drilling deeper than I would have ever expected. (The head bolts are only 1-1/2” long and that includes going through the head) I was impressed with the Harbor Freight drill, and it made short work of the drilling, drilling 1 ½” or so deep in short time. At this point the bushing had ridden up out of the hole with the chips built up under it and was easily removed. If this happens while drilling you will want to remove it, and blow out the hole and then replace the bushing. This ensures your drill is tracking straight at all times. I blew out the hole well, and then replaced the ¼” bushing with the 17/64” drill bushing. The reason for the 17/64” drill bushing is that it is quite close to the minor diameter of a 5/16-18” drill bit. Think of the minor diameter as the size of a bolt if you removed only the threads, the solid portion left inside is the minor diameter. This means when I drill out with this size, if I am centered well, only the threads should be left in the block. Depending on how stuck the fastener is the left hand bit may even catch some of the threads and spin them out, otherwise all of this work could be performed with cheaper and easier to obtain right hand standard drills. As with the previous size the 17/64” drilling went well, and it even pulled out the first few threads. I proceeded in much the same way only drilling ¼” or so then stopping to blow out the hole, clean the drill bit, apply more lube, and push the bushing back in the head, while checking depth against another hole in the block. A short time later I had a drilled out hole, and it was time to remove the head again after thoroughly cleaning the area to prevent metal chips from migrating to the cylinder bore. With the head removed I was relieved to see that my hole appeared to be well centered on the bolt and I moved on to the tapping operation. Much to my delight it threaded almost as easy as the tap turned in an already tapped hole, simply pushing the remaining threads out of the hole. I stopped every few threads and backed up to break any chip that was forming, as well as stopping every ½” or so to blow out any chips. Again being careful to not introduce them to the valves (Motor turned to be on the ignition stroke so both valves are closed) or the cylinder bore. Job successfully completed! I purchased some new bolts today to reinstall the head, and will be picking up some anti seize as well to thoroughly lube the hole up. I am not a member yet, but when I have some extra cash I will be, and at that point I will upload some of the multitude of pictures I took during this process if anyone is interested in those. After that it’s on to seeing if a new coil, condenser, spark plug wire, and spark plug fixes this thing for good!
-
4 pointsBetting I know where you prefer I mount the new horns. I’d be able to blow them if I ate enough beans.
-
4 pointsSee my moon window in the door? Wood is my preference over plastic, but going outside is still king.
-
4 pointsSquonk: That storefront... now the Indian restaurant, is only 2 minutes from my house! No idea they used to sell WH tractors there. Cool! Thanks...I will bow my head in reverence whenever I pass by it.
-
4 pointsOn the west coast.... up in Maine...
-
4 pointsDon’t know really were to post this but I had this manual offered to me . I really don’t have any interest in it besides the cool factor and something to display . What do you think and what’s something like this worth ? It’s a 45min drive to Owasso Michigan to pick it up.
-
4 pointsLove those truck ramps. Vermont has them. Hoping I never have to use one.
-
4 pointsYap, @Darb1964 you‘re right. nothing beats a loader, except a bigger FEL... 😎 Eric, just a word about FEL using, edit i know, you‘re not a greenhorn - as far as i knew, you be in a Area, where some slopes are happen. I lost last year a good friend with an Tractor Accident, that can be easily prevented with a ROPS. He had one, but didn‘t use it. Please be so kind and think about a ROPS. While working on slopes with a Loader, you can smash a tractor very easy sideway‘s, that is not a impossible issue, but with a Roll Over Protection Structure you are more protected and able to survive a sidesmash. A simple Metal structure 3 easy welded Pipes can prevent, your tractor rolls over in case of an Sideimpact or tilt. Just a suggestion.
-
4 pointsI was able to make the trip 3 hours north yesterday 11/10/19 to pick up Stage Coach. The hitch was very wel designed and fabricated. Unfortunately the Coach had rotted away and destroyed. Therfore will need to build another Coach/ Wagon. The hitch part makes up for not having the Coach. Will do a video later with it laid out. If you are on Facebook there was a LIVE video yesterday. Stay tuned. This will be a little longer process than I expected
-
4 pointsLittle change of plans in the shop. My parts cabinet and the black plastic shelf have served me well for a long time, but I never liked how much floor space they took up. So today Krystopher and I decided to put up some more overhead shelving and build another shorter workbench along the west wall. Very happy with the way it turned out, and really enjoyed getting to spend some one on one time with my oldest away from Mom and baby brother
-
4 pointsHad to remove about 1-1/2” off the air cleaner base to clear the hood. Still have to do the lid. At least the hood fits over it now. Also still have to clean up the inside a bit. You’ll never see it but I know it’s there.
-
4 pointsSo I have the frame cleaned up no cracks in the back gusset plate so I guess theres no welding needed today. one thing I wanted to address is the amount of slop in the front axle and steering. I cleaned up the axle and took some measurements. And heres the frame Doesnt seem like a whole lot until you do the math here is the difference between the two for comparison it's next to a 16d nail. So a little tweaking in the arbor I mean frame press Now shes like a German nun.... good-n-tight. Also not sure of this is factory machining, the lip, I think it's wear on the axle where the spindle rides, but a little flap disk wheel on the grinder took care of it.
-
4 pointsHad a slow leak on a rear tire that's been a real PITA. Broke the tire down cleaned up the bead on the rim and made sure the tire was nice and clean. I think I may have got a good seal on it now. It's an original tire , but it's still in pretty decent shape.
-
3 pointssure can, not even counting the days
-
3 pointsLooks good.Sometimes you just need something bigger than a Wheel Horse.
-
3 pointsWelcome to the forum. Is it item #4 on this page? Glen has had some serious health problems so don't know how fast he will respond. Garry
-
3 pointsTook advantage of another beautiful day and finished cleaning up and organizing the mess we made yesterday. I like the extra room I gained by getting rid of the two plastic shelves. Hoping to have the money here in the near future to finally get my electric service permanently hooked up and a ramp built to get tractors in and out of the door a lot easier. After that I plan on finishing the last wall and then start on the ceiling
-
3 pointsMaybe I put the wrong size for the plow. Edited that. Thanks... As far as the engine and transmission it is mechanically excellent. The engine doesn't even let out so much as a wisp of smoke. Cold starts go quite well. Transmission gears are in good shape but the shifting mechanism is a little loose. The hydraulic system is good and strong and works perfectly fine but there are some seals that need attention.
-
3 pointsNice Tractor Eric, it has a kind of MadMax style, i love it. My honest respect for your Attitude!👍 My Vote, change / recrimp the failure wires, and keep the Patina. That Ferguson looks rock solid cool.
-
3 pointsLooks like a great starting point can't beat old iron!
-
3 pointsI have that same manual.Lots of good info in it.Interchangability of attachments,attachment instruction manuals,etc.I wouldn't part with mine.Til death do us part.
-
3 pointsFor me it would have to be the Ryobi cordless impact driver!
-
3 pointsCool Truck, very nice old girl! 👍 don‘t be in a big hurry, let the old Girl do her job without to much rush. I bet she will do her job better than you expected. (Oldtimer rulez)
-
3 pointsI to think the Blackbirds are amazing and have seen one at the Smithsonian Air and Space Museum and one at an Air Museum outside Portland Oregon. I routinely make one or two airshows a year. I still have a Blackbird Estes Model Rocket. Of course my dad used to jokingly say "Jets don't fly, there just rockets with wings to guide them". @ZXT it's interesting you grew up with a Dad that had an aviation background as I did to. I also built model planes that my Dad designed. We definitely need to get together sometime. I recently found the picture of my Dad flying Santa to town from the North Pole. I think the plane may be a Stinson (if anyboy can identify it for sure I would appreciate it). This was probable in the early 1950's. They would close down Hwy 71 in downtown La Grange and my dad would land on the Highway to deliver Santa to the Firetruck for the Christmas Parade. At the end of the Parade he would fly Santa back to the North Pole. So to think, while he was the last of the Barn-Stormers, they were beginning to design the Blackbird.
-
3 pointsStarted tonight off with getting the head put back on this machine. Went well but the tractor still wont run right. Any changes to the throttle or choke while running and it dies. Test fit the Hood Stand Fitting I milled a few days ago for the rockshaft build. Off the waterjet before mill. After Mill Installed Also rebuilt the pump and installed that. Only things lacking are the belt (on order) and the fluid (need to determine what kind). The lever returns well with the new spring from the rear position, but sticks in the forward direction. It takes very little force to get it to return to center though. I am hoping this is a symptom of the dry bore it was installed in and will go away after the pump is filled, internally lubricated, and actuated a few times. Put the rear axle bracket on as well and mounted the cylinder to it. Its getting very close to a test run and I am very excited!
-
3 pointsAbsolutely true! Just reading about the challenges that they faced with fuel is intriguing. They had to develop something new for the parameters mandated by the heat generated through traveling so fast. The plane was made out of titanium and the number one supplier in the world was...Russia! Classic
-
3 pointsThanks for the post Josh. Since the Black bird was built we still have not come up with the technology to build a fuel tank that will with stand the temperature changes. The Black bird would actually leak fuel on to the run way while waiting to take off. The fuel level on the plane would be less than 25% after take off so the first thing on the flight agenda was to hook up with a tanker plane and refuel.
-
3 pointsThe Battery Tender Jr will work just fine for your intended use. It has a charge rate of 3/4 of an amp so it would take considerable time if the battery is run down. I have the standard 1.25 amp version so that it is better able to handle larger batteries. Unlike the single stage models mentioned previously, the Battery Tender chargers have a four step program for a much better result. Complete 4-step charging program (Initialization, Bulk Charge, Absorption Mode, Float Mode). Automatically switches to float / maintenance voltage after fully charging the battery. If the battery voltage drops too far under load, full charger output power resumes.
-
2 pointsHave you ever been asked "What do you want for Christmas?" Wheel Horse Parts and More have options for you! Click on the link below! https://wheelhorsepartsandmore.com/parts.html
-
2 pointsDefinitely true. We live on the side of a small mountain ridge. As always I appreciate the safety reminder. I am professionally trained in lifting, balance, load carrying on multiple forklifts and cranes. I still do some stupid things. This tractor won't be used anywhere but in the flat of the front yard for the time being. To get it into the woods will require a ton of work. The paths would have to be widened and a LARGE amount (whole truckload?) of stone put into the swamp where the bridge is. (The bridge is built for a 42" wide tractor)
-
2 pointsLooking good Bryce. I'm glad you resurrected this thread. I'm planning on getting one of those buildings to tweak my storage space. It won't be until spring but I already have brochures, pricing, etc. from several companies around here so I can ponder things a few months. Pricing differences are so little that it won't be a factor but materials and construction methods vary enough to give me something to chew on. Of course all the sales guys I've talked to say theirs are the best. In any case they sure do offer a pretty good bang for the buck.
-
2 pointsI have one on my C141. I have a manual for it too. Marv
-
2 pointsspent the afternoon working on getting the front end bolted up. put the hitch on made up a new lift cable. didn't realize I have the wrong parking brake, I will need to track one down. I am really liking the black wheels. tomorrow or Monday I need to put the new gasket for the fuel tank and get that bolted together.


This leaderboard is set to New York/GMT-04:00