
Leaderboard


Popular Content
Showing content with the highest reputation on 07/28/2019 in all areas
-
15 pointsSaw this on facebook. I have a video of the truck from 1961 ad.
-
11 pointsHere is the truck video. The Corvair is shown around 0:56 mark. 1961 Chevrolet Trucks.mp4
-
7 pointsJust finished mowing with IRV and what great seat time ! I hated to see it end. Time for a black and tan!!!
-
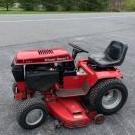
7 pointsHi folks, picked this up not to far from home this morning. Seller had mentioned it needed some carb tweaking, it would idle up, but then not idle down when ya moved the lever back, kinda raced......I thought maybe it just needed a govenor adjustment, but feared it might be an internal govenor problem. Lucky me, as it turned out, the linkage was just kinda wonky, and needed the be persuaded with a pair pliers to allow free movement without getting hung up on itself!! Idles up and down great now, runs like a kitten too!!! Came with the 42 inch deck, plow, some extra blades and pieces parts, and manuals. Fella was asking 400$ for all of it, I end up getting it for 300$. He was very nice and seemed glad it was going to someone that would appreciate it. Anywho, just Sharing.
-
7 pointsFirst the sickel bar now another mower........ wonder if she will ever go away again ? My number 5 daughter returned home a few months ago and was willing to mow but the "big" Horses intimidated her a little.... so.... after picking up yesterdays Sickel Mower I went and got a Wheel Horse cousin.... A Toro 10-32 that has a Wheel Horse Decal up front, maybe they sold em that way in 1989. Appears to be very well kept and after airing the tires, swapping a battery in, and jumping the ignition she fired right up.... Not anything like my other Wheel Horses but pretty nice little mower..... I was surprised that the turning radius was larger than my C-100..... but for 200.00 a keeper and maybe my new tenant will cut the grass !!!!!!
-
5 pointsHere is the second one.
-
4 pointsTrina n her mom spent some time dodging rain drops and moving wood this afternoon. She moved 4 loads with mumma and another 2 herself. The basement is well stocked for fall now.
-
3 pointsThis was next to my tractors yesterday at the Plymouth tractor show.
-
3 pointsBought an engine for the raider10, which was my main working tractor. Now running the c141 with a 12 horse, but the Raider10 has a better deck for the ditches. Pumped about the engine. It's a starter/generator set up. I love this modified harbor freight high position motorcycle lift. Add the wheels and perfect for jobs that require a strong back. Rated for 1100, but I keep it at 750. Lifts to 30 inches and lifts quickly compared to most others. I have had a Gold Wing on it for a rebuild, so don't put down Hft
-
3 pointsMy second Economy tractor, brought it home so it could the first one company. Rough but it runs. 14HP-16"Wheels, tandem trans, hydraulic lift and a mower deck.
-
3 pointsLeave it in gear and start it from the front. Hop on as it's buzzin by!
-
2 pointsSince I no longer do much welding sold my Mig, I hate flux core wire and there's no way to justify paying demurrage on gas bottles and it takes a few months for the turn around to have self owned bottles filled. Found and older Lincoln AC at a yard sale that's old enough to have copper winding's, performs decent enough that I'm happy with it, now that I'm using that old RV trailer frame and axles to build into a utility trailer. I'm burning up some rod, with the welder purchase some 7014 came in the deal, now that I've used all of that up a neighbor gave me some 7024 that has an unusually thick flux coating. So I did some research and this is what I found on welding rods. 8 Questions About Stick Welding Electrodes Answered Print Article We’ve answered some frequently asked questions to help you choose the right stick electrodes for your welding application. Stick welding requires skill Whether you are a DIYer who stick welds only a few times a year or a professional welder who welds every day, one thing is certain: Stick welding requires a lot of skill. It also requires some know-how about stick electrodes (also called welding rods). Because variables such as storage techniques, electrode diameter and flux composition all contribute to stick electrode selection and performance, arming yourself with some basic knowledge can help you minimize confusion and better ensure stick welding success. 1. What are the most common stick electrodes? Hundreds, if not thousands, of stick electrodes exist, but the most popular are mild steel electrodes, which fall into the American Welding Society (AWS) classification A5.1. These include the 6010, 6011, 6012, 6013, 7014, 7024 and 7018 electrodes. 6010 electrodes deliver deep penetration and have the ability to “dig” through rust, oil, paint or dirt, making them popular among pipe welders. 2. What do AWS stick electrode classifications mean? To help identify stick electrodes, the AWS uses a standardized coding system. Codes take the form of numbers and letters printed on the side of each stick electrode, and each represents specific electrode properties. For the mild steel electrodes mentioned above, here is how the AWS system works: The letter "E" indicates an electrode. The first two digits represent the resulting weld's minimum tensile strength, measured in pounds per square inch (psi). For example, the number 70 in a E7018 electrode indicates that the electrode will produce a weld bead with a minimum tensile strength of 70,000 psi. The third digit represents the welding position(s) for which the electrode can be used. For example, 1 means the electrode can be used in all positions and 2 means it can be used on flat and horizontal fillet welds only. The fourth digit represents the coating type and the type of welding current (AC, DC or both) that can be used with the electrode. 7018 electrodes produce strong welds with high impact properties and can be used on high strength steel base metals. 3. What are the differences between 6010, 6011, 6012 and 6013 electrodes and when should they be used? 6010 electrodes can only be used with direct current (DC) power sources. They deliver deep penetration and have the ability to dig through rust, oil, paint and dirt. Many experienced pipe welders use these all-position electrodes for root welding passes on a pipe. However, 6010 electrodes feature an extremely tight arc, which can make them difficult for novice welders to use. 6011 electrodes can also be used for all-position welding using an alternating current (AC) welding power source. Like 6010 electrodes, 6011 electrodes produce a deep, penetrating arc that cuts through corroded or unclean metals. Many welders choose 6011 electrodes for maintenance and repair work when a DC power source is unavailable. 6012 electrodes work well in applications that require gap bridging between two joints. Many professional welders also choose 6012 electrodes for high-speed, high-current fillet welds in the horizontal position, but these electrodes tend to produce a shallower penetration profile and dense slag that will require additional post-weld cleaning. 6013 electrodes produce a soft arc with minimal spatter, offer moderate penetration and have an easily-removable slag. These electrodes should only be used to weld clean, new sheet metal. 4. What are the differences between 7014, 7018 and 7024 electrodes and when should they be used? 7014 electrodes produce about the same joint penetration as 6012 electrodes and are designed for use on carbon and low-alloy steels. 7014 electrodes contain a higher amount of iron powder, which increases deposition rate. They can also be used at higher amperages than 6012 electrodes. 7018 electrodes contain a thick flux with high powder content and are one of the easiest electrodes to use. These electrodes produce a smooth, quiet arc with minimal spatter and medium arc penetration. Many welders use 7018 electrodes to weld thick metals such as structural steel. 7018 electrodes also produce strong welds with high impact properties (even in cold weather) and can be used on carbon steel, high-carbon, low-alloy or high-strength steel base metals. 7024 electrodes contain a high amount of iron powder that helps increase deposition rates. Many welders use 7024 electrodes for high-speed horizontal or flat fillet welds. These electrodes perform well on steel plate that is at least 1/4-inch thick. They can also be used on metals that measure over 1/2-inch thick. 5. How do I choose a stick electrode? First, select a stick electrode that matches the base metal strength properties and composition. For example, when working on mild steel, generally any E60 or E70 electrode will work. Next, match the electrode type to your welding position and consider your available power source. Remember certain electrodes can only be used with DC or AC, while other electrodes can be used with both DC and AC. You will also want to assess the joint design and fit-up you need and select an electrode that will provide the best penetration characteristics (digging, medium or light). If you are working on a joint with tight fit-up or one that is not beveled, electrodes such as E6010 or E6011 will provide digging arcs to ensure sufficient penetration. For thin materials or joints with wide root openings, select an electrode with a light or soft arc such as an E6013. To avoid weld cracking on thick, heavy material and/or complicated joint designs, select an electrode with maximum ductility. Also consider the service condition the component will encounter and the specifications it must meet. Will it be used in a low temperature, high temperature or shock-loading environment? For these applications, a low hydrogen E7018 electrode works well. You should also consider the production efficiency. When working in the flat position, electrodes with a high iron powder content, such as such E7014 or E7024, offer higher deposition rates. For critical applications, always check the welding specification and procedures for the electrode type. 6. What function does the flux surrounding a stick electrode serve? All stick electrodes consist of a wire surrounded by a coating called flux, which serves several important purposes. It is actually the flux, or the covering, on the electrode that dictates where and how an electrode can be used. When you strike an arc, the flux burns and produces a series of complex chemical reactions. As the flux ingredients burn in the welding arc, they release shielding gas to protect the molten weld pool from atmospheric impurities. When the weld pool cools, the flux forms slag to protect the weld metal from oxidation and prevent porosity in the weld bead. Flux also contains ionizing elements that make the arc more stable (especially when welding with an AC power source), along with alloys that give the weld its ductility and tensile strength. Some electrodes use flux with a higher concentration of iron powder to help increase deposition rates, while others contain added deoxidizers that act as cleaning agents and have the ability to penetrate corroded or dirty workpieces or mill scale. 7. When should I use a high deposition stick electrode? High deposition rate electrodes can help complete a job faster, but these electrodes have limitations. The additional iron powder in these electrodes makes the weld pool much more fluid, meaning that high deposition electrodes can't be used in out-of-position applications. They also cannot be used for critical or code-required applications, such as pressure vessel or boiler fabrication, where weld beads are subject to high stresses. High deposition electrodes, however, are an excellent choice for non-critical applications, such as welding a simple liquid storage tank or two pieces of non-structural metal together. 8. What is the proper way to store and re-dry stick electrodes? A heated, low humidity environment is the best storage environment for stick electrodes. For example, many mild steel, low hydrogen 7018 electrodes need to be stored at a temperature between 250 and 300 degrees Fahrenheit. Generally, electrodes' reconditioning temperatures are higher than the storage temperature, to help eliminate excess moisture. To recondition the low hydrogen 7018 electrodes discussed above, the reconditioning environment ranges from 500 to 800 degrees for one to two hours. Some electrodes, like 6011s, only need to be stored "dry at room temperature," which is defined as humidity levels not exceeding 70 percent at a temperature between 40 and 120 degrees. For specific storage and reconditioning times and temperatures, always refer to the manufacturer's recommendations. Related Articles Factors for Selecting the Right Stick Electrode Frequently Asked Questions About Stick Welding Stick Welding for Equipment Repair: Electrodes, Equipment and Technique
-
2 pointsI'm leaning that way myself. I've got some red ones, and a set of fronts that are black and don't care to much for them. So maybe when I paint the wheels, I'll do the weights. I can always change them if I don't like it.
-
2 pointsI've been tinkering with a couple of bugs in that 877 I bought at the Big Show. I'm pretty sure they are all taken care of, now. All that's left now is to get the wheels cleaned up and painted. I wire wheeled the weights and primed them, just not sure yet what color to paint them.
-
2 pointsThis needs to be posted in the "Classified" For Sale section.
-
2 pointsYes, Glen, thats the name I remember seeing, Thanks
-
2 pointsHere is a link for the good ones. https://www.aircraftspruce.com/catalog/eppages/solidstatepump.php Randy
-
2 pointsUsing a wedge to draw two pieces together.
-
2 pointsCheck the vendors section. Glenn Petit is the man you need to talk to about those.
-
2 pointsI did a deck lift on a 42" deck on my 312-8. It works as all four tires are three inches taller then the originals. It cuts close to five inches in the top position. That.s 1 1/4" lower then the original hole. There is another hole 3/4" lower I'm not sure I have enough height under the tractor for that one, This picture will show why it works on my 312.
-
2 pointsno 1 of them is badly buckled, otherwise I would of cleaned them up... im gonna keep looking for a supplier who can get same offset and height and work with it Phil
-
2 points
-
2 pointsYou paid for a deck and snow plow and the seller threw in a free !
-
2 pointsWell besides the obvious short vs tall chute... the chute rotator is much simpler and user friendly on the tall chute version than the wire/cable rotator on the short chute also the early short chutes had adjustable steel wheels vs the adjustable flat steel skids for wear bar/cutting edge height.. as someone who has only had a tall chute single for 15 years before moving onto the 2stage from my own personal experiences that single stage tall did all types snow (light and fluffy ,wet , crusty frozen) very well from 4" to 24" depth the only thing the tall single stage can't do that the 2stage can is chew through D.O.T. plow banks without clogging/plugging the chute up... another thing is with the short chute the plume doesn't cover you (the operator) as much as with the tall chute when it's windy outside where a cab comes in handy...
-
2 pointsI was looking for a sickel bar for the Wheel Horse but finally gave up. My wife foolishly left me home alone this weekend and there suddenly appeared an ad for a vintage Jari Sickel Bar in nice condition. Hooked up the trailer, stupidly left the Cape on a Fri afternoon and zipped on down to see my new purchase, Looks like it was made by Jari Mower of Mankata Minesota and definitely a 60's 70's pre OSHA vibe but ought to do my small jobs easily.... haven't seen a Wheel Horse sickel attachment in the 200 hundred dollar range so maybe a win for a change. Changed the oil and a first pull start....that's a first !!!! Pics attached.
-
2 pointsJust a short ligh shower was occur, than it come heat again. Cool, time for Tinker. Because i’m soooooo curious, if all my Calculations until now are right, i do the first Test with real Things. few mm differences are ok, i just wanna know if things fit as i had Planed ahead or if i did bigger mistakes. Ok, i have one mistake found, the changed and ordered Hydrauliccylinder has the greasenipple on the opposite side than the first, i missed this item in my Order. Aaaaarggghh. 🙄 Next issue i see yesterday in the Nightworker Action, the 25mm drillbit was extremly soft, it seems it is not hardened, in that case unusable, I contact the Dealer and drill instead 20mm for now. Maybe i work with standoff’s we will see. Than the big moment reached, (Drum roll) Tadaaaaa. 😂 boah looks that Cool. And it Fits, even with missed Greasenippels (gladly enough space planed) 😎 I must Lift the arm to Grease, but i can Deal with, so the consequences are low. Then my urgendst Challenge, did i reached the 2,30? (Don‘t look at my fingernails, the chewed..) This was a 3Meter rod (thanks by Mercedes for that Giveaway) 👍👍 The Mark is at 2,35m - chacka. Buddy‘s i cannot bring in Words how glad i am, to Solve that. it‘s real high, so the Rollover Protector is definiteley a must. i‘m also real Proud of the changed Shape, because it will give a pretty Cool Housing if all is finished. The „Church roof“ will be changed later into a cabin, this idea was in background. a short impression from Driver Seat.
-
2 pointsYummy
-
2 pointsI’m sure hand drills and a tap handle would have been just fine, but this mag drill was offered for the project. I can see one of these on the shelf some day!
-
1 pointHere is the fix. Toro flange bearing No. 6472 May need to weld that back together and strighten it. The fan gear may also need shimimg to take out the slack.
-
1 pointWouldn't be fair of me to comment on the parts specifically because we have no newer style horses. You mention ethanol. There are few or no stations in Maine selling anything higher than 10% ... Right now. We use ethanol free gas in all our small engines. It's only 15 minutes away from us. You don't have a great access for that nearer to you. Sanford airport is in the listings but doesn't always have it available. Brentwood NH and North Hampton NH both show it.
-
1 pointVery strong hydro on B100 automatic. Long story short, I fell off tractor, it ran against wall and keep working for several seconds before I was able shut it off. Now major hydro leak. Feedback on transmission prognosis and repairability please. Btw, I suffered skinned knee and jammed shoulder. Lol
-
1 pointYeah, a guy at Portage spent some time talking with me about it. Quite the design for an “open” transmission! So cool, Craig!
-
1 pointDo a compression test to be sure you are actually running on 2 cylinders. If that comes up good then likely you need to do a good carb cleaning.
-
1 pointThe vacuum operated fuel pumps obtained their pulsations from the pressure changes that occur in the engine's crank case as the piston moves up and down. If the pump has a diaphragm leak some fuel will be pulled into the crankcase.
-
1 pointBe a bit of fuel used with that and a tractor.
-
1 pointThe flat bar had excess gap, tack weld then hammer down before the weld freezes held the piece in place. Another trick is to use a piece of scrap metal with a cut out tack welded over the piece you need to move then using a wedge cut from another bit of scrap under the arch. Especially handy when your trying to get to edges to meet. The arch is called a strong back.
-
1 pointNice Steve ...smoked salmon is the best. Nothing beats a day fishing on the big water . My neighbor has been fishing for walleye in lake Erie . Caught a lunker yesterday along with a cooler full of nice keepers. Let’s hope that they can keep the asian carp from invading the waters .
-
1 pointPaint them red then the are WH weights.
-
1 pointNice Hat! We have a Lake Trout derby here every Memorial Day weekend. You could come and I could watch!
-
1 pointThese devices are more properly termed a "relay" than a "solenoid", although they do have characteristics of both. A relay uses low current to switch high current. A solenoid uses electrical power and electromagnetism to produce movement. If you got a single thunk or click out of it the relay is grounded properly, is getting it's trigger power, and probably has worn or dirty internal contacts that are preventing it from passing the higher current needed to run the starter. I'd start by testing the relay's ability to pass current by using a dummy load of some sort, a headlight is usually a good substitute. If that shows all is good, I'd use some jumper cables to try and run the starter directly off the battery and make sure it still works.
-
1 pointTough to beat a 400 Series 8 Speed wheelhorse, they never complain or give up, Great pic.
-
1 pointAhhh, the slant six. A buddy and I had a ‘79 Dodge truck given to us one time, it had the slant six and 727 auto. Those were the days... three wires sticking out of the dash to start and run it! Ok... I found the photo albums of my vehicles and toys over time... so bare with your bandwidth for them all to load... There are highs and lows, you’ll see what I mean! Sorry for all the pictures of me and my posse too! Rebel kids, right? A few funny notes about the pictures... The Jeep was my first vehicle. I totaled it on the way to school one morning, when the right rear axle shaft fell out and I sailed into the trees. The Toyota was given to me with a broken frame and a bad clutch. Wind it up high enough and it would kind of weld itself together and away we went! I still have that first 8’ Boss plow. The Propane Mud Truck was a Ford chassis and 366 tall deck BBC that came out of a school bus, and of course LP powered! The Olds diesel was 5.7 liters, but it wasn’t just a converted gasser. I’ll swear that was an awesome car and I shouldn’t have sold it! It did a 20 second quarter mile at 45 mph at Mid-Michigan motorplex, would haul a Dana 60 axle or a 350 Chevy in the trunk! The Junky old trailer that my brand new motorcycle was on came out of the junk yard. The fenders were a coolant drum from the die shop. Yes, that’s my girls when they were a bit smaller. I was inside the enduro car when the rock crawler drove up my side... it was at a work car show. The monster GMC truck I built was going to be a plow truck, but unfortunately it never made the road. I’m probably still alive because of that. Well, the photos are done up.oading, so I’ll quit rambling! Enjoy, y’all!
-
1 pointA little filler work, and this radius will be ready for paint! I am going to sand the other filler rods before welding, that should have been done first.
-
1 pointthat's why you change ratios with the engine stopped unless you don't like your fingers
-
1 pointThis belt sander was on Amazon for something like 40 bones and I figured it was worth a shot on these seams. I figured there would be more control than a flap disc on a grinder. I roughed in the welds with the flap disc and finished with this. Worth every penny!
-
1 pointLong ways to go, but it’s found the general shape! I flipped an image to better picture the finished product compared to the scale model.
-
1 pointI've been in Co Springs for the last week, 105 degrees, no humidity. If I hadn't had elevation sickness almost the whole time I would think about moving there. The elevation was rough on me though. Day one: You are still dizzy at 6K feet? Cool, lets go up to Pike's Peak, that's only 14K, you will only feel like you are dying. Day 5: You are almost mostly adjusted to 6K? SURPRISE, we are doing brunch with your brother in law's parents, they live above 8500 ft. What, not hungry because of the surprise elevation change? Here is this extremely British guy doing British things in the most British way possible.
-
1 point
-
1 pointI'm starting to piece together the history of this little tractor (the one at the beginning of this topic). I think my father-in-law bought this one, used, probably in the early '60s. It still has a decal, barely visible, that reads "Jack Cornish Tractors - Hallsville, Texas". It probably ran for a few years and then stopped. He took it to some local small engine mechanic to get it running again. (I see evidence that some engine gaskets and wiring have been changed.) It probably ran for a few more years and stopped again, probably because of the stuck valve. So then he parked it in his shed and bought the RJ-58 shown below. The second one I remember him driving and pulling the grandkids around in a little go-cart frame in the early '80s. It had a replacement Briggs&Stratton engine on it. No one in our family had any idea how valuable these little tractors would become as collectors' items. Recently they were thinking of selling them as scrap, but I volunteered to sell them on craigslist. I listed the RJ-58 below on craigslist and sold it to a guy from Dallas a few weeks ago. He sent me photos of it a few days ago after he got it running. I'm glad I kept the other one that still has most of its original parts.
-
1 pointMan, that was a tough lesson. But I'm learning slowly - don't take actions that will be hard to reverse. Take my time and think it through.


This leaderboard is set to New York/GMT-04:00