
Leaderboard


Popular Content
Showing content with the highest reputation on 08/06/2018 in all areas
-
16 pointsI've been dreaming of a new shop space to work on tractors and generally store things at my house. We already had a three car garage on the house and could only fit one vehicle in it due to the large space that kids toys, bikes, zero turn mower, shelving and a workbench already occupied. Well.. that stuff and a few or so little garden tractors... but they don't take up that much space, right? Anyway... we'd been talking about building my dream shop for several years. We live on a large in-town parcel, so there's plenty of room, but as with most things, it comes down to when it can fit in the budget. I drew it up several times on the building designer at Menards dreaming of when we could go forward. Well, in the early 2017 we decided to go ahead with it, and I came up with my final layout plan. We proceeded under the option of build the shell, and finish what we can later. We went over and over the list of things to do now and later. Things I wanted that had to be done now for sure were the rough in for the in-floor heat and the attic trusses. I had a contractor friend who would GC and frame it for me if I bought all the materials and he could do it on his own schedule. Yep, done. I figure I could have built it myself, but it would have taken most of the summer of every night and weekend, as well as the headaches of arranging the subs for the stuff I couldn't do, but if he could do it, and he has all the contacts/subs already... I'm money and time ahead to work some extra overtime and avoid the headaches. The previous owners of our place had a gravel RV parking next to the house. The old poorly done timber walls were deteriorating and leaning with age.It was convenient for parking the trailer, and nice when the kids were little that we could park off the driveway so they could play, but every year inevitably it was always a weedy mess by mid-summer. Step one, remove ugly timber wall. Lucky for me my neighbor had an chainsaw with a garbage blade on it. He came over and we were able to cut the wall into 12 ft sections that we loaded on the trailer for the dump. Next, met with our contractor friend to stake and mark it out. Since part of the goal was to reduce the amount of gravel, the equivalence of one car parking space was being removed and returned to grass on the left edge. Then just before the excavator was to start work, the kids and I did a little groundbreaking for the big project. Some gravel removed and sand base laid down and compacted. Concrete guys laid the forms for me on a Friday night so I could lay the insulation and pex for the in-floor heat. Like any kids, the call of the sand pile was irresistible. Next day I had help to lay the insulation boards and pex. Might seem silly to see two people carrying these boards that weigh all of 2 lbs each... but notice all the pavers? I'd been hoping for good weather to do the insulation and pex..... what I got was great temperature, bright, sunny......and 25 mph sustained winds with 40-50 mph gusts. So.... two guys to carry each flippin' board and weight it down. Ugh.... made the process much longer. Got the pex down, which went very smoothly. Three zones, stapled to the foam board. Monday morning I get a call.... inspector won't pass it because there's no pressure test on the pex. Ugh. Nothing about that in our building code, but what am I going to do? Project can't go on without his initials. So... I build a pressure manifold, tie all three zones into one long line and charge it up. Tues morning, concrete guys are onsite... inspector shows up and says ok. By the time I get home from work, I have a new slab. Lumber pack shows up the day before the family and I are leaving for a week at the cabin. When I pulled out of driveway, construction was underway. We got a few progress pics through the weeks from various friends. And I returned a week later to this. Totally the best way to build a shop! I was out of his way, he was out of mine... worked out perfectly. I installed the overhead doors, had the electrician come and trench the electric over. Got the gas line roughed in for the boiler as well while the trench was open. After that, the excavator came back with the final top dress for final grading. We bit the bullet and decided to go with sod right away. Even got the kids to help for a little while. Couple of neighbors (one of whom happens to be a professional landscaper) came over the chip in too, and three pallets later.... Now we're at slow progress time. I bought all the construction materials on a Menards 11% rebate, so once I got the rebate check I started to finish the interior. Got the vapor barrier up, and ceiling rocked with 12 foot 5/8" type x. 105 lbs each. Ugh. Thank God for drywall lifts, right!? More rebate checks allowed for the insulation and rock for the walls. Then we came to a complete standstill..... got enough stuff moved out of the house garage to get both the car and truck in for the winter, but with no heat and no ceiling insulation the shop was just a big storage box for winter. Spring this year rolled around and prioritizing shop work made it to the list. I realized it's going to be much easier to get the interior done before I move in. So... started back at it. I got the floors masked off and got tape and mud done... then the girls helped me paint. Did the floor with Rock Solid polycuramine kits from Menards... grey with flakes and a textured topcoat to make it less slippery if wet. This is a long and multi-stage process. First it required renting a diamond grinder and grinding off the curing sealer. Then powerwashing three times to remove all dust and debris. The base coat went on, cured for a few days, and topcoated three days later. Then I let that cure for a week before moving in. It's supposed to be cured in 24 hours, but why rush it if not necessary? Finally ready to move in. Got some used kitchen cabinet take outs and installed them for the workshop area. Really looking forward to getting stuff organized and cleaned up now. It's totally a dream come true. Still have to buy and install the boiler and get the ceiling insulated... but those are things that can be worked around. Up until this point it's been much easier to have minimal stuff in the way. If you made it all the way to the bottom, thanks for taking the time to read it. Get more done, have more fun!!
-
13 pointsMy wife wants to have chickens. We can't have them where we live. As a joke a while back I bought a couple of metal chicken lawn decorations and planted them in a flower bed and waited for my wife to see them. Took a while but she got a good laugh out of it and named them after a couple of neighbor's that moved away that we miss. I found another one and didn't tell her again and she finally found it and joked they were multiplying. I named it Ralph after my retired next door neighbor engineer. Picked up a big ceramic Rooster on my way home the show. She named him Homer as he's what you see when you get home. It's our 30th Anniversary this weekend so I got her a coop and we made a little display in hope that someone sees it and turns us in for having chickens. @stevasaurus thought of The Dead Chicken Society but since these were never alive in the first place I un gruesomed it a bit. Hope to get some good laughs out of it. We'll do more landscaping after it cools off!
-
11 pointsPictures from the Dodge County Antique Power Club 50th anniversary show. I'll start with the features for this year, Minneapolis Moline & Cushman A line up of MM steamers. A gentle man doing a painting of the MM steamers in front of the clubs new barn. Oil powered MM. Turning some soil with a MM Steamer. An answer for more power & traction. Some Cushmans. Following my friend while tuning soil with the GT's. It was roughly 1/4 mile from one end of the field to the other. Proving again that my Raider is not just another pretty face, it will also earn it's keep. Last year @squonk asked about the annual Economy & Red E reunion that takes place at this show every year. I remembered to get some pic's this year. A pic of part of their corral. A rare Power Queen. A custom Economy race car. My best guess here is that someone fill these tires with concrete then ran them until the tires rotted off. Then they added a metal belt with scraps fastened to it for traction. Next up uncommon & customs. A no wheel Fly Mo, hover mower. Newer but not common in our area Yamaha lawn tractor. Jacques Frazer A sweet looking home built. I hope you enjoyed the pictures.
-
10 pointsI have been a little static on the forum lately because we have been getting ready to relocate. I retired from my job on June 30th, put the house on the market July 1st and it sold July 2nd. Specifically, we are going from 2,500 square feet to an RV for a while. So the tractors are packed away in storage for now, because I couldn't part with them. We'll see where we end up. We settle on our house in southcentral PA on 8/22. Jump in the RV and head to northern PA for a few weeks to see family, then work our way south stopping at the following for a couple weeks at a time: Ashland, VA Shawboro, NC Myrtle Beach, SC St. Mary's, GA Zephyrhills, FL (November-April) Tractor packed and headed to storage Everything else we are keeping has to fit in this trailer. Bought the trailer and will get our stuff to where end up and then maybe sell the trailer (at least that's what a told my wife Then we live in this for a while . . .
-
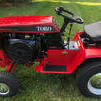
8 pointsThanks to DJ Harrison, here is my new toy. D-200 with rear PTO, big plow and 5' finish mower. Got home too late to unload so I just parked trailer and all in the garage till I get a chance to unload and play.
-
8 pointsThat display is awesome!! A rooster crow recording set to go off every 15min starting at 5am might speed things along for you.
-
8 pointsIt never ceases to amaze me the lengths that people go to . I managed to find this Very rare to UK RJ58 , (like I need another tractor ) . But hey this one was too good to pass up . It was located in Dunfermline Scotland which is slightly east of Edinburgh and I live 470 miles away in the south west of England . I struck a deal with the chap , made him a good offer he couldn’t refuse , so he made a good few bucks . Now I have the problem of getting it 470 miles away , Och , I’ll deliver it says 🤩 ,so naturally I excepted his offer , I payed the fuel costs happily . Two Scottish chaps set out at 10 pm on Saturday evening and arrived at my house 10 am the following morning , made them a cup of tea/ coffee and showed them around some of my stuff and then we unloaded the the RJ58. Heres what they brought me from Scotland
-
7 pointsNumber 3 grandson ploughing for the first time with a friends Raider 12 and a Ransomes drag plough.
-
7 pointsI thought of a rooster recording! or maybe Some Foghorn Leghorn quotes!
-
6 pointsHi Everyone, New to the forum here I usually collect tractors of a different color. I saw this auction come up and wanted to make sure you all knew about it Lots of WH tractors and parts. Not sure if VINCENT RODERICK was a member here but it looks like a great collection, to bad to let any of it head to the junk heap so figured I would let people know. https://keenanauction.com/auction.cgi?i=4405
-
6 pointsI saw this 1930 Model A twice today, in two different towns. Must mean I’m supposed to take a picture of it!
-
6 pointsThe chickens are "Out Standing" in the yard.
-
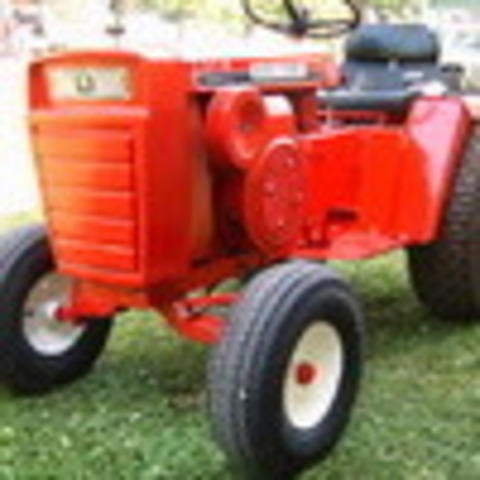
5 points@RandyLittrell here you go. Took care of that issue this evening. Still have to clean up the old welds but the axle will sit at the end of the frame, just as it does on the 1054. Ran out of daylight. Probably have to make a new drag link but thats ok.
-
5 pointsI took these pictures from the street corner. The white one on the left really looks real with a passing glance...
-
5 pointsI reckon I was a bit clairvoyant ? with those pics I drew back when I was a youngin in 1986 just needs a paint job like it...
-
5 pointsAnd here's just a couple other odd pics along the way.
-
5 points
-
5 points
-
4 pointsMike, you do know how to stir the pot, and I ain't talkin chicken soup. If you lived in a community with a Home Owner Association you would be on a wanted poster by now!
-
4 pointsTerry customized my order for Putt Putt, for a rediculously cheap price... not that I’m complaining. I feel though, like us as customers get the better end of dealing with @Vinylguy every time! It must be that he just enjoys what he does
-
4 pointsjump in and buy them all... you already found the forum to support it!
-
4 pointsActually 3 are metal and 1 is ceramic. Hot sauce won't make a dent!
-
4 points
-
4 points
-
4 points
-
3 pointsMowing with my 244H over the weekend ---- the electric clutch stopped working. It functioned intermittently, after initial stoppage. I checked around for a bit ---- and found the problem. Put my volt meter on the battery while it was running - and only measured 10 volts. Shut the tractor off ---- same result. That clutch draws a lot of juice! Charging circuit was blown (fuse melted into the fuse box). Not sure how long this issue has been around. Put a new battery into the tractor last October. For all I know, the system wasn't working, then. I replaced the charging fuse after digging out all the melted plastic, and voltage now reads a steady 14. Trickle charged for an afternoon ---- and off to the races.
-
3 pointsI'll let you know if it works or kills me. The logging mule has received its latest mod.
-
3 pointsLooks like it ought to do the job. But at 90+ degrees here today, I don't think you're going to get much seat time with it
-
3 pointsMounted the blower and installed a new chain.
-
3 pointsMore pics of my project.
-
3 points24x36 can't believe I forgot to mention size! It will be. Gotta wait a little while to afford that. Ceiling was supposed to be 10' but I got 10' 6". Lower cost ladders stop at 10' 3". Yep... Plumbed in a condensate drain right next to the pex stubs. It ties into the floor drain.
-
3 pointsNice Jason ...real nice Thanks for the . What is that about 22 x 32?? Couple of things I like and a couple I woulda done different. The lighting is real nice and what's not to like about infloor!! Go with a tankless to run it, that's what we use. Any chance you put a floor drain in by the tubes for a drain for a high eff. one? Here there is no requirement for pressure testing the loops but we do anyway. Had an unruly concrete dude stick a shovel in one once and a run with a hole in in from factory. I woulda spaces the tubes a little closer. Then you can run lower water temps thus less gas use. For a shop it's probably not a big deal tho. Is that a pull down stairs for stowing horse parts in the attic?? I woulda had the big door an eight footer. looks like you had the head room. Now the real work begins tho....getting it set up the way you like. Air compressor & piping, sound system, wall art, stocked fridge...cot for when in the dog house.....
-
3 pointsThose plastic chickens won’t taste too good deep fried.
-
3 pointsYes Farmer, you are right. Built for a Ransomes crawler. Balances fine but the plough share is very close to the ground. If you look at the second picture, you will see, behind the wheel, half way up a bar with notches in. One of those ropes is tied to a rod. Pull that out and then release it and that bar drops down and engages with pegs protruding from the back of the wheel hub. As the wheel goes round, the pegs lift that bar and that raises that side of the plough till it locks. To lower it, you pull the same rope and that side will drop. Anyone standing at the side should keep fingers well clear. (Don't ask how I know) The handle on the left, looking from the rear, controls the depth wheel which is the wheel on the opposite side. The other handle controls the small trailing wheel at the end. That tilts the plough down or up. Lining it up behind the tractor is done by altering the position of the draw bar. It's in three pieces. There's a cross bar with several holes in which you can move left or right. Another bar again with holes in, goes to the tractor and one more from plough to that bar with a pin in the end. The pin can be fitted in any of the holes in the tow bar. That lot adjust plough left or right to suit the tractor. You can see them in the first picture. I hope that description is understandable.
-
3 pointsLove it Squonk!! and honestly... in town, it's probably better than live ones anyway.
-
3 pointsAnother photo taken from the rear.
-
3 pointsThat was a great tour, thanks. This Power Wagon brought back memories of the first non-farm job I had. The service station I worked at while in high school had two of them and they were awesome. Slow, rough riding, but nearly unstoppable!
-
3 pointsI'd have to say this trio of GMC would be my fave (but I am GM biased) they ALL are cool ole trucks though, Thanks for sharing, Jeff.
-
3 pointsExcellent score Niel...and excellent people to buy from also. That is a long way to be driving on the wrong side of the road.
-
3 pointsWhat an awesome place! Really and truly thanks so very much for those pictures. I'd probably would never had seen this place if it wasn't for your pictures
-
3 pointsCool photos! I Love old trucks. Thank you.
-
3 pointsHere's the Iowa 80 truck museum!
-
2 pointsjust got another 312,8 , and while snooping around oiling ,checking etc., just thought I would see if the long ignored paint would come to life. using two different types of cleaners ,brought amazing results . using TURTLE WAX RUBBING COMPOUND, HEAVY DUTY CLEANER PASTE, first to initially lift and clean the paint. then using MEGUIRES DEEP CRYSTAL PAINT CLEANER LIQUID after cleaning off the compound . you could instantly see the paint break thru into a brilliant red . tried it on a number of dull flat looking areas, same result, mirror like deep red paint ! so in addition to dragging this tractor from the grave, along the way I will also bring back its paint. this is something I did today on my new/old horse, nothing like a bucket of oats and some new shoes, horsing around , pete
-
2 pointsLooks nice. Might as well keep both.
-
2 pointsSkittles Jr! Lookin’ good Richie!
-
2 pointsThe "Big D's" are popular with a lot of us....I have 4 of them.... The Ross steering is a common problem on these, it can range from a fairly simple repair if the housing is still good, to a bit pricey if housing is broken, it is a pretty good job to remove/replace it. The 3 point is a most wonderful and handy feature, the PTO is if you have the correct attachments - attachments are a bit hard to come by. I dont know much about the Onan, they do have some issues that can be a problem - one of the other guys can elaborate more on them. The hyd drive can be a problem and you really need to know more about it with being able to drive it and ck it, It is also quite a booger to work on. If you feel comfortable with your mechanic skills and cant drive the tractor get it as cheap as possible (hah!, thats a requirement anyhow!!)
-
2 pointsThat is an awesome truck Jeff!! I'm a square body GM fan for sure & definitely a big block fan. It should serve you well.
-
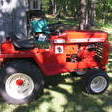
2 pointsWelded the 1054 tower assembly to the gt14 frame. Ordered an Eaton 1100 case gasket and axle seals for the transaxle. Want to get it to roller status.
-
2 pointsLove my big D's. Oh yes they are 200's
-
2 pointsThat would be about 4 maybe 5 people? Anyways, here is the tower assembly sitting on the gt14 frame. Then with the 1054 dash and nose with a gt14 hood. Looks like it was made for it. I’m tickled pink.


This leaderboard is set to New York/GMT-04:00