
Leaderboard


.thumb.jpg.affe7d34ead61ae3c7684997c39109d8.jpg)
Popular Content
Showing content with the highest reputation on 03/11/2018 in all areas
-
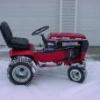
10 pointsYou probably run out of traction much before that. Made a couple of improvements on it that have really made it easier to use. Th new seat is much higher making it much more comfortable for my long legs. Also made an extension for plow lift so I dont have to lean forward to operate it. I don't even have to take left hand off steering to use it now.
-
6 pointsHere's another 867
-
5 pointsMy last post showed the condition of the axles for this project. This weekend I had a chance to make the repairs on them. First weld up the damaged key ways and unwanted through hole. True the axle back up on the lathe. Cut a new full length key way on the mill. Job done, easy as that. Finally was able to start assembly, one item on the list was the hydro pump. A Century Fox pump made by Hien Werner. Unlike the HY pumps made for Wheel Horse this pump needs to be spun clock wise, so it will drive off of the fly wheel side instead of the PTO side of the engine. So I have the axles done, I should have the transmission back together right? Well after some one wrecks a couple of seals, assembly was kinda brought to a halt. This is kinda depressing as I could have had it put back together. Oh well, I got it this far. Sorry for the blurry pic. With the transmission out of the picture I just moved on to assembling a few other things. Not quite looking like a tractor but it is heading in the right direction.
-
5 pointsStarted installing my rear rock shaft. Still need the cable. Also need to relocate my fuel pump but that's no problem
-
4 pointsI have a problem with short frame square hood tractors lol bought an 867 today. The last 2 horses have been short fame square hoods, the other one being an 857. I just love the 8hp kohler engines! A restoration is in order for this bad boy at some point.
-
4 pointsIT'S ALIIVVE !!!
-
4 pointsOh you have the adjustable model. I must upgrade.
-
4 pointsModels that used the 6509 belt guard 1046 1056 1057 1067 1257 1267 Garry
-
4 pointsThanks to everyone for the birthday wishes. I had a great day. Started with a 5K run for charity in 30° weather, then my son & daughter-in-law and some other runners took me out for breakfast. After an afternoon of yard work, (with a little seat time), we all went out again for dinner. I'm now sitting back in my recliner with a homemade brownie and a cup of coffee thinking how lucky I am to have such a great family and great bunch of friends here on RedSquare.
-
3 pointsPainted some engine tins and small panels for skittles. While I was at it, I got started on my mash pole sign. Painted the first color today. Hope Howard’s tractor don’t flip over.
-
3 pointsQuick base coat of paint. More coats as the evening progresses
-
3 pointsAnd while I was puttering in the workshop....
-
3 pointsI don't think I've ever ran out of power with my onan eric j
-
3 pointsThats a beautiful tractor. If my 57 was a 67 i probably would have kept it.
-
3 pointsCheck with @daveoman1966 or @A-Z TractorA-Z Tractor http://a-ztractor.com/, thy should be able to hook you up.
-
3 pointsthere is one on ebay now for 49.99 with free shipping in great condition. another idea is get rid of the outlet patch a piece in, rotate the the tank 180 and tap in in a new outlet on the other side
-
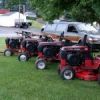
2 pointsThis is what I mowed about 10-12 lawns with between my Jr. and Sr. Year in high school. 1980 Simplicity 4108. I sold it to my dad in 1982. He mowed his yard for 35 years with it. I figured it has about 1100-1200 hours on it. The mower deck was replaced. It starts right up. Uses very little oil. Dropped off a 1999 WH 312-8 I bought for him this winter. We didn't know what to do with this. So, I took it home. I think I'm going to clean it up and putz with it some. Looking it over, It probably needs about $150.00 at most put into it. And a little elbow grease!
-
2 pointsHad to clear out some older drifted snow today. Drifts that have settled are pretty dense. The old Charger 12 was working so hard I darn near stalled the engine. That you can almost stall a healthy 12 hp Kohler plowing snow speaks well of the strength of the hydro and the traction provided by the 10 pinion differential. In the past my other plow tractors would always spin out long before the engine was really worked hard.
-
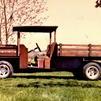
2 pointsTrying to ID this tractor - any ideas?
-
2 pointsThe 1055 is my snow plow tractor, short frames rule there. I need to make mine pretty like @520HC's.
-
2 pointsCan't. .. I don't have time to write that novel.
-
2 pointsWelcome to Red Square Pat. We have a few guys that have shipped a horse over seas. Hopefully, they will see your thread and join in. Do you have a line on an RJ? Where you find one might make a difference on how you get it shipped.
-
2 pointsYour drive belt is a 5L-850 which crosses to a B-82. I use a Kevlar K5L-850 on my GT-14 from tractor supply. You could place a wanted ad in our classified section for the gas tank search. http://www.wheelhorseforum.com/classifieds/wanted/?do=form&d=2
-
2 pointsDiamond plate helps a lot. I don't have any problems going in or out. Vice grips are for throttle .Keeps creeping out of position. Was going to change cable years back but got used to using this way.At least I always know where vice-grips are.
-
2 pointsI have an extremely steep driveway and don't want to take any changes with it. The almost stalling only happened with this storm for the first time. I had 18 inches of wet stuff on the top part. It was brutal on tractor but it pushed it. I need to get up to the top of it first and then plow downwards. However since I do not have a lot of spots where I can put snow, many times I just push it all to the street like this time.
-
2 pointsGet ya one these you shouldn't have any problems with drifts or banks...its only 22hp.
-
2 pointsFunny you mention this. The same thing happened to me this time with the Electro plowing huge mounds of wet snow. Helping my neighbor plow his steep 1/4 mile driveway going uphill engine was slowing down considerably. Also going up my driveway I almost stalled it a couple of times. Ramming into big snow piles I have to be more careful. I almost flipped it a couple of times. Kept going forward over pile to the point that it was going vertical. I don't know what i would do without this tractor, it is just unstoppable. This time I went through 3 fuel tanks non stop.
-
2 pointsJust a heads up - You're better off to run the grounds to a single point on the frame, then use a 12ga wire to the battery negative post. Running a ground in a single direction chain to each system can lead to loop issues and cause the voltage regulator to get a false reading or burn out. I generally use one of the bolts that mount the regulator to the chassis. If the regulator is mounted on the dash stand as is the case with the C160, run a ground wire to a frame bolt instead and bring all the system's grounds to that point. I use a jumper wire and use internal tooth lock washers to mount the regulator so the wire can ground the regulator body properly . This will keep things tidy and prevent ground loops and interference. It also helps voltage meters and other gauges read more accurately and prevent future grounding issues. I still always run at least an 6ga ground wire directly to the starter's mounting bolt to prevent the starter from ever using something else as a ground path, such as the choke or throttle cables. Sarge
-
2 pointsYeah...you can be sure, things quiet down quick. When the Mrs. K's cookie bars come out.
-
2 pointsIf it had said Mrs. M's cookie bars...
-
2 pointsVIBRATION.... Regardless of the patch you chose, you might think about putting some rubber line in between the tank and the fuel line. Maybe scratch the whole "fuel bowl thing" and put a inline filter in. The tank is small enough where the leak could be brazed lIke Eric is suggesting. If its welded (gas) you might have to make a reinforcement piece (like a washer) to get a purchase onto some good metal. But that hard line hookup is probably vibrating to all get out so its going to keep testing the fix. Just went back and looked at the picture again, take the sediment bowl off, get a inline shutoff and get a new outlet bung welded into the tank. I'm thinking the weight of the bowl assembly combined with the shakes is causing the problem to revisit you.
-
2 pointsI actually just picked one up from member on here last week, along with a 702 belt guard that my grandfather needed. I really appreciate all the help you guys give here, this is such a friendly and great site.
-
2 pointsHere is the wire diagram. Later model 520 wire diagram.pdf It shows the 3 fuses, how they are wired and the wire colours. I personally wire from the voltage regulator straight down to the starter motor solenoid battery cable with the 30A inline fuse. Fuse holder is down by the solenoid. You will then only have 2 (15A and 25A) fuse holders up where they are now. That takes a large load off of the 9 pin connector. Wheel Horse did this on the early 520's, unsure why they changed for the later ones. Any more questions just ask. Cleat
-
2 pointsEveryone deserves a 2nd chance. Well almost everyone. You better be at the show. I don't want Jim to be all ornery and hit me with his suspenders!
-
2 pointsThat is the belt tightener bracket for a front mount mower deck If you need one for a front mower deck I can make some more I made some last year
-
1 pointI requested reinstated to my account, Karl brought me back, I wont Joke around. I bought a 417-8 today over the phone, he said it was mint, well it wasnt, steering column pulled out from dash, engine running on turpentine, & a List of more things, Ericj ripped my rear today TWICE saying theres some times you have to walk away, well i didnt & im out 600 bucks for a Non running 417-8, so i need your help, i called 19richy66 and he is gonna send me some info after his work. Hers 1 pic before sale, its what caught my eye for being a deal. Thanks for Letting me come back Karl, oh boy, im sure i will get the texts now
-
1 point@Lars lives by Oslo Norway and he has done it maybe he will chime in and give you a few pointers.
-
1 pointI’ve responded to you on the gas tank by PM. However, if you have a tank with cracked outlet, I posted a repair / fix for that and you should be able do a Forum search and locate it.
-
1 pointEasy to do and makes it start a lot better.
-
1 pointFlat driveways are ideal however far from that here. Weight really makes a difference . I have 100Lbs on wheels, 90Lbs on rear hitch and about 25Lbs inside tool box. On my neighbors steep long driveway a 4 wheel drive pick up will not make it all the way up plowing. At the turn it slips and stops. I make it all the way up with tractor without one single slip.
-
1 pointsorry I'm late Bob, eric j
-
1 pointJohn deere
-
1 pointOMYGAWD! How did I miss this and homemade brownies to boot! Happy Birthday Bob!
-
1 pointIf there any "old pro" radiator guys in your area,they were masters at soldering new hose outlets on and reinforcing them. Another option.
-
1 pointHave to take a break after that read.
-
1 pointHAPPY BIRTHDAY BOB Hope you have a great day, and don't loose that cents of humor.
-
1 point
-
1 point@WHX14 if you take the southern route it is all freeway and it only adds about 1 hour to the trip. 90 -39-80-65-70 in Penn catch 79-68-81 or 90-39-74-70 in Penn catch 79-68-81 it is just that 1st toll in Illinois. All interstate freeway.
-
1 pointGot some parts in and a few more small things painted / prepped and ready for paint. Decided to go with black for the rims.
-
1 pointThat's the biggest draw back, my BIL/FIL had one and was constantly tearing up the grass/sod because it is a "SKID" steer my BIL does concrete/construction work and is a skilled operator but when I did the digout for my new carport/shed (was only about 2" off level in a 18'x21'+ span) and concrete slab(4'x8' span) in front of our deck he commented on how much nicer I had done the work with my eMax vs him on the skid steer, open differential 4x4 I agree you can see more of what you're actually doing on the skid steer vs my tractor loader combo but that also is part of becoming familiar with the pieces of equipment you're operating be it a gear drive vs hydro drive horse or compact car vs a semi truck and everything in between, you wouldn't necessarily use that 40hp utility tractor to mow a 1/4 acre lawn then use a single to plow a 14 acre corn field but if that's all you got and know how to use it...Jeff.


This leaderboard is set to New York/GMT-04:00