
Leaderboard


.thumb.jpg.affe7d34ead61ae3c7684997c39109d8.jpg)
Popular Content
Showing content with the highest reputation on 01/24/2018 in all areas
-
13 pointsNew van is finally here. Still hard to believe the condition this thing is in. On top of that previous owner had the whole thing detailed, replaced a taillight that had a scratch in it, took it to his mechanic to ensure all fluids were OK, and drove it to my house and insisted that I drive it and inspect it again and if I was not happy he would give me my deposit back. I cant believe my luck. Those of you who own one of these vans will definitely appreciate the condition of this thing for a 2007. There are a few blemishes on photos but it is some crud in the lens of my camera. The only body damage!One little nick! I don't think anyone has EVER been on passenger side. Springs still have factory tags Fluids are totally clear.
-
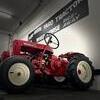
9 pointsCraigslist score! I've been looking for one and this showed up less than 5 miles from home. It's been used maybe a half dozen times, only twice by the previous owner. Its complete with the flag and chute handle and 2 belts. Is got nice pan no dents and good life in the shoes.
-
9 pointsIf All Of You Didnt See This Or Heard About It Here You Go I Know I Gonna Bring My 500 Speical To It Because That Baiscally Right In My Backyard Lol
-
9 pointsJust chiming in to follow Jeb & say keep up the nice work! . Really like your bushing ideas & great minds think alike. May have to go start a "fun with bushings" thread! Here are some more bushing ideas to take care of well worn holes. . I do have the tightest steering 1067 on the block! Apologize if I got a little pic heavy!
-
7 points@19richie66 Looks like you were trying to draw a mouse. I wish I could be the on Wednesday but I can't . Will be at the Fair Grounds on Thursday afternoon. Wear your mouse ears and I will look you up. I 'll have on a white tee shirt blue jeans red suspenders and a gut. Forgot the dumb look on my face.
-
6 pointsCan’t make any promises but on friday I plan on being somewhere on the blue line. If you see me stop me and say hey.
-
6 pointsWell i best get the shop cleaned up before you all think i'm full of it ?
-
5 pointsI'm rebuilding a Sundstrand #90-1136 that came out of my 1974 WH B-100. I Found this company www.novahydraulics.com that has the entire rebuild kit PN / 99890. It shipped quick too. Gordy is the man you want to talk to regarding Sundstrand units. Good hunting all.
-
5 pointsGreat job on the cleaning and organizing! Enjoy your success because chances are that when you tear into that “C”, things will get a little messy again! you have me thinking about my music setup in the shop. I think I might have to wire something up. I’ve been cheating (or wimping out) and using my phone a a Bluetooth speaker... As Tim Taylor was so fond of saying, it’s time for “More Power!” I would like to see what you guys have done for your sound systems. BRF probably has a 1980’s BoomBox on the wall rocking his favorite cassette’s
-
5 pointsJebbear Thanks for sharing this rebuild with all us miserably crabby forum members here at RedSquare. I as many others look forward to many posts and pictures of your progress. I am fortunate to have a 50 year old commando 8 with the rear discharge deck and am amazed at how hard it works for me. There are many benefits to becoming a support member here and one of them is that all support members who are registered on my website rec. a 15% discount off all items in my store. But here is the kicker, If you decide to become a paid support member I have a complete set of 856 decals that I will for this project if you pm me your address. Again thank you for sharing and I look forward to watching you get the 856 ready for another 50 years of hard work.
-
4 pointsI 2nd that motion LOL I have a old 8 track out of a 68 Camaro RS, playn The James Gang Rides Again LOL
-
4 pointsGreat pix WHX14, and great ideas! Funny you should post this right now, because I just now came up from the shop cleaning up a lot of the other little linkages/shafts and things that I plan on adding bushings so I can get an order ready. That "fun with bushings" thread sounds like a great idea! That goes right along with what the Sarge has been saying about fixing up all of these old parts and keeping them running. Agree whole-heartedly that there are only so many left and most of the used parts are as bad or worse than some of us are working with. BTW, that is a neat vise/clamping system for the steering block. That is one of the locations that I plan on adding a bushing this time around which I did not do on the prior rebuild. I only bushed the hole where the fan gear shaft went through, which wallowed out again & will need redone. Wish I could fix my fan gear like you did Sarge, cause my teeth also have a fair amount of wear, but I don't have a tig and probably couldn't use it if I did! I only have an old stick welder and acetylene torches but I never considered myself a welder, I only stick metal together and sometimes it actually holds! WHX14, did you have to cut down some of the axle casting thickness where the center pivot pin went through to allow for the extra flange thicknesses between the frame supports? I want to do something very similar, but the existing would need trimmed to accept the flanges on the inside. My old fan gear, block, and wallowed out bushing... .
-
4 pointsI'm booked, so the little lady and I should be there Wednesday.
-
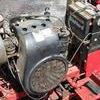
4 pointsHere's a few pix just to keep you all updated of where I'm at. Since I kind of got a late start with this thread and tore into it before I brought you guys along for the ride, here's a couple more "before" pictures. I think I mentioned in an earlier thread a couple of months ago, that initially the starter gave out on me, which was kind of the catalyst to get me into restoring her to her full glory. This first one is when I rolled her into the corner of the garage and parked her after that happened. A couple "befores" of the engine that was crying for me to work on... So I began... Here is the block after the machine shop work and a fresh coat of paint. I included this picture as a subject for discussion. I might hear a lot of negative feedback about this and I would have probably been right there with you before I started, but here's the issue. The engine rebuild kit that I got was one of the Stens aftermarket kits from ebay which I hesitantly bought, but they all seem to get good reviews so I thought I would try it. The engine required a .020 oversize piston and a .010 undersize rod. The kit came and I was well pleased with the apparent quality of the parts. What I didn't like was the head gasket that they gave me which was more of a flexible gasket and didn't have the metal 'fire ring' along the inner perimeter. I checked at all of my local sources and no one had a genuine Kohler and even the NAPA store told me they would have to order one which would probably also be an aftermarket. After a little research, I read on Brian Miller's site that there is no problem re-using an old head gasket if there was no damage as they did this with aircraft engines all the time in WWII. Mine seemed to be in great condition so I followed his instruction, cleaned up the old, gave it a shot of the Permatex Copper spray and this is what it looks like. My Dad also told me that he thought it was changed once not too many years ago so it is not the original. So go ahead and blast me guys, I'll be the guinea pig and give it a try. Hopefully worse case is it blows out and if that happens, then I'll go looking again for the real thing. We'll see how it goes, if it goes south I'll sure let you all know. Here is the completed engine. I don't have the tins or air cleaner shell on yet as I may decide to paint them with the same paint that I use on the tractor and install at that time. Still need to find and install a new spark plug wire as the boot is cracked on this one. If anyone is interested, I used Duplicolor Universal Red Engine Paint rattle cans for the engine and will be using Dupont 7410 (International Harvester IH-50) Nason Single stage urethane for the tractor. Paint seems to be a controversial subject here but I did a few paint comparisons of my own earlier which I will post my findings/opinions at a later date. Which brings me pretty much up to date with where I am at now. Here are a couple of the frame during tear down. Oh, by the way, pay no attention to that "green bucket" you see in the background of the last pic. I just got here and don't want you guys throwing me out before I get started! These last ones are more of what I have been discussing recently. First one shows the wear in the paint (which I didn't notice on initial teardown) where the axle pivot pin had been rotating due to the lost bolt. The other ones are the front axle and a close-up of the old bronze bearings that I installed 31+ years ago. I think Sarge has me on the right track for the rebuild this time around, so I'll have to get an order ready for McMaster-Carr and begin the long task of fixing things.
-
4 points@Big_Red_Fred You are not right in the head.
-
4 pointsOnce in a while I will haul a truckload of stuff away, just to make room to set a pail on the floor. I have a hard time getting rid of my treasures. Great job cleaning up your shop Eric!
-
3 pointsnice 50 degrees Sunday to take her out on a cruise !
-
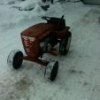
3 pointsSaw my old 90 210H on CL today. I bought it new. Got an Allis Chalmers blower after the Super Storm in 93 and made it fit. This little guy was tough. all I ever did to it was a diode and a tie rod. Moved lots of snow with it. I'm not linking the ad because of rules but here is the pic from the ad I sold it about 6 yrs. ago.
-
3 pointsIm going to try and see it all. I don’t have any mouse ears but I’ll see if I can find some. I figure I can check out the fine rides I have seen on here, hang out with as many as possible and then hopefully make the cruise for a couple of laps. Really just want to put some names with faces, shake some hands and tell a lot of of you “thanks for the help, advice and just all around great fellowship” on here.
-
3 pointsI'll be set up by Porta Pottys
-
3 pointsWho ... @Achto ??? ...he's in never never land or margaritaville on any given day...once in awhile he's located on the captain's ship as well!! !
-
3 pointsI'm in, reservation is made! See y'all on Wednesday evening!
-
3 pointsHAPPY 69th BIRTHDAY DAVE .... eat lots of and !
-
3 pointsYou know what they say..... all show and no go
-
3 pointsYou took it out of the closet? Make sure you put your special goo on that belt too. Makes it last just like the tires. Lol How did you steer while out crusin around?
-
3 pointsLots of respect! I know how long it takes to put a tractor together like that and the money and attention to detail that it takes to be competitive. It sounds like that makes lots of horsepower judging by the video. Excellent work! How many first place trophies do you have?
-
3 pointsI'm sure glad I don't have one of those darn ol loaders. They don't seem like they would be good for a person.......I be so stuck in the seat you'd never get me off of it
-
3 pointsJust to chime in that ramming snow piles isn’t the only thing that breaks frames... There’s no doubt that ramming things with the snow plow is cause for concern to the transaxle mounting plate, but I’ve parted out several tractors - especially 520h’s - that had broken and torn plates and which showed no signs of ever being wearing a plow. Worst break I ever saw was on a 312h that only ever mowed and carried a front mount generator. That tractor was held together only by the sheet metal tunnel and belt guard and the owner was none the wiser. Sometimes the welds let go. Sometimes the four little bolts work their way through the plate. Sometimes the plate cracks (as pictured )and rips apart...That’s what happened on the 312. The Combined weight of engine, implement, and - to a lesser extent - operator are conspiring at all times to break that plate over every bump. The 60” mower in particular is a killer...combine that with a hefty operator and you got the recipe for trouble my friends, right here in river city. Of course, you won’t be hanging a 60-incher under your oldie. Wheel Horse reinforced the mounting plate somewhere along the line, and even sold a reinforcement plate to help in that area. The D-series and 5xi’s went to full-length frames to get rid of the problem for good. That said, the vast majority of these tractors never suffer a broken frame...so if you drive your tractor like a reasonable person there’s not many tasks you should be afraid to put up against it. Like others have said, you’ll usually run out of traction before you can do any real damage. Although I do recall the legendary Dale from MI ballasted a tractor so heavily that he broke an axle... Work it as hard as you dare. They were built to mostly take it. Steve
-
3 pointsI got here late and I am amazed at the change. I worked several days collecting and sorting 1200 lbs of scrap in my shop....My before and after look exactly the same.
-
3 pointsOK guys, you convinced me. Notice that a "Supporter" logo just appeared by my member ID!
-
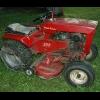
2 pointsHi all! Finally got around to starting this makeover on my 856. A little background on this tractor (1966 model - don't want to tell my age but you guys do the math), when I was a youngster at about 12 years of age, my neighbor bought this tractor brand new to maintain about 8 acres of property. I was intrigued and amazed at this machine as any 12 year old kid would be. So everytime I would see him out mowing, I would run over to his yard and he would let me mow for him (I know, he was probably a lot wiser than I was), just so I could ride around the yard on this sleek machine. I guess it was a win - win for both of us. Anyway, long story short and fast forward several decades, I ended up purchasing his entire estate after his passing, and guess what came with it. Anyway, after a gazillion hours between the original owner and myself, mowing and hauling and plowing snow, along with my dad maintaining a garden with it for years, I decided it was time to try and give her a new lease on life. She still ran OK, but I could tell she was getting a little tired and cantankerous in her old age and like any fine lady wanted to look young and pristine again. She has always been a true and reliable "work horse", which is what I still have in mind to this day. So that brings me to today, and here I am. I have pretty much completed the engine rebuild (which some of you guys have already provided some assistance in another thread) and have started into the tractor and chassis. This is actually the second go around with this machine, as I kind of did a rebuild back in 1986, just replacing some of the worn out stuff and giving her a quick shot of new paint. To reiterate, I couldn't even begin to estimate how many hours are on this beauty which I have no doubt is staggering, but I refuse to let her go. Anyway, that all being said, I am certain to have a bunch of questions for this undertaking which I am sure you guys have seen many times over and thank you all in advance for any assistance that you can provide. I guess I am limited as to how many pictures that I can post, but I will try to put a few up along the way. This is how she looked before I started.
-
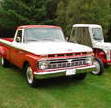
2 pointsGreat looking van!!
-
2 points
-
2 pointsNow come to think of it I eventually did not go with that idea because of just that. I did bore & bush the axle pivot and had just enough space behind the axle to get a thin bronze washer in and didn't worry about a shim in the front figuring the tractor would be driven more forward than reverse anyway. Thought of that too Ed and filing down the space or teeth in the fan gear for a better fit and no quarter wheel turn to steer. It was a lot of work and I doubt if I would do it again. What I really wanted to do was put a spring in the area shown instead of factory shims for self adjusting fan to pinion. Holds the fan tight against the pinion. Not enough room on the rear of it tho. Next refresh on another project I am going to drill and tap the end for an extension bolt and washer/spring setup. Would not use the cotter key hole then follow me? BTW Jeb that plate/pin assembly. is available from Toro yet but they are quite proud of them. PN 6216. Dan @Achto makes them but can't speak for him if he is willing to sell any. If your pinion looks as good as your fan gear you should have no problem in tightening that area up.
-
2 pointsIt's 8 weeks out to be built, but I got the blue ZR2 crew cab short box. I've got 4 full size trucks, so no need for anything bigger than the Colorado... especially with a 7700 pound tow rating! Apparently they don't build leather seated trucks with a rubber floor very often... but when I plan to haul the buggy to the sand dunes regularly, weathertechs just won't cut it for cleaning up sand!
-
2 pointsDon't know if I'll make it yet but if I do
-
2 pointsComfort Inn swap meet in the back parking area before dinner 😂😂
-
2 pointsThanks guys. Believe me, this is the absolute first time I ever re-used a head gasket and would never have even considered it had a new OEM been readily available. I guess I could have tried ordering one somewhere, but had fears of receiving the same thing that I have now with the aftermarket kit, especially after what my NAPA guy told me. If you would have seen the one they sent me in the kit vs. my old one, there is no comparison in quality. Like I said, live and learn. If it doesn't pan out, its not that difficult to correct. You're right cpete, like I mentioned she has always been a "work horse" but I probably should have given her a "bath" once in awhile. I guess I was more focused on maintaining the juices inside vs. the gunk on the outside. Hopefully after all of this work, the new one gets a little better care.
-
2 pointsthese pics are worth more than several thousand words
-
2 pointsI got a new horse last fall. I looked a long time for a low hour, newer 314 or 315. Finally found one with 265 hours within a few hours of me. Brought it home, cleaned it up and went through everything and it shined right up. I would highly recommend Forever Black plastic trim dye on tired looking plastic. The next project was the cart. I decided to go with a poly one made by Ohio Steel. I liked the poly over the steel due the low maintenance factor and it got great reviews. Then I built the wood side railings and turned it into a “Toro” cart with some decals from eBay. Finally, I have been searching for a front mount generator for a couple of years with no luck. I found this one on eBay last week that was mid-listed and got a great deal. Mounted it up today.
-
2 pointsThank you Jeff. The 1995 520H with plow has 1136 hrs. On 8/5/2017 it had 1117 hrs. The blade at max vertical works best for my driveway for scraping and picture mode.
-
2 pointsThanks Glen! The photo of Supreme Commander MacArthur accepting the unconditional surrender of the Japanese armed forces brought a memory. My wife and I traveled to Hawaii some years back. The first thing I did was to take her to the USS Arizona Memorial to pay our respects. Then I took her aboard the USS Missouri and pointed out the plaque attached to the deck showing where the signing was done. She did not get it, but I tried to explain the deep significance of the sites we had visited. The USS Arizona was a somewhat isolationist, innocent America. The USS Missouri was America as a global super power. The book ends of a war that still define 'old history' from 'modern history'.
-
2 pointsSmitty’s lawn and garden supply. Bethalto, IL
-
2 pointsProbably another good topic to start. What kind of stereo do you use in the shop and what you listen to there.
-
2 pointsChances are you have carburetor issues. I would try running some Sea Foam through it. If that doesn't help, replace the carb. $12-15 on Ebay. Cheaper than rebuilding and "plug and play".
-
2 pointsI'm amazed at how much more snow you guys have!! We've yet to have more than a inch or so on the ground for any length of time.
-
2 pointsThat really looks great. I have a 2000 314-8 and it has 262 hours on it and it is very nice to drive. Like new looking This is mine I really like the power. But I would like to have a generator setup like yours. Great job
-
2 pointsWish it looked like that now Chris. Got the pulley replaced and needs a good detailing before the lake opens this spring. Also need to see if I can get the rear lift pin out to install one of Lowell's hitches. Hoping to find a good lawn sweep for it. Just put your account in the rs supporter group and next time you log in you will see the prices are 15% lower for any future orders. Also if you have any issues at all with the decals let me know asap so I can take care of any issues. If you make it to the BIG Show we are in the 4-H barn.
-
2 pointsThanks so much for your offer. I guess I should have started this project last month because believe it or not, back in December I already purchased from you a complete set of decals including Kohler items for the tractor. I know I probably put the cart before the "Horse" by buying these first, but I made the purchase up front as an added incentive to proceed and convince myself that I can make her look new again! I will consider the support member anyway, thanks again.
-
2 pointsGot the trans all cleaned up. Knocked out the bearings and bushings, axle bushings had little wear. Mushroom gear and diff gear a little worn. Smoothed them out a little with a file as they are going back in.


.JPG.9f2ecb26065c66527b0730084ab7fc7a.thumb.jpg.7dc8a04d9a53d44ee2b23f26ee94496f.jpg)


This leaderboard is set to New York/GMT-04:00