
Leaderboard


Popular Content
Showing content with the highest reputation on 01/20/2018 in all areas
-
18 pointsFinally finished my Wheel Horse themed Kohler engine lamp Here is a link...
-
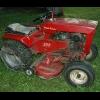
16 pointsHi all! Finally got around to starting this makeover on my 856. A little background on this tractor (1966 model - don't want to tell my age but you guys do the math), when I was a youngster at about 12 years of age, my neighbor bought this tractor brand new to maintain about 8 acres of property. I was intrigued and amazed at this machine as any 12 year old kid would be. So everytime I would see him out mowing, I would run over to his yard and he would let me mow for him (I know, he was probably a lot wiser than I was), just so I could ride around the yard on this sleek machine. I guess it was a win - win for both of us. Anyway, long story short and fast forward several decades, I ended up purchasing his entire estate after his passing, and guess what came with it. Anyway, after a gazillion hours between the original owner and myself, mowing and hauling and plowing snow, along with my dad maintaining a garden with it for years, I decided it was time to try and give her a new lease on life. She still ran OK, but I could tell she was getting a little tired and cantankerous in her old age and like any fine lady wanted to look young and pristine again. She has always been a true and reliable "work horse", which is what I still have in mind to this day. So that brings me to today, and here I am. I have pretty much completed the engine rebuild (which some of you guys have already provided some assistance in another thread) and have started into the tractor and chassis. This is actually the second go around with this machine, as I kind of did a rebuild back in 1986, just replacing some of the worn out stuff and giving her a quick shot of new paint. To reiterate, I couldn't even begin to estimate how many hours are on this beauty which I have no doubt is staggering, but I refuse to let her go. Anyway, that all being said, I am certain to have a bunch of questions for this undertaking which I am sure you guys have seen many times over and thank you all in advance for any assistance that you can provide. I guess I am limited as to how many pictures that I can post, but I will try to put a few up along the way. This is how she looked before I started.
-
16 points
-
13 pointsNo no no, It didn't snow here in Pee Aaa. It's 55 degrees and sunny. So I felt it would be a good day to remove another one of my dead spruce trees. She fell as planned, missing my holly tree and my neighbors lamp pose and rail fence. The 312 plow tractor was selected to drag the tops to the burn area and it handled the first one although there was some spinning when I got off the stone road and on to the grass that was starting to thaw. The rubber chains on the 312 were just not providing the traction in the mud, so I had to bring out the 520 with the 2 link Vee Bar chains. This did the job in the quickly thawing ground. Anyone have use for a dry 15' spruce saw log....before I cut it up for camp wood? That's 5 down and 15 more to go.
-
13 pointsI went today to look at a plow, disc, midmount grader blade and sickle bar. Only problem the guy would only sell it all or nothing. And i really wanted everything except sickle bar. So I ended up getting it all. Probably end up selling the sickle bar.
-
10 pointsWe all have a "must build" project in mind, and this is mine.. Over the years I have restored WH's Built things that go on them such as a snowplow and harrow... Added a couple of extra wheels - The 6x6.. And even made a fast fun machine - Project Why Not.. Wheel-Vo is the silly/stupid one As you all know I paid The Showman a visit the other day and came back with a car load of WH.. A 312-8 although with no engine and trans it's more like a 300-0 Here it is back in the workshop thrown in a rather neat pile The plan? The title should of given you a clue, I'm on the look-out for a cheap Volvo that will give up a 2.3 turbo engine, gearbox, rear axle and maybe a few other parts, then sell on the rest to get a few £££'s back.. Of course a standard WH chassis won't be suitable so I'm going to have to build one.. A lot of work ahead but I can/am collect parts while I'm finishing Project MadTrax.. There won't be any real updates for a while but I can keep you updated as to how the parts collecting is going.. And of course... Video's
-
10 pointsHere's a few pics of the new addition. Several small things need attention. I'll be working on them as I get time to try to get it as close to 100% Mechanically usable for now... Maybe a repaint next winter but who knows. Runs great. Starts with a screwdriver across the solenoid. There's a dipstick in the toolbox below the seat that spins but won't pull up/out. Am I missing something? Do I need to turn it or is it just stuck? Whatever grabs your attention in the pics that needs work, please feel free to tell me. Seems like a bit of an odd location for a solenoid... Yes Josh, these are the wheel weights you thought they were. The hitch cross pin is free and rotates !!!! What kind of hitch is this ??? I'll put new wheel seals in. This front tire might be a bit low on air judging by the hole in it. Think maybe I need a head gasket.
-
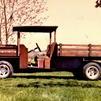
9 pointsHello folks, it’s been awhile sense I shared with the group so figured I’d throw this out there. I’ve been piecing together a mut Ranger. Used a 68 frame, 64 fender, deck and tool box, 633 dash stand and hood and a 701 gas tank. The engine is from an 856 and I used one of Glens 701 dash boards Most of the ranger specific parts came from my 64 that couldn’t fit the starter generater under the hood. So I came up with this. When I get some extra cash I want to change it over to the newer style wider rear wheels and load them so it’s not so tipsy.
-
9 pointsEd can you mail it to me ??
-
8 pointsOK guys, you convinced me. Notice that a "Supporter" logo just appeared by my member ID!
-
7 pointsI got this 520H about a month ago to get the snow off the drive. I had a walk behind thrower before this and a C175 with thrower & cab before that. Temp got into the low 40s today so I wanted to get the lights mounted & working. I wired the switch directly to the battery with a 10A fuse in line. The bar is made from a piece of 3" wide by 3/4" thick nylon I got at work. I have 2 LED lights at each end and a blue flasher in the center. Alll from ebay. The switch bar inside is a piece of 1" x 2" aluminum angle. I have 3 switches mounted but am only using one for now. It turns on both the flasher & lights. In the spring I will have a separate switch for the flasher, 2 lights, and inside dome light. I wired the ground & 12 volts directly to the battery to save time today. The 12v wire has a 10A inline fuse connected. I will change the 12v supply to come from the key switch on position when I do the other changes. I also added the rear view mirror with home made mounting bar made from electrical conduit. I live on a dead end street with only 5 houses past me, but the young girls go driving past without slowing down. I dont always looking behind me when backing into the street so figures I needed a little warning light on the tractor.
-
7 pointsHave it cut into 2 X 4s and build another shed!
-
7 pointsI remember after I restored my C-121 and brought it to the big show. Ed Mayhew just finished making all the C-1_1 decals and brought them to the show. My brother told me to get a spray bottle with soap and water spray the area, apply the decal, squeegee out the soap and water with a credit card. He says "It's no big deal", I think okay fine. However one thing that I didn't count on was the fact that when I went to do this at the big show there would be a crowd of people watching me! So here I am putting these decals on with all these people watching me and I'm trying to act like I know exactly what I'm doing and not show how nervous I really am, when who shows up? The man himself Cecil Pond😳 It was the first show he had been to. Anyway the decals came out perfect with this method and Cecil signed my tractor right after that. This might sound corny but that was one of the proudest days of my life. My profile picture or avatar I think it's called in the top left corner shows me, Betty and Cecil soon after applying the decals. Speaking of which we took a large group photo this day with my tractor in front. If anyone has this picture I would love to have a copy. I'm not sure who took the pictures. Thanks!
-
7 pointsSpray it, apply it, position it, then squeegee it in place.
-
6 pointsWhile visiting with a friend of mine today he showed me a magazine that had belonged to his grandfather. The date on the mag was May of 1955. While paging through I found this advertisement for the all new Chevy trucks. There are some other interesting adds that I will share with you all later.
-
6 pointsNice job on the lights...Look great! Here in Michigan they used to mean a special in aisle 8 at K-mart...
-
6 pointsJebbear Thanks for sharing this rebuild with all us miserably crabby forum members here at RedSquare. I as many others look forward to many posts and pictures of your progress. I am fortunate to have a 50 year old commando 8 with the rear discharge deck and am amazed at how hard it works for me. There are many benefits to becoming a support member here and one of them is that all support members who are registered on my website rec. a 15% discount off all items in my store. But here is the kicker, If you decide to become a paid support member I have a complete set of 856 decals that I will for this project if you pm me your address. Again thank you for sharing and I look forward to watching you get the 856 ready for another 50 years of hard work.
-
6 pointsWelcome aboard, I'm guessing you already know how miserable and nasty these people are on this site, and they don't help with anything, and if they do give you any information its just to throw you off course cause they are not friendly to anybody. I was so taken back by how nasty they were, I just became a supporter because I couldn't believe how mean they are. That being said, I look forward to watching your progress and I'm certain you'll have a wonderful time interacting with all these miserable people for assistance. She is a beautiful machine, should be cool to watch the rebuild. Thanks for taking us along for the ride. Chris
-
5 pointshi, it took a long time to reply, I have found the problem, I feel stupid, but this is what happened, I dropped a screw driver under the seat and it logged in transmission linkage blocking linkage, I removed it now every thing is fine. Thank you.
-
5 pointsOne of those rare hitches. Called a BENTONE
-
5 pointsNot exactly what I was expecting but I couldn't just leave them there. They were wasting away under tarps. Nice fellow in his late 80's had them. Asking 250 gave him 350. Looks like each one is all there? Won't know till I put all the parts in separate piles. SB an SK486, 800 special C120 and a suburban. We will see when I sort through them. Gotta unload now. Wife wants her Pilot back.
-
5 pointsYesterday I paid a visit to @richmondred01and purchased a 37 in SD deck and picked thru his scrap pile . Plan on using the deck on 1 of the to clean up the leaves with the help of a vacuum wagon.
-
5 pointsThanks everyone for the welcoming comments. Cpete - I already noticed how "miserable and nasty" everyone is here from reading some of the forum posts, that's why I am here. Seriously, you all sound like a bunch of dedicated and great people that are all part of a wonderful hobby. Ed, it is rather unique I think to have a 50+ year relationship with this same machine, that is why I shared the story. McClellandtown is located in southwestern PA, 50 miles south of Pittsburgh, actually closer to Morgantown, WV. I'll consider the Supporter idea.
-
5 pointsWorked on the roof until nearly dark, then had a teen activity to orchestrate, then had a couple of college folks who used to be in my TeenGroup come over and watch a movie...so it was a late night. Today—back on the roof to see if I can get the shingles finished. The Tractor: The tranny is an interesting story. He began to search around for a durable yet compact gear Jammer. He wasn’t turning up anything that would work given those tight “spatial parameters” that Chris mentioned earlier. It was important to him to make something tough that didn’t turn out to be the size of a Farmall A! So, he began to visit the local junk yards and was turning up with one dead end after another until he went to Kolpin’s salvage yard. He asked the guy at the desk and he told Uncle that he didn’t have anything that would fit that description at the time. Then Ken spotted this gear box... He said,”what about that one over there?” The guy says, “you don’t want that, it’s really old and one of the gears has a bad bushing!” Ken asked how much and flat reply was 5 bucks—DONE! He got it home and opened it up. Had to machine his own bushing, put it together and it hasn’t been apart since about 1972! Here’s where the story takes an interesting turn. Ken and Tricia were visiting a car museum in California about 15 years ago and there was a featured exhibit on the development of the transmission in automobiles. As Ken look over the wall of tranny’s and was reading about them he spotted one that looked exactly like his! It was from a 1920’s era GM. He began to rave about it and pointed it out to Aunt Tricia. After reading about it and looking it over she said, “If parts from our tractor are in a museum, don’t you think it is time for us to get something a little newer?” All I can think of is the line from Indiana Jones, “It belongs in a museum!—So do you!” Several guys have mentioned that that it looks like a Case GT—and so it should because that is what the outside is modeled after. While going through my pics I found these of a 400 series Case from our annual Symco Thresheree Plow Day... You will notice the similarities but yet a closer look reveals how much beefier Uncle Kens tractor is. (I’m not in the habit of posting so many duplicate pics, but I haven’t had time to swing back over and take more...) The Case tractors had the HyDrive system which was unique to them (actually Colt started the development and were bought out by Case) which is completely different than uncle Ken’s. I’d like to stay and chat some more, but a roof is unfortunately waiting on me. I’ll check in again later—maybe with some fresh photos! PS—did I tell you that my uncle had his blasting license for a couple of decades? The 4th of July could be pretty exciting! How does that tie in to his tractor? I’ll tell you later and include some cool vintage pics...
-
5 pointsInteresting indeed! Is this your own design? We redid one of our bathrooms a couple of years ago, and for some reason I decided to keep the old sink, just so I could possibly use it in the shed for cleaning parts and stuff. I may still get around to it some day, but yours is so much more cool! We're actually doing another one soon, and we're looking for a small pedestal sink. I don't remember seeing this one on Pinterest or Houzz.
-
5 pointsCaught mine waiting for next snowstorm . Rear tires are loaded and ready !
-
5 pointsAround here, if one of those early 90's W-250 Dodge's shows up for sale folks will practically get in line and shoot each other to own it - they are an indestructible work horse and in my opinion sure do look the part. Always wanted one but prices now are well north of any sort of sanity - just watched one that was a rust-free Cummins sell for nearly 20k....ouch. I'd still love an old 50's Power Wagon with the 90's 12-valve drive train - that would be so cool... Sarge
-
4 pointsWell my old van is finally being replaced. For the last several years I have drove my 2005 Ford E-150. The van has never done me wrong and has hauled what ever I really needed to with no issues. But it has 384000 miles on it now and the new York weather has tooking it's toll on the lower sides of the sheet metal. So since summer I been searching for a replacement and last week Thursday I found one. Just went and picked it up today. 2006 Chevy Silverado LS 1500. No rust and super low mileage. The price was amazing so i jumped on the deal.
-
4 points@Ed Kennell Bring it to the Big Show for @857 horse Howard's sign post.
-
4 pointsSUCCESS!!!! The arm was about 1/16" out on the shaft. Used r.l. Addison's idea and wacked it in. moved back flush. Nothing really exposed enough to clean up but used more bug juice and a chisel to move it back to where i started.. and there it stopped.. About 45 minutes of differing wedges that moved it out a tad, driving it back and repeat. Damn thing held on until it had come out over 2/3rds of the way off!! Finally got an old battery clamp puller to fit in and victory!!! Thank you all!!!
-
4 pointsNow You too are a miserable, crabby, don't help with anything, rude member of this rotten bunch of people forum. I bet just in the short time you were here , you couldn't believe how bad it was and that's why you joined. That's what happened to me!!! Now you'll see just what I saw when I joined... Welcome aboard, and Congratulations on the "RED" listing. Don't tell anybody I said this , but its one of the best forums I've ever been involved not to mention how cool the tractors are. Very much look forward to your restoration and any information it provides to help when I do mine. The biggest problem I see on the horizon is matching talent with these guys. Chris, PS. Vinylguy's tractor looks really rough doesn't it.... ...(I don't have that good a paint job on my car for god sakes)
-
4 pointsRebuilt the carb (again) on the C-160. Got the Carbunkles out from sitting. Now it runs without the choke again!
-
4 pointsThanks so much for your offer. I guess I should have started this project last month because believe it or not, back in December I already purchased from you a complete set of decals including Kohler items for the tractor. I know I probably put the cart before the "Horse" by buying these first, but I made the purchase up front as an added incentive to proceed and convince myself that I can make her look new again! I will consider the support member anyway, thanks again.
-
4 pointsThank you all for the ideas. i have tried the propane torch. May give the oxy / acetylene a go. Also tried the chisel but chickened out as i didn't want to break the surrounding housing. I can see why WH switched to allen head bolts later. At least with a ball end allen wrench I could probably get the bolts out and then try a flange puller to get the whole unit pulled off. Also figured out I don't have the 12pt 1/4" socket I need. Have one coming...just when you think you have about all the wrenches and stuff you need....
-
4 pointsThat’s totally..... Lowell ! You never disappoint .Bring it to the Big Show so I can take ... aahhh I mean check it out !
-
4 pointsBest way to straighten/flatten a dash is to place it in the oven between two piece of glass, (with about 1# total weight on top):" 1. Set the oven for 170º with the dash & glass in the middle, for about 20 minutes, (don't open the oven until tomorrow). 2. raise oven temperature to 180º for 10 minutes, 3. raise temperature to 190º for 10 minutes, 4. raise temperature to 200º for 10 minutes. 5. raise temperature to 210º and hold it there for 30 minutes, 6. shut off your oven and let the dash cool down all night, remove it in the morning. The sides may be slightly wavy, but your dash will be perfectly flat. If you have any deep nicks, broken-missing corners or need to reposition/re-drill any of the holes -- fill in that area with "J B Weld, quick" then sand, cut, file or drill to get the correct shape. A black felt permanent marker will match your black dash. To re-letter your dash, follow this: http://www.mywheelhorse.com/models.php. To keep your dash looking fresh and like new, spray it with 'Plastic Restorer' (like Mothers or Meguiars), but after you have lettered the dash, this restorers the oils that have been lost over time. When reinstalling, it is smart to place a very thin rubber washer at each mounting screw between the plastic dash and metal stand, and then only tighten the screw 2-finger tight with lock-tire on the threads. Good Luck, Glen
-
4 pointsAnother method is to use dishwashing soap & water (just like the Windex method); wet the glass or metal with the soapy water then lay the decal on that, slide around until you get the exact position then using a squeeze (start in center >out), remove the water from beneath the decal. This method works especially well with larger and longer decals, the watery residue left beneath the decal will evaporate in time. Naturally, clean/degrease/clean the surface very well first before applying the decal (alcohol would be smart too). Now we know Craigs occupation.
-
4 pointsYes sir...I remember doing this one in direct, midday, summer sun. Glass was so hot, Windex was turning to steam on contact.
-
4 pointsThe last time I pulled one apart to replace the seal and try to service the piston block I had the same problem - that arm was stuck tight and basically rust welded to the shaft. I ended up having to use a welding tip on the torch and some paraffin wax to help get it apart. It's tricky not to heat that aluminum casting and that part is very brittle, broke two of them in the past just trying to knock out the roll pin in the arm. I just heated the whole bottom portion of the arm just enough to swell it a bit, applied the wax at the joint and allowed it to cool for about 30 seconds - arm slid right off. Heating it did cook out the o-ring completely - it came out as dust but it was getting replaced anyway. If I remember right, didn't someone come up with a better way of sealing this portion with an oil seal instead of the o-ring ?? Sarge
-
4 pointsI actually cut out the cardboard pattern at lunchtime at work. Used thumbtacks to hold it together pushed into another box. Probably was eating a 🍕 when I did it. Anyways, it was a box for gloves. Nice and thin but still strong enough to make a working model. Don’t get mad for me getting off topic..... you asked, I answered
-
4 pointsThat's one sweet little tractor and a great story. Not many of us have had the opportunity to use a 50+ year old tractor since new. Thanks for sharing the story. Those short frame 8s are great machines. I have reconditioned several 875s that I have resold to new owners, and I still have a Commando 8. Yes, please keep us posted on the progress with plenty of pictures. Tear down pictures may also be a real help to you during the reassembly. And, like HAMMER said above, becoming a supporter will eliminate any picture posting problems. GOOD LUCK Oh, where is McClellandtown located?
-
4 pointsThanks everyone, I had a great Birthday. You guys made it extra special though.
-
4 pointsGood looking machine jebbear, with the help you might need, you probably might have to put up more pics. Not much limits here and tons of help. Good luck in your venture and definitely let us see what is going on.
-
4 pointsJosh, get the d%$ roof done and give us more pictures of Uncle Ken's tractor, we're starting to drift , save us from ourselves... Chris Richie, how many pepperoni specials did it take to figure out the lambo hinges?
-
4 pointsI go through a lot of cardboard. I try to make patterns and tape them together as I did my fuel tank. We eat a lot of pizza. 😁
-
4 pointsYes maybe so but think how the pile would match your cabinets....
-
4 pointsThe only time I ever did an addition with a hip roof coming off another roof I let the truss company do all the math. All I had to do is keep everything two feet on center. Thankfully my compound miter saw has settings for Crown Molding or I would have a very expensive pile of sawdust!
-
4 points@WVHillbilly520H Even measuring the angles with a protractor and creating small pieces of kindling from larger pieces of scrap pine, the results were still #$%^&*()_. I Googled ,researched on line demos , plans and stilled ended up with @#$%^&*()_.
-
3 pointsLoved the "before"... and I'm sure, the after too.
-
3 pointsNow Eric, If everyone had one... it wouldn't be magic.


This leaderboard is set to New York/GMT-04:00