
Leaderboard


Popular Content
Showing content with the highest reputation on 09/20/2017 in all areas
-
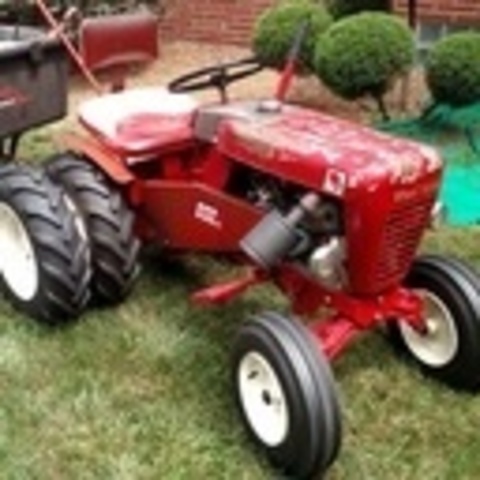
10 pointsPicked this at todays auction.
-
7 pointswell I guess I will put in my two cents. I looked at a back hoe for my D-250and saw what was need to hook it up and the cost, I did not like either one so I went out got a small towable one. It was half the price and needed no mods to the tractor. I have had it for about 20 years now with no problems. It digs down about 7 feet has 4500 pounds dig pressure at the bucket.
-
7 pointsJOE #1
-
5 pointsThis is what I had saved. According to the thread the bar would wrap around this. Thanks to @dclarke
-
4 points
-
4 pointsSeem like that truckster comes up for sale every couple of years, nice for sure. here are a couple more.
-
3 pointsGents, i picked this up yesterday. Serial 46574 ive searched and can't seem to find a chart or method for determining what this model is specifically by serial number. it looks identical to my 551's but seller listed as 401. Engine is a Tecumsah 5.5hp or at least it appears so to my uneducated eyes. can it be locked in by serial? Perhaps it is a repower or actually started life as a 501/551.
-
3 pointsGlad I'm from central Florida
-
3 pointsI can identify with that, between my back two years ago and my wife's shoulder last year I was rather limited on shop time. We are both now healthy (sort of) so I'v been able to make some progress.
-
3 pointsStumbled upon this in the New London, CT CL listings. Pretty cute, and potentially pretty handy. Definitely innovative. Looks to be nicely done. A little pricey, IMO........but an original, for sure.
-
3 pointsHaving all the pieces and parts is a necessary task towards completing the project. I get what you mean about work and project focus/time. The good news is the big show is approximately 7 months out now so there is still a chance we will both get out projects ready:-)
-
3 pointsWorking for a living sure inhibits hobby time. But I was able to break it down some more. And I'm 75% certain that they did not weld onto the 3 speed tranny so that's good news. Took a a day off and should be able to get more done tomorrow.
-
3 points
-
3 pointsNone last year, so this year we will get it. I took the cab off my 520 for some needed repairs to the tractor and have to replace a pulley on my snowblower that I sole off of it for another project. Since I won't have the 520 done and have dillydallied around about replacing that snowblower pulley, probably will get a blizzard or two. You can thank me later Denny.
-
3 pointsActually I could but it would be quite cumbersome. The real challenge on this one was getting the roll pin free. Without damaging the phenolic plastic or whatever that compound is on outer grip area. This was really a brain cramp on my part. I knew this ...but was on autopilot to error:-)
-
3 points
-
3 pointsYou did it now! No snow for you!
-
3 pointsUpdate 9/19 I've spent a bit more time working on the Wheel Horse, got her cranking over quite well tonight!!! Though without the carb installed... Unfortunately, somewhere between the shed and the carport I've lost the choke linkage to the carb. I've scoured as well as I can, but to no avail. One is on order, and should've been here today, but apparently two day shipping really means five (according to USPS tracking). I won't name the vendor yet, but they will be hearing from me as I paid quite a bit extra for expedited shipping since I have to leave tomorrow for work. I gave her a basic wash, looks pretty good considering its 18 years old. See pictures at end of post. Some things I've done the past few days: - Replaced drive belt - Clutch gas strut is a bit sluggish, so I've installed an aftermarket bungie from the clutch pedal to the seat bracket that seems like it will work well enough until I can get the proper spring to connect from the clutch linkage to the transaxle ear - Removed mower deck - Gave mower deck a wash - Replaced mower deck belt - Replaced blades - Removed entire blower housing, removed all mouse nests, gave housing a bath while I had it off - Replaced coil/ignition wire - Oil/Filter change - Lubed up every zerk I've found so far - Removed starter and cleaned all of the oil grass clippings that seemed to be impeding the Bendix gear About that starter... When I first tried to crank it, I could hear the starter moving, but it seemed very anemic. I removed the housing cover to watch the gear, and could easily see the teeth while cranking it. That's when I decided to remove it and found all of the crap that was obviously binding it up. Gave it a good cleanup, and "bench" tested with my jumper box. Spun up very strong, Bendix gear slid up the shaft, perfect. Installed it back onto the engine, and cranked it up. Spun up strong, but did not engage, no matter how many times I cranked it. Decided it maybe needed to be lubed up a little, and did that while it was still bolted on by pulling up the gear and lubing as best as I could. Try to crank, same thing, spins strong, but doesn't move to engage. So now I remove it for a second time. (Good thing it's so easy, eh?) Clean it even more thoroughly, but don't lube it, test it with the jumper box a few times, looks great. Re-install it back on to the engine. Try to crank it again. SAME THING. Then something clicks in my head. That ground cable from the battery seemed the whole time like it was too long and hanging out of the engine compartment too much. I took a close look at the routing of the cables, and realized the ground from the starter was connected to the pos. post on the battery!!! Upon closer inspection, I know how I did it. At some point while hooking up the battery (both cables are black), I looked at the starter solenoid and saw a black and red cable. I then proceeded to absent-mindedly think "oh, well the red cable is positive, so obviously this black cable hooks up to the negative post" and proceeded to hook up the real ground to the pos. post. Once I realized this, I knew that my whole problem with the starter not engaging the flywheel was because the starter was turning the wrong way and the Bendix gear was unable to advance to engage! I swapped the battery cables to the correct posts, and on the first try (without carb installed) I got I nice "whoomp-whoomp-whoomp"!!! Still need to do: - Install carb and air filter assembly - Replace gear oil - Replace fuel filter and line from tank to filter/pump One question: I'm not sure how far the attachment lever is supposed to move, in the attached pics it is in the full back/up, and then the fullfull forward/down positions, as far as I can tell. The lever only has range of about 20-30 degrees (definitely no more than that). Just looking for advice on whether that's the normal down position or whether I need to look closer to see if something is binding it up. Thanks for reading! -Dan Edited to show different handle positions
-
3 pointsAnd the back-hoes caused lots of problems in the "D" series units, (usually axle bearings) and a redesign. I wonder if care and common sense would have eleminated a lot of problems. But there are also problems with the same units in the "C" series also.
-
3 pointsIt definitely got me moving yesterday. In order to assure I did not miss out I drove almost 8 hours round trip last night and did pick up in dark of night in springfield MA. i have another patina 551 which I will make this one whole with. Pretty stoked about the condition of hood, steering wheel, the tires and the serial number as mentioned. Already started the process...
-
3 pointsWell its not a Wheel Horse but in the ballpark as far as trucks go. Im down in Sevierville, TN on vacation and found this while doing my coffee and craigslist.
-
2 pointsI recently picked up a nice single stage tall chute blower for my 520 and decided to put an electric chute motor and an actuator on it. After researching different threads here on the forum I decided to use a 4" actuator (ebay) and an electric seat motor (Amazon). I cut the seat motor shaft then turned it down on the lathe to fit a coupler that i picked up from McMaster Carr, then ground a flat spot on the shaft for the set screw. I also made a new shaft for the worm gear so I could keep the original shaft in case I need to use the hand crank again and I added a shaft support to the mounting bracket. I made a bracket for the switch box and used a couple of momentary rocker switches to control the motors and used a couple of Weather Pac connectors in the wiring harness so I can unplug the wires under the hood when I take the blower off. Right now I'm not going to put any limit switches on the rotation motor, I'll add them later if I need them. I still have a few things to finish up, I'm going to cut a piece of inner tube and zip tie it over the chute motor to help weatherproof it and I need to insulate some wiring from the muffler heat etc but overall I'm happy with the way it turned out..... And my wife finally got tired of listening to me complain that I needed a welder and bought me one for my birthday.
-
2 pointsPlease, no buying or selling on this post. If you have questions regarding prices of anything I buy or sell, please send a PM. And not to fear guys.....mad max is staying.....but a tiller on both ends....
-
2 pointsDefinitely correct priority list. im doing the same thing as you for my GT22-8 project. trying to get it fabbed up and then tear down and paint in Spring. If time in Spring allows.
-
2 pointsAt the rate your going you will finish a couple by then. I have been thinking I have plenty of time but my wife is having neck surgery next week so I doubt I'll get much time in the shop for the next couple of weeks. My wife is more important than my tractors. If I can't finish it. I'll do what @wallfish said. finish the build and take it as is and paint it later. lol
-
2 pointsWith the holiday and extremely busy at work I haven't made much progress on the build. I have managed to collect some parts for when I can work on it again. Hydraulic hoses. Fuel pump, fuse block, led lights...
-
2 pointsI think your rattle can paint job is pretty darn good. I wish mine came out as nice.
-
2 pointsVery useful an cool. Is that one a roll off? Nice.
-
2 pointsI busted my butt last fall , repaired the blade after some genius bent it into a pretzel and topped it off with some buggered Super Missel Weld 100 welds (nearly impossible to grind off) , got the D-180 all ready to go and got one decent , but wet as heck snowfall . That was it . If I'm not prepared , it will be butt deep...rule of thumb in Illinois ..... Sarge
-
2 pointsThose wheels are really close to Bakelite , which is a sort of pre-resin material . There are fillers made for it , and VHT makes a very potent black vinyl/interior dye ( UV stable) that will make it black again after you repair the cracks . Just be sure to blast those areas dead clean first so everything can bite into it and adhere properly . Once cured , sanded to match the profile - use Eastwood's Diamond Clear on the whole wheel - it will literally look like new . I did that with a '68 Charger 12's steering wheel years back and it still looks like the day I finished it . Sarge
-
2 pointsI have been following your progress, but my first project required removal of the tires since I was not able to get a seal due to the rust. I found someone to sandblast the wheels down to bare metal. ($10 each), so now I have primed, painted, and mounted new tires. The next project (1969 Raider 12) is just a cleanup, so I bought a needle gun and will give that a go. I hope mine look as good as yours.
-
2 pointsA couple of decades back (before I owned a ) I had an MTD with a grease packed Peerless. I had to replace one of the gears after three years because it seized to the shaft (lack of lubrication,imagine that). When I put it together I filled it half way with 80W90 gear oil and had no further problems with it, passed it on to my son and he sold it after using it a dozen or so years.
-
2 pointsRichard this was in the dealers list. I hope this helps. TEXAS, , , , Daniel Implement, Frisco, TX, -, - Lowe's, Bryan, TX, -, -
-
2 pointsWhat did the ocean say to the pirate? Nothing it just waved! OK so I just Googled pirate jokes but so didn't Richard! least i didn't just copy and paste Dick! Arrrgggg Oh so didn't Digger..... time to walk the the plank matey...arggarggargg https://www.rd.com/funny-stuff/pirate-jokes-pirate-puns/
-
2 pointsMy D-180 with a Brantly backhoe has the backhoe frame-mounted in lieu of the 3-point.
-
2 pointsI made a seat for the 3 point and I weigh 300. With no weights is is light in front, front wheel weights is better but I made suitcase weights for it. So 300 max with no weights. Probably 500 max if it's weighted right, it will probably lift more but it's not a tractor.
-
2 pointsQ: Why is pirating so addictive?A: They say once ye lose yer first hand, ye get hooked!
-
2 pointsIf your not worried about cosmetics and are unsure of your know how, then I would get an estimate for a mechanical resto. Then you will have number to decide if it is worth it to you. Most times even a free tractor can go over value during a resto.
-
2 points551 has the two piece transmission, and @Racinbob types faster than me!
-
2 pointsztnoo I seen this around for years at the shows Always a head turner.
-
2 pointsPrices were steals up to the ridiculous. Emory got a lawn ranger with a decent paint job - a little dough was used to straighten the hood though. Lot of people thought I overpaid and I did too (for the Emory it was worth it). I didn't notice the engine up there - sat a little too far back. Upon closer inspection it is a Kohler k91! Cleaned the carb and she took right off! Fogged all of the mosquitos for a while though. Runs pretty good, but is throwing some oil from the crank seal. I think some rings, new gaskets and seals and it would be a great motor. Talked him into a predator for now - I'd like to see him save the Kohler for a suburban project down the road! Too nice of a motor to put on a mid 60s ranger. Now I feel a lot better about the price I paid! Below is a picture of him on it after I got it running. I've cleaned the 857 tank and ordered a rebuild kit for the carb. Paint is too nice to repaint. Thinking I'll just scuff it and shoot with some clear for a patina look.
-
2 pointsThanks for the advice and the lead on the seat. It and the switch worked like a champ. I was wondering what the size difference would be compared to my 314-8 so I parked them side by side.
-
2 pointsGot her back together. It's about a 20 footer but I like it.
-
2 pointsI would wire wheel the flakes, then feather sand the edges with some 150 (or so) grit sand paper. Prime and paint the outer edge with a couple good coats and then blend in the rest of the wheel.
-
1 point
-
1 pointHang in there, Tomorrow just hang out with the Wheelhorse
-
1 pointNice work as usual Denny! What are your thoughts/concerns about travel/limit stops? Or do the actuators just stall out?
-
1 pointI don't know where he gets it from. He has 2 suburbans that run, 2 lawn rangers that run, and another lawn ranger project waiting. This is a lot better addiction than a lot of the stuff our kids could get hook on. Heck, who knows, he may be the next AMC Rules. Wait, I've got to put a stop to this right now!
-
1 pointThe biggest cause of overheating on any air cooled engine would be a restriction in the flow of air past the cylinders. If you remove all the tins from the engine and give it a through cleaning that would probably help.
-
1 pointLooks good!


(800x673).jpg.cc3aefcd170c6bab1f22408014a1eb53.thumb.jpg.37c62115dec7a1fc65b8e86afd6af643.jpg)


This leaderboard is set to New York/GMT-04:00