
Leaderboard


Popular Content
Showing content with the highest reputation on 09/02/2017 in all areas
-
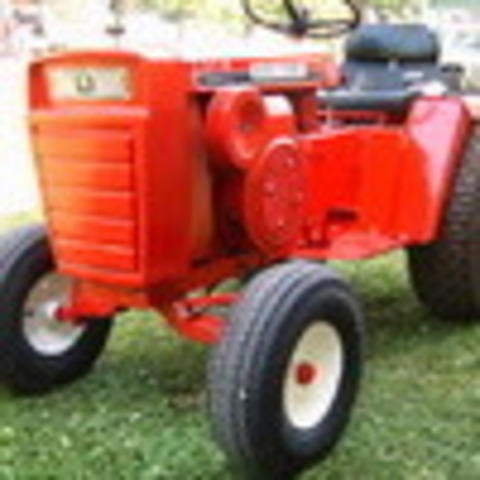
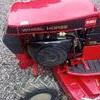
15 pointsPicked up this little Commando 8 today. I looked at it more as buying a mid-mount grader blade, a Lawn Ranger dozer blade, and getting the tractor for free. The tired old girl may not be worth much more than that. In addition to being rusty and worn, all the tires are shot (I took 2 fronts with me just to make it easier to roll onto the trailer), the engine is locked up, and one front spindle is even seized in the axle and won't turn. There are a few good parts there, but probably a bunch of broken bolts and seized parts in the way of getting them off. While this tractor may be lacking in physical value, it certainly has an interesting story. The seller was actually quite fond of the tractor, and was embarrassed about letting it get to this condition. He was quite a talker, and we ended up chatting about the history of the tractor and how it intertwined with his own life story. After hearing it all, I feel a bit reluctant to part it out (it IS in pretty rough shape though) so in honor of the tough little guy, I thought I would tell it's story here. The tractor started life in 1968. It was sold by the dealer in Decatur, IL. The seller recounted that the dealer started by selling Wheel Horses as a travelling salesman, and that Wheel Horse convinced him to set up a store with a showroom, and would give him a credit back on his purchases to reinvest in the store. The Commando 8 was originally sold to an older gentleman, who unfortunately had a stroke not long after getting it. The stroke wasn't fatal, but he was no longer able to use the manual lift so he traded the Commando on one with hydraulic lift. Mark, the seller, served in the Army in Vietnam driving an M113 armored personnel carrier. He showed me pictures of his tank after it hit a land mine, which he referred to as "his last day in Vietnam". He later mentioned injuries he sustained in that attack to both knees and his foot. He was rightfully proud of his service and enjoys reconnecting with the men he served with. He showed me some pictures of incredible scale models he had built of the M113's, and planned to give one to each of the surviving guys he served with when he meets up with them again in a few weeks. Very cool. When he returned home from Vietnam in 1971, he decided that the old Montgomery Wards riding mower he had been using just wasn't up to the task of mowing the rough yard he had. He wanted a real garden tractor with a floating mower deck. He and the Wheel Horse dealer worked out a deal on a slightly used Commando 8. He didn't take it with him right away, and when he returned to get it, he was a little early and caught the dealer using it with the grader blade to level the gravel in his parking lot. The dealer was embarrassed to get caught using a sold tractor, so he threw in the grader blade as part of the deal. The dozer blade was a later purchase from a friend who also had a Wheel Horse. It sounded like the Commando had a fairly active life. It's primary job was mowing. Mark mentioned his wife used it to mow and one time she ran it out of oil and the engine locked up. He said he took it to a machine shop and after getting into it they found that other than a new piston and rings, all the block really needed was honing and it ran fine after that. Mark told stories about using the grader blade to level various projects, and how he used it to help dig a basement by hauling cart-fulls of dirt out of the hole. Mark was proud of his tractor and even though he wasn't a collector, he was a Wheel Horse fan and seemed to know quite a bit about Wheel Horse tractors and company history. He held on to it planning to restore the tractor "someday", but realized he wasn't ever going to get around to it, and even if he did it was going to take alot more work than he initially thought. (He also seemed excited about freeing up some garage space.) He enjoyed seeing a few pictures of my restored Wheel Horses. As I was tying down the tractor on the trailer, he went into the house and came back with a Wheel Horse hat he had purchased a few years back that he wanted me to have. I hadn't planned on spending 2 hours picking up the tractor, but fortunately it was a rare day where I had taken the day off and didn't have anywhere I really had to be. Sure, I had other things I could have done, but I could tell he was really enjoying having a captive audience, and to be honest, I found his stories interesting. This long, holiday weekend will be a good one to see if the tractor has any life left in it, and what scars it might have from it's life experiences.
-
7 pointsI picked up my second 520 awhile back from @DeterminingFactor that had no spark. Changed out the 9 pin connector from @rmaynard as the red wire was already routed around the 9 pin. Found the coil was bad and replaced. Motor runs good and now on to the next step. PO said hydro was leaking I think I found the problem so tomorrow I will open up the hydro and replace all seals and gaskets. Plan on wet sanding all the tins and repaint, new decals will need to be ordered. Now if I could only convince @ACman to release the rights to the wheel a matic decals, other wise it may end up being the patriotic series decals. This one may take a while as still working 10hr days and Saturdays. I'll try to post as much as I can. Also picked up an Ark loader for it. Need to build subframe, new hoses and modify a few other things
-
6 pointsJust got the loader mounted today. a few things to tightening yet, this was a one owner tractor, the loader was made for a early Allis or simplicity . The loader is a Johnson no.10 and in very nice condition. The tractor had not been used for over 20 years, and the loader was stored in a old barn in N. Iowa, the tractor came from S. Illinois. But I did put a Wheel Horse 520H seat on it.
-
4 pointsA great turnout of made for a good showing at the Chambers tractor pulls today.
-
4 pointsCould not spend much time on tractor stuff today as wife invited Grandkids over to do late B'day cake day...But I was able to remove the belts supports and modify the belt cover to fit. Now I have to rig the belt supports. Probably going to mount the belt support to the tractor side and only use the cover as a cover.
-
4 pointsWell , now that you know the history of the tractor and have begun to bond with it the only logical thing to do is give it a good home and welcome it to your herd. Let the restoration begin! Perhaps an Army paint scheme would be appropriate.
-
3 pointsTwo more followed us home again. One is a 654 and the other appears to be a 551. The 654 runs cuts and drives, but needs throttle and choke cables, ignition switch, battery, and of course, axle seals. The 551 has the complete deck and even the belt guard, but was bundled with an H60 that was pulled off a snow blower, and is missing the carburetor. The pair set us back $175. I hope we didn't get taken...
-
3 pointsThe more I thought about it the more it bothered me. I bought this tractor because I love the look of the GT14 with the air cleaner out the side, fenders and overall design. I couldn't bring myself to cut it up to put that engine in it. Maybe if I had another to keep it company but down here these just don't exsist. So I decided to sell the v-twin and located a K341 that I bought to put in it. This motor powered a backup fire pump at an aircraft factory. It was fired up only for maintenance and was never actually used. The seller said it probably has less than 50 hours on it. Its clean and purrs like a tiger. Should make a nice replacement for the worn out 14. Also got my power steering lines welded up.
-
3 pointsDon't , ding, ding we have a winner!!! I just got home. We're worn out, but had a great day! I picked up a 68 lawn ranger that will be put to work mowing our yard and a C125. I'm tickled with both and they run great!!! Below are a couple pics I made when we picked them up. Planning on visiting again in December to pick up a few more parts while we are in town for a dr appt. @oldredrider and I have nicknamed the black hood Coyote Ugly since it's so ugly that I just can't help think she looks pretty good!
-
3 points'60 Model 400
-
3 pointsHEY STEVE! I THINK YOU NEED TO LOWER THE DECK MORE IF YOU EXPECT TO CUT ANYTHING!
-
3 pointsThe view behind us. Any guesses?
-
3 pointsMowed with 1995 520H 60". 42 Degrees 7:00 AM 1 1/4 acres..2 gallons gas, no oil, no parts. Break time now. 67 degrees now 1:50 PM.
-
3 pointsI did not man to imply that the rear dual pulley would be the drive for the hydraulic pump. That is not the case. The Hyraulic pump will be driven from a second pulley off the engine crank. The rear dual pulley would only drive the manual transmission and the tiller if and when in use. Tiller would only spin when clutch is engaged which may be problematic. So I'm reconsidering using standard rear pulley and running a belt from 3rd pulley off crank to run rear tiller. If I choose this route, I'd install a new old stock electric clutch I have on the shelf. As far as drive pulley diameter, it may allow me to use hi-lo feature. While I'm more of a hydro guy thus far in my tractor hobby, I have had a few 8 speeds, and I rarely if ever have had any need for low. It might make the tractor a bit more versatile. I will say I don't care to get these beasts to go too quick. It is hard enough on my back to get jostled around at routine common speeds. I imagine if I got it going faster and hit a bump it would just hurt a lot more.
-
3 pointsNot true. Wheel Horse wants 3400 rpm on my 1996 312-8 with M12. All the engine RPM literature I have seen is for no load RPM. Kohler and Onan both clearly defer to the equipment manufactures for engine rpm in all the literature I have seen. The last 2 Wheel Horse tractors I got were set to high. You really do not know how many RPM's you are running now. You only know what a 20+ year old lawn tractor tach shows. You need to buy a tachometer. Do not trust that 20+ year old 520 tach. Find the correct manual and read what Wheel Horse wanted for RPM.
-
3 pointsSeems it would make for the perfect candidate to do up a custom ARMY ...to honor, and then, share with your seller.
-
3 pointsMore goodies came in the mail today.
-
3 pointsI took mine all apart and cleaned thoroughly. Then lightly scuffed the heavy rust off with a few different scotch brite pads. Only scrubbed enough to remove heavy rust and debris. Then freshened up and replaced what was needed. Ended with a couple coats of Eastwood patina preserver and one coat of gloss clear to give it a little more of a shine. Here's a before and after.
-
2 pointsI was frustrated enough at constantly needing to remember to clean the blower screen on my 520H that I decided to fabricate a fix. It's not pretty, but so far it seems to work. I used 22g galvanized riveted together. I thought it was important to use the original screen and hardware to attach the shield as I didn't want to risk any hardware getting into the spinning blower. The hardest part was getting the side of the shield to clear the brake when depressed. The airflow seems good from the top and I haven't seen any overheating, but time and weather conditions might affect that. If I do have issues with air I can easily open up the top.
-
2 pointsTake a look at this bulletin. Would it work? Marv Engine cooling screen.pdf
-
2 pointsI don't think you need an engineering degree to solve the problem or measure the cfm volume of air flow with and without your invention. If it works for you, that's the important thing! It's your 520H and your creation. Who knows, bu next year the guys telling you the sky is falling and you're going to blow it up might be trying to order one from you for their horses............
-
2 pointsLawn Ranger ('67 or so) and a 321-8?
-
2 pointsAny day you pick up a new addition for the herd and get to talk with a fellow member is a good day ...
-
2 pointsThanks for the help everyone!! With a little help from a digital tach the 520 is back up to 3550 rpm!! Shes got 1100 hours and is smooth. The Gov spring was on the first slot so i moved it to the 4th last hole and its great now. Believe it or not the 20+ year old tac on my 520 was pretty accurate lol.
-
2 pointsI have "rebuilt" my Nikki emissions carb on my anniversary using the Onan service parts they can be obtained from "Onanparts.com" or any certified CumminsOnan dealer, I don't know the size of the main jets other than there's "low" and "high" elevation jet kits, and others have retrofitted the older carbs vs messing with these, @lynnmor I believe has done this and still has the emissions carb on a shelf, Jeff.
-
2 pointsThat's some fine and interesting history behind that tractor. You may find it's worth bringing back to life. Given the simplicity of the prior engine repair, it may be simple to get it running again. The spindle can probably be taken apart and cleaned up or replaced. Stuck fasteners happen even on newer Horses (Had my fair share on my 520H...) -- the great thing about Wheel Horse is that they generally are standard SAE fasteners that you can get replacements for at a hardware store that stocks a good selection of nuts, bolts, and other fasteners. Pretty much the same for bearings -- I've learned that either they're standard sizes that are easy enough to obtain, or you can get them from vendors here on Red Square. The biggest cost to restore it to working condition may be time, more so than money.
-
2 pointsYou need that for your yard!
-
2 pointsNow...that's just crazy talk.
-
2 pointsFinally I have a few pics from the 416-8 I picked up last weekend. Only the seat pan is pitted so I think the original had been damaged. I had written that the PO had thought the starter had issues but it does crank. Issue is electrical! Think I will need to rewire a lot if not all. Got it to crank a bit but it quit just when it was ready to come back to life! Hope to short the switch so I can get it running so I can start in on it when time allows. They were asking 750.00 but in the end I got it for 550.00 with a 42" deck, dozer blade and grader blade.
-
2 pointsWith the larger engine pulley coupled with the over sized rear tire you will be hard to keep up with. Don't know about using the rear pulley to drive the pump though, would only have a lift while the clutch is out.
-
2 pointsSave this attachment to your computer, it has all the belt information you could ever want. Belts_Mower_spindle_and_drive_belt_charts.pdf
-
2 pointsOkay, I have a model 400 and a model 401 that I am considering leaving in it's "work clothes". I have searched but have not found a definitive method to preserve the patina. So, to the experts, I ask, what is the best method to use? Both of these do have a small amount of dark red oxide primer on them that blends in. Should I just leave that as well or try and remove it? Knowing the person I bought these from, I suspect it is there because of possible metal repairs, so don't want to expose bare metal. Model 400 with white seat on the trailer, model 401 with red seat off the trailer. Also, what is your opinion regarding the rims, the 400 has refinished rims in white, but the rears on the 401 are somewhat rusty, leave as is, or clean them up and spray all of them in a linen beige? Please share your methods and tips.
-
2 pointsYup. The diameter of the GT14 Hydro double pulley was same as the 8 speed pulley so I figured I may as well use it since I plan on adding hydraulic pump for the 3 point and later a loader. I could then use it to drive the GT14 tiller. It will be a bit less effective as I'll only be able to till when clutch is engaged. So there is still a chance I'll swap the 8 speed pulley back.
-
2 pointsYou want it at 3600 with the deck running, + or - 50rpm. Running under this rpm risks overheating the engine. They are designed to be run this way, one to make rated torque and two, to move enough air to cool them. Basic small air cooled engine 101. You definatly do not want to overheat an Onan, that gets expensive quickly as bad things happen. When I set RPMs on a small engine, I shoot for about 3700ish no load. While this is a bit overspeed, its ok. I want to see it fall back and maintain at the 3600 range I typed above with the deck running in the shop. Then the Gov will maintain that, or should, when the deck is working in the grass. This will keep the engine, doesn't matter the brand or model of air cooled engine, in its power band and at proper cooling temps. Also, do not rely on that dash gauge, get a proper tach to set engine rpms. They sell them just for that, look like a pocket calculator or you have the Tiny Tach that B&S sells in ther parts selection. I would use that till I know that dash tach is correct when compared to a known accurate tach. Mike Should just be a throttle stop or cable adjustment on the Onan to get her back to full power. If you haven't done a cylinder head decarbon and valve lifter adjustment, you need to research that ASAP, very important to the life of the Onan twin. Mike 30+ years of small engine work
-
2 points
-
2 pointsWell I took another crack at the clutch linkage and I'm glad I took the time to do so. I was able to make it work runningbit inside the tunnel so I won't have to cut access hole in the fender. Also got brake linkage all set. The belt guard is going to be a project in and of itself. I'll get started on that tomorrow. In the pic the parking brake is set which is why the pedal leans forward.
-
2 pointsYou run 3600 RPM for any mower.
-
2 pointsI picked up this old 312- about two years ago for $50. Had three flat tires, missing pieces, messed up wiring, and lots of dirt. I had to drag it out of an old shed that was about to collapse onto it. Lots of cleaning, parts, paint, and work on it over the past two years, probably more than I realize if I add it up. It wasn't high priority, because I had other WH projects that I valued more. Figured I'd just fix it up to sell. But now that it's running, I hate to get rid of it. Funny how you become attached to it after putting a lot of work into it. It runs and looks great, so I might put a plow on it this winter.
-
2 pointsJust choose your method of cleaning first... I like to start by pressure washing mine, then a light buff job using a red scotch brite pad... then seal it with the Johnson's paste wax. You can take all, or none of the rust off, it's up to you...I prefer mine smooth to the touch. It's also OK if you get down to bare metal in places...the Johnson's will protect it. My "custom" 551 has been bare metal for over two years now.
-
2 points702 with PTO 66 hooked to elevator
-
2 pointsHere are a few - Emory driving his new 63 Lawn Ranger and he and my wife out for a ride on his Lawn Ranger and my 73 GT14. I think I have a higher resolution one of him close up. Here's two more of our suburbans.
-
2 points@stevebo I found this pic of Brennan and my little cuz Sam riding around the grounds on Saturday morning . Sam had a great time hanging out with your son . He said he's definitely coming back next year but we need to leave the girls at home !
-
1 pointWhat engine is in that, I like the loader.
-
1 pointwe junked a c-101 a few years ago that was in rough shape it had that style rims on it. they are still in use on back of a 502
-
1 pointNext year's show fund! If Steve comes it will be EPIC!
-
1 pointI just received 10 off amazon for 13.99 bearing number 6203 is 17mm x 40mm x 12mm, mine are sealed both sides but I'll just remove seals, nice having extras and can't beat the price.
-
1 pointThey really got a gut punch down there. I told a friend of mine, who is just out of Beaumont that I sure wish we could get some rain in North Texas. He was un-amused and sent me this pic of the highway leading from Beaumont to his town.... I didn't tell him that I watered my lawn last night. God bless em!
-
1 pointThanks Fred. It's been an interesting storm., This sounds hard to believe, but most area of Texas didn't,t receive much rain at all But the poor souls within a 100 miles of the coast got dumped on. While we didn't have much rain at our dams/lakes on the middle of the (Texas) Colorado River, the lower part of the river had record flooding. My hometown of LaGrange got around 24 inches in 3 days. The river there peaked at 52 ft , 125,000 CFS. Our farm there is over a mile from the river but the river backed up the creek that runs through it to cover half the farm. My tower deer stand along the creek probable had 5 ft of water over the roof. Thankfully all my family stayed dry and no significant losses My sister in Houston had water within inches of coming in her house, but thankfully she to loo stayed dry' but trapped in her neighborhood
-
1 pointYou should use at least an 8 AWG and preferably a 6 AWG wire to the solenoid from the battery as well as from the solenoid to the starter. All wire contains a lot of "magic smoke" and using too small a wire for the load will release it!
-
1 pointThere is a post here in this section, that explains the whole rebuild process, very well done post too. The post does state to make sure not to run the pump dry be sure to have oil in this pump.


.thumb.jpg.0c495eaa7ff874c741991d7b1de2f119.jpg)


This leaderboard is set to New York/GMT-04:00