
Leaderboard


.thumb.jpg.affe7d34ead61ae3c7684997c39109d8.jpg)
Popular Content
Showing content with the highest reputation on 07/16/2017 in all areas
-
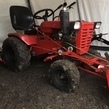
11 pointsRichard wanted to know if I was going to start a thread on my 953 refresh, so blame him for my ramblings. I'm terrible at taking pictures, but here are a few. Please ignore the clutter around my shed - I'm a messy worker and a pack rat. A couple of questions. My 953 has the early steering box, but later headlights. How early is this machine? Seems to be maybe a crossover machine between the first thousand or so with early boxes and later 1963 machines. I've included the serial number if that helps. Also, when I took off the hood decals, it seemed like there was no paint under most of both decals. Did wheel horse scrimp that much on paint? One pic shows the decal just above the area it was moved from. Well, I'll post more pics s as I finish the refresh. I'm hoping to get it assembled to take to our annual tractor show this thurs-sat. Check it out at www.oldgladetractors.com. If you're near Southwest Virginia this week, come spend a few days with us!
-
10 pointsJust finished this RJ 35. Can't decide if I should paint the seat red or leave it black.
-
7 pointsJust wanted to share a couple pics of the 876 i picked up at Portage Garden Tractor Daze. Here is the before i intended on polishing it and applying new decals (still have to get a hold of Terry) Before AFTER Hope you like them
-
7 pointsWell it took 6 hours to Dig it out, ran for a battery, Fired it up, smoked sum, cleaned up & mowed sum River grass before Loading to bring Home, My Adrenalin is pumping at 57, hands were shaking, could of made mix drinks the way i shook, Had Elvis beat LOL, Here it is Guys, this Goes out to all who gave me the courage to Rustle that horse ! Is it a C165H or C160H, Let me know
-
7 pointsYours and the one that @TravelinJavelin picked up both have the Ross steering and the later headlights and steering wheel, also both in the 3XXXX serial number range. The information @gwest_ca has on file shows that the first 1,000 or so had a serial number in the range of 62-00XXX and then the next group spans from 32508 to 36637, then it jumps to 41516 to 42111. Hope we can get a bit of feedback from others on this; seems to be another conundrum the Pond family left us to consider and debate.
-
5 pointsYesterday's haul. A four haul day.
-
5 pointsHere's #3, a 701. But yes, you need to watch out for that tough guy on the Ranger. If you cross him, he'll mess you up for sure!
-
5 pointsOk, so I went Horse shopping, and ended up with not one, not two, but three more horses! A Lawn Ranger, a 856, and one more...
-
5 pointsI just compared serial #'s mine is a little earlier 34696........I know one thing, i'll be glad when my shifter is fixed
-
4 pointsHi all. I have been a member here for a few years but have just been in hiding. Until now. I have recently started a build on MoM and have been urged, pushed, threatened by Chris, Mr Showman to post on Red Square too. So here goes. As some will already know, the Showman and I have been clearing a friend's land of his large collection of various garden tractors, horticultural machinery, workshop equipment and whatever else you can think of. Nearly 2 :1/2 years later the end is in sight. As friend John is having to sell up and move soon due to ill health, my Roper tractor which was stored on his land has now moved on to a new home. As I have very little room at home to work and store in, mainly a single car size garage which is already half full of stuff, thoughts turned to something small to build which could be transported in the back of my Meriva car. Small enough to fit in the car, but hopefully big enough to ride on, but if not towing a trailer which I can sit on and operate the tractor by remote steering etc. Various options were looked at, thought about and discarded due to too many compound curves etc. Then, after studying photo's of the D-series Wheel Horse which has very few awkward curves a plot was hatched. During the clear out lots of "might be handy one day" bits and pieces were kept. One of the few tractors which remained, unloved and unwanted, was this Bolens ride on mower. It was eventually stripped of useful parts, gearbox, axle / diff assembly, wheels and various other bits before the remains were left to be dumped much later. Also found among the junk in John's barn was the bottom end of a small engine which was later found to be a 65cc BSA 4 stroke. After further hunting by the Showman other parts were found in various locations in the barn loft. Enough parts to build a complete engine with spares left over. Engine just roughly assembled in this photo. John never stored related parts together and in one place. We think this was his anti theft device. Find a few parts, no good without the others, so leave alone. Appears to have worked as we have found on various occasions. Tri rib tires Chris. After looking up the measurements of the full size D-series Wheel Horse, a half size model worked out at approx 38" long, 22.5" wide and 23" tall. I did not intend building a 100% dead scale model, just something which looked right. If all the main measurements were close to half size and the main components looked compatible with each other, then Some parts, for various reasons, were altered slightly in size without being too obvious. First, a suitable building bench was required. I have one along one wall in my garage but too narrow and my creaky knees object to crawling around on the floor.. A tool trolley, unearthed from John's workshop, was pressed into service. The wheels moved outwards to give more stability, a mid shelf added which was boxed in on three sides, and a thick sheet of chipboard on top. Not shown on these photo's. The Bolens bits were cleaned up and placed onto some box section which would be used for the main part of the chassis, Due to the width of the gearbox, the rear end of the chassis had to be a lot wider than scale. This area was one of the main problems of the build, trying to keep the gearbox far enough back without touching the differential which revolves with the attached sprocket, plus keeping it and the surrounding frame within the width of the fenders and the upper sections of the footrests. Hours and hours of head scratching, trying different positions etc resulted in "This might work". When fitted to the Bolens, the gearbox input shaft pointed down. It was hoped by mounting with the shaft horizontal a short prop shaft could be used. This was found to be a no go due to the height difference of the engine crankshaft and gearbox shaft. The centrifugal clutch assembly also left very little room between the engine and box. The next stage was to work out a mount for the gearbox. Bits of angle were pop rivited or self tappered to the frames and lots more head scratching followed. The long lengths of box section had been cut down at this stage as they would have been too wide further forward. The next photo's show these in the correct, sort of, position with the engine roughly mounted to see how things line up. The axle bearings from the Bolens were used plus the front axle mounting bracket which was hack sawed from the frame, cut in two, excess removed, slotted and drilled to take the bearings. The extra holes were for possible height adjustment at a later date. Easier to do now than later. These were pop riveted to the box section ready for welding later. The front axle was then given a lot of thought. The full size is a cast, tapered in two directions, webbed unit. Something simpler was needed. A piece of thick walled 1" square was used with tube king pin mounts. A test piece was cut to gauge the angle required, followed by marking, cutting, bending, filing and drilling the main components. Small infill pieces were inserted to give the weld something to bite on. The axle mount was made up of 3/16" plate fastened to chassis box section cross members, with 1/2" bore bushes. The pivot is an old Austin 7 king pin. All a bit on the beefy side but just materials to hand. I should say that ALMOST all the materials used in the entire build were saved during the clear out at John's. Also, as I do not have proper machining facility's, most of the work was done by hand. Hand drill, hack saw, jig saw, files etc. I do have a small Unimat 3 model makers lathe which was used for some of the lighter machining jobs. Also an old Drummond round bed which is in need of work and a chuck adapter. Guess where this came from. I also adapted an old Picador drill press to take a larger hand drill. This wasn't too satisfactory, side play and too fast for the larger drill bits. These were more suitable for wood, not metal. Photo's later. The next few photo's show the chassis and axle mounted on a board ready for welding. The nails were just to hold parts in place before clamping and weighing down. The rear axle mounting plates drop into slots in the board. The two dark colored angles are temporary and just to help keep things square. A few photo's of a few welded up bits. The welds on the rear end of the chassis were nice and neat. No photo's of this. The welder decided to be naughty at the front. Wire feed kept jamming until speeded up which resulted in heavy welds. Some ground or filed down and others left as will not be seen. The used Austin 7 king pin for the axle pivot seen in the third photo. A bit rusty but good enough to use after a clean up. The chassis was cut away to allow for more axle swing. The rear wheel adapter hubs were made up from 2" thick walled tube and round plates into which the tube was welded. The plates already had bores of near enough the correct size. The cut to length tubes, after a lot of head scratching and measuring to make sure the holes would be in the correct place, were drilled 5/16" using a standard center drill for the first hole. I was going to use this as a guide for a 5/16" drill to spot the lower hole, followed by gradually opening up with other drills, but found a long series 5/16" center drill which did the job in one go. This also did away with numerous height adjustments on my not very accurate drill press conversion. The plates were drilled after marking out using a card template which was cut to just fit into the wheel dish and over it's hub. 4 holes were also drilled through the wheels using the same template. This ensured that all holes lined up. Even though my drill conversion was a bit of a blacksmith job, after drilling the axle shaft I found that it and the hubs lined up almost perfectly.
-
4 pointsWell I got the 1045 out today after fixing the lift cable so it would hold the plow, also adjust the belt so it would grab better, but now clutch won't go in far enough to let me shift without grinding the gears. I do believe I know how to fix that just don't have time tonight. But I did get it out for a few picture with the plow. Hoping I can have ags and maybe some weights on it soon so I can go to plow days!
-
4 pointsAs Deadguy's wife, I'd just like to say how much fun I had wrangling with him this weekend. It's so awesome to have a hobby (borderline addiction) that we can do together. I have learned so much, including how expensive it is when both of you love horses. The memories made and the thrill of the hunt with him are things I'll treasure forever. See you at Symco!
-
4 pointsDouble dip Sunday, on road trip, had to bring @wheelhorseman along to help load.
-
4 pointsThere is a kit available to add the hyd lift to the C-120 Sundstrand power unit. I have most of it in my shop...here are a few pics. to pursue this, send me an off-forum email... I am : daveoman@windstream.net
-
4 pointsMy thoughts are sell it as a hole. You don't see many c195 s. These are very sought after tractors from what I've seen ,And to part it out I don't think will get you more then a whole tractor. It's the engine that made it what it is. Even with a bad engine people want a c195. Heck I would have to buy one if I found the right deal. This tractor is almost a 520h the biggest and best of there time. By the way Welcome to the best wheel horse site in the world.
-
4 pointsFor sure, put all the blame on Richard, but thanks for the pictures anyway! Keep it up!
-
3 pointsI was most impressed as to how it ran and how strong the hydro was. Don't see that often on a new to me tractor.Most often they need carb cleaning, motor or tranmission or electrical work. If you get the time Mike a few tips on some clean up tips would be great!
-
3 pointsCouldn't tell there was that much paint under all that oxidation and grime.
-
3 pointsI really want to bring my pink Raider 10, so I might take you up on the offer. I'll talk it over with Deadguy. Those are wonderful pictures and memories. Thank you for sharing. We hope our son will treasure them as he grows too. This is how we announced the pregnancy last year.
-
3 pointsI did go just barely south of the border for the 856. The metal is perfectly straight, not one dent on the thing. However, none of the tires match, and it needs carb and ignition work. It does start though! I will also have to soak the transmission in kerosene and flush it out too. The 701 has ignition issues, is missing the dash plate, has been repainted at least once or twice, and has more than a few small dents and patches.
-
3 pointsThe Bolens axle was cut down and drilled. The shorter end didn't need altering. The length was just right and the original wheel retaining bolt hole was also used for the model. The other end was a pain in the ++++ though. Tough to hack saw through, although it could have been worse, but the 5/16" hole was a ( censored word ) to drill. Finally got through with an assortment of drill bits, cutting compound and my lashed up drill press using various speeds and lots of naughty words. Luckily I only had to drill this one side. Now, what to use for the front axle bushes. A long time was spent looking through my piles of bits and weighing up all the options. Some bits had the correct OD but too large on the ID and so on. Still wanting to use what I had to hand, a piece of engineering plastic was used. Not sure, but I think this is Delrin or Acetal or similar. A short piece was tapped into copper tube to hold it rigid while drilling in my Unimat lathe. I was surprised to see blue swarf as the material is black. After drilling up to 1/4", the bore was opened up on the drill press. Can't remember the drill size but slightly under the OD of glacier bushes which were tapped in afterwards. These had an ID of 3/8" which was the bolt size I used for the king pins. If these bushes were later found to be unsuitable they could easily be changed. So far, with a few test drives that the Showman and I have had over rough ground, no problems have been found.
-
3 points@Deadguy nice haul!!! You were doing some serious "horse wrangling" and it looks like you had one tough hombre with you! He will really love those machines as he gets older. My two youngest were out driving on their tractors last night... I like all of your new acquisitions--especially tht 701!
-
3 pointsOkay, three is better than two, but I can't see #3, unless #3 is the tough guy driving the Lawn Ranger.
-
3 pointsJust to add, the Man hooking Battery up is the Original Owner's Son Ken Jumper, the 3 Land Owner's at the river camp ground, i made the deal with them for the trade, the parts are hard to find the one Retired Man said, the Younger man that installed the battery said its hard to drive, to many controls ? LOL ok, and the other Retired Man Bob said he's to Fat to operate it so he just drinks the beer hahahaha, Hey its retirement Blues, So i Didnt steal it, I Took the pics, im the Dark Shadow in the battery install Here's a Pic of Dirty Old Red Fred At work, Now you will see my face & the C is at my shop, i Steamed it off, came home to eat, heading back to work on C125
-
3 pointsI thought I drop a note may help someone else. My 312-A on starting issue found finally found safety switch to pto starting side was bad not supplying power to relay. Replaced starts like a charm every time. In process of painting it from top to bottom. Thanks to all that helped with electrical issue on starting.
-
3 pointsDefinitely a C-165
-
3 pointsthe big wheeled horse I've always I think had a thing for I do wish they made a gear version of GT-14 or i'd be having one of those too well i'd take one anyways if the price was right
-
3 pointsWhich means my builds are extremely well thought out to the point of overkill mine take years! Yours Is Very Nice thus far! So your doing a custom Rear PTO? What are you doing for the transfer of power? On the wheel horses it tended to be a pulley with female splined opening I think. Id really like to do something like that myself but have never gotten past the thinking stage:-)
-
3 pointsBest way to find out and set the plow angle is to put all four tires up on blocks (six inch or eight inch depending on how deep you want to plow) and let the plow down. Adjust it until the bottom of the plow is parallel with the floor.
-
3 pointsBetter check with Richard's wife first to see what kind of job he does with their laundry!
-
3 pointsBless you sir! Black hood duty sounds better than Laundry....sorry Richard!
-
2 pointsPicture from Lars, our Norwegian Wheel Horse brother, preparing his garden for planting by picking up rocks . . . (Or better yet, having his spouse do it while he takes the pictures 😇).
-
2 pointsGood grief Tom was in Wisconsin again .... what I did I tell you @Racinbob about having to go east to rustle!
-
2 pointsNo trades!! Unless you can wiggle your nose and make the C-160 quit acting up!
-
2 pointsBetter than new.
-
2 pointsGot the 520 yesterday. Started making it today. Here are some pics.
-
2 pointsIt will take a tank or two for best results. Tell your wife you want some of these for your birthday.
-
2 pointsThanks for all the info. I will be getting pictures and posting in the classifieds asap.
-
2 pointsThanks! These days, ANY 701 is a nice one! Thanks! But now I have an even bigger dilemma on deciding what to bring to Symco!
-
2 pointsOr post to trade ? I'm sure on here the REAL CRAZY Wheel Horse Collectors would give you a Running Tractor for a Hard to Find Relic , Give it a try, it wont hurt
-
2 pointsI apologize to Fred. The part where his hands were shaking and adrenaline was pumping made me think that something was not right. Fred took the time to send me a PM that explained everything so I hope that everything remains OK between us. So keep on keeping on, and God Bless you
-
2 pointsI was going to suggest that you contact Dave, but he beat me to it.
-
2 pointsYou could put another engine on it, perhaps a single cylinder Kohler, and keep it going while you find another twin or rebuild the one you have. The C-195 is hard to come by, probably best to keep it or sell as is.
-
2 pointsThe way I look at it, they are our machines to enjoy. I've seen several at the Big Show the last couple of years with custom paint on them. Paint is something that can be changed back to original fairly easily and it gives you the chance to freshen up hardware if you wish. I like them in their work clothes, rat rod style (oiled or clear coated), and shiny all!
-
2 pointsJust buy more clothes! Rustlin' is more important than laundry
-
2 pointsA nice thought out system takes time. Looks like a good start. I see a stack in your future.
-
2 pointsSuper - job on the axle !
-
2 pointsHe's got 3 - 4 weeks to get it finished for a forthcoming show. BTW. It was he who restored my Sears/Roper.
-
2 pointsPlease keep us posted on the remain build , you are doing an outstanding job.
-
2 pointsLooks like it will be a nice tractor when done. A true custom.


This leaderboard is set to New York/GMT-04:00