
Leaderboard


Popular Content
Showing content with the highest reputation on 05/30/2017 in all areas
-
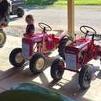
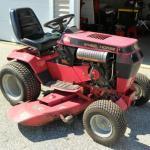
14 pointsI finally got one. 😀It looks to be a 1997 520H with 630 hrs on it. Back fins were clean and free of any gunk no leaking from underneath, haydro oil was full and clean. Also came with a 44 in two stage blower. just two spots with surface rust on the tractor. Pictures below I am excited to get my kwik way on it but first I want to do a full comprehensive maintenance on it and mow a few times just to make sure all is well. I am excited to join the group now what to get next 🤔 It also came with most of the manuals, front plastics not chrome hub caps as well below are a few more pictures
-
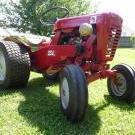
6 pointsFinally mounted my ag's this weekend in between rain storms. Carlisle tru power 23-10.50-12 on what I believe to be 8" wide rim. I never measured the width but assume they're 8" for that's what came on the tractor when I purchased it. Had wheels blasted and powder coated for $50. i really like the way they look and I'm sure will function just as well
-
6 pointsUpdate guys. The seat was unbearable to continue playing. The back cushion is extremely necessary. I decided to try my hand at making one. Here are the results
-
6 pointsI hate when people buy these old tractors just for the money to make on them. It's like basicly selling to a scrap yard because they tear them down and part Them out and in my opinion that's not being in the hobby or a collector. What really kills me is when a guy also has a bunch of cool old tractors and just buys them and packs them away in a trailer or barn and does absolutely not one thing with them. No shows, no restores, nothing. Let's them sit and rust away more. Shame but oh well in the end not my business what someone else does with their stuff.
-
5 pointsI can't say for sure what the culprit was, but I cleaned the main ground contact again at the starter generator and re-gapped the points which were definitely out of spec. Starts and runs like a champ. Thank you all for your thoughts and input. It is very much appreciated!
-
5 pointsThis could get ugly!!! I refuse to referee any skirmishes! I'll just stand in the back and heckle!
-
5 pointsDid you put the woodruff key back in...and did it stay? They have a tendency to get pushed out of their slot as you push the hub back on you may not have noticed it. Woodruff key have a half moon slot in the axles not the length of the axle. the correct hub should have teh setscrew hole line up with the center of they key when the hub is flush with the end of the axle.
-
5 pointsNo, this was a custom clutch build for my Low Rider. The pedal is normally used to engage and disengage the clutch, but the hand lever can be pulled if additional pressure is required to tighten the drive belt when drag racing or pulling. I just threw the idea out there to give you some other options other than converting your gear drive to an auto. I do think the hand lever could be added to your existing clutch pedal with the addition of a support pin for the lever and a connecting rod to your existing clutch pedal.
-
4 pointsKeep doing standard maintenance on that old Kohler. Change the oil every 25 hours and top it off as necessary before each use. Kohler's that use a little oil will run for decades as long as you do your due diligence and keep them lubricated. And don't forget the air filter!
-
4 pointsI guess because it's mine and I really like it. Plus I like working on stuff. I do have a 1276, but that is not going to be a work tractor. I am pretty sure I can set up a right side pedal.
-
4 pointsLike Bob says....nice start. Put the FEL on this one, then get another one with a cab for the big snow chucker, then get another one for the mower deck, etc.
-
4 pointsThat's the engagement pedal for the 1960 only mowing deck This is normally the front snow blade pedal....this is on my 401
-
4 pointsFYI, later models like the B and C series and the 300 and 400 series had a separate brake pedal on the right side.
-
4 pointsNo, this was a custom clutch build for my Low Rider. Hold on a minute! Couldn't it be both? I've read a bunch of your posts Ed Sorry, Just couldn't resist even though I promised another member I'd try to refrain from any more jokes.
-
4 pointsThese two little girls were able to drive their even though their legs are too short to reach the clutch. The implement lift lever had been converted to a dead-man clutch / brake for safety of the girls. Spring loaded to the rear de-clutches and applies a bit of breaking pressure, push forward and the clutch engages. In your case the lift lever would stay and a second lever could be connected to the clutch pedal like Ed has.
-
4 pointsYou may want to consider a hand clutch.
-
3 pointsSometimes, one really wonders "why" would someone do that? Here are some recent examples, let's see yours! 1 & 2, let's add plates inside the head stand gas tank mount, for no apprent reason! 3, let's drill holes in the frame for a motormount, don't use them, and weld it down instead! 4, not quite sure where the motor mount holes should be, so let's just cut slots in the frame! 5 & 6, dang it, I hate throwing away that broken wheel hub, let's just weld it to the end of the axle (who cares if it is straight)!
-
3 pointsI just noticed it is missing the rubber seal ring that seals the oil filter to the tins. This helps to increase the air flow across the rear cylinder. There are many posts on here detailing the things that can be done to keep the rear cylinder cool. Just do a search and read these posts.
-
3 pointsThe guy I bought the stuff from had started on both tractors, but work and family got in the way, so he sold everything. That said, I have four other tractors, two 857's, a 1276, and an 854. One of the 857's is my yard tractor, and I am currently working on the 1276 for the June show. The others will get worked on this fall. The two tractors I got in the parts deal, was a Raider 10 with a tore down Tecumseh 10hp, and a Commando 8 with no engine, and no tranny. Both are incomplete, and have other issues. The frame from the Raider is going into my 1276 as it's frame had been broken numerous times, and is going to need a lot of metal work to save it. I am contemplating swapping the 6 speed tranny into one of my 857's, and then I may repair the Commando frame (the pic with the slots cut in it) and use the extra 3 speed to make a rat rod along with some of the other parts. I know I am going to have left over stuff, eventually I will pass it on to someone who can use it, hopefully here on the forum.
-
3 points
-
3 pointsI had to read it twice but get what you're saying now. Basically transferring motion from a new right side modified pedal ( changing pull of a rod to a push on the rod) to a new lever system in order to cross sides of the frame, which then connects to the arm in which the original pedal connects to now. That should work! I'll be keeping an eye out at the show ED, when I least expect it, expect it! I guess you do owe me one for that.
-
3 pointsOK, I'll mark that one up for you John. I admit, I have lost a few gray matter cells inhaling CO , but I never forget to pay my dues....and I owe you one.
-
3 pointsOkay, I think I got this. So I am sitting here in my chair pulling apart the Raider 10 that came in my parts lot the other day. So I have it down to the frame, and I am sitting there staring at the pedal and the brake/clutch linkage and the brain goes into analysis mode. One thing God blessed me with, is the ability to see mechanical objects in X, Y, and Z planes in my head. So this is what I came up with, using probably 85% or more WH parts. Using the left side pedal, flip it around and shorten the tube so it fits between the stirrup and the PTO pedal on the right side. Cut off the lever, and rotate it to the bottom and re-attach it. I may have to modify the angle of the pedal some to clear the PTO pedal. Then, either open up the frame hole which is just behind the fan gear location, or weld in a new tube across the frame just below. Use a drive belt tension pulley lever/rod cut down to the correct lever length pointing down on the right side, inserting the rod through the new tube. Take a long brake/clutch accuating rod and cut it down to fit between the pedal lever and the new transfer lever/rod. Then using another short cast lever that the brake lining accuating rod attaches to, attach it pointing up on the left side. Then using the remainder of the actuating rod previously shortened, attach a rod between the new left side transfer lever and the existing brake/clutch lever. So, when you would depress the right pedal, the lever being under the pedal, it would transfer the motion rearward. This would rotate the new traverse rod and corresponding rotation to the left side. With the lever on top of the transfer rod on the left side, the rotation is forward so it pulls on the left side brake/clutch rod and functions as originally designed! I will draw up a sketch when I get time, but this should do the trick and look all original to boot!
-
3 pointsA little puff of smoke is no big deal to me and as Jerry said, stay away from anyone that thinks a Kohler can't be rebuilt; they are idiots! Not being from your area I don't know anything about the shops in your neck of the woods. I would go to equipment rental stores and ask them who they use for engine service. They want the job done right but are thrifty so would think they know who to use, and who to avoid.
-
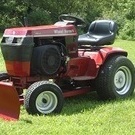
2 pointsGot the front mower hooked up to the c121 today. Worked great. Just have to get it a little more level but I don't use it to mow the yard so it doesn't matter
-
2 pointsHi all! First I want to say thanks for letting me join this forum, it's helped me many times before. I've had a long love for wheelhorses, ever since riding on my uncles 71 commando 800 as a kid. Now I own that tractor, and a 75 B-100, which I use regularly. I look forward to learning a lot more from you guys!
-
2 pointsI always add a second set screw 90 degrees from the original. It takes up any clearance in a worn hub/axle and prevents any movement that will cause the wear.
-
2 pointsThose mysterious electrical Gremlins.
-
2 pointsLooks like it is time to contact Lowell and buy a new one. http://www.wheelhorseforum.com/forum/141-wheelhorseman1000s-hitches-brackets-parts-and-more/
-
2 pointsFor those reading this...he needs the cluster gear for a #5025 transmission. I would send a PM to @A-Z Tractor here on Red Square. You can also try to get a hold of @racinfool40 (Mike) on facebook / wheel horse junkies. One of these guys will have your part.
-
2 pointsHere's a pic of mine.
-
2 pointsI would check the pulleys again and turn them all the way around. I one that looked fine but ended up having a wasp nest in the groove making it vibrate also check idler bearing
-
2 pointsHi, my friend, you're absolutely right. I check the manual and the 702 does not have a selenoid thanks¡¡¡
-
2 pointsThanks, the more I search and talk to you guys here, the less I'm concerned with the little bit of smoke I see. I'll be sure to stay away from the dealer that mentioned no rebuilds on a smoking engine. I thought that sounded kind of strange. I guess I'll just keep an eye on it and see if it gets worse or starts drinking oil.
-
2 pointsNow that there is a dandy start and will cause you to acquire a full blown case of incurable Wheel Horse Addiction at a rapid pace.
-
2 pointsWow! That would make a difference! Also, the center blade would have been spinning at a different speed than the outside two, probably accounting for the biggest issues you saw. Federal law mandates manufacturers design blade tip speed to be no more than 19,000 ft/min (~216mph). Your blades were spinning at 25,487 ft/min or about 290 mph! Wheel horse designed them for about 17-18k and after your switch you are running at 17,979 ft/min. I would very carefully inspect the blades for stress cracks starting to form as they were not designed to go that fast... Maybe even a new set of blades as your resharpened originals have been running that way for a while. I would bet that that deck works beautifully now (save for the bad bearing!)
-
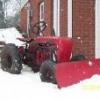
2 pointsVery nice Horse! I started my addiction with a 520H this spring, very much like yours. You'll love how well it'll power its way through the tough work. I've come to think of the 520H as sort of the "muscle car" version of the Wheel horse design -- big, powerful, and pretty much maxxed-out as far as the design can go. Winter's worst will be no problem with that 2-stage snowthrower! I see in your pictures that it's got the wrong kind of clip holding the PTO together. It should have a wire lock pin through it that will stay put but won't bind up or shift like a hairpin clip can. Here's a picture of the same area on mine (bad lighting on a cellphone camera...) with the correct type of clip: You can find these clips at any good hardware store that has the drawers of individual nuts and bolts and things, at some place like Tractor Supply or Rural King, or even big box stores' hardware section, usually in the "hard to find" drawers or bins. In general, a lot of the hardware that holds Wheel Horse tractors and attachments together is simple standard hardware and clips and pins -- things you don't have to go to a dealer to get (expensive) specialized parts for. That's one of the things that makes it so enjoyable to keep these tractors -- routine upkeep and repairs are straightforward, no-nonsense and simple.
-
2 pointsUPDATE ... The defibrillator is in and working like it should, at least for the pacing part, I hope it never has to shock me!! Doc said "you're a big boy ... it will still put you on your knees"!! Thats bad, but the choice is a backhoe and dirt on my head so .... And the official word is no driving for a month!! Great!! This is gonna suck!!! Oh well ...
-
2 pointsOn my C160 which is probably the very same wiring as yours the amp meter wire goes to the positive side of the starter solenoid the other lead goes to the B on the ignition switch. My amp meter was bad therefore the tractor would not start so I had to bypass the amp meter. I added a volt meter to mine instead. It is wired differently then the amp meter. The B terminal has to go to the battery for the engine start it may be bad is why it's not wired.
-
2 pointsIf the rest of the tractor looks as clean as your pic I'd better come get it and figure it out for you No really check the grounds.... how many times have you fellas had problems with trailer lights only to finally figure out the simplest thing.. a stupid bad ground?
-
2 pointsI won't be able to help you much, but that statement is ridiculous - stay away from them... good help will be along afterwhile..
-
2 pointsI would do what ever it takes to keep using your horse
-
2 pointsI don't think there one think sacrilegious about modifying a tractor to suit your needs, or for that matter, if you just want to do it. I like Richies idea and was thinking if a right side pedal could be tied across to the left side so you'd end up with a pedal on both sides. The biggest obstacle would be the pto pedal on the right. Maybe fabricate a lever to operate the current pedal? I don't see where changing it to an 877 would be a difficult project at all. One of the cool things about these tractors is that so many parts are common to many models. Once you had the hydro in hand you would be able to start taking parts off of the 857 until you reach a point that it's identical to an 877. Then just start putting it back together with the hydro in place of the manual. Tag it an 877?? By all means, if you want to. But it also might be fun to see how often Wheel Horse gurus catch it if you left it tagged an 855
-
2 pointsRoll pins are hardened steel and will eat up a regular drill bit, a carbide tipped bit will do the job. I have found that heating the roll pin with a small torch (the flame will go right down the center) followed by PB Blaster will get them moving. If they don't move you can follow up with a regular bit because the heat will take the temper out of it.
-
2 pointsWell, I guess it's official now, I'll be watchin all the BIG SHOW festivities on the computer. I wore a heart monitor for a month, and my cardiologist wasn't happy with the results, so this coming Friday I get my very own defibrillator / pacemaker installed. This should be interesting. I did FINALLY get the hauler unloaded from last years show ... about 3 weeks ago actually. That's probably some kind of record!! LOL Sadly, the only casualty appears to be the front panel of the Trolley. We are the proud owners of the Crystal River Generating Station, the 8th largest pwr plant in the US ... and the WORLD'S LARGEST SINGLE SOURCE OF SULPHUR DIOXIDE!!! The rain here brings new meaning to TOXIC!! The plants have all adjusted to it, but if it is left laying on any ferrous metal, it chews on it big time. Will post some before and after pics of the repairs, once I get the energy to start them. Sure was looking forward to another trip north, lots of great people. Be sure to post lots of videos and photos!!!!!
-
1 pointthank you
-
1 pointLucas Electric aka the Prince of Darkness
-
1 pointIf my son happens to surprise me with a motor within the next 2 weeks (been waiting since the show last year) then maybe.
-
1 pointThose are awesome!
-
1 pointRound hood got one step closers today! 20170513_194814.mp4


This leaderboard is set to New York/GMT-04:00