
Leaderboard


Popular Content
Showing content with the highest reputation on 04/09/2017 in all areas
-
22 pointsMy son got bit by the Horse bug, and I think he likes it!
-
12 pointsI was lucky enough to get a C160 back that I owned years ago, and a Case 448. I will keep the C-160 and use the Case for trading material..
-
12 pointsHe got the boots!
-
10 pointsI wanted to share pics of the replacement muffler I recently purchased from Jay Bee. This is a nice piece for the money, it fit well and sounds good.
-
9 pointsWelp, acquired it, so I'm gonna go with 1960 suburban 400, haven't quite read the serial number yet, but its gotta be that.
-
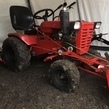
7 pointsRighty O, firstly I'd like to put Texas Todd out of his misery, that small orangey part on the bench, you know that bugged you, yeah that's nothing to do with the project.....sorrreey And that bit of extra frame behind the steering axle, well the drivers got to sit somewhere. Stewart thanks for the 'honey bee' reference, wacky looking but I'm sure they served a useful purpose in their day.... One day someone will say the same of my LS. More exciting loader stuff now, first a image from the rear showing the subframe, not sure what length I'd need so make sure there was plenty. As I mentioned earlier I used standard cat 1 pins and cat1 to cat 2 sleeves as bushings, nice simple and strong. Drilled out the boom end and welded in the bushes. At the same time drilling the bushes for grease nipples. Two hydraulic rams 60x30x300x500mm turned up so I could make and tack weld the lower mounts. The holes in the ram ends matched my cat 2 sleeves, so I was laughing. I had decided on 790mm for the height of the towers so I cut them to length cut caps and welded them on. Next came making plates for the tower tops for the boom to pivot on, and on the boom to receive the ram ends. Lots of clamping and checking, when happy I spotted them on. starting to to look like a loader...stay tuned for more.
-
7 pointsThis probably should go in What Are You Listening To. Mods you can move it if you want to. Just thought the MMO can was interesting. This guy has become my go to music video on Youtube. He also plays a mean garden spade! He does a very haunting tribute to Cohen's Hallelujah. This guy could play on my front porch all afternoon while I'm having a few cold ones.
-
7 pointsTry as he might... I don't think he would fit.
-
6 pointsGot the decks on the 520's today. Sharpened blades, greased and ready to mow. 2 48"s and one 42" mulcher. The 520's seemed happy to get some fresh air.
-
5 pointsI built this yesterday to clean out garden rows. I only got $14.00 in this build so far since I got given the square tubing. And a video of me trying it out. I'm sorry for the bad word.
-
5 pointsMy shop Superintendent stopped by Saturday and dropped off the Allis Chalmers 912 Hydro that I picked up from him. Kinda tough when your Boss is also a collector.
-
5 pointsNice!....let's not give Howard @857 horse ideas about nap time on a comfy seat tho!
-
5 pointsDeadguy.......good to see you again........ You make Grandparents happy here.......That lilfella is welcome anytime.... thank you for the pic......Priceless !!!!!!!!!!!!!!!!
-
5 points@Deadguy all he needs is a pair boots and a hat and he will be ready for some seat time.
-
4 pointsI know a fella who has this and that of all things tractors (big and small old and new) related and the inventory is constantly changing most of you guys would either be in heaven or trouble so here's today's rather cool or weird finds, enjoy...Jeff
-
4 pointsGood evening to everyone and hello, I am new to this forum, even though I have visited several times over the years. Allow me to introduce myself. I am Kevin Thomas, from Webb City, Missouri. I was first exposed to Wheel Horse garden tractors back in 1975 or 1976 when I first got to mow with a 16 hp Wheel Horse that one of my uncles owned. He was a long time Wheel Horse owner and used his to mow and plow his garden with. His parents had them back in the 60's and what impressed me about them and still does today is that that you just can't wear them out. I have owned several Wheel Horses over the years and currently own a 1986 414-8 (Model # 31-14K801) that I have had for several years and use it to mow our place with. I had been wanting another one and found a nice one which I purchased this past Friday. It's a 1988 414-8 (Model 31-14K803). It's in good shape but it's got some really bad slop in the steering and I read where it's been a problem on some of these mowers. It's hard to explain but you can turn the steering wheel about 1/4 turn before the front tires turn. When I look at where the steering wheel shaft meets the lower gear where the grease zerk is, you can see the shaft move around when you turn the wheel. Not sure what part of this needs rebuilt, possibly the area where the lower part of the steering wheel shaft is mounted but just looking for some thoughts on this subject, and if there are parts available. Thank you in advance! Kevin.
-
4 pointsThe original 1593 (3Lx34.4") belt is no longer available for the starter/generator 7340 Gates .410"x34.58" 36 degree 25-7340 Napa .410"x34.58" 36 degree (I believe these are automotive belts) The original 7263 ignition switch Garry
-
4 points@Retierd Wrencher, thanks a bunch, here it is breaking in those new "shoes" today leveling out some fill for my FIL, Jeff. I hope so, I'll keep my tubes in a cool dark place till I need 'em again, thanks Jeff.
-
4 pointsNow that's some quality seat time.
-
4 pointsGot to bring them up right!
-
4 pointsIt's been that way all four hours I have owned it. 😊 The tractor is a basket case, but its hard to turn down a tractor, blade and deck for less than $50!
-
4 points4 years, hard to believe.
-
3 pointsHad the time and good enough weather to begin getting acquainted with the new Horse. Got the snowblower off and tucked away in the shed, along with the walk-behind tucked in beside it perfectly, which helps clear some space in the garage. By the way, is there any good way to attach/detach the snowblower belt shield bracket -- the one that holds both the guard and the pin for the anti-sway bracket? It goes on with two bolts, but the front one in particular is a pain because the engine mount bolt gets in the way of a socket, and the axle gets in the way of putting a wrench on the nut on the back side of the frame. I had to hold the nut with an open-end wrench just right, and work the nut off with a wobble adapter and long extension out past the left frame rail. Getting it back on promises to be interesting... Washed the dirt off, and took a few more pictures... No mouse nests in the engine, thankfully. Plenty of dust and dirt caked on, though, that I had to carefully wipe and blast away with the hose sprayer. Moved her into the garage where I could get a better shot. Hardly any clouds most of the day, and made it too bright outside for good shots. I did find some rot on the footboards -- all the way through in a couple of spots on the left side, in fact, and a lot of rust where the plastic treads fasten through the metal with molded-in "pins". It looks like the plastic treads let a lot of mud and water go underneath, where it stays and rots them out. Looks like I'll have some metal repair in my future, and if I can get them filled well enough, I may fill all the holes and switch to the older style rubber treads. Or maybe work up some nice diamond-plate treads. I'll have to think about it and take my time. Here's the underside of the deck after I got it cleaned up and scraped off some lingering grass clipping residue. One of the spindles looks a little chewed-up on one side. I'll have to keep an eye on that and replace it if it gets any worse. Got the blades off to sharpen them -- with a bit of PB Blaster and a few thwacks to the wrench from a rubber mallet. I don't think they've been off for a couple of years. Now that everything's off and out of the way, it's time to go through and lubricate all the pivots and get grease in the zerks on the tractor and the deck. I also need to clean and adjust the hydro drive control cam -- it's loose enough that it slips and won't hold faster speed settings, and reverse doesn't always pick up smoothly because the cam wobbles. It doesn't look like anything is really wrong -- just seems to have crept out of adjustment. And a hardware store trip is in order to replace some rusty fasteners on the dozer blade. Won't be long before she's all set for yard work!
-
3 pointsThank you all, I affectionately refer to April 8th as my "Death Day" and my family now celebrates, the life. Sometimes it feels like yesterday, and other times a lifetime ago. I have not fully recovered, and I doubt that I will. Still can't move much of my left side of my face, headaches every day, but sure beats the alternative!
-
3 pointsGotta say when the paint fades on these tractors they almost look tougher somehow. Big fan of ags love 'em.
-
3 pointsSome triangle shaped gussets welded into those corners would add some strength too.
-
3 pointsHaha he is awesome! Nice pictures!
-
3 pointsCalendar material
-
3 pointsHere they are installed, Jeff.
-
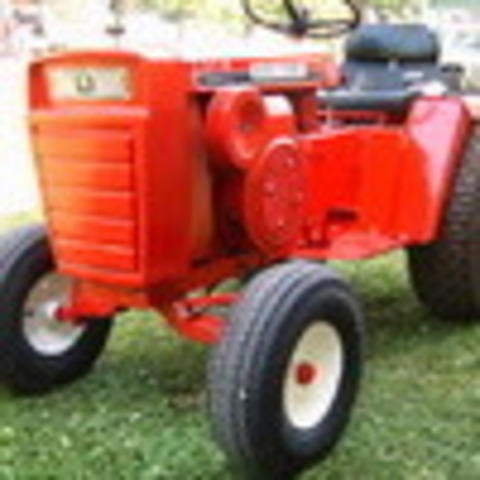
3 pointsI bought this 314-H last year for my brother David. Has hydraulic lift also. Hood has been changed but it is a 314 Hydro.
-
3 pointsCub weights look right at home! Did the same with my 520. Filled the roller and got the first spluge of dog poop on the tires for the season! sent from Brrly's basement using crapatalk!
-
3 pointsGotta love those 520s !
-
3 pointsThis is what you need... Just got done 2 days ago doing the driveway. The ditch by the dirt road is still too soggy to get that done. Beats the heck out of raking
-
2 pointswe ran this tractor for past couple years with different engines on it. never had electric hooked up since 1996 when dad got the tractor from neighbor and pulled engine. engine died during mowing for neighbor. dad ddidnt know better and pulled engine almost complately apart. removed crank carb cam. and come to find out the points broke. well i had a junk h70 snowblower engine i brought home last year. and recently got a couple tecumseh repair manuals. so i pulled the points out of the junk engine and put this engine back together for dad. needs head gasket. but hey it runs all that counts lol. when getting parts out of shed a mouse died in oil pan so everything had to be cleaned really well.
-
2 pointsHere is a picture of my grandson Vincent, he is my little helper! I would sweep up the sawdust and he would drag it back out. We probably spent a half hour doing that. I so enjoy spending time with him! Randy
-
2 pointsI need bushings for these wheels they have inch holes in them and I plan on putting them on 3/4 axle I'm also looking for another set of these wheels
-
2 pointsThank you Ed for the help
-
2 pointsFor 50 bucks? Id say evidence for robbery
-
2 pointsThe two wires from the Generator light also go to the switch, with the addition of the solenoid you will need to move one of them to the S/G side of the solenoid.
-
2 pointsYou are so right, I was having a senior moment! 550 for sure.
-
2 pointsNot so much "for sure" Dick. It's a 1960 model 550. Steel foot pedal (not cast) definitely a 1960 hood with those controls, 1960 foot rests, Tecumseh engine with the correct Tilloston carb. A 401 would have a cast pedal, push/pull controls and a Kohler among other things.
-
2 pointsI was hoping for a test drive! England though... Well. I've always wanted to go to my source! What better reason?
-
2 pointsNice score. Glad you got your 160 back. I would have to really fall on hard times to get rid of my C-160 automatic.
-
2 pointsThis was modified to work on a tractor from a $250 walk behind broom. Much easier to find and won't break the bank.
-
2 pointsLooks like a great place to start a dream.
-
2 pointsIt is not freezing here. I don't know if there is a drop of fluid in it. I got the shifter to move after putting some oil at the base for a few minutes, but she is still locked up. Been sitting in a shed for at least fifteen years, but I suspect it has been more like 35 or forty years...just what I needed, another project😊
-
2 points@squonk In the south they are called doggy land mines. Depending on the number of hounds and if you home on wheels is jacked up off the ground animal land mines may be mixed in. Never have to fertilize the yard .
-
2 pointsGlad that you are still here to post to this thread pal! Mike......
-
2 pointsLong overdue update: Hard to believe it's been nearly a year... Mark is out and doing better. Not able to live on his own as in many ways he's much like an average 12 year old. He'll be 30 in June. Girlfriend from before the incident has stuck with him and is caring for him. Things could be a lot better, BUT, they could also be much worse. Through the grace of God he is alive and able to visit, and enjoy a meal, and have a relatively decent conversation. Couldn't really ask for more than that. Been a while and man we've had a ton on our plate but things are looking up. Wanted to thank you all for all you support, Prayers, PM's, sharing of your own injuries and TBI experiences, it's all been good stuff and my Bride and I are truly grateful. Grace and peace!
-
2 pointsFinally, some color !!! The pictures make it look a bit orange, but I assure you it is deep deep red IH-50. Still VERY wet in these pics. As far as finished durability and appearance goes, I LOVE this paint. The biggest downside to it is that it takes 7 days to cure. *7 Days*!!! The trans came out beautiful, and since it's cast I won't do any color sanding and buffing. I did have a snafu with the blower housing, though. A fly landed right above the word Kohler. Other than the hood this is the most visible 5 square inch area on the whole tractor!! Murphy had to get one more over on me I guess.. I'll post some pics next week when I get it back on the RJ.. and let yall know how the trans is working out..


.thumb.jpg.0c495eaa7ff874c741991d7b1de2f119.jpg)


This leaderboard is set to New York/GMT-04:00