
Leaderboard


Popular Content
Showing content with the highest reputation on 04/07/2017 in all areas
-
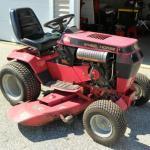
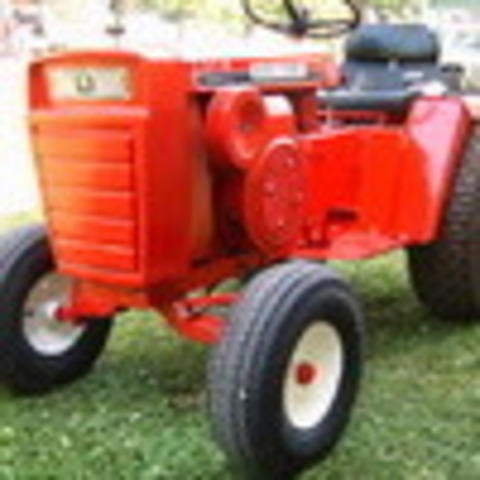
16 pointsI reminded myself of an important life lesson recently -- If you're off sick from work, and bored, don't go cruising Craigslist for things you've been wanting if you don't want to spend any money! You see, I've been wanting to get a Wheel Horse for a long while now. I've had a couple of older lawn tractors to keep the grass under control, but nothing spectacular. Just older 1980's stuff that's inexpensive to pick up used, built better than box-store MTD stuff, and easy for me to repair and keep running. For the past couple of years, the wife has commented when we go past the lawn tractors at the big stores that wouldn't I want to buy something nice and new one of these days? I've always said, "No, not really -- If I'm going to spend the kind of money those new ones go for, I can find a good used Wheel Horse for less, and it'll last longer." So I've kept my eye out. Seen a few go by on Craigslist and Ebay, but usually too far away to be practical, and/or just a little over-priced for my taste for what they're selling. This time was different -- I'm down with a nasty ear/sinus infection, not much to do but have my morning coffee and surf Craigslist, and there it was, a 1996 520H. Just listed less than 24 hours before, and located hardly an hour's drive away. And it had attachments -- 46" mower deck, dozer blade, and a 44" two-stage snowthrower plus weights and chains, and a winter cab -- all included! Didn't take long to discuss it with the Boss -- here was a whole package for less money than a glorified lawnmower at the stores, so I was off that afternoon with cash in hand. It all checked out good, and the deal was done! Had to wait a few days to pick it up -- between the last %^#@ snowstorm that was coming over the weekend and finding a day that the local U-Haul had their biggest open trailer available, I had to wait until Monday to get it. Would have loved to have had that big snowthrower over the weekend -- we had a foot of heavy, wet snow come down. Got it home and squeezed it into the garage before this week's nearly constant rain started up. More pictures later now that the weather is clearing for the weekend!
-
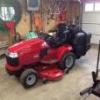
14 pointsI finally got around to mounting 1 set of new tires front and rear on my "Good Friday" 520H after 22 years the original Dico brand were weather/dry cracked through the sidewalls only tubes were holding the air inside, @HorseFixer, Duke the 23x10.50-12 Nanco brand Ags mounted out to 9.5" not 10.50" but still more than 8" wide ,I don't think you would've been happy with that for your set up, but I'm OK with them being a bit narrow, means a bit more traction and bit less flotation for my intended purposes mowing,gardening, and snow pushing. The fronts are Trac Gard 16x7.50-8 turfs they were an PITA to seat the beads but got it done, had tire shop do the rears, also did inside MF approximately 45# and outside weights CC 30# on them and put my one off powder coated wheel covers on (they hide the "blue" weights that were originally MF red) all this today since I'm on 4-10 hour days now Friday is going to be project day, anyways here the goods, Jeff.
-
8 pointsHey Everyone. I found this procedure on the internet and wanted to make sure that it was posted here as well. This was my replacement though. I have a 1990 520h with the Onan P220G-i/ 10955c that had a plastic governor ball spacer under the governor cup. The symptoms were mainly hunting of the throttle and when hot (about 30-45 minutes into operation) the rpms of the engine would rev well past the designed 3600 rpms as high as 4000 rpms. I tried everything I could think of including the memo put out by Onan to remove both governor clips from the governor rod that attaches the throttle to the governor arm, slightly pinch them with pliers to tighten them up and then reinstall. Which did seem to help for a bit at first. but to no avail wouldn't fix the issue. I had some time and decided to document the important aspects of this procedure for those that wanted to attempt it themselves. If I forget anything please feel free to mention it in response as it only benefit the thread. It's said that the engine needs to be removed for this operation but I didn't want to do this. So I left the engine fully mounted for this method without any issues and it didn't seem anymore difficult as all bolts and fasteners can be reached easily IMO. Steps to take are: 1. Warm the engine 2. Drain the oil. (I raise the right rear tire up to full drain as much old oil as possible) 3. Shut the Fuel valve off on the tank 4. Disconnect the battery and Fuel/ vacuum lines from the engine. 5. Remove the air cleaner and box completely (I closed the choke all of the way and stuffed clean paper towel into the top of the carb and then covered it with clean plastic sandwich bag and zip tied that down) 6. Remove all wires from the coil and voltage regulator 7. Remove all bolts from the front shroud (sides top and bottom) including the one by the coil on the top of the engine block (by the valve covers) 8. Drain the fuel line from the fuel pump as best as possible and then remove the two fuel pump bolts (Hex head allen wrench type) and vacuum line from the back of the fuel pump. 9. You will need to gently pull the bottom of the shroud out at the bottom, lift up on it and then slightly lift up on the lip of the rear cylinder shroud to get the coil out (or remove the coil first then follow same procedure) 10. Pull the four fly wheel grill bolts, then the flywheel 11. Carefully remove the Stator, Spark Ring and Spark Module and set aside or place in safe spot on top of the engine and secure so it doesn't fall. 12. Remove all four timing cover bolts as well as the nut at the top and use a rubber mallet and some pressure to carefully remove the timing cover to expose the governor and crank gear, etc... 13. Lift the left rear (drivers side in a car) tire up enough so that the engine tilts backward so that the governor balls don't fall out when you take off the cup. 14. You will need to push the governor cup in and gently pry out the retaining ring from the cam end exposing the spacer and gov. balls. Set them and the ring aside in a clean safe space. This is where you should be at this point. 15. Next just grab the old plastic ring and with your fingers and give a twist back and forth from side to side while pulling on it and it should slip right off. Here is the old spacer next to the new spacer. You need to clean the gasket surfaces on both the block and the timing cover really well. I used fine cut sand paper and break cleaner and then blew the whole thing out really well. As you can see I went ahead and replaced the old oil seal with a new one while I had it all apart and drained. The timing Cover oil seal part number is 0509-0040 and if you want it, the rear oil seal in the bearing plate is 0509-0041. NOTE: one thing to keep in mind that is very important is to NOT lose the pivot ball bearing under the bottom of the vertical governor shaft inside the timing cover. If you didn't realize that it slipped out, the guide for the cup on that shaft will not be centered on the hole on the 16. Clean the cam surface where the new spacer will go really well and then wipe clean with something like Rubbing Alcohol or brake cleaner on a clean paper towel or shop cloth. Then apply a THIN Layer of RED THREAD LOCKER!!! not to much. you don't want it to end up somewhere it doesn't belong. 17. The new spacer should fit on there just fine. Align the spacer so that one of the spacers is in the center of the space on the left in the block to avoid the closest ball bearings trying to get into that spot. Bad thing could happen if otherwise if a ball gets out of wack throwing everything off center and unbalanced. Once aligned properly, push on and then lightly tap the spacer the rest of the way on using a rubber mallet. LET THE ENGINE SIT OVERNIGHT OR LONGER SO THAT THE THREAD LOCKER HAS TIME TO SET. 18. in the mean time.... Continue on to reinstall the ball bearings making sure to space them evenly apart in the spots of the spacer. 19. Replace the governor cup, cup spacer and ring and align the hole with the plastic spacer so that it aligns with the pin on the inside of the timing cover, next to where the governor shaft and guide are. Very important. 20. Notice the hole with spacer is perfectly horizontal and lines up with the pin next to the forks of the governor shaft. Also notice that the forks are centered perfectly over the hole. If the ball bearing was missing from underneath the governor arm shaft in that bottom section, the forks would seem to low. Also notice the clean surfaces and the gasket already in place at this point as I prepare to reinstall the timing cover. 21. Oil or grease up the crank and use some on the lip of the oil seal, you can even clean the surface really well first and then place a piece of electrical tape all of the way around and cut it so that it meat right at the other end of the tape and is flat. Then grease and install the cover. NOTE: It is recommended to use some teflon tape or from a tube on the threads of the lower bolts that are closest to the oil pan to aid in avoiding any seeping of oil from those locations as well as a tiny bit of oil or grease. Make sure not to lose the copper washers as well. The torque specs for all of these bolts and nut are 25-27lbs. I went with 26 lbs. Sorry, no more photos after this. I wanted to show the most important parts of the core of the procedure. You all can figure the rest out. The last thing to do is to button everything back in the reverse order it was taken off. Don't forget the flywheel cap screw is 55lbs. I hope this will help someone in the future cure their over revving engine. It's not really as daunting as it seems.
-
8 pointsLong overdue update: Hard to believe it's been nearly a year... Mark is out and doing better. Not able to live on his own as in many ways he's much like an average 12 year old. He'll be 30 in June. Girlfriend from before the incident has stuck with him and is caring for him. Things could be a lot better, BUT, they could also be much worse. Through the grace of God he is alive and able to visit, and enjoy a meal, and have a relatively decent conversation. Couldn't really ask for more than that. Been a while and man we've had a ton on our plate but things are looking up. Wanted to thank you all for all you support, Prayers, PM's, sharing of your own injuries and TBI experiences, it's all been good stuff and my Bride and I are truly grateful. Grace and peace!
-
7 pointsHi everyone, I've been an occasional visitor to Red Square over the years as I've researched Wheel Horses -- I've wanted a good "keeper" tractor for a long time, and Wheel Horse quickly rose to the top of my short list. For just shy of ten years, really -- the search has been a background project to learn as much as I could and be ready when the time and money finally came together. Finally got a chance to pull the trigger on a nice Horse and complement of attachments all in one fell swoop! I'll start a thread in the main discussion area and post pictures there. I grew up in Niles, Michigan -- just across the state line from South Bend. Wheel Horses were a common sight everywhere, and I used to pass by Chandler's Equipment all the time on the way between the towns. South Bend & neighboring Mishawaka were pretty much the center for everything in the area; still are, really. I went to school in South Bend most of the time, so it really was a surrogate hometown for me. So I guess I've always had a bit of a connection... Ironic bit is that I grew up with the experience of running a "real" garden tractor -- but it was green! When my family had a new house built in 1970, my father bought a brand-new John Deere 112 with an 8-horse Kohler and the 4-speed transaxle for mowing and running a single-stage snowthrower. It was certainly a fine machine, and from what I've seen in learning about Wheel Horse through the years, it probably seemed just a little more "modern" in 1970. The Variator drive was darn nice to run with, that's for sure. In a couple more years, Wheel Horse's ongoing improvements to the line probably would have eclipsed the 110 for overall power and bulletproof operation, but with a brand-new house to outfit, my father wanted the most advanced thing he could find right then and there. Another interesting bit -- the JD was purchased from Clay's Service in South Bend, which was just across the intersection from Chandler's and the original Wheel Horse factory location. I also had plenty of exposure to Wheel Horses while I was going to school -- there were two in use for groundskeeping -- a C-160, I believe, and a slightly older one, possibly a Bronco? Those tractors were always out doing work, and often parked near where us kids sat outside for lunch breaks in good weather. So, I guess I've always been a Horse fan, it's just taken a bit over half century to get my hands on one!
-
7 pointsI did take the emblem off and turn it around as a clue, so yes this is a rear wheel steer. Looks like horsefixer is gonna blow, so no more teasing. My wacky races build is a wheel horse loading shovel or some might call it an industrial loader.. The last pictures show one of the lifting cylinders, the hydraulic tank, bosses for some of the pivots a 'cat one pin, cat two sleeve that I used at the pivot points and a couple of hose clamps for the pressure/return hydraulic lines. Tonight I'll try to explain why I built a loading shovel not just a FEL.
-
6 pointsto the Congrats on your new toy, I am sure working on it will be good therapy to help you over your illness. The 520H is a great machine that will handle any task. With the hydraulic lift, it also has the stronger Eaton 1100 transmission. The one area of concern is the excess heat build up in the rear cylinder of the Onan P220 . When these tractors are used for mowing duties, they tend to suck a lot of grass into the engine. The front cylinder is quite open on the right side, so the air flow is high enough to blow the grass through. However the rear cylinder has less flow due to the belt guard blocking the air flow and the grass clippings tend to collect in the cooling fins. If this is allowed to happen, the high temperature will cause the block to expand enough to cause the valve seats to loosen. So, follow Blasterdads advice in the above post. I would definitely remove the tins to do a good cleaning of the fins. With the tins off, look closely for any oil leaks around the oil filter base plate. It is bolted to the block with two bolts and has a history of leaking. If there are any small oil leaks, this oil will be blown across the fins and contribute to the grass build up. When you reassemble the tins and the new oil filter, make sure the rubber grommet between the tin and filter is in place. This also improves the air flow. I also highly recommend venting the belt guard if these tractors are used for mowing. Although I do not use mine for mowing, I have vented the guard and the amount of heat that comes through the guard is amazing. It heats my cab 30-35 degrees above outside temperature. Get well, and best of luck with your new horse.
-
6 pointsMake sure to check the GEAR OIL in that blower, grease the deck spindles, & change the oil & check the fluid in the hydro... (when you feel better). Also a good Idea to check the air flow across the cylinders, especially the rear one, mice and/or grass like to get in there over the years, & the belt guard hinders the air flow on the rear cylinder.
-
5 pointsWell a little update for you guys. I got back to working on this Horse again. Got the hood fab done all except the bottom hood bracket. But here's some pics. Also this hood was rotted out on the bottom and split along the front seem and someone put a cut in the hood were it raps up to the fuel tank. So I did not chop up a good hood. Just slightly altered it to fit my needs.
-
5 pointsFor some time now I've been on the lookout for a loader for one of my tractors, I'm in the UK and they just aren't available over here. So awhile back I gave up looking and decided to build one. I have driven a lot of different loading machines down the years from skid steers through two wheel drive tractors to rear wheel handlers, four wheel steer, pivot steer, crab steer... you get the picture. So if I had to build one, why not go try to make a purpose built loader. The trouble with FEL's especially on two wheel drive tractors is that it's a compromise. When you put the bucket under the material and start lifting and crowding the bucket, all that weight goes down onto two little relatively weak wheels/tyres spindles, and the steering gets stressed. Meanwhile the weight comes off the driving wheels, you lose traction and the whole outfit becomes unbalanced, you can counter some of this with ballast, wheel weights or a weight block to the rear, but that's all just dead weight that has to be lugged around. So by trying to copy a loading shovel, when you push in and lift the weight get transferred to the driving wheels, traction is much better and the steering axle at the rear remains light, a much better balance. My loading shovel has no extra weight, no water filled wheels, wheel weights or large counter weight. I have put it through some 'trials' before stripping it down, it pushes like a little tank when loading, I had over 200 kg in the bucket and the back wheels were still planted on the ground, and there was no one in the drivers seat! So there you go, I'm going to start my build thread from the first mock ups tomorrow, it will be mostly pictures but I'm happy to share as we go along.
-
4 pointsI got a soft heart for the old tired ones but the price was too good to pass up. I will dig into them this weekend and see if they both will fire up after new plugs, cleaned carb and fresh fuel. 1994 314h with 900+ on it; All four hub caps 1991 520h with 1200+ on it; All four hub caps 2x 42" SD Deck. Both spin and are quiet that I could tell in the spindles.
-
4 pointsI love your positive attitude! Thanks for the update and I hope every day is better than the previous day for Mark. Mike.....
-
4 pointsAre you sure you live in Virginny Jeff? That sure looks like Billy country.
-
4 pointsSo many responses, thanks for the support, guys! I'll go cross-eyed trying to quote individual posts, so I'll try to hit the high points... I didn't expect (but probably should have!) to be in competition with any one here to nab this one or any part of it. I just knew as soon as I saw the ad that if I didn't jump on it, I'd miss out and regret it. I'm not one to call off indiscriminately, though with the, umm, persistent persuasion of my wife ever since I had a small "warning" stroke a few years ago, I've learned to take a bit better care of myself. So, guess I wound up with a "reward" for doing the healthy thing. The price was fair, if not darn good for all the attachments along with a solid 520H -- $2000 for the whole kit 'n kaboodle. And nearby, too, so it didn't cost much in fuel or time spent to pick it up. I'm sure folks have found better deals, but I'll count myself fortunate on this one. It's a fine tractor and the mower deck and snowthrower have done plenty of work but are in fine condition. I need to replace the sacrificial chain guide/tensioner block in the snowthrower -- the seller handed me a brand-new one with the sale; he just hadn't gotten it installed yet. I'll tend to any little maintenance issues on it and put it away in the shed ready for next winter. The mower deck is basically ready to mow -- I'll just make sure the spindles are greased and the blades are sharpened. The dozer blade could use a fresh coat of paint, but it's not bad and will probably look better after a little cleanup. And the seller tossed in a very sun-faded red dump wagon that's either the Wheel Horse one or one made by their OEM supplier. It's a fair bit sturdier than the plastic-tub dump wagon I've been using, and I've got some projects around the yard that it should be well-suited for. And, it will give me something to practice painting on. The Horse doesn't need a full restoration, but it's due for a little sprucing-up. The wagon will give me a nice practice piece to work on, then I can move on with confidence to the faded paint on the hood and some other places. Hours? Just a bit over 900 on the 520. Ought to be plenty of life left in the Onan powerplant. I plan to go over it this weekend to clean it up and blow any dirt and grass clippings out of the deep corners, and take stock of where it needs any TLC. The seller pointed out that the gas gauge isn't reading correctly -- seems to be stuck near full. It could be a stuck or bad float/sender. I'll test that and the gauge, although it's not a huge priority. It's got some light bulbs out in the instruments -- either loose, dirty, or need to be replaced. All the other gauges are working, so nothing too bad there. Fluids and filters will get changed before mowing season gets underway. I expect I'll be spending some "quality time" with her to get started off right for the season. I've read some of the information here about the Onan's rear cylinder airflow issues. I'm keeping an eye on it. I only have about 1/3 to 1/2 of an acre to mow, so it's not going to be run too hard in the summer. Also, I've always wondered if that big plastic shroud over the belt and PTO was really a good idea or not. Sure, it's a nice modern safety feature, but the Wheel Horse design did without it for decades. And without the shroud, there's got to be better total air flow across the whole engine. The seller still had the shroud with the tractor, but I don't intend to use it. (No small ones here yet -- my kids are all in their 20's, and if they can't keep from sticking their fingers in the PTO belts, well, there's some bigger problems going on...) To me, the wide-open PTO assembly has always been part of the Wheel Horse "look" anyway. I grew up during the switch from farm machinery with big, menacing exposed shafts and pulley/belt systems to the all-enclosed safety-shrouded stuff. I still like the old ones better... And I got in the habit of wearing sensible clothing and respecting the machinery. This weekend promises to be a busy one! I was hoping to get some time with the 520 as soon as I unloaded it on Monday, but life had other plans. I'd cleaned up after the ridiculous snowstorm on Friday and Saturday, then on Sunday I went to change the oil in my daughter's car and discovered it had developed an internal head gasket leak. Not worth the high cost of repairing it, and no time (or much inclination to punish do it myself), so Monday after unloading and taking the trailer back to U-Haul was spent starting the search for another car. As it turned out, I found her a two-year-old Subaru with low miles at a great price just because it had gotten shuffled around a large Chevy dealer's lot and sat there long enough that they realized it was costing them and they just wanted to get it out the door. Guess that made for two good deals in quick succession -- I want to quit while I'm ahead! So, after a week of rain, this weekend I get to catch up on giving my daughter's car a thorough going-over and get her all settled in with it, then take the radio she'd just had me install in the old car back out and drop the factory one back in, and get it all set to blow out on Craigslist along with my old lawn tractor. (A little Bolens Suburban) And it's Yankee New England, where we don't pay for trash pickup, nope, we haul it to the town dump "transfer station" most every weekend. Looking an awful lot like I'm going to push a lot of work with my new Horse into Sunday, but that's when the weather is expected to really turn for the better. Which means some good pictures, I hope!
-
4 pointsNice work Chris...looks like you take your time on projects like me! See here what you started tho..... More pics on my 1067 thread once I get off my a$$ and have time to keep making things happen!
-
4 pointsSweet! Someday one of my steeds shall be shod with a new set of ag's... I'm leaning towards the one with the loader I haven't bought yet...
-
4 pointslots of
-
4 pointsI have a completely different set up, but I like bright red to pop out with the bright white wheels. I'm a "poppy" kinda guy.
-
4 pointsIf they do we will get the posse after them.
-
4 pointsI know some characters here that might try that with ! Sorry me too... I love
-
4 pointsNo seat time! Count me out. Besides, I have seen these things on TV and there is no way they could deal with the creek and steep slopes in my yard.
-
4 pointsStor 2017 storm Stella made me a believer in the rubber chains. IMO, they grip better on blacktop than steel chains....and they don't leave marks.
-
4 pointsLike this...fluild fill Ags with 75# cast wheel weights+ 2link chains another 125#+ out back a cab and a 2stage if it should ever snow more than 4" around here again, Jeff. Also with all that extra weight it doesn't seem to spin much at all on asphalt.
-
4 pointsVery nice! A Horse is a Horse of course! Please do update your progress, we "need" to know. Of course we do!
-
3 pointsHad the 312-H out after work this afternoon with the lawn roller and rolled the front yard. Thinking Spring!!! finally after the snow storm scare we had here Thursday. Think I might have to put some Regal Red on that "Farm Store" roller.
-
3 pointsI just talked WheelHorseMan. He's got just what I need and is hooking me up. Thanks for the lead fellas. 👍🏻
-
3 pointsSounds like you have a good handle on the quirks of a 520 Eric, main thing is that you enjoy tinkering with it and like said use your shout out should you be stumped. Don't fret about scoring a nice tractor....around here it's ya snooze ya lose!
-
3 pointsThanks Chris... I also saw it on another tractor done in a sort of brushed AL style and thought it set off the whole tractor so thought I'd give it a shot. I am in the process of clear coating it but that might have been a mistake kinda lost it's luster but was afraid of oxidation that happened on some of the HD parts I did like this. What had happened I think is the Missus would run her salted car in the garage right next to polished scoots and just that was enough to start the uglyness ....stay tuned.
-
3 pointsVery nice tires. Those old ones were in rough shape although I have to admit I would have kept the old ones with tubes till they blew out. I a;so love those one off powder coated hub caps. They create a nice touch and hide those weights very well.
-
3 pointsLol Jay @roadapples...but honey I'm gettin too old to be gettin on roofs and ladders every year. ...ok leave them up year round....but honey the weather is gonna knock them down and wreck them.....no it won't.... yes it will...and then you will buy new ones and I won't have money for that new to me C-1....hold it right there buster now help me with these RW&B I just got for the 4th....
-
3 pointsThanks for the warm welcome, all! I have to confess that the two models I had focused were the 520H (which there didn't seem to be a lot of for sale when I started searching in '08 or so) and the C-160. I've seen a fair number of C-series Horses worth tearing down and restoring, but I had to find a working tractor that I could spruce up as I went -- that was a bit harder to come by since the prices for those were inevitably higher. Until recently, ready-to-go 520s were pricey out here. Maybe in a couple of years I can add another Horse, but I need some stable space first! Luckily, I'm taking down an old above-ground pool this summer, so that will clear all the pool paraphernalia out of the existing shed. And give me some more space in the yard to build a bigger one... which could possibly contain a C-series someday... Hmmm...
-
3 pointsFinished the "new" C-81 last night, last on the list was to replace an axle seal, all went well... Now on to finishing the 48" deck for the C-120... Pics of my "seal installation tool", cut the bottom off an old hard rubber table leg cap, & tapered the end a little on the bench grinder. Slid the new seal in place & pushed into seat evenly with fingers, butted new "tool" to it, used a plastic extension tube from my shop vac & one good tap with a rubber mallet drove it home. Worked great!
-
3 pointsForgot to take a pic of it down.
-
3 pointsI had a couple of pics, I chose the one with the mouse trap in it, figured it would get a comment or two.
-
3 pointsWhite was the color used in the 60's up through the mid-70's. They switched to red thereafter for the cast wheel weights. The 1976 brochure shows them in red, while the 1975 accessories brochure shows them in white.
-
3 pointsExcellent tutorial.
-
3 points@WHX11 Jim, should have taken that picture at night with the Christmas lights on...
-
3 pointswell guys i thank you all for the warm welcome i called A-Z yesterday and had a great talk with Lincoln about this part,,,,and he said he was going to make some up since they are so hard to come by,,,he said it would be about a week and he would give me a call so we could arrange some shipping,,,he seems like a great guy willing to help the cause we had a nice chat exchanging ideas and getting measurements for him,,,he said he was going to make both sides,,,,so looks like new parts are in the pipeline again thx much to all of you guys for the help and guidance,,,,and especially to Lincoln at A-Z tractors ocharry
-
3 pointsMy neighbor has used one of these for over five years. His was not a rental, He owned it. The only problem he had was with humans. Someone stole the unit while it was mowing.
-
3 pointsOh come now you haven't been trying! Quite a few members here from your hometown , maybe you'll run into someone you might know! BTW They do have a tendency to multiply & we do like our pictures here!
-
3 pointsHow many hours are on it?
-
3 pointsI think that valve will work out well. At first I thought that was the same one that Brian bought for his build. However, he ended up going with the one that has a float setting for the boom spool. It cost about $40 more though. This is the unit with a float detent: http://www.surpluscenter.com/Hydraulics/Hydraulic-Valves/Directional-Control-Valves/2-SPOOL-8-GPM-PRINCE-MB21GB5C1-DA-VALVE-W-FLOAT-9-7862-F.axd Brian also has a great FEL build thread from last year. His was a ground-up, from scratch project. Another very good resource for anyone embarking on an FEL build for a garden tractor: One more thing about the control valve..In the specs for it on the Surplus center website take note of the information about the relief valve setting. According to the website, it will ship to you with it set at 2000 PSI and it is reportedly adjustable from 1500 PSI to 3000 PSI. Most likely, you are going to want to dial that relief valve down as low as you can. You probably already know this, but its basically a spring loaded ball bearing behind a relief port that sends excess high pressure fluid back to the reservoir tank when you hit the relief valve pressure. Now, the smaller loaders, at least the Kwik-Way built ones, shipped with the relief valve calibrated at a much lower pressure. Like 550-600 PSI. I adjusted mine slightly to increase that pop-off pressure because I noticed the relief valve was squealing (trying to open) when lifting medium loads. What you want is for the relief valve to open at the maximum safe load limit for your tractor FEL setup. From all the reading that I have done, for the 5xi and a loader attachment similar to yours and mine, that maximum safe load is around 550 pounds (I'm sure people will chime in and say its a much heavier weight than that). With that said, if your relief valve on your new control valve really cannot be set to a value lower than 1500 PSI, it will allow the tractor to "try" to lift much more than 550 pounds. That is where you, the operator, will need to exercise caution. You will need to evaluate the weight of a load before you try to lift it. Because your relief valve has a much higher opening pressure, you won't be able to rely on it to be the weak link in the chain to protect your loader frame, your tractor frame, or you in the drivers seat. Instead of the relief valve opening under too heavy a load for your setup, a weld may open up, or a cross member may bend/break and nobody wants that to happen. Think of the relief valve as like a circuit breaker in your main panel. Your counter top convenience outlets in your kitchen should be on 12ga wire protected by a 20 amp breaker. Having a relief valve set a 2x the safe calibration would be like protecting those same kitchen outlets with a 40amp breaker. If you try to draw that much current on 12ga wire, the wire becomes the weak link and effectively also becomes a fuse, and POOF...
-
3 pointsSweet, You just made a life time purchase. One of my all time favorite W/H's 520H and you got all the good stuff with it, enjoy friend and welcome to red Square where a world of knowledge on these wonderful Wheel Horse's is at you finger tips, just for the asking.
-
3 pointsEric F, I don't know what you paid, but as you say compared to a new 'ride on' it was cheap. With the help (if you should need it ) from the members here, you will likely have a machine to be proud of and will last you many years. You will thank your lucky stars you were off sick!
-
3 pointsTurfs, weights 'n chains. No problem pushing snow. Not in any hurry, at my age, drive slowly all the time. Sorry, what do my helpers use? Whatever I set up for them, the Grandsons just wanna drive Horses!
-
3 pointsPrices are incredibly regional. With you being out west, you could get a decent amount for it because they are rare and you find an interested party, or in some cases i have seen you cant give them away because of the lack of interested parties. Personally (keep in mind I have never owned a d250) i would list for 2k and expect to take around 1500. I could be wrong (and i often am)
-
3 pointsHere as promised the pictures that show which way I'm going with this, and what it's for. The last pic only shows one of the hydraulic rams, there are three on the finished machine. I think I'm going to call it wheel horse LS or maybe wheel horse i. Not sure yet.
-
3 pointsActually.. kinda got me thinking about making my own swath board... hmmmmmmmmmmm.
-
3 pointsYes Mike I have been planning this trip for at least 15 years now. Just waiting for the wife to retire. Here is the what we are looking at from a good friend. It is 34' Class A.
-
2 pointsNice looking Tractor!


This leaderboard is set to New York/GMT-04:00