
Leaderboard


Popular Content
Showing content with the highest reputation on 02/26/2016 in all areas
-
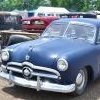
11 pointsHey guys! Got home tonight to find a pleasant surprise - Buckrancher fixed Emory's muffler for me. It looks awesome. He even put the baffle back inside! Brian you are awesome!!! Thanks so much for your help! I've attached a few pics showing Brian's work. Light makes it look a little bronze, but it's silver and looks brand new!
-
10 pointsI bought myself a new camera recently for my frequent birding excursions. Nikon P610. My wife has used it way more than I have a took a few pics of our resident Eastern Screech Owl female hanging out of her nesting hole last night. In the dark....Damn, I'm gonna like this new camera!
-
6 pointsI never ask Brian's secrets. It's like magic. When you watch a magician, it's amazing. Once you know how the trick is done it takes all the fun out of it. Let's not find out how he does it and just enjoy the magic.
-
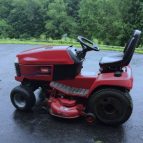
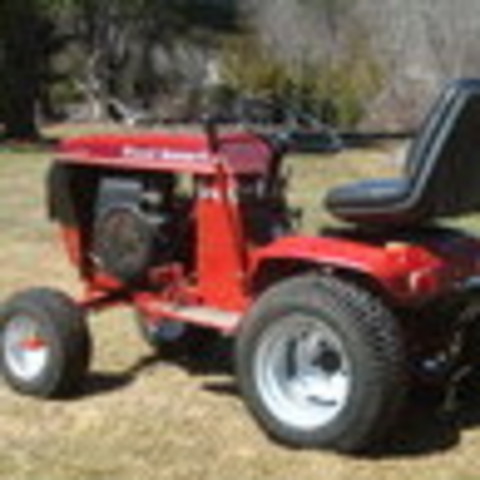
5 pointsTrying to identify this Wheel Horse that my Dad use to have when I was a kid...this is the only photo I have of it....it was a 72 or 73 (believe it was a 72) it was hydro automatic....and had a manual lift deck. Any help would be appreciated....thanks
-
5 pointsThat is incredible. My better half has that look...once in a while.
-
5 pointsI have zero desire to go that fast on a tractor. I must be getting old.
-
4 pointssquonk you're right. Brian used the good back half of my original muffler as a starting point. I'm telling you, when you see it in person and hold it it's amazing! You'd never think it was repaired and he had started with the rusty carcus I sent him. I'm thrilled and my son was more excited than if it was Christmas! He carried it around looking at it forever
-
4 pointsOscar winner Halle Berry accepts Razzie for Catwoman If the Academy Awards celebrate the best of what Hollywood has to offer each year, the Golden Raspberry (Razzie) Awards take a distinct pleasure in celebrating the worst. On February 26, 2005, the Razzies held their 25th annual ceremony at Hollywood’s historic Ivar Theatre. Making a surprise appearance was Halle Berry, an Oscar winner for Best Actress in Monster’s Ball (2001), who showed up to accept that year’s Razzie for Worst Actress for the title role in the poorly received action extravaganza Catwoman. Created in 1981 by John Wilson as a cynical counterpoint to the Oscars, the Razzies–named for the disapproving gesture known as “blowing a raspberry”–traditionally release their nominations one day before Academy nominations are announced and hand out their awards on the night before the Oscar ceremony. The actual Razzie statuette, which the organization itself values at under $5, is a “RAZZberry” about the size of a golf ball, perched atop a smashed, gold-painted Super-8 film reel. At the 2005 ceremony, Catwoman led the pack of nominated films, earning seven nominations (including one for Worst Film)–one more than Oliver Stone’s epicAlexander. In a show of humor and humility, Berry shocked everyone by coming onstage at the Ivar Theatre to accept her statuette for Worst Actress. Grasping her cheap Razzie in one hand and her Academy Award in the other, she made a lengthy speech (which she later admitted to have spent two days working on) that parodied her 2002 Oscar acceptance speech. “It was just what my career needed,” she claimed. “I was at the top and now I’m at the bottom.” Perhaps understandably, Razzie winners rarely show up to claim their awards. Berry was joined at the Razzies by Catwoman screenwriter Michael Ferris, who accepted the award for Worst Screenplay (for a script he co-wrote with Theresa Rebeck, John Brancato and John Rogers)
-
4 points
-
4 pointsI'm puckered up just sitting here watching this.
-
4 pointsLooks great... both, Mr & Mrs Buckrancher's fabrication skills are truly first rate.
-
3 pointsWell my good friend joe at imissthefarm.com makes all kinds stuff with basically any tractor you want... He emailed me the other day to tell me he started to try cell phone cases with tractors or tractor logos on them.. I immediately told him to send me one with the wheel horse and logo on it.. I got it today and he says he will be getting better and better at it but I'm 100% happy with it. Actually might have him make me a backup one with a wheel horse tractor on it. And if he don't have the tractor your looking for email him (tell him Greg from NY sent ya) and he will either find you the tractor your looking for or send him a nice big picture of your own tractor. He is one of the nicest guys to deal with! I will post pic of my case asap!
-
3 points...but even so, don't you just hate it when this happens?
-
3 pointsThere is an auction saturday between Ithaca and Auburn you boys in that area might want to attend. 10 wh tractors, decks, sickle bar, etc. www.goodrichauctionservice.com
-
3 pointsmany times I have heated a stuck part to cherry red and allow it to cool and then it will come apart easy as the heat carbonizes the rust between them Brian The early steering wheels that have the gear pinned on the shaft I remove the gear with a pin punch and put the wheel and shaft in a 20 ton hyd. press
-
3 pointsDefinitely cool Steve...tractor looks awesome.
-
3 pointsI will be setting up early thursday in barn 6 Come to our Canopy to sign up and get your banner. Your Wooden Nickle will be placed in the Drawing can for drawings during the day Friday for Prizes to be announced later this Spring
-
3 points1963 tractor. The hood has a metal lip band on the edge at the bottom-between the gas tank and the front of the hood.
-
3 pointsIn '72 there were three possibilities that would have a Hydro. Trans and Kohler engine; the Charger 10, Charger 12 and the Bronco 14. Can't make out the decal on the side of the hood stand so that is as close as I can come, perhaps some others will see something I missed. That is a great family photo and thanks for sharing it with us.
-
3 pointsAn update on the cracked, 2 piece, differential housing. Engineguy63 (Eric) purchased this housing, thinking he knew some friends that could fix it so he could use it in his Suburban. His friends decided the best way to fix it, was to turn it true and press a collar on the end. They did an excellent job, and even succeeded in closing the crack. Here are the pictures. Thanks Eric I would count this as #1 transmission saved.
-
3 pointsI will be there
-
3 pointsSure hope he starts making more.
-
3 pointsMe an Ranger 13148 are going. Looks like a they are unrestored and have been in a barn for a while.
-
3 pointsThat rust weld is some durable stuff.
-
3 pointsTo me those kind of ppl are nothing more than cowards ,,, a disgrace to humanity,,,
-
3 pointsI mentioned in an earlier post that I was having an issue keeping the front end of my Suburban on the ground. I don't really want to fill the front tires with fluid like the factory did so I decided to try lowering the front end instead. I'm happy with how my drop spindles turned out. It was a lot more time consuming than I expected. Then again I took my time in hopes to get them right the first time. The factory used a snap ring to hold the wheel on, I choose to use a bolt in the end of the axle like the later models used. I was going to just use a bolt for the king pin but I didn't like the way it looked, so I made the king pins out of left over stock from making my axles. I had to through some wheels on to check out the stance. Even if the drop axles don't help keep the front end on the ground, the lower front hot rod look was worth the work. Definite cool factor!
-
2 pointsHello, From these limited photo's can anyone tell me what model / year this is.....I am guessing 63, 64, or 65............but would like to know. Its a little rough and a 2 hour drive so kind of tempted.............but, may get over it. Thanks
-
2 pointsLast year at the big show I was speaking with Clay (RJ35 Hunter) about his early 55'. I noticed he had a really cool looking S style intake with the carb kinda offset with an oil bath air cleaner on it. He knows these early models pretty well. He said it was original and that mine should have the same set up to be correct... So I had to find that set up. Charlie rebuilt the motor for mine back in 09' I think when I restored it. As most here know he pretty much has any Clinton parts you could ever want. Well I spoke with him and sure enough he had one and NOS to boot! I had it sitting on my self for a few months now and finally got around to installing it. I really like the look and it runs real nice too. I want to thank Charlie for the set up at a very reasonable price, Clay for helping with pics of his set up and advise along with Vin (Vinsrj). (Sorry about the sideways pics, I am having issues trying to crop them)
-
2 pointsRegal Red is what I redid my with. I gave the hood a light compounding and the color just pops in the sun.
-
2 pointsIf anything you have sparked a vigorous conversation. For sure somebody has the right answer. Too bad you don't any more pics. There is a ton of info and a mountain helpful hands. You're gonna' like it here.
-
2 pointsThe only Tecumseh motored in the '72 - '73 time period was the smaller lawn tractors and this is definitely a Garden Tractor.
-
2 pointsI use the heavy spring that came with my tiller,it really helps,and I too don't like the hydro lift that much,i have a few hydros and the control just isn't there,its up or down more or less,i do like it for snow throwing,and the hydro control is nice for that too,i put my tiller behind a hydro,what a waste of time(as warned by redsquare members)but hydro lift on an 8 speed would be nice for tilling
-
2 pointsNo excuse now for not putting pics of red tractors here now
-
2 pointsBased on the pretty safe assumption that the seat was original I would say A Charger 10. The Bronco and Charger 12 had the adjustable high back seat. I don't think the hood stand decals are the 73 no name type. Per the brochure the Charger 10 did have the electric clutch though................a quick dealer change if that's what he wanted. Forget that last comment. The electric clutch was an option. I think I'll stick with a 72 Charger 10
-
2 pointsGlad to see Eric was able to save that differential ! That collar idea is just what the doctor ordered ! Should go on working for many more years !
-
2 pointsJust wanted to show what happened to the casting that Eric got. This is copied from the PM we had going...and the pictures following. Thanks Eric. And they did manage to close up the crack. engineguy63 62 Replied: 19 February · Report There thoughts were , as this part is over 50 years old and it may have sat in an oil bath for a while , the cast may have absorbed some oil. Then welding would be iffy at best and it would not help the fact that since it was cracked the bore was expanded. The thought was turn it down clean and shrink a band on which may close the crack up a couple thou, or not, but either way it would not get worse! Anyhow its in the hands of a VERY capable machinist!! Quote Edit Options
-
2 pointsLittle too much speed for me now but there was a time when I would have loved to try that. I have enough scars from dumb things I did in my younger days. That engine sounds great though.
-
2 pointsI'm guessing he needs a GOOD ORIGINAL back half and grafts a new muffler front half on it.
-
2 pointsDid you take the roll pin out?
-
2 pointsThat's right, show em who the boss is. They are stubborn. Glenn
-
2 pointsI did. My son brought one of those bearing puller set ups as well after I broke my first puller. I called the one machine shop where I live and he does not have a press so I did a little digging in my scrap metal and decided to build me one for pressing steering wheels. It has become personal with this particular steering wheel so I figured I will torture it for a while as it watches me build a press.LOL
-
2 pointsApparently the guy was a gang banging thug with a long criminal record that hadn't been employed there long. He had made several posting on Facebook holding an assault rifle, even though he was a convicted felon, WTF
-
2 pointsBecause he can. I would love to see the build on that project.
-
2 pointsI think that's the biggest set of Cragar SS's I've ever seen. Oh Yeah,those caps looked good!
-
2 pointsBack yard mechanic at his best. What makes one want to do that??
-
2 pointsWOW that looks great!
-
2 pointsI would have never thought that muffler would look like that again. 10 times better than a new one that would look way out of place!!
-
2 pointsI'm pretty much finished cleaning the 420LSE. I just have get the gold plate made for the hood. Overall it's in pretty nice shape. I put some new tires on the back. The bottom seat could be redone at some point. I patched one hole as best as I could. I'm very happy overall with her. Can't wait to mow with it!!!
-
2 pointsI picked up my RJ frame from my welder yesterday. I had taken the frame to the welder as it was missing the left side of the hoodstand welded to the frame. This is the side that the left handle latch with the knotch on it sets in place when the rear hitch is lifted up. This was cut off on the frame I had purchased -so I needed some additions. The little knotch piece rides about 6 1/2 inches from the bottom of the frame and is about 4 inches long. It is placed at about a 30 degree angle from the frame. Picture # 3 shows the new left side with the kotch welded on before I primed it. Photo # 4 is the front part of the frame that some previous work was done on with some welding done to the frame. Looks like steer bars were added on the sides with heavy weld beads . I used a 4 inch angle grinder to drind that all down before painting with grey primer. Photo # 6 is what the left side hoodstand piece with lift handle knotch looks like on a restored RJ. I also completed the painting of the RJ 18 hole seat pan seen in photo # 6. The final photo shows the "before" picture of the hood and frame with the left side of the hoodstand cutoff. This final picture I added in an edit shows that the weld bead from the fourth photo (above) has mostly been removed with the angle grinder.
-
2 points


.JPG.9f2ecb26065c66527b0730084ab7fc7a.thumb.jpg.7dc8a04d9a53d44ee2b23f26ee94496f.jpg)


This leaderboard is set to New York/GMT-04:00