
Leaderboard


Popular Content
Showing content with the highest reputation on 02/07/2016 in all areas
-
12 pointsThanks Karl!! This came in the mail during the week and today I tore it outa the package! A bit wrinkly from being packaged but it fits great and looks even better! ). Mike........
-
11 pointsThey are sweeet Karl... the Mr&Mrs Rules give them two thumbs up.
-
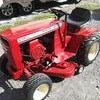
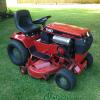
9 pointsWell I have been wanting another wheel horse to replace my RJ59 I sold a few months ago and finally was able to get this 1966 856. Runs good and everything works great. When I restore it I'm gonna need new back fenders tho.
-
8 pointsI'm back after spending a short vacation in the hospital this week. The Bad During my routine 4 month checkup last week, I complained to my Dr that I experienced some shortness of breath while dragging a tree top that had blown out of one of my spruce trees. Due to my past history of heart disease, this triggered an EKG...then a stress test...then a heart cath. The Good The cath was inserted in my right wrist therefore only requiring a 2-3 hour period of time without moving as compared to the 6-8 hours required if the cath is through the groin. The new cath showed no additional blockage since the 30% branch blockage was discovered by the cath in 2004. The cardiologist said "See Ya in ten years". The Funny The young lady( she appeared to be a teenager to me) that prepped me for the procedure seemed very matter of fact, as she went about her duties of installing the electrodes, the IV, and shaving my wrist and groin (in case the Dr can't get the cath in my wrist). All the time asking me the same questions I was asked by every person I met that morning. What is your name? ekennell. What is your date of birth? Jan 8, 1944. Do you have any pain? No. Do you have any stents? No. Have you had bypass surgery? No. Did you have a stress test this week? Yes. Did you not study? You failed the stress test or you wouldn't be here. The Ugly About 1 hour into the recovery time I felt the need to readjust my position. And ignoring the nurses instructions to not move, I grabbed the hand rails and pushed myself up in the bed. Almost instantly Mrs K started screaming and running for the nurse as the alarms on the monitor lit up and started beeping. I had separated the incision in my wrist artery and by the time the nurses got there, my right side and the bed had changed to a Regal Red color. The teenaged looking nurse that made the no study joke calmly grabbed my right bicep and applied a vice like grip to stop the flow while another nurse reapplied the compression bandage to the incision. After the situation was under control, I apologized for the mess had I made and thanked the teenager. She said it was no big deal as she had not walked to the cafeteria to get her donut yet where she would have been 4 minutes away. She said I had 6-8 minutes to go before I would have died. That's when I learned this happens in the cath lab about ever two weeks and she has been doing this job for 18 years. I guess anyone under 40 looks like a teenager to an old guy. The Moral Please listen to these young teenaged medical experts....they may save your life.
-
7 pointsFirst remove all the tins along with the starter generator and the muffler. I didn't remove the muffler before hand so I'll have to remove it at work by clamping the block in a hydraulic press. It is easier to remove the muffler while the motor is bolted to the tractor using a little heat and a pipe wrench. Once the tins are gone remove the head and find out what your dealing with. A lot of black carbon buildup can be normal for these old girls. I take a gasket scraper and clean the top of the piston an then use a brake cleaner and a brush to look for any stampings in the head This one is marked STD for standard bore this is a good sign. Note the divets in the top of the piston something has been through this engine a rock or nut, something hard.
-
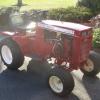
7 pointsGot it in the shed with the 310-8 and my kids tractors. I was happy the plow fit in the door!
-
6 pointsHaha, not a problem! Photos I have! Here's one, although it's a bit farther along now
-
6 pointsI am a WHCC member Terry, but I am fine either way. Especially if you all ready have the banners printed.
-
5 pointsHello. I've never owned any Wheel Horse before, but I had an electrician do some work on my farm and he mentioned two that he had for-sale cheap. So I looked at them and bought them immediately. He wanted $300 for both and I couldn't pass them up. The Commando 7 we got as a gift for our 13 year old daughter. It runs, but I need to do some tuneup as there is gas dripping from the carb. The D-160 will be useful around the farm. It runs, but it starts extremely hard when cold and the power seems a bit low to me, even when the motor and hydro is warmed up. Is that normal for these? All I have for comparison is a Kohler 20 hp magnum that starts immediately even in cold weather with no choke above 32 degrees.
-
5 pointsOnly 1-3" forecast for SC Pa. Sounds like plow time for the 312H.
-
5 pointsGlad to hear you're doing ok now. Sometimes those nurses take better care of you than the doctors. I had a heart cath in the groin, and the doctor didn't wait long enough for the local anesthetic to take effect before he thrust the cath needle in. I rose about a foot off of the stretcher, and almost took a swing at the doc. The nurse told me later the that doctor had a reputation for being kind of rough. My daughter is an RN, an she takes more personal interest in their patients than most of the doctors do. THANK A NURSE .
-
5 pointsSo glad Mrs. K was there and the nurses were so quick. While I was in rehab following last summer's surgery a very young Physical Therapy nurse was helping with my exercises and I made a comment about how competent she was at her age; she showed me pictures of her grandchild!
-
5 pointsSorry, guys....
-
5 pointsIt appears that the 11/44 toothed gears are identical. Time for a little "eye candy". RJ plates are done...on one side.
-
4 pointsI thought I would try to make a step by step teardown, measurement and rebuild of a k161 the way I do it. I see a lot of people wondering if they can do it,and I thought this might help. I do use the kohler manual as it does give step by step instructions also. The only "special" tools I use for teardown and measurement are a set of telescoping gages, a dial or digital caliper that reads to .001" (I prefer digital it takes out some guess work), a valve spring compressor and a harmonic balancer puller (for the flywheel) all four of these items I use can be bought online or from HF and are relatively cheap and can be used for other projects. Tools needed for assembly are a ring compressor, shim gages, a valve lapping tool with compound, and a torque wrench (none of these tools have to be top of the line, I use a $30 in/lb torque wrench for the connecting rod and a $50 ft/lb torque wrench for the head gasket bolts. ( the last two can usually be borrowed from a friend if you don't have them.
-
4 pointsSo here is the Kohler k161 motor from my 702. I believe it to be the original motor but I have no idea if it isn't. Truth be told I have never been worried about spec numbers, they have never made a difference to me a kohler is a kohler and ill make it run. The motor when I got it was missing the air cleaner assembly and I could not get a full rotation out of the crankshaft . I thought there was a stuck intake valve and I think I was right because I poured a little kroil penetrating oil down the carburetor a few weeks ago and this morning I turned it a full revolution no problems.. The first thing I do is take a few pictures of the overall engine and especially trotted cable linkages, and locations of hole used for the govenor ( note the govenor arm uses the lowest hole and the carb uses the farthest out hole)
-
4 pointsyes they will fit fine they are a little narrow for the wheels but look good once mounted Here's a set mounted on my daughter's 857
-
4 pointsYea I've owned almost every name brand garden tractor made and some not so name brand, and I'm getting so I have really picked my favorite tractors. Wheel horse is #1 tho. But I love most all garden tractors
-
3 pointsThis is a hydraulic lift I started in 1999 I bought all the parts and due to working out of town never started it. Last year I had to move tons of dirt from installing a pool so I built it to do that work. I have found the cylinders and control valves I want and will be building a hydraulic system for the 854 as well as rebuilding the system for the Raider 12. The square tank on the front will be replaced with a schedule 40 pipe bumper/ tank.
-
3 pointsNow I remove the old piston rings, if they break no big deal you don't need them any way. I make six measurement to figure out cylinder taper and out of round. I write them on a sheet of paper which I will post t a pic of. I measure what I call the thrust measurement ( the thrust direction of the piston) and the pin measurement ( runs parallel to the piston pin when bolted to the crank) I use the piston as a support for the telescoping gage to help in the accuracy of the measurement this can take some time and patients to get the hang of, you can leave a single ring on the piston for tension to hold it in place while doing this. I measure top, middle and bottom of the bore on both the thrust and pin sides of the bore. Use the t-gage to measure the bore and the caliper to measure the t-gage. I take one measurement at a time and write it down the move to the next measurement, sheet then looks like this With it written down I can figure taper and out of round. There should be little to no wear on the pin side so count on those three numbers being the same or darn close. The thrust side is where the cylinder wear is. Taper just subtract the lowest thrust number from the highset thrust number and in my case it's .006" for out of round you take the greatest difference between thrust and pin but they must be from the same level measurements, i.e the top thrust and the top pin not the top thrust and the middle pin. My max taper is .006" and the out of round is .006" Now comparing my measurements to the kohler manual You can see that I exceed th max out of round by .003" which is where most people think they can re ring and hone and keep going... not a good idea, you would be putting a circle in an oval good luck trying to keep it from burning oil. If you are following the picture real close you will see my measurements are smaller than the standard bore for a k161 this is because I have a k161 with a small bore, the small bore k161 is no longer available and i will need to go to a standard 8 hp piston, being tue same as a large bore k161. But if I were building say a k181 with the numbers I have and the condition of the cylinder walls I could bore it out to .010" and not have any issues but I like to air on the side of caution and would go to a +.020" piston because at .010 I would have .004" to clean up the cylinder walls (any scratches I don't see right now) it would only remove. 002" from each side of the wall. I also measured the crankshaft with the caliper in 2 spots Nevermind the numbers the pics are just for show. My actual numbers showed a .001" out of round nothing I'm concerned with and the connecting rod showd no signs of wear or scoring so it looks like a standard 8hp piston and a standard connecting rod kit with valves needs to be ordered, will try to get ordered in the next week or two to complete this thread. I will be using an aftermarket stens/rotary kit from ebay, I have used many of these kits never had an issue with quality and most builds have been in workers. Don't forget to remove your other crankshaft bearing and seal still in the block a brass drift and a hammer will work don't want to send these to the machine shop.
-
3 pointsyou got to love these decals from redo your horse
-
3 pointsYou guys realize all of the quizzing and body art work prior to procedure/surgery is the MDs/hospitals attempts to make sure they do the correct procedure on the right patient. Made me feel better when I had a retinal procedure a couple of years ago when every person who talked to me all the way to the surgeon himself 'quizzed' me.
-
3 pointsLast year I ran the gamut at Hospitals. (And I don't mean working there either! ) Before my shoulder surgery they asked me who I was and why I was there a dozen times. The last one was the anesthesia doc. Before he could utter a sound I rattled off all the info. Before my knee surgery, I critiqued the docs' artwork he made on my knee with a sharpie. He said He'ld doanother one on my other knee if I liked. Before my heart cath, They jammed an IV into my left forearm that sent me to the moon in pain. I almost clobbered the nurse!. The heart doc offered me a margarita before the procedure to relax! then I had to pee right in the middle of it. One nurse jammed a bottle under my blankie and said have at it. I must have pee'd 10 times in an hour after it was over!
-
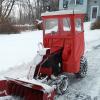
3 pointshttp://www.wheelhorseforum.com/topic/53342-led-headlight-upgrade/ Here is one good thread on the topic for head lights with excellent photos for reference. Sorry to get off track. Pretty much. I was thinking of knocking down the heavy stuff with a wire wheel in a dremel tool. Then move to a small buff wheel in a dremel and work my way through compounds until I get the best finish. That idea may change when I go to actually do it. Might just be easier to buy some reflective material and form it to fit inside then glue in place with epoxy. Then find the highest lumens LED bulb I can fit in there, think I saw them as high as 1400 Lum. You will never achieve the light put off by a quality LED spot/flood fixture but should be much better then factory and allot less amp draw. Also this does not alter the originality of the tractor which is the main reason I would go through all the trouble to do that. For those of you that don't like the blue hint but off by LED, that has changed and you can find LEDs putting off light in the 3500K-6500K spectrum of light. The higher the kelvin rating the more blue the light will look. Natural light I think is some where around 3500K. Here is a picture of a set of 18W CRE LED floods on my blower. There is NO outdoor lighting. This is all light from the cab lights and I think they are rated at 1260 lum. Makes blowing at night wonderful and also makes a good emergency light when you need it by a trailer for loading at night and so on. But I would never drill holes in my tractor hood to mount them.
-
3 pointsEbby and Emma and Lee Lee
-
3 pointsI recently bought 2 of the new ones (on the right in the photo) and neither one of them worked. They were from EBay and did not put out enough voltage. I ended up getting new ones from STENS. I did get my $37 each back though.
-
3 pointsJake: This is a great looking rebuild/restore thread Jake. FYI Some pics of an RJ35 a friend of mine has that I took this week . FYI May give you some ideas.
-
3 pointsNot a whole lot to see, but got all of these sanded and ready for another coat of primer. After sanding them again they should be ready for paint. Hope today to get the frame and wheels ready but we will see. Probably won't be a whole lot of progress on this next week as I am planning to finally work on the hoods for the 400 and 58.
-
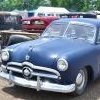
3 pointsTommy, it was very nice meeting you and your family as well. Guys, if you get a chance to talk with Tommy, you'll see he's just like the rest of the horse heads I've met - truly nice and knowledgable. He even gave my son a wheel horse collector's club hat, key chain, and lawn and garden magazine. We had a great trip and look forward to playing with our new machine. Yup, Emory has already laid claim to it, but I'm still the primary stakeholder in this one. He kept saying that he had a great day!! Below are a few pics of the machine, Tommy, my dad, and son and one pic of Dad, Emory, and some goofy looking guy with a goatee . I've also put in a pic of a set of original wheel horse tires and rims for the back - plenty of cracks and checks, but still very nice. Both of the other rear sets are Carlisle and in pretty nice shape. Oh yeah, I took the hoods off to keep wind from grabbing them on interstate. Gotta go clean out a spot in the basement for the new girl.
-
2 pointsAfter pumping up my one leaking original Titan turf one too many times on the 518xi, I splurged and purchased a pair of Kenda K502 4-ply tires in the 23x10.50-12 size. They are a bit cheaper than the Carlisle All Trail that is popular but I feel is a more aggressive tread. It was the first time I purchased tires from GCT Wholesale and was a bit disappointed when I took them out of the box.They were triangular in shape! But I let them warm and some gentle persuasion with my size 12 they were sort of round again for mounting. They are not too aggressive so they should accept chains, but with the blocking may be able to cut through light to medium snow. I still need to put the wheel weights and suitcase weights on as they look like they have too much pressure in them. Trying them out may be a problem as I looked at the long-term forecast to mid-March - and no snow is forecast. I may try the next size up on the 523Dxi if these work out. Also, check your hubs for tightness. I had the wheels off to install the lug nuts about four years ago with about 40 hours use since then. This last year it wasn't used because of having the diesel. They were just beginning to move on the axle. In fact originally when I checked I thought they were tight.
-
2 points
-
2 pointsYeah, I was so smart, I went to basic bald... and, they still made me get a hair cut.
-
2 pointsBased on very favorable performance of replacement LED marker lights for the rear lights on my 314, I decided to buy replacement bulbs for the headlights and tail lights on my 5xi and the tail lights on my 416H. The xi headlamp replacements are for an 1159 bulb and the tail lights for the xi and the 416 are 194. I bought the most powerful ones available within a reasonable cost. Headlamp replacement in the xi was a snap. Tail lights were a bit of a problem as LEDs only work in one polarity and of course those small 194 bulbs are not marked. Anyway with a couple of tries, I got them installed and working. The bad: I was very disappointed with the intensity, but at least they worked. Install on the 416 was not as positive. The receptacle design is cheesy and I never could get the 194 LED bulbs to consistently make electrical contact. More disappointment. I had to use the 5xi yesterday to move the wet slop that fell in MA. Midway through, one of the front headlights quit. As I was putting the machine away, I checked the tail lights. One was out and one was flickering. Today, I pulled out the tail light that was not working and I found that there was a thermal runaway condition due to poor connection between the bulb and the electrical socket. The ugly: the socket is burned a bit and the LED bulb was toast. I will have to get a replacement for that socket. I pulled out the other tail light, the flickering one, and there was evidence of a start of a similar thermal runaway. Replaced that tail light with an incandescent bulb and pulled the 1159 LED head lights and replaced them with incandescent as well. All three work. So my plan now is to get a set of red LED marker lights for the 416H (these are stand alone units and for $5 they offer superior intensity and they mount up to the original WH mounting holes-however, you have to drill a new hole for the power lead. It does not match up) As for anyone else who has gone down this road of replacing bulbs only, I suggest that you give a look to make sure your receptacles are not getting cooked as mine were.
-
2 pointsFirst day at Navy Boot Camp we all got our GI buzz-cut haircuts. The barbers had a ball with the kids with mop tops. They would cut a swath from the back to the front, comb it to both sides then cut across from one side to the other. Next they combed it to the corners and played eeny meeny miny mo to see which corner to cut first! Some of the kids were in tears over it. I already had a crew cut so I was no fun at all.
-
2 pointsI was sitting in a barber chair getting a "regular" haircut about the time that The Beatles craze started. A guy came in and sat in the next chair and told the barber he wanted a beatle cut. The barber refused and called them a bunch of communists and told the guy to go somewhere else.
-
2 pointsGlad it didn't ALL leak out, boy your wife would have been mad at you......
-
2 pointsCool ride, although I`d sooner be sitting by the fire. And welcome to Red Square..
-
2 pointsI have done this to all 3 of my 520's and also the 416 with the Onan engine. Should help. Cleat
-
2 pointsThat carb needs to be clean, clean, clean. That includes removing the whelch plug, and even the check valve nozzle. If it doesnt rattle its stuck. Do not use aftermarket needle and seats. They will give you head aches. Your better of sticking with genuine parts there. Aftermarket gaskets are alright. Keep original needles to if you can. Clean it good make sure there are no air leaks in entire system. Turn screws out 1 turn to get it running. Let me know how this works out.
-
2 points
-
2 pointsBeen using it for years. If it doesn't work, it's not coming apart! Originally introduced into the industrial/commercial markets...real torture test environments. In my opinion, there is no other product that compares to it. And yes, the price is worth it.
-
2 points
-
2 pointsTerry I may not be going but could I get one made WHCC member, Plans have changed I will make it to the show this year.
-
2 pointsLEDs are linear in projection so the view angle is not very wide. Therefore it takes a number of them placed in a cluster to be seen from different angles. There is also the factor of lumens. LED bulbs with a higher LUX will light a given area better than a lower LUX rated bulb. But they also produce more heat. There are some LED bulbs that have their own fan to keep them cool The latest technology of LED (SMT/SMD) are more expensive but show promise.
-
2 pointsI like the skids on the blower also. I have a cab for the first time after decades of using a Wheelhorse with a blower and we haven't had more than an inch or two of snow in one storm yet. (I said yet)! Had I known all I needed to do was buy a cab and mount it to stop major snowstorms here, I would have done it in the 80's. I'm not enthralled about snow like I used to be. Not after last winter!
-
2 pointsThanks guys! Yeah gas is $1.57 just north of Lexington, va. About the same here in southwest va. I'm sure it won't last long and will go back up - haven't seen prices like this since the college days. Going to enjoy the GT just as it is now, as I'm in the process of completely overhauling Emory's 61 Suburban that I had been promising to finish for the last two years - he's so excited that I'm finally back on it.
-
2 pointsJohn, nice tread pattern, looks to have some real "bite" for the snow. Will be interested to see how they work. Glenn
-
2 points
-
2 pointsMokee - 9 years and still a puppy at heart... _MG_4303.CR2
-
2 pointsThanks guys!! Here are some close ups of the actuator. I had to cut the corner off the bracket closest to the blade to clear the spring


This leaderboard is set to New York/GMT-04:00