
Leaderboard


Popular Content
Showing content with the highest reputation on 01/18/2016 in all areas
-
10 pointsYes, I have decided to start on another project. I'll learn someday but couldn't resist! This one is a 56 or late 55 rj35 with the stamped frame. I started working on it a couple weeks now, but just now taking the time to get it posted it I know I still have other projects to get finished and I will, but starting on this 1 because it should be very easy and straight forward, the 59 and 400 are on hold until I can get some help with the hoods at the body shop and it has been too busy. But I hope to have all 3 of these done by the end of the summer. I have decided to put the 701 on hold for now, its going to take a lot of work, I do intend to finish it someday but its on hold for now. here's what I started with Slowly coming apart Parts blasted and ready for primer And these went right to paint I decided to build a k90 for it and had been slowly gathering parts up over the last year. It recieved a complete rebuild. Bored .10 over , crank was turned .10 under. New gaskets and seals, crank bearings, reground the valves, and due to the valve guides being worn out I had the machine shop install bronze bushings in them to make them tight again. Also got new points, condenser, coil and a carburetor. Put it together on saturday and it runs great ready to fire up And ready for paint The steering was a little sloppy on this 1, so I drilled out the holes and installed bushings in the spindles. I also am going to make a new tie rod, this 1 was worn and bent. Got the piece made, now need to get a friend to make the pin so it can be welded in. Also picked up a pair of New steering pins from the member Smitty. front axle and speed selector arm still need a little work before primer And the first patch of parts that were primed Frame and wheels are still in need of blasting, but not the funnest time of year to be blasting outside. New rubber for it, went with carlisle super lugs for the rear and kenda loadstars on the front. They are trailer tires, but look identical to the original schenuits it had. And finally the last for now, the hubs, Hoping to have a friend braze up the holes in these. Someone had drilled a hole in them and had a bolt running through the axle, while it made the hubs a little ugly, there in great shape due to not being used how they were supposed to be.
-
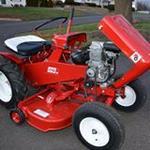
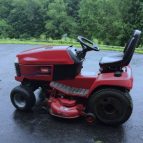
6 pointsHopefully taking this to the big show this year.. Equipped with another pair of the rare headlights. And with all chrome hubcaps. I can't seem to ever find the painted hubcaps. Are those fairly rare? What do you guys think of the tractor? Share a picture of your tractors if you'd want in the comments
-
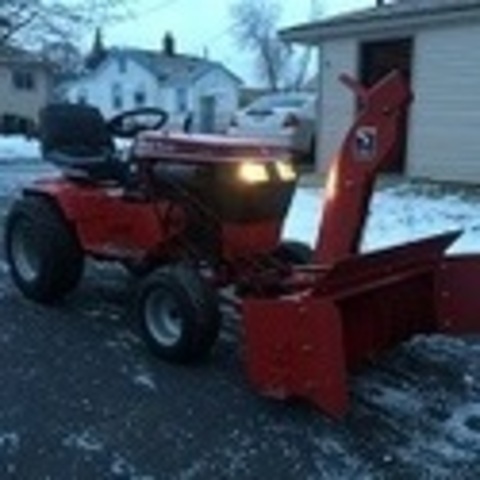
6 pointsHey All, Figured I'd sign up here because information I've found on this forum led me to buying a tractor today. I bought a house a year ago and it came with a pretty large paved driveway so i needed something that could handle moving a good volume of snow. My dad had this '89 414-8 that he was the original owner of, but wasn't really using anymore since purchasing a zero turn this year. 1200 well maintained hours on it and i believe the 48" deck as well (I didnt measure). I remembered as a kid looking through the sales brochure of all the attachments you could get for these so that got me thinking this would be the perfect tractor for the job. Took me a couple months but I managed to track down a 79360 tall chute on craigslist that appears to barely have been used. We put it all together today and brought it over to my house. Going to make a weight rack for the rear hitch next. I havent gotten to use it yet, but so far im very happy with it and can tell its going to last me a long time. I've never had much interest in lawn tractors but I'll probably be making a few more changes down the road with all the information that seems to be available for these. Joel
-
6 pointsThe next step is to take the 3 differentials apart. I picked the one in the middle to start, which is actually the one with a crack in the housing. This differential has the crack on one side. In the 1st picture, there is not even a bronze bushing in the housing on one side. The other side looks OK (as far as not being worn from side to side.), but this is where the crack is. You need to tap out the roll pin that holds the spider gear shafts (pinions). Those push out the back and then the gear can come out. It is the same on the other side. You are now looking at the axle gears with their roll pins. You need to tap out the roll pins...the axles go through the axle gears and are keyed (just like the axle hubs on the outer ends). The axles pull out, with the wood ruff key, and then you can slide the axle gear into the differential chamber and pull it out. After taping out the roll pins. Use a blade screw driver, or a 2' pry bar to go in between the axle gears to get them started to come out. You can align the wood ruff key notches to tap the axle on to the other axle to help push it out. Now this transmission is totally apart...except for popping out the bearings and seals. the axles themselves look OK. The one has a little groove where the seal might hit. You can drill a 1/4" hole in the end of the axle a turn the axle around. We will see later. The plan is to take it all apart and clean it up first. We have 2 bad pinions out of 4...a crack in the differential housing...a couple of small chips on 1 of the axle gear teeth, a worn area on 1 axle where the seal would hit, and the bronze bushings in the differential carriage (while worn evenly) are grooved pretty bad. Some how, I need to find a good quality set of roll punches...the ones I have are just junk. And this is just the 1st differential out of the 3rd transmission. We will get them all apart and cleaned up, and then take inventory and see what we can do and what we have.
-
5 pointsThis is my 1987 416-8. Everything is original. Original paint, tires, motor, sheet metal, and plow. I'm the 3rd owner.
-
5 pointsI'm enjoying watching this thread Steve. As far as punches go, my favorites right now are from Grace USA http://www.graceusatools.com/ They make a great set of roll pin punches with the little doo-dah on the end to center the punch. I have both the short and the regular set, start the thing moving with the short punch (less chance of bending the punch) and switch to the long ones when you need to. Apparently lifetime guaranteed, but I've never bent or broken one. Not expensive at all thru Amazon - http://www.amazon.com/Grace-USA-Gunsmithing--Gunsmith-Accessories/dp/B00H407C1O/ref=sr_1_9?s=sporting-goods&ie=UTF8&qid=1453163140&sr=1-9&keywords=roll+pin+punch+set At work we need to remove tapered pins that have usually been in place for over 100 years. My punches at work are mainly Snap-on, but I break or bend a 3/32 or 1/8 punch every week, so I need to keep 2 or 3 of those sizes in my box. I think about $20 apiece but no problems exchanging them when the Snap-on guy calls on Wednesday mornings. I keep meaning to get some Grace punches for work.
-
5 pointsYou guys got this all wrong. There's no such thing as a Wheel Horse addiction, sickness, depression, anxiety, or affliction. There is only DENIAL!! DENY, DENY, DENY, DENY, DENY, DENY, DENY, DENY,DENY,DENY,DENY,DENY,DENY,DENY,DENY,DENY,DENY,DENY,DENY,DENY,DENY,DENY,DENY,DENY,DENY,DENY,DENY,DENY,DENY,DENY,DENY,DENY,
-
4 pointsOK, I just happen to have 3 of these transmissions...2 are RJ #5003 and 1 is a Suburban #5010. The original goal was to build one good RJ transmission from these 3. This is sometimes a neat trick in itself. LANE RANGER (Lane Ralph) dropped these off at my house last weekend with that original goal in mind. (1st) this RJ tranny was on the tractor yet and froze up (the one on top in the wagon). We dropped the tranny in about 20 minutes...it was cold outside. (2nd) Suburban transmission (in front of wagon) was picked up as a spare. (3rd) transmission was already disassembled and in a box. My thought with this thread is to show tons of pictures and some videos of taking these apart, what tools really come in handy, cleaning, fixing and going through bearings, gears and seals, some tricks (methods) that have worked for me, getting parts and what to look for, and maybe being able to save...not one...but 3 transmissions. This thread is going to take some time to do...it's cold out...and I already know I am going to need some parts to make 3 transmissions. Feel free to add to this thread, or ask any questions. Here is the RJ Lane picked up...I think you can guess what the transmission looks like inside. I put the 1st transmission on the bench and proceeded to try to see what is going on inside by turning pulleys and axles. I could spin the hubs in opposite directions, but I could feel that something was not right. I think some broken teeth on the axle gears or pinions. It would not shift at all...the shifter is there, but the forks will not move at all. The transmission is in neutral, as you could turn the input pulley CCW and axles and brake drum did not turn. I was lucky, the hubs came off with a little help from my puller...the keys, hubs and axles are in great shape. Same with the brake band, brake drum and input pulley. Notice the tension pulley in the above picture. I did not have any luck getting that brake, tension pulley mechanism apart. It has a roll pin holding that together and it was not going to come out. I cut the rod in the middle of the transmission front with a 4" grinder. I think I can get a new rod and drill the one end and weld the other. Also, notice the dog point set screw is broken off flush with the casting. Now I could take this apart. OMG...a 1/2" of goop, some water, a lot of rust. You can see why the shift rails will not move. After cleaning, electrolysis is in order here. This transmission needs a good scraping and cleaning to see what else is good here. I think the case will clean up great in the E-Tank. Transmission #2...this was picked up as a spare. This is the suburban transmission. Notice the regular tension pulley. I was shocked, but the hubs, input pulley, brake band and brake drum came off easily with some assistance from my puller. I was also able to get that roll pin out and tap the tension pulley shaft apart so I could open this up. As you can see, this one had no oil in it. Somebody had rebuilt this and put it on the shelf. All the gears and bearings look real good. Differential turns nice, but I have not opened it yet. The bad thing...the 2 bottom bolt nubbies are broke off. They are stuck on the side plate...looking to try to fix this. This transmission has the needle bearing for the brake shaft. opening. Transmission #3...already apart and in a box. This one has had a tough life. The casting has been welded 3 times all the way across. ..and I think I see another crack. something else what a camera and flash will pick up. We have a issue with a couple of the bolt nubbies. One is about gone, and the one south of that looks like it has a crack. The welding looks top notch and the case appears straight. The side plates look good. The differential housing appears to have a crack. A couple of the pinions are half gone. Notice this is the newest differential for the 3 piece with the separate bull gear bolted on. The rest of the gears look good. OK...that is all for now. Looking to take the differentials apart next...purchase a gunk tank and clean up gears and plates.
-
4 pointsSo, I walk into this bar and I order a Guinness Stout, and the bar tender asks me if I want a head on it?? So then the bar tender asks me why I carry that head around?? "It keeps the flies off me", I told him.
-
4 pointsLittle assembly done, until I ran out of painted parts and stainless hardware. Need to blast the tank and lift lever. Have NOS kohler 10 waiting to go on this one. Hopefully soon. Just noticed in the pics the two holes in the gas tank support that will need to get fixed.
-
3 pointsUpon seeing the turnout for his new movie, Mr. Hitchcock was beside himself!!
-
3 points
-
3 pointsSaddle up men, we'll head them off at the pass!
-
3 pointsThings that work for anodes that you may have laying around...I have and have used these...Garden tractor and lawn mower blades, the scraper blade off of a snow blade, any flat scrap iron or steel. Re-bar works good, but flat stock works better (more surface area). Another nice trick...I end up doing a lot of gears in the transmissions...clean off a spot on the piece, clamp a "C" clamp on it, and hang the "C" clamps on a piece of re-bar across the tank...clamp the black clip from your charger to the end. You can hang many parts and the continuity is there...plus you can hang the parts so the "C" clips are a little in the solution. It will not harm the clips, but it will clean them if they start out a little rusty.
-
3 pointsI just cant help myself . 18 right now
-
3 pointsI tell everyone my wife has a problem and all do is try and counsel her when she buys another one. I think she has around 20 and I just have a 401. I do enjoy keeping them going for her and picking them up. She enjoys keeping me busy and out of trouble this way. I will have take count again and see what she has. It has been better this last year she has been after attachments like a dual gang disk, front reel mower for her 704, plow for the 702, lawn vac and a few other items.
-
2 pointsHi Guys, Well after 3 months of hard work here she is. I know its not all original but I made modifications to make it easy to service in the future. The Honda engine and split hood came together nicely. Every bearing and seal and bushing is new. The paint was sprayed on. Hope she cuts grass good after all this work. I was hoping to hear any opinions......
-
2 pointsSo I goes to the checkout at Ace and the gal says "my that's an expensive little bag of bolts you have there".....
-
2 pointsHere's hoping... any snow is a no show.
-
2 points=================================================== They were made by Western Tool & Stamping Co. and sold under the Craftsman and the Homko names. This is the 1963 Homko version, that I got for free on Craigs list a few years ago. You would not believe how well it moves snow. I used it in 16" of snow and could not clog it. It just laughs at the plow bank, at the end of the driveway. It also was throwing snow 10' in the air. Mine has an H-35 on it. I made new front wheels for it, because the ones in the photo were worn down so much.----- John in York
-
2 pointsHas anyone seen my "I'M WITH STUPID>>>>" t-shirt.....I wanna wear it today!!
-
2 pointsI don't know what to say . I am going to have stop following all restorations ,I keep having to clean the drool off the keyboard.
-
2 points
-
2 pointsThe name of my farm is Off Site, bring em on over
-
2 pointsAND THEN KICKED!
-
2 points
-
2 pointsDenial is for, you know... "that guy" who only ownes one .
-
2 pointsA bird in the hand is better than two in the bush.
-
2 pointsFound it. It however just confused me even more. When testing for polarity on magnets I found that these magnets have the same polarity on both ends and the reverse in the center. After a little more research though my literature I found the clarification to my confusion. I had printed this years back from researching some stuff about Tecumseh ignitions. The way it is described on the Kohler site is really not correct as it pertains to the individual magnets.Here is the link to it http://enginesandmagnets.com/id2.html. Here is the end result on my flywheel, blue dots is South, green dots is North.
-
2 pointsLove the stainless hardware, always a nice touch!
-
2 pointsWho put peanut butter in your tranny?.
-
2 pointsk181S air filter cover. Two coats high gloss black. Rest of engine is black and for some odd reason I thought the cover would look good in almond......well It didn't tickle my fancy. Ditched the almond paint for the black powder. Came out sweet.
-
2 pointsThe STEELERS Steve...really?? You are not a RED, WHITE and BLUE New England Fan??? I feel like my footballs have just been deflated.
-
2 pointsLet us know how that works out for you Russ..... I personally prefer the beet juice that way if I have a leak it will help melt the driveway .....big leak I can add it to my V-8...with some celery salt...tobasco...vodka... and have a cocktail!!
-
2 pointsWay cool. Good to see that you get the recognition you deserve. (I like the hood ornament) Like Russ said, don't forget about the Rat-rod. That thing was way cool, and stupid fast. (had some cool rear meats on it as well.) Oh...and this little short as well. http:// Very creative and talented indeed. Good for you John.
-
2 pointsI never owned a wheel horse before AUG 2015.but i needed to replace my 15 year old craftsman rider that I've used to cut grass and plow in winter. it has held up nicely because l took good care of it.i looked for other options on a good tractor. i ended up here at red square and said to myself with all this info i would buy a wheel horse 520h. i got a nice one and next thing i was hooked.but the c160 is my favorite i have a nice b80 i want to redo when weather brakes. i really enjoy working on them.
-
2 pointsCongrats John!
-
2 pointsThanks guys! It truly is an awesome piece of machinery and VERY creative!
-
1 pointYes, the oil pressure sending units can go bad.
-
1 pointThat is a Cleat/ previous owner mod. The previous owner of the blade cut off and lost all the factory blade release and angle handles. This is his handle, it did not work very well. My handle works fine. Some day I will return it to factory, all I need is some measurements of the attachment points and the handle etc. It works as is but getting on and off the machine over and over does get old real quick. Cleat
-
1 pointGreat vids of racing history, thanks for sharing.---Wayne
-
1 pointThanks for the great detail! Interesting to watch...
-
1 pointOne more for Ryan!
-
1 pointI like the names you've given then - truly time tested, I kept looking but didn't see the Lone Arranger listed.
-
1 pointAhhh, I like that! Sort of wish it worked that way! I'm afraid it would only make it worse with added regret and depression...
-
1 pointThe liquid ballast will help " push" your tractor when plow snow. As the tire is turning it builds up momentum with the fluid spinning around. as you hit a snow bank that fluid give the tractor an extra shot going forward.
-
1 pointMy wife is no genius, but she would see right through that!
-
1 pointGood lookin' herd there.
-
1 pointfor more than just points and condensers
-
1 pointI got do sum painting today the sun is shining but still kinda cold i tried out sum rubberized under coating that was on sale 3.99 vs 12.99 but it doesn't seem to be drying very well that's what i get for being cheap hopefully it will be fully cured in a couple days they also didn't have the color i use so i went with IH Red witch i know alot of members use. At least it isn't green anymore


This leaderboard is set to New York/GMT-04:00