
Leaderboard


Popular Content
Showing content with the highest reputation on 01/17/2016 in all areas
-
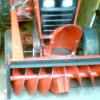
9 pointsOK, I just happen to have 3 of these transmissions...2 are RJ #5003 and 1 is a Suburban #5010. The original goal was to build one good RJ transmission from these 3. This is sometimes a neat trick in itself. LANE RANGER (Lane Ralph) dropped these off at my house last weekend with that original goal in mind. (1st) this RJ tranny was on the tractor yet and froze up (the one on top in the wagon). We dropped the tranny in about 20 minutes...it was cold outside. (2nd) Suburban transmission (in front of wagon) was picked up as a spare. (3rd) transmission was already disassembled and in a box. My thought with this thread is to show tons of pictures and some videos of taking these apart, what tools really come in handy, cleaning, fixing and going through bearings, gears and seals, some tricks (methods) that have worked for me, getting parts and what to look for, and maybe being able to save...not one...but 3 transmissions. This thread is going to take some time to do...it's cold out...and I already know I am going to need some parts to make 3 transmissions. Feel free to add to this thread, or ask any questions. Here is the RJ Lane picked up...I think you can guess what the transmission looks like inside. I put the 1st transmission on the bench and proceeded to try to see what is going on inside by turning pulleys and axles. I could spin the hubs in opposite directions, but I could feel that something was not right. I think some broken teeth on the axle gears or pinions. It would not shift at all...the shifter is there, but the forks will not move at all. The transmission is in neutral, as you could turn the input pulley CCW and axles and brake drum did not turn. I was lucky, the hubs came off with a little help from my puller...the keys, hubs and axles are in great shape. Same with the brake band, brake drum and input pulley. Notice the tension pulley in the above picture. I did not have any luck getting that brake, tension pulley mechanism apart. It has a roll pin holding that together and it was not going to come out. I cut the rod in the middle of the transmission front with a 4" grinder. I think I can get a new rod and drill the one end and weld the other. Also, notice the dog point set screw is broken off flush with the casting. Now I could take this apart. OMG...a 1/2" of goop, some water, a lot of rust. You can see why the shift rails will not move. After cleaning, electrolysis is in order here. This transmission needs a good scraping and cleaning to see what else is good here. I think the case will clean up great in the E-Tank. Transmission #2...this was picked up as a spare. This is the suburban transmission. Notice the regular tension pulley. I was shocked, but the hubs, input pulley, brake band and brake drum came off easily with some assistance from my puller. I was also able to get that roll pin out and tap the tension pulley shaft apart so I could open this up. As you can see, this one had no oil in it. Somebody had rebuilt this and put it on the shelf. All the gears and bearings look real good. Differential turns nice, but I have not opened it yet. The bad thing...the 2 bottom bolt nubbies are broke off. They are stuck on the side plate...looking to try to fix this. This transmission has the needle bearing for the brake shaft. opening. Transmission #3...already apart and in a box. This one has had a tough life. The casting has been welded 3 times all the way across. ..and I think I see another crack. something else what a camera and flash will pick up. We have a issue with a couple of the bolt nubbies. One is about gone, and the one south of that looks like it has a crack. The welding looks top notch and the case appears straight. The side plates look good. The differential housing appears to have a crack. A couple of the pinions are half gone. Notice this is the newest differential for the 3 piece with the separate bull gear bolted on. The rest of the gears look good. OK...that is all for now. Looking to take the differentials apart next...purchase a gunk tank and clean up gears and plates.
-
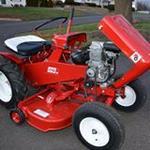
7 pointsHi Guys, Well after 3 months of hard work here she is. I know its not all original but I made modifications to make it easy to service in the future. The Honda engine and split hood came together nicely. Every bearing and seal and bushing is new. The paint was sprayed on. Hope she cuts grass good after all this work. I was hoping to hear any opinions......
-
6 pointsJust get a thread protector cap from the hardware store. Slip it over the end. That will protect the inside of the boot and keep dirt and debris out of the end of the set screw.
-
6 pointsLittle assembly done, until I ran out of painted parts and stainless hardware. Need to blast the tank and lift lever. Have NOS kohler 10 waiting to go on this one. Hopefully soon. Just noticed in the pics the two holes in the gas tank support that will need to get fixed.
-
5 pointsI had an extra lift spring floating around so I gave it something to do.
-
5 pointsAll kidding and other distractions aside and sticking to subject at hand , PLEASE do research it and become familiar with it before proceeding. Many do not attempt ideas here. Stick to plain water with Arm&Hammer detergent. Stay away from metal containers. Steve has provided a great link to this process. Read it over and over. Take this advice from someone who obviously does engage in foolish activities.
-
4 pointsI found an old Snow Thrower (from 1970) to mount on my C-120, but it had the flag without the piece for attaching a Lift Assist Spring. I know those newer flags are expensive, so I decided to modify the old flag. Made a trip to my local Ace Hardware store, and bought a couple of eye-bolts. Drilled a hole in the flag, and attached a forged steel (1200 lb. high strength) eye-bolt. Ran the other standard eye-bolt to the spring (bought from Glen Pettit, Forum vendor), assembled as pictured. It worked great, maybe better than the factory design because the angle is better. Definitely less expensive.
-
4 pointsonly running ethanol free in all my small engines. a bit more money but after you add up the cost of those additives it evens out. a great web site to find a ethanol free gas station near you. http://pure-gas.org/
-
4 pointsTo answer your question Russell an e- tank is short for electrolysis tank wherein a container is filled with water and washing soda. A small voltage is a applied through electrodes (usually a battery charger for us home brews). The process will remove rust from horse parts. Will find alot more info on the net.....and here. I'm way to slow AMC has got it. The only dumb question is one that is not asked. Um ahhh Dennis.....I think that's Formariz' still....not an e tank...
-
3 pointsWell my horse is back on her feet , some more paint work and I can start putting the body on
-
3 pointsMacKissic made that same shredder for basically all the Garden Tractors, just the mounts were different, I would suspect your mount was for another brand, you may have to cut & re-position and weld that mount to fit. I had to shim out the frame a little on both sides on mine to make it fit, hood still opens and the PTO pulleys line up perfect (paid $300, it was used by a grocery store to shred Aluminum cans for years, I saw no damage from that use). MacKissic is still in business, still has all the parts, manuals and decals available and their prices are very fair, nice Web site, but that same shredder is over $2,000 new now. I've purchased a couple of different hole-size screens from them and use this shredder every Fall, really like it; collect from in the city and incorperate over 100 bags of shredded leaves each year into the garden.
-
3 pointsI think anti-freeze is a very bad idea...could make the solution toxic. I don't think you want to use metal containers either. Be safe!! If you do not mess with the solution and you do not use non-ferris metals, you can dump the solution around your shrubs and not hurt them. Buy any size plastic garbage can or a plastic swimming pool if you need something larger then a 5 gallon bucket. This link is one of the best for explaining the process and what to watch out for...MUST READING if you have not done this and are looking to try it...OR IF YOU THINK YOU KNOW WHAT YOU ARE DOING AND WANT TO TRY SOMETHING. http://www.oldengine.org/members/orrin/rustdemo.htm Cas...out standing pictures Mate.
-
3 pointsSomeone at the Show was selling two sets of restored lights like yours. They were asking $120 each, but they still had them at the end of the day, Friday. The Adams County police are looking for you because you stole them for $5. Good find. Jim
-
3 pointsMy local gas station has 92 octane, no ethanol for the HD guys and muscle cars. I use that, sure it cost a little more but I only buy 2.5 gallons at time, never any problems like that. Clean her up and switch to non ethanol fuel and you should be good.
-
3 pointsExplosive, well ventilated area,Madeira, cooking..... I just don't understand the kind of foolish stuff you get into.
-
3 pointsWow! Maybe the Ponds should have used your hood design. I'm not a rigid purist, especially when the change is a betterment and I think you found two! I really like it a lot! Would have like to have seen the hood splitting process.
-
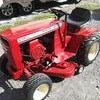
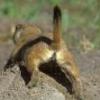
2 pointsHello all, New member here. Thought I would say hello. I have a 77 B80 which is my work tractor, a 66 JD 110 that I just finished restoring and 66 Sears Suburban that needs restoration. Would like to find an RJ. Couple pics of my toys.
-
2 pointsPete Caroll ......c'mon men.
-
2 pointsk181S air filter cover. Two coats high gloss black. Rest of engine is black and for some odd reason I thought the cover would look good in almond......well It didn't tickle my fancy. Ditched the almond paint for the black powder. Came out sweet.
-
2 pointsAll I care about is the Steelers !!!
-
2 pointsYou saw Red Dog sleeping .. That's funny !!!
-
2 pointsA friend dropped off a 48" Craftsman dozer blade, free. I don't need the blade (have four or more). I was interested in the rubber homemade edge. PO cut a tire to fab a squeegee edge.
-
2 pointsI've been known to call all of mine a few names when they won't start, especially if its electrical. Chris in Florida
-
2 pointsHow much are they worth? At least $95.00...
-
2 pointsI think they are reorganized under a different company, air filter should interchange from the old one, mine did. I put one of these on a my Massey MF8 replacing the Tecumseh HH80. The new air filter was oval and it wouldn't fit through the round hole in the grill, but the old one bolted right onto the new engine. Mine came with both electric and pull start, if the battery was dead, I could reach over and pull it, usually started on first or second pull.
-
2 pointsAlthough most of my Horses seem to have distinct personalities (based on how they look and how well they run), I've never considered naming them. I think my wife would have me committed if I went that far. Also, it might be more difficult to sell them if I name them. Kind of like selling your old dog.
-
2 pointsWhen I was a kid I collected it, played with it, rolled it back and forth in my palm, coated pennies with it. About the same thing with asbestos but into my 30s! Used asbestos gloves, heat shield paste for welding, siding for welding protection! Who knows what I'm going to die from! Probably from falling off a Wheel Horse! Not a bad way to go! One of the things I like best!
-
2 pointsFrom the model list... RJ-58 1958 Lawn & Garden Tractor Ride Away Jr. 4-Speed Kohler K-90 3.5 Wheel Horse 5003RJ-58 1958 Lawn & Garden Tractor Ride Away Jr. 4-Speed Clinton B-1290 3.6 Wheel Horse 5003 The most noticible change for the '58 models...the new angle iron frames, and the new three piece/speed transmission. Gone were the sheet metal frames, and the variable drive trans from the earlier '55-'57 RJ-35's. Ride-Away Junior's hoods started getting stamped with the new Wheel-Horse brand name starting in '57.
-
2 pointsI like Berrymans products. Work great, https://www.berrymanproducts.com/ My grandson and I drive to our local airport. Gas is 100 octane, low lead, non-ethanol.
-
2 pointsWhen I saw your post in another thread and you mentioned 'splitting the hood' I figured you meant you cut a slot so it could be removed without taking the steering wheel off. That was very common in the 60's. Then I went to this thread. WOW! That looks great! Not only the hood but the entire restoration.
-
2 pointsJust saw this...Have to say thats one very well done custom hood modification . I Like it, Very Well Done!!
-
2 pointsVery good discussion on the bearings and axle strength. I been running over 500 pound on my FEL for a couple years now. Worked the dog snot out her many times. About half the weight is on the wheels and the other half is in suitcase weight on the rear. My yard is sloped and it makes for an interesting trip when I have a full bucket. The over hung suit case weights made the biggest difference on the hills. The wheel weights seem to add more tractive effort. No science, just seems that way. I know I started out with less weight on the wheels and the tractor had more zip. The heavier wheel weights seem to kill horse power. The only axle issue was when I had a leaking seal. When I went to replace the seal, found the hub was moving on the axle and wore the axle shaft enough that a new hub was to loose. Odd, the axle key was okay. I had a 1" hub bored out to 1 1/8" .002 under size at a local shop. It was tight enough that I had to heat it a little to in order to tap it on shaft. 1 1/8" axle is a pretty stout axle size, the axles are slow speed and I figure they can good bit of abuse. my thoughts and a buck 75 get a get you a coffee at Sheetz!
-
2 pointsCool mods, nice job.
-
2 pointsThat is a very nice looking unit.
-
2 pointsI have used a Mobile Home water pipe heat tape with some success on a 5 gallon barrel- Thanks- Al
-
2 pointsLittle painting done, may start some assembly soon.
-
2 pointsThe biggest difference between resurrecting a rough old cob of a tractor and restoring a nice one is the degree of pride you will have as a result of your perseverance;
-
1 pointI use a Rubbermaid 120 gallon stock watering tank. Works great, can do a 48 inch deck in two shots.
-
1 pointIt's cold out? Well I'm sure your kitchen has heat! This brings back memories. A frind of mine and myself tore a mini- bike Briggs apart in his kitchen while his mother was out shopping! I think we were about 10. This is back when gas smelled like gas and it didn't burn your skin so you could clean parts with it!
-
1 pointits nice that you take the time to teach us guys about these trannys.thanks its very helpful to see and hear how to rebuild these,my first 8 speed 25 years ago I didn't have a manual or computer,it was daunting but I was poor and to fix her and couldn't afford to take it to the dealer,so thanks you
-
1 pointThe STEELERS Steve...really?? You are not a RED, WHITE and BLUE New England Fan??? I feel like my footballs have just been deflated.
-
1 pointI have ordered my Arm and Hammer washing soda and dug up a 55 gallon plastic barrel. I have some rebar I use for staking tomatoes and an old battery charger . I think this is a good way to start and big enough for what I want. I'm not sure a fender panel will fit in it , but lots of things will. I think any additives to this solution is an unworthy risk to hazards unknown for breathing, and to the disposal of the solution. It could be a few weeks before I try it and the weather may be to cold, but hey spring is on the way . It would be nice to be able to wash the parts off out side with a hose and scrub brush , so as anxious as I am , warm weather sounds very enticing. I'm assuming I should also be ready with some primer to stop future rusting.
-
1 point
-
1 pointLets all keep those votes coming in!
-
1 pointBack in the 80's I always added some lead additive. Still got a few bottles but I haven't used it in decades. No issues after LOTs of hours!
-
1 pointFor reference...
-
1 pointIs that why your Buick is still waiting to be finished---Can't find a 455 Buford or a Muncie? Tony
-
1 pointUse an allen head wrench in the end of the threaded stud to adjust the play in the shifter... just tighten it down enough to allow ease of shifting into all gears, then tighten down the lock nut. Pull and fit the boot down over the dog point set screw assembly, and you're good to go.
-
1 pointI have had to replace the fuse block on three of my 520's with individual fuse holders. The heat genrated to melt a fuse will also damage the connectors and wires at the base of the fuse block. I've tried to get by with quick fixes, but none worked until I just cut out the fuse holder and started over. I don't think cleaning the connections is going to be a long term solution. I used solder and shrink wrap on one, but I had issues with an intermittent short, and had to re-do it. Two of mine were done with crimp-on butt joiners, and they have worked fine for two+ years The one that I had to revise is currently in the garage in Wausau. I redid the solder junctions with crimps just in time for the snow this week. Works fine, and plowed all over the neighborhood The fuse order, seat to headlights, is 30 (red/white)/25 (red/red)/15 (pink/pink) There may be a metal link in the bottom of the fuse block between the 30 and 25 amp fuse holder, eliminating the red wire into the 30amp slot
-
1 pointHad a chance to do a little painting on Monday


.JPG.9f2ecb26065c66527b0730084ab7fc7a.thumb.jpg.7dc8a04d9a53d44ee2b23f26ee94496f.jpg)


This leaderboard is set to New York/GMT-04:00