
Leaderboard


.JPG.9f2ecb26065c66527b0730084ab7fc7a.thumb.jpg.7dc8a04d9a53d44ee2b23f26ee94496f.jpg)

Popular Content
Showing content with the highest reputation on 12/30/2015 in all areas
-
9 pointsMost of my deck hitches are badly worn so I decided to make a couple. These are for my 42" and 48" decks. 60" is completely different. They are just tacked together now to check for fitment, I will take them back to work for final welding and painting. I have drawn up the plans, I will scan them and post as well. Cleat
-
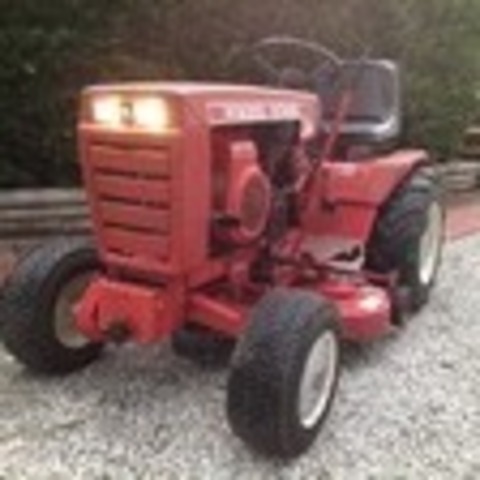
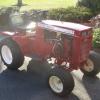
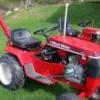
6 pointsCHAPTER 1 So I learn a neighbor is selling a Cub 128 puller (with a 16HP motor) . I delayed a few days and thought I better at least look at it Bad move, no way I wasn't buying it . . . I know I just committed a sin because she ain't red, but a deal is a deal She ain't pretty, but the guy dumped a lot of money in the engine and pulling accessories. It is set to go with wheelie bars/weights/hitch/tach/carb spacer/shift lock/exhaust, heck he even threw in four scales so I can pre-weigh it in the garage The tractor is rock solid, straight and pretty rust free. Now before you say "carb spacers are illegal" and assorted other advice, I only plan on using at "fun pulls" in the area. I don't really have the time for competitive pulling (yet). Chapter 2 So, I have to get it in the garage without my wife freaking Fortunately with the holiday, I was off Monday and my wife planned a shopping trip with my niece who happened to be staying with us few days. "That's awesome honey, you guys have a great time today and shop till you drop." I then hooked up the trailer grabbed the Cub, off-loaded it washed/dried it and had it under a cover in garage in t-minus three hours. That included washing the mud tracks off the driveway after having to drive in the dirt to pick up said Cub avoiding "Hey honey, what in the world were you doing with the truck today that you were in the mud . . . .?" Chapter 3 1. Park truck beside covered tractor so wife doesn't notice there is something under there other than a pet unicorn. 2. Go inside and promptly order some jewelry online 3. Wrap jewelry upon arrival and wait for the occasion when wife needs something from that side of the garage and discovers new addition OR I find Captain Morgan can be effective at helping her better understanding certain things 4. Hope it all works out and none of your Red Square buddies let the story slip at the Spring Show so you are not on to wife #3 Seriously, I think she be over it by then, plus I made SURE I finally fixed the non-working rear hatch on her SUV last night that I have been putting off for weeks And it was a happy holiday in Dillsburg. THE END Lastly, some pictures. With a butt like this, how could not . . .
-
6 pointsThe trail camera caught my Horse playing in the snow!
-
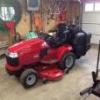
6 pointsI decided to install plow off a 520 (longer set up) on my C160, add the rear weight box, turf tires and old school wheel weights and chains. We had some heavy and wet snow the other day and it pushed really well.
-
4 pointsFound this pic in Mom's old album and thought I'd share it with y'all. Not sure where to post this in the proper forum. Anyhow, I don't know a darn thing about the Pond Walkaways but this kinda looks like one maybe. Those are 2 of my uncles circa 1953.
-
4 pointsFirst....In your 2nd pic, it looks like the hyd motor shaft is free-floating....that's not right. You should NOT be able to remove it just by taking off the little cir-clip. There is a retaining clip down inside the cyl block assy and that is what holds the spring tension on the individual pistons. If that clip is broken,there'd be little to no power. Secondly.... the motor housing MUST be oriented correctly..(.you should have marked it before taking it apart). It can be mounted 180 deg out of phase. Note the orientation in my pics. It occurs to m, too, that the cylinder block SPRING may have broken...maybe. There is a SPIRAL RING retaining clip that holds the spring inside the cylinder block, with a thin washer between the clip and spring. My pics aren't too good, but you can see some of it.
-
4 pointsMy wife always says, "jewelry prevents head-aches"!
-
4 pointsI think you will find the two collet pieces inside the domed washer piece. The inside lip is probably worn or sheared off.
-
3 pointsCould be an 855 or there about, has been re powered from the looks of the fuel tank. First thing you would need is a belt guard so you won't be grinding gears all the time.
-
3 pointsVery nice. I would think you have a "marketable" item there!
-
3 pointsGood luck with you adventure , since I hope to go to the Big Show , I hope to meet what's left of you. Hope the gift for the wife is at least equal or higher value than the puller. If not your A_ _ is grass and I know who will be guiding the mower. Not sure I would want a ride on that , broke my back once.
-
3 pointsMany members have had good luck installing a bike chain in the middle of the tires. Deflate them and install chain and then inflate. Kinda like turning on a rail.
-
3 pointsIf someone has not told you yet...the answer to your roll pin question is "yes"...the spring goes under the roll pin and then the pin goes back in place.
-
3 pointsThe shop is quite now. No more sounds of a BFH, the sounds of a saws-all or noise of a air chisel. Gone are the few choice well used swear words. The battlefield is silent, the battle over the war won. I stand here triumphant with my surrendered enemy, the frozen hitch pin in hand. This is just not a lone victory but a victory for all Red Square members that have faced this battle and for all who will face it again, and for all who will face it for the first time. That there is hope in determination to face down this dreaded enemy that stands in are way of the perfect transmission rebuild. Talk about laying on the BS. Lol, Anyway it's out! Time to celebrate.
-
2 pointsBeen trying to get a froze hitch pin out (like we have never heard that one before have we gang lol.) finally got the pin to rotate in the transmission. The crazy thing is froze in the slot hitch. So the first battle of the war was won. Now just cut the pin between the case and the hitch and the war should swing in my favor. There should be some kind of a medal for all of the guys and gals that have fought this war and won and survived. Drilling, air chiseling, sawing, etc. takes a toll on the ol arms. Not to mention the desire to just say _ _ _ _ it , and just walk away. But we all keep at it till the war is won. This particular one has been a tuffy so far and looks like it will fight to the bitter end.
-
2 pointsWe have had weeks of rain here in the UK. It seemed like a good idea to go for a play in the mud. until we got stuck, here's a few pics and a video http://youtu.be/tHyKTt4J6w8
-
2 pointsSo, I read up on where to put a hydro filter. Best place being in the return line, so that's what I'm doing. Just like a 5xi has a strainer screen on the left side that is user serviceable, I decided to do something simulate with my loader hydraulics. The strainer looks like a clean out, but is actually described in industry as a "y strainer". Here is what I bought. That strainer will protect the pump and the valve from larger debris. The 80 mesh is .007" openings. Its probably overkill, but wanted to do one anyway. It was a cheap enough add-on so I figured what the heck. You could mount a hydro filter in that location, but I've read that you are best served having it in the return line.
-
2 pointsNice score Zeek, but...won't all that pulling stuff swap over nicely... to something red, and more appealing to the eye?
-
2 pointsYep! I keep my Kroil for special occasions. It is pricey! But if it works where nothing else does then it's worth it. As a side note, I do think that using other stuff and then Kroil with no better results is not fair to Kroil. If another product only partially creeps in but blocks Kroil from going any further or making full contact to the problem spots then it's not Kroil's fault. So using everything else first and then saying Kroil didn't work either might not be a proper test... Probably better to heat again as hot as you dare or what is appropriate to burn off and out any other product and THEN try Kroil would be a better approach.
-
2 pointsThere better not be a Tecky under the hood or I'm tellin!!!!!
-
2 pointsWell, I finally got to try out the 2 stage blower on a 520H. Snow is not real deep but it is very heavy ice crystal snow with a fairly thick covering of solid ice on top. Works real well and throws snow a long ways. Only problem is steering but a slight lift of the blower gets it going the right direction. No wheel weights but the rear tires are loaded. Auger sounds like it is hitting something, I will check that out once it drys out in the heated shop. Cleat
-
2 pointsNice fab work... looks factory original.
-
2 pointswell I grew confidence spoke with indy wh a.k.a (mitchell) last night on the phone he walked me right through it seems to be a cake walk well see once I get parts if it leaks
-
2 pointsDennis and Hank have the right approach. Use patience. If PD blaster does not work, buy some Kroil-it is 4X the price but works better. I have had to pull the rock shaft out of two late 70's model tractors. You cannot swing a hammer in there, however if you pull on the lift lever (make sure you have removed item 5 and 41 in Daveoman's pix), the rock shaft will hit the side of the tower and should slide off.
-
2 pointsI think it was in the late 1950s. I helped an old guy, ( who was a plumber ), put in a cast iron sewer line in a house that was getting indoor plumbing. He used a torch like that to melt the lead to seal the joints, where the sections of cast iron pipe went together. The fuel he used in his torch was white gas ( that's what he called it ) . That was a long time ago. I believe that is the same as the old Coleman lanterns and cook stoves use.
-
2 points...and boy...did it turn out great Magne.
-
2 pointsI agree with Hank, sometimes it takes time. Sometimes it takes more times. Heating and cooling seems to help. PB Blaster and the like needs time to soak deep into the trouble locations. Then again sometimes a bigger torch and hammer is the right combo!
-
2 pointscontinuing on to the second scenario, but first the obligatory cautions If you have any questions on your ability to perform this mod, do not have the proper tools, fear the mod may introduce a "fire hazard" in your home, or fear loss of the warranty on this ($5) product, PLEASE DO NOT ATTEMPT THIS MODIFICATION. The second modification concerns changing a resistor within the float charger circuitry. This mod can be performed if the voltage output of the float charger exceeds 14 volts or is under 13.2 volts. Why can there be such a variance in the output voltage? HF has been producing this particular float charger for over 10+ years and has apparently gone thru several styles of circuit boards. Some of the original boards I had contained circuitry that required hand selection of a resistor value to set the output at 13.2 volts. Understand we are talking about a product that routinely sells for under $5. Any time assemblers had to hand select a resistor value to adjust the output to 13.2 V DC - well, that just becomes too costly. If the value needed to output exactly 13.2 VDC fell in between standard, readily available resistor values, several resistors had to be placed in parallel to come up with a "custom" value in order to achieve 13.2 VDC. Some of the early HF boards had several slots to insert these parallel resistors to achieve 13.2 VDC. This concern for additional manual labor to custom adjust the float chargers every time a new batch of transistors were received became a cost concern. A new circuit board was apparently designed to allow the user of a variable resistor - a potentiometer - to be inserted onto the circuit board for final voltage adjustment. A quick screwdriver tweek of the potentiometer would set the outp[ut voltage at 13.2 VDC. Done and done. Well not quite. Potentiometers cost about 20 cents each and a resistor costs about 1 cent in quantity, sooooo....... the bean counters must have said something about the additional 19 cents in cost. Bean counters usually win and the product was assembled with a 1 cent resistor that was "close enough". This results in a possible explanation why some of the early model chargers put out a precise voltage and some not so precise. The second scenario mod will change the 1 cent "close enough" resistor back to the 20 cent potentiometer design. This mod will allow the float charger output to vary between 12 to 15 volts. You as the user will have the final say in what the output voltage is - you should strongly consider setting the voltage around 13.2 VDC for proper float charging. This mod also had the advantage of being tweeked slightly if you need say 13.6 for gell cell float voltage. Pros . Cons Pro - only a 20 cent modification - ability to adjust final float voltage for wet lead acid, glass mat and gel cell variants of batteries. Con - solderiing / de-soldering skills are needed - you need to order a potentiometer - the potentiometer may not be as reliable in a damp or wet environment as a resistor - rough handling (tossing the float charger or dropping it to the floor) may change the output voltage and require a quick resetting of the potentiometer. From my internet searches, I find at least 3 versions of this circuit produced over the years, The mod I am presenting was performed on chargers in the 2008 era as seen by the stamping on the power supply cases. My circuit board looks like the one below. I am currently placing an order for the most recent offering from HF as I believe this charger is going to be on clearance for the 2016 year . Having addressed cautions and expectations, I will begin the mod in the next post
-
2 pointsThis isn`t going to help at all, but since you brought it up I remember as a kid they did sell dynamite at the local hardware store here in Fairfield. Hard to believe the way things are today.
-
2 pointsMake the holes the right size (#3) and then you can tap them to 1/4" NF and screw in grease fittings afterwards. The C-160 that I bought then sold to my neighbor came with a grease fitting there and the pin just slid out. Cleat
-
2 pointsWish I had read these post before I began my painting..I bead blasted all parts after a complete tear down. I mean every nut bolt and screw. I then primed everything with Rustoleum white bare metal primer. I then took the cheap way and bought the Majic paint at the tractor store..IH Red and the IH white..I used a spray gun and mix with the hardener and thinned with mineral spirits. As for the results, I am very pleased with the finish, no it did not take weeks or many days to cure. I am not restoring this for show but it does look great, however it is still in pieces and I will know the full results soon..Hope I didn't make too big of a mistake. All I can say is read and learn from these guys, they know their stuff. Thanks for being there for us noobs.
-
2 pointsI've been spending way too much time on the wheel horse, but it is addictive. I took care of the weak factory tie rods and replaced those with the threaded rod and aluminum bushing method talked about on this forum. The aluminum rod was a bear to fit into the threaded rod, but I got it reamed out. Spent some time working on the deck repairs too. Looking for a dial a height knob and a mule drive knob for the front. Also spent some time painting the seat and panels. I haven't touched the hood yet and most likely wont. The steering gear bracket was also cracked on both sides. I had a welder weld the two pieces back together and I had him put a reinforcement piece in front to make it stronger. This is the welded bracket. Hope it helps with the weak spot in the steering system.
-
2 pointsHe's not wrong, I had a C-101 for about 6mths now I also have a C-161 and I still search every other day to see if any more are near me that need to be saved. That looks a nice tractor. Welcome to the forum.
-
2 pointsLooks good Mike! I have these custom made. Mike's particular one is extra long to fit B's,C's and Blackhoods with the longer hood. Cost is $50.00 plus shipping depending on steel prices. I make nothing on them. I have a retired friend who is a retired welder/fabricator that does them for me.
-
1 pointHowdy Gurus! Well, it took several months but I have the old 1980 C125, rescued from a Southern backyard, cutting grass so it's time to start disassembly for restoration. What a road it's been! The stereotypical redneck treatment (read creative) was applied everywhere... Anyway, first step was to move the tired 12HP Kohler yesterday. She smokes on load so I'm sure it's had a hard life and some abuse. Bore looks fine when the piston is up top (std piston) but I can see plenty of ring when she's in any other position - I don't have a bore gauge but the compression ring gap is well over the .030 limit. Crank journal clean. So.......given the fact that this engine is in otherwise good condition on my bench in pieces, can I just bore to the 3.5 spec and put a 14HP piston kit in there? Seems plenty of metal to allow 1/16 removal on each side. I've seen on the Internet (which is never wrong) that some have done it before me but know nothing of the longevity. Perhaps Kohler uses the same block for the 10-14? If too risky, it will simply be an .030 clean up. Inquiring minds want to know. While you ponder your response, I'm off to stand in a government line on my day off to renew my driving license...
-
1 pointOnly just recently did someone describe those to me! Isn't that neat!
-
1 pointThat's a good thought and I can't say I wouldn't swap it for something like that. It was just a good deal at a good location at the time. I figured worst case I'll paint her up because a lot of guys are into the direct drive Cubs. Heck, maybe I'll paint her red It will be because as far as a recall I paid next to nothing for the tractor
-
1 pointWe have a winner... I decided against pulling the head for now since I found the valve keepers smashed around the pushrod when i lifted the valve spring with some screwdrivers. Guessing the valve keepers aren't supposed to be smooth on the insides. From the looks of the valve, it appears to be alright so I'm thinking I lucked out and only need another pair of valve keepers. Thoughts on replacing the valve keepers and seeing if it runs?
-
1 pointRichard is right about the repower. Double right about the belt guard. Some tractors in that era had the engine mounted gas tank but I think it was only Tecky's and B&S. I didn't realize you were going off an ad but if the price is right you could have a good start to a nice machine. The K181 is a great motor.
-
1 pointImagine what OSHA would say about that rig!
-
1 pointWell now thats bizarre that they weren't in there. The keepers (your bottom pic) are too big to go down the drain hole (the small hole you see in back) to the crank case. Look real careful and inside both valve springs in case they are wedged in there. I would think even if they got chewed up up by valve gear some pieces would still be there. The retaining washer, your top pic is what wedges the tapered keepers to a groove in the valve stem. Valve spring pressure is all that holds them in ther. Check the breather tube on the off hand chance see if they didn't try to get blown out there. Slammer might be right and all you need is some keepers. Would be nice to know what happened to the old ones tho and I would endeavor to look for them.
-
1 pointWhite Gas is actually Naptha. It is actually more flammable than gasoline.
-
1 pointI can do that. No way I'd go this far without at least going in for a look. I can tell you there is grass poking out between the shrouds and valve covers, and most anywhere else it can poke out. Never had any overheat issues, but I'm sure it's a mess in there. Should know tomorrow, and will grab a few pics.
-
1 pointEd, Thanks to Dave's pictures, you can see there are hair pin clips that help keep the rock shaft in place. They came out just like they should and I hoped that the shaft #1 (first diagram) would just slide out with some heat and a couple of whacks with a hammer. WRONG!!! The little propane torch I have just doesn't cut it and I have to find it's big brother. Dave, Thanks for the picture and if I end up destroying the rock shaft, I'll be in touch. I was really hoping that the hood support ( the dashed outline in the upper left ) would come apart but I suspect they spot welded it for strength. Cod
-
1 pointI thought he used photoshop on it. Glenn
-
1 pointIf you read online, a guy can probably make it fit a 14 in a 12 BUT......... Longevity will suffer. The block walls will be too thin for heat load and you could end up boring through the sidewall....oops there goes the block. I would clean up the cylinder to the next biggest bore allowing cleanup of any scoring while still allowing for future rebuilds. If it is STD. Bore, clean up to .010 or .020 . I would not bore out to .030 right away this is not a small block chevy it's a kohler, you will feel no power gain between std and .030" and if you need more power than a 12hp buy a bigger motor or get a bigger tractor. The k301 is a power plant, give it a rebuild you will be impressed with the results. A clean work area, a good machine shop, and proper break in are the keys to a strong lasting rebuild.if you have any questions feel free to PM me.
-
1 pointHI EVERY ONE, EACH DAY IS A LITTLE BETTER. THE NECK BRACE IS VERY HEAVY. THEY TOOK OUT 7 STICHES TODAY SO THAT IS GOOD. I STILL HAVE TO WALK WITH A WALKER. NO CHRISTMASS FOR ME THIS YEAR, BUT THAT IS O.K. I MISSED CHRISTMASS AND NEW YEARS EVE IN 1952/1953 WHILE I WAS ON A TROOP SHIP. HANKS FOR ALL THE GOOD WISHES AND PRAYERS. RUSS
-
1 pointahhhh yes, the 9 pin connector the gift that keeps on giving !
-
1 pointLots of guys have tried it, but I don't think many really like it. It's expensive buying it from a Toro dealer. Find a color that you like and use it. No one is going to fault you for using the "wrong" color. I personally have been using an acrylic enamel from PPG on my latest paint job. Seems to have a nice gloss, covers well, and dries reasonably fast. Adding the proper hardener gives it more gloss and quicker drying time. Spray cans like Rustoleum and others can take up to 30 days to fully cure. You didn't mention whether you were using spray cans or gun. Lots more color choices if you have your paint mixed by an auto paint supplier and use an HVLP gun to spray. A quart of auto enamel will cost you about $35.00 to $40.00. Hardener is about $20.00. I think you will probably use at least a dozen to 15 spray cans if that's the way you go.
-
1 pointOk please let me add my 2 cents here. I spoke to Cecil Pond directly and he said there was no exact wheel horse red. He said there were many variations in the color over the years as mixing paint was not the exact science it is today. I painted my c-121 with ppg two part epoxy primer, three coats sanded between coats, three coats of ppg red ( I have the code some where ) and three coats of clear. Cecil laughed and said he was pretty sure it didn't look like that when it left the factory! I then painted my c-161 with rustolium sunrise red and it is pretty close match at a third of the price. I just wet sanded the heck out of it till I practically had no finger prints! So like someone said earlier paint it a color you like. That will be your Wheel Horse red!


This leaderboard is set to New York/GMT-04:00