
Leaderboard


Popular Content
Showing content with the highest reputation on 11/12/2015 in all areas
-
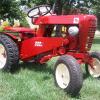
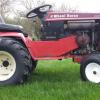
7 pointsThought I share some pics of the Homesteader Tractor I picked up this summer & my ugly mug here on RedSquare. I shared these on Facebook earlier this year too. A little history, The Homesteader tractor was made in Clinton, Arkansas in the mid 70ies by Bill Anderson. A side business to his trailer manufacturing. Made with 8 & 10HP Tucky power, 11HP B&S (mine), 16HP Kohler & a 7HP Lister diesel intended for the export market. They use a Peerless 2300 4 speed gearbox with chain reduction from the Peerless axles to the wheel hubs. The steering is just as crude with, but functional with two sprockets & a chain. Yes...those really are wheelbarrow tires on front & how they were made. The tractor came with a snowplow, garden plow, cultivators & what was left of 48' mower deck. I really enjoyed turning the garden with it after we were done for the year. The seat get's a little hot....should be an easy fix with a Cub style muffler. It's a tuff little tractor & about as simple as you can make one. Bill Anderson must have appreciated function over style.
-
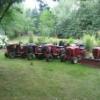
7 pointsSo I saw a listing for a slot hitch plow and mower decks yesterday. The final pieces to my puzzle. The gentleman was looking to clear house so I offered to take the lot. i got more than I barganed for... 11 mower decks, 2 sets of wheel weights one with wheels attached, the slot hitch plow, and a pile of misc chains. A little over wealming but i am happy as all get out!!! (more pics to come)
-
7 pointsAlright, couldn't sleep in. Had to get to work. Headed to ace hardware to get a round file to file the holes out on the deck handle and foot pedal so I don't scratch the crap out of the footrest rod on the frame. Got the wheels right too!
-
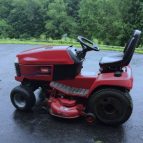
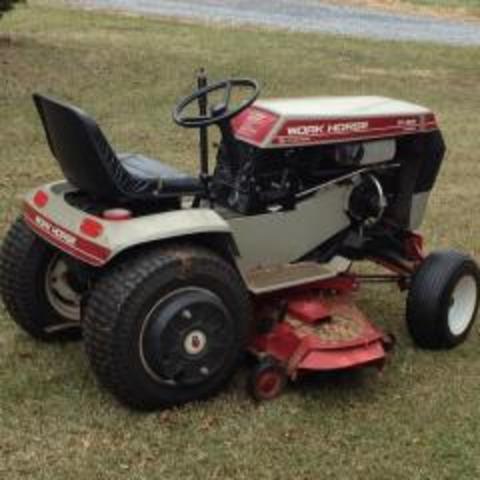
7 pointsha ha , it's the sunroom off the back of the house that I just finished remodeling for my wife last week. Still need to put the trim around the floor. I got heavy duty cardboard down and the tractor is squeaky clean so my wife was ok with it. It will roll out of the sliding door onto the deck and into the garage. Believe me, I'll try to keep it in there as long as possible, it's awesome to click the light on and see it when I get home and when I wake up in the morning with a cup of coffee.
-
6 points
-
5 pointsthanks for the positive reactions guys. to be honest i would've came second if the single bottom plows were a seperate class because there were two of us with single bottom plows, me still being the smallest tractor tho. and about the backing out, i could've done that but i said to the guys i was going to compete with the horse and they all laughed at me, had to show them it would plow the bloody field that said they all were amased at what the little guy could do and got a lot of thumbs up
-
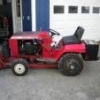
4 pointsJust got this new (to me) Wheel Horse. I think it is a 702. I am going to do a complete resto on it, but I think it looks pretty straight. What do you all think.
-
4 pointsI'm jealous. Those are some great looking tractors
-
4 pointsWay cool. I like the pic of the tractor in the field, and of the WH nest to the big boys. I'd be certain that you gained a little respect from them as well.
-
4 pointsThis is a great bunch of posts on the RJ58 Wheel Horse tractor . I have two and enjoy them as much now as I did as a kid 55 years ago when my dad bought our first Wheel Horse tractor. I have a snowplow, mower deck and front cutter bar for one of my tractors. I also have an early Wheel Horse garden plow, cultivator and spiked tooth harrow I use on my other one. These things are working garden tractors -yes they look cute but they will do jobs well and way beyond your expectations.
-
4 pointsBrian, I can tell you those wheels were for moving it around. I know because I built that frame and sold it at the big show a couple of years ago. I was in the process of making my own frame for a genny and then this one on my old C-145 became available so I snagged it. I added wheels to this too.
-
3 pointsSorry about the neck will figure it out o a tablet... OK give me crap....I is a WH tranny virgin.....did you do it right the first time!?!?.....get her mind out the gutter. ...?. yer mind not hers.......
-
3 pointsThat is a calendar shot with that last picture. Put a doily on the hood with a nice plant on it and keep it in there all winter.
-
3 pointsSteve had been warned about the long term effects of Rock n rye......
-
3 pointsCould just drive it in reverse... Man - Your "garage" is way nicer than mine!!!
-
3 pointsIn my book you won that hands down just for staying and plowing against those tractors , GREAT JOB !!!!!!!!!!
-
2 pointsjust a question, will there be a picture thread for the redsquare calender again this year?
-
2 pointsi had my first plowing competition last sunday. ended up in last because i had to plow with the big boys anyway here's some pics of the day the first one of the day: my try on a opening furrow then i had a little hickup with the engine suddenly shutting down on me, wouldn't restart at first but after a couple minutes it started back up and ran strong the rest of the day don't have much to say about this one, just looked nice and here's me plowing
-
2 pointsHoly schmidt ......11 mower decks?!?!?!?.....my problem with that haul is that I like to keep all of my horse stuff inside and a haul like that I would have to build an addition on to the the addition on to the addition on to the ...well you get my gist...nice score any way!!
-
2 pointsNow you will have to come to the "Big Show" and sell off what you don't want.
-
2 pointsUnfortunately you're probably gonna have to break the right side cover loose to get to that one. Don't feel bad. I had mine together and apart so many times I lost count.
-
2 pointsThis is my RJ-58 that I bought this one from RedSquare member Jdog_kustoms about four years ago... I bought a seat and both front wheels/tires for it. Other than that, I believe it to be all original otherwise except for the plastic gas tank which I intend to replace. This is as it sits today... Near as I can tell, the S/N of my RJ-58 is 4885 which is also not on "the list" in the link noted in above posts. There is no date code on top of the transaxle case so it would be one of the early RJ's. This tractor is currently located in York, PA.
-
2 pointsStevasaurus says, " I not only customize my WH GT's but I customized myself to fit the machine"!
-
2 points
-
2 pointsas redranger said , those gas caps seam to be an odd thread the only flat steel gas cap i have found to work is an Arnold / Ace Hardware 72906. but they are still hard to find... i ordered several from my local ACE here is one on ebay for you to look at http://www.ebay.com/itm/1-1-2-GAS-CAP-VENTED-GC-150-72906-ARNOLD-ACE-/270963679171?hash=item3f16b19fc3:m:mDyEBOJFznqJ88Kn3KlYvkA
-
2 pointsIn using the 8 inch tri-ribs you have the choice of using the wider turf tire rims or a narrow rim if have a older tractor, or you can choose the rim you want, but they look different depending whether you had a 16x6.50-8 tire and wider rim or a 4.00 or 4.80-8 tire and narrow rim. The use of hubs is mandatory for the 10" or 12" if you use them because they do not come in a wheel that contains bearings. If you do opt for a hub I like BMIKarts billet aluminum 4 bolt hub as it use 1-5/8 precision sealed bearings. I used a 5.70-8 tire on this Wheel Horse as I wanted a tire that would match up to the Maxxis Ceros rear tire which is a dual purpose turf light AG tire, not a full blown bar lug AG. You have to be careful in purchasing hubs, the Bolens in the pictures below with the red rims has a 5 inch axle spindle, but the Wheel Horse only has a 4-1/2, the smaller tractor usually have around a 3-1/4 inch long axle spindle, that's why I use the billet aluminum hub on the shorter axles as it is 2-1/2 and I can use a 3/4" locking collar on either the inside or outside to position the wheel to line up with the rear tire which could be wider or narrower due to rims or direction the rim was mounted.
-
2 pointsI agree, I don't think I would have stayed either, great job!
-
2 pointsNot 100% sure on this, but I think even Wheel Horse changed them to metal in the last months of the Blackhoods production. Here's mine with a pan off a 520.
-
2 pointsI would like to share this idea to help take some of the weight which the snowblower/thrower adds to the front, and add it to the rear. While also making the blower easier to lift. I know some of you use the spring to help with lifting, but most of its tension is when the blower is in the down position. I ran the cable directly through the cable tube and not using the rock shaft. Ran it it through a pulley (NOS idler I had) which is connected to the "attach-o-matic" and back to the bottom hole in the lift arm. While the flag is in the upper hole of the lift arm, the weight that is in the rear, is connected to he bottom hole giving the added weight a little better mechanical advantage. So the weight in the back is actually helping to lift the weight in the front.
-
2 pointsRiver bend hose, about 1 mile away from the old south bend wheel horse plant built me a set for my c161 auto for about $125. They knew they were wheel horse when I put them on the counter. They have new style fitting combinations that replace the old , obsolete ones, and I was out the door in about 20 minutes total!
-
2 pointsYou da man!
-
2 pointsI'll bet everyone there will remember you. How many others will be able to say that. And you got first place in your class.
-
2 pointsI believe both that you mention will bolt right on. If you want a metal one from a 520 Ive got one you can have, just cover shipping. PM me if interested
-
2 pointsAlright fellas this is as far as I got today. Just realized I got the rear wheels the wrong way.
-
2 pointsYou'd be surprised how much snow those little things can push. I see others say it will only push small amounts of light snow but that's not my experience. I was pushing some heavy snow in decent size amounts one year with my RJ. Have since sold the blade to AMCrules and he was pushing snow with it last year. I wouldn't bother with the snowblower unless you want it for looks. Those little 4 hp engines don't have the power. BUT, the blower you are looking for is a ST302. It has round sides so you will know when you see it. Borrowed this pic of another member's machine
-
1 pointthe guy says its the area right where the transmission attaches to the frame, so... I suspect that area there towards the back of the tractor, not so much the floorboard area. I should have mentioned that I guess. If it's just matter of welding, I think I'll grab it since you all are saying it's an easy enough fix. Thank's for the assist!
-
1 pointI have a c160 8 speed and it burns oil but you cant see it,but I can smell it,just top her up and keep on using her
-
1 pointI think I'll see if I can burn the rubber off these tires before I invest in a pair of $400 slicks.
-
1 pointTell her it's part of the remodel job...keep up the nice work!
-
1 pointRound hood for a coffee table....hmmmm
-
1 pointWill be at Lambeau Sunday Mike maybe I should pick you up a 44 jersey so you can bench the 27......
-
1 pointI had the whole tranny apart, inside of this thing was a mess. The machining was a little break time project at work. These axles are not hardened and would be easy to make if I had the tooling for the woodruff key on the inside (this one would have to remain a woodruff to keep it in place). Maybe a good project for someone that has easier access to the machines needed for the job. Thanks for the thumbs up guys, only time will tell how it holds up. Now that I have the tranny set up I can start on my engine. Thinking on voiding the crap out of the warranty on a Harbor Freight engine for this project. Maybe 8 to 12 horse out of a 6.5 horse engine. WHX5 there is a little motorcycle shop in Redgranite, owners name is Bob. I'm sure he would be able to cut some slots for you if you take him your axles, winter time is his slow time. If you need more info on the shop PM me.
-
1 pointYou may need to remove the fittings that the hoses couple up to and replace them with ones that are comparable with the hoses you can obtain. They are generally a 1/4" or 3/8" pipe thread adapter. Take the removable parts with you as well as the old hoses so they can match up the size.
-
1 pointIf I had pulled in to a competitions with every tractor being at least 4x bigger than mine I would have turned right around and left... So for sticking in there and doing what you set out to do!
-
1 pointCan't say I have ever attempted, or had a desire to do any of Glen's "Non-bucket list" items. But. I did just returned from an eleven country World Tour ( EPCOT World Showcase ).
-
1 pointThe 00005 came from Red Square but long ago. 0005 was posted but the extra digit added to make all 1958 serials 5 digits. The name associated with it was Terpstra's. I used to record who and where so one could go back to the original post but it's not working this time. Garry
-
1 pointThe Video... https://youtu.be/m9z1a5ppVmA
-
1 pointThis is the kind of post that I like the best and another reason I love Red Square and this site! Innovative ideas that are so simple, but no one has ever thought of this before, I sure didn't. This is just brilliant!!! C-85
-
1 pointYou might be suprised... by the work these little guys can do.
-
1 pointSoda blast it. I did that on my 49 Farmall carb and it brought it back to as-cast in seconds. Then I rinsed it in hot water to clean the rest of the baking soda out. http://www.farmallcub.com/phpBB2/viewtopic.php?f=1&t=86330 There are instructions online to make an even cheaper blaster out of a spray nozzle and box of baking soda. wear a respirator when you do this, it burns the nose!


This leaderboard is set to New York/GMT-04:00