
Leaderboard


Popular Content
Showing content with the highest reputation on 08/30/2015 in all areas
-
6 pointsI picked up this steering wheel for my Suburban at the big show. It was decent but did need a little work. I didn’t take any before shots but you all know what happens to these old wheels. After patching deep gouges, cracks, etc. smooth things up and do any reshaping if needed. Clean up the spokes, prime and paint. Mask the finished spokes stopping about 1/16” short of where the plastic coating on the rim started. I used Dupli-Color Truck Bed Coating in a spray can. They make two bed coatings. The blue can that I used and the Bed Armor in the black can. The Bed Armor might be a bit better for a truck bed but I really don’t think it’s best for this application. I held the wheel with a ¾” wood dowel and had several coats on in just a few minutes. Even in this Florida humidity you could actually see each coat dry literally in seconds. I applied enough to get the finish I liked and to blend it into the painted spokes. I love the texture and feel of it and it should be durable.
-
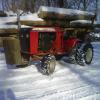
4 pointsI just got back from Le Sueur, we had a good turnout of horses and members. I got a few pics of the horses and some pics of some of the other cool stuff that was at the show. I'm hoping some of the other guys will post some "people" pics. This is a huge show with lots to see, an auction that lasted most of the day on Friday and the parade on Saturday lasted well over an hour. And lots of good food! Here's a few pics for the "Connecticut" guys.
-
4 pointsHere are some of the pictures I have, will try not to repeat someone else's. Was a great weekend met a few new Red Square members new to the show. Glad you could make it.
-
4 pointsI think Georg Ohm just rolled over in his grave.
-
4 pointsAutographs are only $5 each!
-
3 pointsI worked on the 5xi project for 3 years. The average person doesn't realize how many man hours and money go into the development of some products. They see the end result and judge it from there. Another person helped me on the 5xi build. I think the demise of the 5xi was the price. If you could afford over $10,000.00 for a garden tractor with a deck you would probably hire someone to mow your yard. There were 4 wheel drives out there that were better at the use of attachments. There were about 7 designers, a head engineer in charge of the project, an engineer working on the power for the tractor, an engineer from Wheel Horse was brought out of retirement to design the transmission, and the 2 of us building the prototypes - all who were dedicated to the project for the 3 years. There were 2 people from test dept, an electrical engineer, the toro stylist designing the look of the tractor, someone doing the finitite analysis insuring it was structurally sound and the marketing team that was driving the build of the 5xi. The cost of development along with the costs for production - Tooling for all the stamped steel and plastic parts and setting up the lines for production were a lot to recover. A differential lock was designed but never made it even into the prototype.
-
3 pointsClearly then... them bars are too small.
-
3 pointsAnd they brought this in when they heard Steve was coming.
-
3 pointsThe box is all welded and holes for gloves and window are cut.
-
2 pointsI just noticed this on CL i was curios what you guys thought about this setup i hardly ever see magnum 16 for sale so thought i would share it with you guys
-
2 pointsJust finished reading (cover to cover) the recent issue. As always, lots of good articles and top quality photos. I didn't get front page billing, or a center fold, BUT....On the back jacket there is a photo of a Lawn-Boy and if you look to the left of the photo, you will see my 1975 B-100 with trailer (and seat) with my 18' "Horse Hauler" behind! I made the magazine this time! Woo-Hoo!
-
2 pointsBeen wanting/needing a pressure washer. Wife has been looking at reviews on washers and everyone on the market has something that folks don't like. We found this one that has been repaired due to a damaged wand and was $150 off the regular price.
-
2 pointsWhen the 15 amp fuse blows, everything is dead....no nothing, nada, zilch....Replace the fuse, it starts right up and runs a minute or 2 then pop and nothing.....dead in the water. Haven't done much trouble shooting yet, but (before all this trouble) every time I turn the lights "on", the volt meter drops to 12 volts or <. Probably start at the lights. According to the schematic, the pink wire from the accessory terminal on the key switch goes (fuse 1st) then to the headlight switch and to an air filter switch as well as ALL the other gauges on the panel (except vacuum gauge).. I just finished troubleshooting with another member here - 15 amp fuse would blow and tractor would not run without a fuse in place. Turns out the 15 amp and 30 amp fuses were reversed in their positions in the fuse holder. When I checked the wiring diagram for the 15 amp fuse, all it controlled were the gauges, headlights and indicator pod power. Might be worth checking the fuse positions. http://www.wheelhorseforum.com/topic/58405-520-h-wont-start-hour-meteroil-sensor/?page=2#comment-539906 near the end - post #37
-
2 pointsI'm so upset because I put a brand new battery in the tractor and used it off and on for about a month, and I just thought that it was the old battery not being able to hold a charge, but i was wrong. I have one of those things that you put into your 12V outlet in your car and it give you a digital readout of the voltage, and I did stick it in the lighter on the tractor twice and it read close to 12 volts if I remember right, but it was like 2 months ago. I have to put in another battery and try what you said and then report back.
-
2 pointsHF is all that I have used for the 10 years since retiring. I have found no difference in the quality of my welds now compared to when I was working and using mainly LINCOLN, MILLER, and ESAB products. That is to say my welding ability is the controlling factor for me, not the price if the consumable. The one factor I do stress is to store the wire in a warm dry environment , and to weld inside with no air currents to keep all the cover gas in place when using flux core wire w/o bottled cover gas. BTW, the $13.99 is for a 2 lb spool that normally sells for $19.99. I do like the 2 lb spools. I can keep more of my wire sealed.
-
2 pointsIt is madness. ...61 with a solid seat pan??? I though only '60's had a...... never mind....nice tractor any hoo...
-
2 pointsYeah, next thing you know mama will tell me she is with child!
-
2 pointsShout out to thor, nice rig there. Wellcome to red square, dont be a stranger. Glenn
-
2 pointsYou probably need a new project anyway.
-
2 pointsBlock the left front and rear tractor wheels up on a flat surface the depth you want to plow. Now lower the plow and adjust so it sets flat on the ground. This is how everything is positioned when the right wheels are in a plowed furrow. If you are not getting the depth you want tip the front of the plow down a bit. If it is going too deep raise the front of the plow a bit. It does not take much of a change to get results. This is called adjusting the suck. By design the plow will pull it's self into the ground. Garry
-
2 pointsGot a bug and bubbles right in the center of the hood, I'll have to fix... You can see it if you zoom in on this pic. I'm not real worried bout it though...its not like its show room paint job anyway lol
-
2 pointsYep, to all the above. Thats three for three Muz
-
2 pointsThanks again, Paints dry so it was time to put the weights and blade on it and try a little light yard work. After I figured out I needed to change the position of the springs in the blade (after pic), and lower the air in the rear tires it did ok. Not crazy about these deestone rear tires, there supposed to be 10.50s but are tiny. My local hardware store's flyer has rv anti freeze on sale so I believe they are getting filled...... I ordered up some of Miller's 23-10.50 Firestones for my C105, I hope they bite a bit better.
-
1 pointTomorrow I am going to look at a 1971 tractor of a color other than red. It has the 10HP Tecumseh in it and I was wondering if they are any good. I never owned one and was also wondering about the parts availability. I know it needs a muffler but other than that owner said it is in great condition.
-
1 pointMe too Slammer, but it's kind of a "Sleeper' in the 12 Auto isn't it? LOL, kinda like a 427 big block in a 1964 Chevy Nova with 14 inch wheel and hub caps.
-
1 pointthe gates green belt, is that a # 6969 cross reference? Thanks slammer, glenn
-
1 pointIt's not red, the wand is too short, it's not electric start......LOL!!!! ..
-
1 pointYou should be seeing 12 + volts at rest and 14 +/- while running. Cleaning all of the battery cable terminals before changing the battery could pay big dividends too.
-
1 pointSounds like a problem with the ignition switch, If it stops firing when you stop cranking, the switch may be wired wrong, or the ignition contacts bad.
-
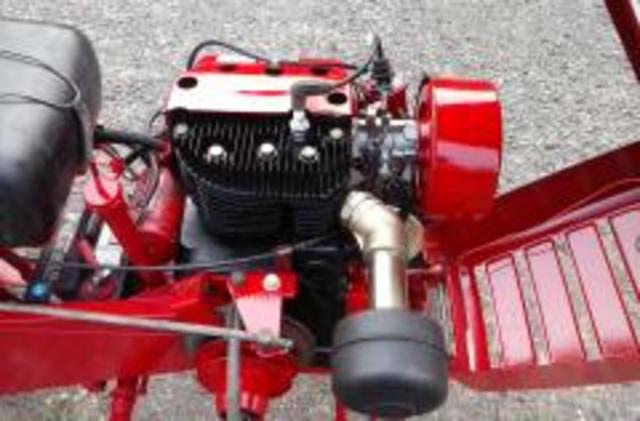
1 pointEvening guy's, sorry about the lack of updates of late, two shows in a month has been a bit of a killer.. Long days in the workshop, get home, cook dinner, then fall asleep in front of the TV early evening! Thanks for posting the latest video up Koen The run up to the first show (Rural past times) was busy, the steering lock stoppers were fitted. And a more suitable steering wheel center was fitted The exhausts got wrapped in black heat wrap, a horrible itchy job! To dry the heat wrap out I thought I'd go for a gentle potter about the place to heat the pipes up.... This is where I found a problem and is why under bonnet looked like this.. The last time I drove WN the engine started to cough and pop a bit. I thought it was just really low on fuel and left it at that.. Today the coughing and popping continued even with a full full tank, and then I found out it was only running on one cylinder!!! With Karl's help (thanks mate ) by swapping the coils and spark plugs from side to side we were able to rule them out, which is just as well as I would not stand a chance of getting replacements before the weekend!! So I thought I would give it a bit of a hard drive to try and clear out the problem... 2000rpm.. Sluggish.. 4000rpm.. Sluggish.. 6000rpm... The second cylinder kicked in and gave the engine so much power it felt like a turbo going to full boost in a second! So below 6000rpm sluggish, above 6000rpm = Hold on Which could only mean a blocked jet in the right side carb..... As it turned out getting the carbs off and on WN was very easy, only the fuel tank had to come out first.. Both carbs were cleaned out, the left one was spotless inside, the right one as expected had a blocked jet which was causing the running problems.. Rural Past times was a great show and all went well apart from me breaking the gear shift (it was fixed on site) and me getting very burnt as it was a scorcher of a weekend. A couple of day later I had a visit from Stormin and The Showman aka Norm and Chris... They both drove WN and survived Something that I was surprised but happy to see... I had to turn WN around to park her back in the workshop, so I climbed on and pottered down the car park.. While turning I gave the loud pedal a little blip and the inside tire chirped a little as it tends to do.. About 30 mins later I noticed a couple of marks on the tarmac! The little chirp was in fact both tires breaking loose! Yes the car park was a tad damp but it gives me great hope of some smokey donuts in the future It's a bit hard to see but there are two strips of rubber left in the tarmac Life is a funny old thing at times... I swapped WN's original WH trans out with it's 5 bolt wheel fixings for a Reliant axle which is a 4 wheel bolt fitting.. Then spend loads of time converting 5 bolt wheels to 4 bolt fitting... And now I'm about to start converting the Reliant 4 bolt to fit 5 bolt wheels back on!! It's not as mad as it might sound you know.. Why??? Well it's a safety thing you see... Now WN has proved herself at going sideways , the time has come to starting thinking about something a bit faster and in a straight line.. After some careful thought the chances of going sideways at high speed is far more likely on a grass airstrip than tarmac, so with that in mind something more sticky on tarmac was found.. next door as it happens The tires have a V speed rating which means they are good up to 149mph!! I just need to find some better tires for the front wheels now.. All of the above means I have some work to do to make the wheels fit, so this big old slab of steel was dug out to make a couple of wheel bolt converters.. I see a lot of lathe work coming up in the very near future The shape eyed of you will of noticed a something lurking in the background of the above photo.. Yep I have bought another CX/GL/silverwing engine for doing a bit of development on.. I won't give my plans away yet (those who know please keep quiet if you would be so kind ) as I won't be doing anything with the engine for a long time yet, but I will say it should produce a bit more power than a standard CX/GL engine Don't worry guys, those pipes were only put on like that for some experimentation.. I just posted the photo's to raise a few eyebrows The old exhaust system certainly caught a few people eye, but for me it did have a few problems. The shape of the down pipes didn't look that good where I had to extend them, the end cans made it look like someone had just bolted on a bike exhaust in the only place iit would fit, and the cans are far to restrictive in the flow department! Oh, and it sounded a bit tame! So yesterday out came the grinder and welder for operation "cut n shut" on the old exhuast sytem that came from the CX trike that Nigel and I broke up many months ago.. For me the shape of the downpipes make it look almost like a "factory" system.. Well, as factory as you can get for a bike engine stuffed in a Wheel Horse Both pipes need to be fully welded and cleaned up, then on with the black high heat paint all over.. Heat wrap for the down pipes and I have some honeycombe ally sheet to make some covers for the cans, put a bit of bling back.. But most important the system is a lot more free flowing, which is just what I need for the next stage..
-
1 pointI've only heard... nothing but praises for them big block Techy's. So, bring it home, because...
-
1 pointYour 310 is a long frame. It would be best if you could get the number off the blade or a picture of it. Some frames work on long and short. The parts for the lift are readily available. I wouldn't be surprised if Toro still had them but you probably would do better by posting a wanted ad here.
-
1 pointLast year I bought a Wheelhorse E-81 minus the mower deck. The person told me it was used to move props around and it looks like where was never a mower deck on it. I replaced the 3 batteries and it moves along nicely espiceally in 5th gear. What was the cut of the mower deck that it took thanks.
-
1 pointIf it is a sticking valve, try some Marvel Mystery oil in the gas tank. It might be considered snake oil but it really does make a difference
-
1 pointDay two, went to the steal store and bought 116.00 of iron. and a new combination square for marking angles, it was 69.00, but I will not lend this one out. plus one picture of my old faithful D 160 with power steering off of a 400 JD. It's a real work horse , and strong as a bull. I hope the 520 is as good when I'am finished with this loader. off to the farm store this morning for welding rod and grinding supply's. There are lots of ways to post photos on the Internet...how he does that is his business. I use Flickr or there is phitobucket, imigur etc that are all free to use. Day 3, small amount of work complete, had grinding disc explode and hit lower leg. But leather chaps would have stopped it, now they will be here the 4th. so most work is stopped till then. Any way you could send me a few photos of the d160 subframe loader mounts and components? I'm looking into building one for my tractor. I will do that.
-
1 pointEven with changing out front axels I would not do it. I had a 60 on one of my 520's, it mowed really well, what I did notice was that deck was hard on the tractor, seemed like it put more wear and tear on just about every aspect of the tractor. That's when I started noticing that you could pick out very easy 520's that had been used with a 60" deck. Everything from broken framed to extreamly wore mid-mount hitches, bushings, etc. etc. My opinion is it's a very well built deck, but just too much for the tractor. Not to mention a heavy beast to take on and off.
-
1 pointok another chapter in the C160 with a snap ring coming off . got the transmission off today I had to remove it because it was so dirty. cleaned it top to bottom ,I pulled it apart and needle bearings fell out where the small pinion gear goes in. but I did it when I pulled it apart, the end of bearing cap must have got pulverized .the axle that the snap ring came off of is warn I think to bad to hold it on for long. (that is a bad design) does anyone know if a new slot can be cut in it to hold a smaller snap ring ?? the axle is in good shape other then that. the parking pawl has been eaten by the hungry wolf. and that is a stp filter I hope I can get that differential back together the right way things are adding up fast I need gasket to put trans back together #5999 (discontinued ) oil seals 6449 dealer ordered , needle bearing # 1532 filter Napa 1410 13.49 at Napa store hub 6465 105763-03 woodruff key----------937022 ordered dealer and maybe axle but I am having fun anyways guys here is the progress iv made so far its not very hard to take things apart it trying to use it after you get it back together ONE OTHER QUESTION WHY DOES ALL MY PICTURES TURN SIDEWAYS ???????
-
1 pointJust want to thank you all for helping me out with the questions on my commando 8 with the wiring, starting and all of the other tractor questions i have had with other horses. It is so great to be able to have a place to go. And get good solid answers that you can trust. But to get back to it I got her fired up this morning and the little 8 horse kolher purred like a kitten. All the lights work, cig lighter, gen light. Thank again
-
1 pointDon't know about a 3PH, but Wheelhorseman1000 makes a clevis hitch set up... Xi Hitch Kit
-
1 pointSomething has been following me for a while.... It's a 1996 520-H with 414 hours. There's a 48" deck, 2-stage snowthrower, and snow cab in the back too. Needs cosmetic work and a thorough maintenance session, but the price was very good. It shouldn't take a lot to get it back to "like new" condition.
-
1 pointOh sorry. well the manual that i down loaded for the electrical did not have the generator light or the cig lighter in the schematic. But then was sent one that did by the red square members. Then when i tried to start it. I had good spark, fuel, but just would not fire up. Come to find out my float was stuck open. So it would just flood out. Fixed that and she off and running great.
-
1 pointWe need to know .....what was the problem?
-
1 point
-
1 pointthere is starring Nigel, Norman(stormin), Chris(Chris sutton) and of course Ian
-
1 pointSo what your saying is we should put smaller pulley's on our transmission's so we can keep up
-
1 pointYour welcome Pullstart, to feed your "Habit" have some more WN stuff Well chaps, I'm sick of fillering and even though it's far from perfect it will do for now.. Just the flange thingy in the middle to sort then it can be brown oxided The slots on the front of the bonnet have now been widened.. They need a little tidy up but they look so much better for being wider. And some wire mesh came my way.. It will look good sprayed mat black and tucked behind the slots The other morning was like an archeological dig... Once I'd shoveled 6 inches of white filler dust away I found a bench!! To celebrate I put a couple of wheels on WN to have a look... They soon came off for a second coat of paint. The second coat of IH white lightened the wheels up, make them look less creamy.. Don't be fooled by the photo, the paint is nowhere near as smooth as it looks. Oh, and the bonnet now has a mat black grill/mesh thingy
-
1 pointAfternoon guy's, loads more WN progress for you.. The slimmed down wiring loom is now fully wrapped up in black tape, 90% routed and plugged in.. Working out where to put the voltage regulator took quite a while.. In the end I made this bracket and welded it to the chassis. The "open" design is to let air to the back of the regulator to help keep it cool. I also make up a couple of these.. Which were welded to the battery box/tray thingy. Ideal for mounting the starter solenoid.. It's been a busy few days in the workshop, with Rural Past Times coming up I was even in the workshop Sunday! The wiring was 99.9% done by Sunday lunch time, just one safety switch to fit when I get it.. So I spent the rest of the day fabricating this.. Now you see a mess of wiring.. Now you don't A closer view for you. A lot of template making time went into getting the side panel looking just right.. Speaking of templates, here's the right side template taking shape. Transfer to steel. Bung steel in the sheet metal folder.. Fold a 90 degree bend.. And then forget to take photo's of the other stages, so have an almost finished side panel shot instead A top cover for the main body tub was made, and as the fender pan sits a bit lower than the body tub I made a curved panel thingy to help blend the two heights together.. It will also add strength to the front of the fender pan when it's fully welded on. A view from afar.. Pete dropped in for a visit Tuesday which resulted in the fuel tank being removed!! The reason? Well, Pete had not heard WN running and as I needed to check my slimmed down wiring loom still worked and I didn't cut out anything that I shouldn't of, we decided to fire her up.. It was at this time that the leak free tank decided it wanted to start leaking, and I started to wish I had put the tank sealer in that I had bought!! Then I had a better idea.. Unless WN's engine is warm she has always had a bit of a starting problem with fuel not getting to the carbs.. The problem is the tanks fuel tap is below the carb fuel inlet.. Even though the actual tank is above the fuel inlet and logic says that gravity will do it's thing and get fuel to the carbs through a looped pipe, gravity seems to have other ideas! Also when I tried to drain the tank I found the vacuum side of the fuel tap wasn't working that well! So the plan is to cut off the old fuel tap, weld the hole up and fit a new fuel outlet at the base of the front face of the tank which is the side facing you.. This will put the tank outlet above the carb inlet The only problem is the tank was half full of fuel today, so after draining and soaking up the last dregs of fuel with a rag, I filled the tank up with a water 1001 stain remover solution... I know washing up liquid is traditional, but I didn't have any.. All being well any fuel vapors will be gone by Thursday when I was back at the workshop next, and I can cut and weld it without fear of being blown up! Thursday had arrived so... The first job on the hit list was to tackle the fuel tank.. Once I had drained the water/cleaning solution out and dried the inside, I took the tank well away from the public and stuck a blowtorch in the filler hole... I already knew from the smell of the tank there was no explosive vapors inside, but I had to try to make sure.. Nowt exploded so I warmed up the grinder and welder and set to.. The outlet pipe was welded to the inside of the new plate first, then the whole thing was welded on a bit at a time to make sure nothing warped.. Not the best of photo's but the tank outlet is now above the carb inlet, I just need to fit an inline filter and tap somewhere.. The welds have now had a light tidy up, sprayed with red oxide and the inside sealed up with tank sealant just to make sure it doesn't leak this time. While I was waiting for the tank welds to cool I fitted an extra gauge... I've no idea what you would call it (a better photo coming tomorrow) but it's basically a vacuum gauge which has been following me around for more years than I care to remember.. So I fitted it All the new panels are now painted and bolted down.. Yes I will be painting the bolts I have always been a bit worried about the engine getting too hot due to not enough air getting to the radiator, so today I cut a few extra slots in the front of the bonnet.. This isn't the best of photo's and the slots do look better a little further away, but I think the extra slots need to be wider to closer match the original slots.. What do you guys think? Although I won't have time before Rural Past Times to do a full paint job, I do want to get the wheels painted.. So off came the rear wheels for a bit of "hide the welds with filler" action... I'm not looking forward to sanding them tomorrow! While the rear wheels are off I thought I'd take a look at the fender pan.. This join does not look to bad.. Until you put a straight edge across it!! Lot's of loud hammer work later and it's getting there..
-
1 pointThanks Van, it's good to know I come above Benny Hill As promised a photo of the finished steering box mount. Only tacked on in this photo, it has been fully welded on now. Time to chop the column down a bit. The part sliced off the top of the outer column has a bush in the top so I need to reuse it. I also need to graft this bit of the old steering column onto the inner bit of the new column.. The hole is for a massive roll pin that makes sure the steering wheel will never come off without the aid of a large hammer and punch No action shots as I was busy getting on with doing it.. One chopped column, a little over 1 ft has gone from it's height. A test fit.. The angle of the steering wheel has changed. A bit more upright than it was but not by much at all.. Working out the new Pitman arm... Yes that is a box spanner.. But it's more than strong enough and is a nice tight, straight fit on the steering box splines.. So why not use it The new column finished and almost ready to be bolted back in. The mounting bracket at the top bolt's in just behind the dash surround.. The new steering is now bolted in place, no photo's I'm afraid but the steering feels much improved (well, as much as I can test it on the bench) and it's now a tad over two turns lock to lock which is way better than the old 3rd of a turn lock to lock. And I also have a bit more lock now With Why Not booked in to her first show in a months time, it's going to be a busy few weeks!
-
1 pointThe mystery steering box from Chris turned up.early last week Thanks mate The mystery part turned out to be Austin A30/35, thanks for that Max if your reading this Getting the Pitman arm off the steering box is a whole story in it's self.. Involving a hub puller, zip ties and a huge amount of heat! Once the arm was off the splines the next challenge was getting a large nut off the shaft, this didn't quite go according to plan when the end of the threaded bit on the shaft sheered off right where the split pin holes are/were. As the shaft needs extending a little bit this wasn't a problem. So will it fit? with the aid of a pair of scissors this were looking good.. New and old steering box.. The box bit of the new one is certainly a bit smaller.. Trial fit time. The box is at the right height it just needs to go back a bit or there wouldn't be any room for the new Pitman arm to swing. To get the column up though the top of the dash I needed to make a hole a bit bigger, so I quickly spun up this bung on the lathe. It fit's like so.. The small hole is for the "drill bit" bit of the cutter to slot into. Letting the dash cool down halfway through the cut. The amount of swarf that came out was amazing! A big hole.. With a bit of the body mount sliced out.. And the bottom of the dash surround notched a bit.. The steering box ended up right where I wanted it.. The steering box mount taking shape. That should work well The mount has now had two captive bolts and one captive nut added.. Both ends have been boxed in and the welds cleaned up, I just forgot to take any photos of it.. Likewise I have made a start on shortening the steering column but also forgot to take any photos.. I'd best remember tomorrow
-
1 point


This leaderboard is set to New York/GMT-04:00