
Leaderboard


Popular Content
Showing content with the highest reputation on 07/26/2015 in all areas
-
8 pointsThis 551 has been under a tarp in a barn for the last 15 to 20 years. The PO bought the tractor new in 1961 and has had it every since - 54 years. I knew the tractor was there, but I had not seen it for at least 20 years. This past week he called and said it was time. We made the deal on this and a Bronco 14.. The 551 is missing the foot rests, has the wrong decals, and the fluid has worked over the front rims, but it has the correct H55D - 2113 -(serial 55209). The muffler and belt guard are both there and it looks to be in nice shape for tractor 54 years old.
-
4 pointsJust set up duals on my 753. What do you guys think?
-
4 pointsMy Originl Cab has both... snaps, and a zippered bottom, on its replaceable windshield.
-
3 points
-
3 pointsHere are a few interior shots and an up close of the motor so you can see how mint it is.. Wow Denny I didn't realize it has been 6 weeks! It seems like it has been an eternity. If I didn't decide to bring it to work and work on it in the back warehouse I wouldn't have finished it this year. The weather has been kinda rotten this summer and at home I was working on it outdoors.. I guess i did okay because I was also able to give my Crestliner and its trailer a makeover as well. I'm done working on boats for the rest of the summer so if any of you guys find a boat that needs a makeover don't send me the Link because I'll be too busy out on the water!
-
3 pointsThe Dunphy is done! I just picked the boat up from the upholstery shop and it looks great.. The motor is original to the boat, I did the needed maint. on it and she purrs like a kitten. I spent a few days detailing the motor and it looks almost new..Maiden voyage will be sometime this week. The last time this boat was out on the water was 43 yrs. ago!
-
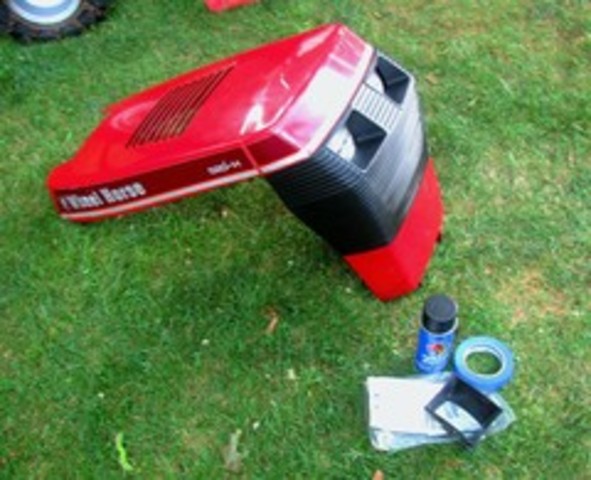
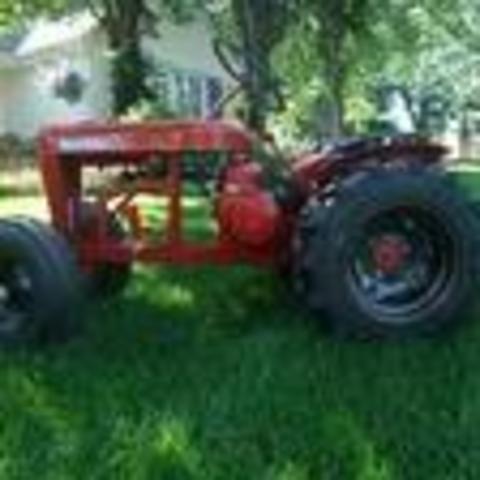
2 pointsHey fellas its been awhile. I had to get back in the garden tractor game. However since I moved to NC its hard to find anything at what I would consider a good deal or a good price. From what I can tell people either hold on to them, value them like they are gold or just scrap them. Well I was checking craigslist and I came acrossed this beauty. It is a Economy tractor, it has hydraulics, and came with a front dozer blade, and a turn over plow. However the connecting rod broke, so I am going to have to do something about this engine, either rebuild or repower.
-
2 pointsMy new 3 point implement what do you all think? It will be fun at tractor shows.
-
2 pointsThe 314-8 is a very good choice. It will handle any garden chores you throw at it. You would be hard pressed to find a better or stronger manual transmission in a garden tractor. The combination of that cast iron Kohler and that 8 speed doesn't get any better.
-
2 pointsI have one-it's a great tractor you'll love it!
-
2 pointsthe 310-8,312-8,314-8 are all great hard working horses
-
2 pointsYou can't go wrong with a 314-8. One of the best models Wheel Horse made.
-
2 pointsThe 314-8 is IMHO one of the all time greats. The rear end is stout and will handle your plowing chores.
-
2 points
-
2 pointsBeautiful job, Mike. One of my biggest complaints, not just with Wheel Horse (theit cab manufacturers, i.e. "Original Tractor Cab, Co.) but pretty much all cab manufacturers, is the fact that most do not have zippered-in, replaceable windows. I've often thought of making my own cab covers and doing just that.
-
2 pointsI saw your Tacoma at the show Lane. Wheel Horse red is a nice color. I almost bought an access cab, 4x2, but walked away at the last minute. It was not certified, and with the winters that we have here, not getting a 4x4 would have been a big mistake. And that tiny thing they call a bench seat, Even my 7 year old grandson had a problem with that. The dealer that I am probably going to finalize a deal with has just lowered all four of his 2013's by $500.00 to $1000.00, making the deal a little sweeter. As far as towing, the empty weight of my 6 x 12 utility trailer is about 900 lbs. With 4 average Wheel Horses, the total weight would be about 3500 lbs. So even without the factory towing package I would be okay. I probably would have already purchased something, but as usual, life gets in the way. Had to replace the well pump, my current Chevy Astro needed a new front wheel hub/bearing, the wife's Subaru A/C went up, and on and on... Here is a picture of the unit I have been looking at. Actually there are two, one is white, and this silver one.
-
2 pointsWell finally got it all together and tried it out and it is getting looser every time I drive it so it should be just fine. Thanks for the help
-
2 pointsJEFF GO WITH THE C-160. NICE SET UP.
-
2 pointsJohnny Bucket makes an electric actuator sleeve hitch that works independent of the rockshaft. I'm not sure if it could be adapted to a classic Wheel Horse due to the rear chassis configuration, but I did put one on my 523Dxi. I use my single stage snowthrower on this tractor and a scraper blade for up by garage doors. My 520xi has the blade with a UHMW edge. At some point my intention is to wire this tractor and get the frame portion from JB so that I can use this tractor as well with the sleeve hitch. You might want to consider this for your new 522xi.
-
1 pointSo I decided to restore the C121 I aquired, I took every bolt out and I am in the process of rebuilding, I need some help with the small screws that go into the block for the points cover, I cant find anywhere a diagram showing what size they are and I have every document I could find on the web, I misplaced them.
-
1 pointJust take time, get help. Its quite hard to lift a Magnum 18 by yourself to a counter top. them key ways are sharp! needles to say i didn't complete the task alone
-
1 pointI use an electrican screw driver that locks on the screw to get it started.
-
1 pointThis might be the ones Kohler Engines X-67-59-S SCREW, WASHER HD TAP #8-32X3/8" USE 25 086 99-S NOT ILLUSTRATED http://www.partstree.com/parts/kohler-engines/engines-horizontal/k301-47648-kohler-k301-engine-k-series-wheel-horse-12hp-9kw-specs-4710-47835/breaker-ignition-cont-tp-2097/ Hardware is listed on the first lines Have often thought an Allen capscrew would work better because it would stay on the Allen key. The originals are a slotted fillister head. Garry
-
1 pointHave you checked to make sure it has the rear cable lift system and rocker shaft to lift a rear hitch? If that is on it, great! If not, you will need to find one here on the classifieds or one at a swap meet.
-
1 pointAre they both 93 through 95 they used the same part no. KH 10321. Some of the 89 and older used KH10320 . You can check the parts numbers on Parts Tree, or the Toro site. I used Parts Tree because it's easier to use. Don't have any idea what the difference is.
-
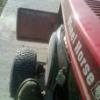
1 pointAMC - that is the serial # tag - 55209
-
1 pointPullstart - the Bronco 14 is still on the trailer. I will post some pictures the first of the week. Jake - Since the decals have been replaced, the tractor has probably been repainted. I do know that the PO always stored the tractor in a garage or barn. I am going to ask him the next time we visit.
-
1 pointDefinitely, the perfect canidate... for a new heart transplant.
-
1 pointMust be a newer model than the original ones form earlier years that I have seen, Mike. I stand corrected for the later models then. I'll have to dig out my old White with Red/Black lettering version and take a few pics. I know where in the storage shed it is, getting to it is the difficult part! LOL With the upcoming "1973 10-8 Replacement Project", perhaps it's a good time to consider setting this new tractor up with the cab I have BEFORE I start the paint job!!! ROTFLMAO I've always wanted to use it, but never wanted to drill holes in perfectly good fenders. I've also played around with teh idea of figuring out how to mount the cab without changing the machine. Perhaps I'll revisit that this time around.
-
1 pointAfter selling my C-200 with loader to MRC, which I of course regret, and the John Deere 112 with Johnson loader, I always wanted to find another one. I saw this for sale mounted on older Sears rider. It was listed on Craig's List and Ebay. I e-mailed the seller and asked if he would sell the loader separate and how much or if he was interested in any trades. He gave me a price and asked me what I had for trade. I have been sitting on that little Kitty Track dozer for a few years and seeing as the amount of work it needed and the cost just to have replacement tracks made ($800 with the chain links!), I offered it up in trade. He accepted and I picked it up yesterday up in Massachusetts (Actually really close to Wallfish). Apparently it was designed for the Bolens 800, 900 and 1000 series tractors. It has a trip bucket but they offered a hydraulic tilt kit. I have the manual that shows all the parts so that may be in order. Going to drop it off at the sandblasters next week and have him go to town on it. I believe he also does epoxy priming too. Today the kids helped me off load it and we rolled out the Diesel Ranger to see how it would look if I mounted it on it. I think the ranger is a touch to small. Maybe a "CERTAIN 702" might be in order to mount it on ! No matter what tractor it does end up on I'll have to fabricate the front and rear mounts which is really no big deal. These little midget loaders are almost impossible to find and this one is never going to leave my sight!
-
1 pointAwesome! Just awesome! I need to know how she works in a few short months! Curious about how much the front chains will help. Looks like the rear chains should do a good job even over the ags. I'm a big fan of the double cross links! Dennis Thornton
-
1 pointThe other thing to mention here is that "valve wear" consists of wear at several locations. The following assumes that the valve seat (the part in the engine block) and valves contact face (also called a "seat" as shown in the image below) are in known good condition and do not need to be re-ground or replaced due to breakage or wear. It also assumes the camshaft lobes are also not worn out. The main wear locations are on the upward face of the valve seat, and the bottom surface of the valve itself. Also, you can have wear on the valve stem and/or the camshaft lobe, but if the engine oil is replaced regularly this is usually very little compared to the valve and seat. As the engine wears, the valve "sinks" into the valve seat, because of wear at both the seat and valve, effectively closing the gap between the valve stem and the camshaft lobe. The most important factor of setting this clearance is to make absolutely certain that the end of the valve stem is ground absolutely flat and perpendicular to the valve stem. Most home shops do not have the fixture, or the correct grinding wheel. to do this "correctly", and we try to do it by hand on a normal grinding wheel we find in most of our garages. Though this might work, in the long run it will shorten the life of the engine more than if you did it on the correct equipment, or had it done by a local machine shop. The procedure is pretty simple. You rotate the engine till both valves are closed (compression stroke), and both valve stems are no longer in contact with the camshaft lobes. You measure the gap that exists between the valve stem and camshaft lobe, and you write that gap on the top valve with a Sharpie. You then look up the spec. for your engine, remove the valves, and either grind them yourself or carry them down to the machine shop to have them ground. The difference between the number you wrote on the top of each valve and the spec. is how much will be removed from the valve stem. n example, I find the intake valve clearance is 0.004" and I know the valve and seat are good, I take off 0.004 - 0.006" off the end of the valve stem, re-install the valve in the engine, and measure the gap again. I should now be between 0.008 - 0.010 clearance when the engine is rotated to the same location. I always shoot for the middle to give me a margin of error, but always "sneak up to" the correct dimension VERY slowly so I don;t trash a valve or be forced to re-cut a valve seat to make up the difference. Same process for the exhaust valve. When they are both within spec. I move along to the next step in the rebuild process. A LITTLE BACKGROUND Say I find an engine which needs a valve job done before I can trust the engine to be installed in a restore. I certainly do not want to get everything painted and installed, then find the engine is failing and have to take it all apart again, messing up the paint job on both the tractor and the engine. Therefore, when I redo a machine, the engine is about the third thing on my list to restore after the wheels and frame are completed. I dis-assemble the engine completely, knock out the valve guides and seats, replace them with new parts, and cut the seats and ream the guides to size. If the seats are cut, then the new valves have to have the matching angles cut to the seat area on the bottom of the valve, so that when assembled and are closed in the block, the valves make an air-tight seal. But your not done yet. Once the seats of both parts are cut to match, you still have to "lap" the valves and seats as a pair. This is a process where you put some lapping compound (very fine polishing paste) on the seat and valve faces, spin the valve in place (usually using a drill or milling machine) and polish the two surfaces so they match exactly. This is not normally possible to do in the home garage because not many of us have the appropriate tools, the drill press or mill, and the lathe to do it right. Sure you can do it with standard shop tools, and it will work, but it will not be as long-lived if you don;t do it with a certain level of precision. This is why its best for most of us to take it to a machine shop and let them do it with the right tools and equipment. Anyway, so now the vales and seats are cut and lapped to perfection. This is the stage at which we are talking about here. Now the valve stem to cam lobe clearance is adjusted to spec. The only way our engines are going to make their maximum HP potential is if the valves and piston(s) are air-tight and close-fitting within their respective tolerances. K321 Valve Clearances: Intake: 0.008-0.010 in. Exhaust: 0.017-0.019 in.
-
1 pointI just got a starter/generator rebuilt, which included a new voltage regulator, for under $130. It goes on a Commando 8hp. While looking on the net, a starter/generator would have been @ $160 alone.
-
1 pointHaha, im guilty of the seafoam thing before too. Put a load of it in the tank then forgot to fill the tank back up. They dont run too well on straight seafoam.
-
1 pointI love it when I'm quoted! LOL
-
1 pointI am not sure what changes on angles and belt clearance for this model and layout but this is the Wheel Horse proper prescribed way for this model. The layout is available on parts diagrams. For C195 and the 60 inch Ariens sourced deck.
-
1 pointNot sure how many hairs we are going to end up splitting here...ie...maybe a suburban is 60 only, but all the mid-engines are nut-roasters. Now the RJ-58 / RJ-59...I know some guys that will tell you, "If you do not have the sticker that says it's a 59...then it is a 58". Like John said, the seat from the 1960's...or the casting dates on the trans would signal 1959. That is the rub...anyone could change this out and call it a 1959 (more rare), but it turns out it is a 1958 with a 60's seat or you found a casting with a 1959 date code. I tend to agree with some of the purists here...if you do not have the sticker...it is a 1958. Does anyone have a sticker that shows 1959??? I do not think so. Do you have the original paper work?? I'd like to see what Stevebo has to say about this...he said he did a lot of research. I think everyone should just relax a little here until we see how we want to try to do this. We all know about the exceptions to the rule, but we may not know about all the exceptions. That is the point. I think we want to have posts in here that we can move into the Wheel-Horseapedia with pictures so we can put this together. It should be helpful, it should be about a particular horse...we are trying to show what this horse has and (maybe) has not. We want some pictures taken from all sides of a correct horse...not just the right side. We would like the pictures put in here from a computer.(direct)..not from a link like Photobucket...so we do not lose them again. We are looking to move these posts of text and/or pictures into a format that is easy to search and see what is correct...for instance...400 suburbans (early) came from the factory with Clinton engines. It will be hard for us to move a post into the right spot if it is talking about 4 or 5 different horses...it will be easier if it is 5 posts talking about a horse by it self. We may end up getting some pictures that are correct, say "except for a belt guard"...that is OK as long as we know what is not correct and maybe what is should look like. This is going to be huge and will make Red Square interesting for quite some time. If you have any pictures (of all sides) of a certain horse and an explanation of what is correct...any brochures...documents...etc. Feel free to post it here...we do not have to start with round Hoods...short frame square hoods...black hoods...etc. We should be able to section this out and work with the information that we are receiving. I'm thinking that once we set up what we want to do here, any posts we can use, we will move into what we are building. We want to keep the integrity of the author of the post in-tact. Dennis and I are still talking about how this may work, waiting for Karl's input.....and anyone else's input for that matter. Looking more for ideas here, rather then horse knowledge at this point....but the last 2 pages does show why this needs to happen.
-
1 pointThat works, but I've busted the aluminum housing off at the large c-clip at the bottom.
-
1 pointThe capsule should have an almost grease consistency lubricant. it is applied to the nylon (or some kind of plastic) follower in the points assembly. It lubricates the follower and the cam on a distributor shaft. Since your Kohler uses a plunger instead of a cam and follower it is unnecessary.
-
1 pointSounds to me like you are caught between a rock and a hard place. Maybe it would be best for you in the long run to do whatever mowing has to be done yourself. Its not easy being the responsible one in the family. I should know................
-
1 pointYup, very common. A welder is your best friend.
-
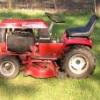
1 pointNics Lawn Ranger has always been able to hold its own. Probably my favorite Wheel Horse of all time...
-
1 pointStay away from R&L. Learn from my mistake. They quoted me $230 for a tractor and when it arrived in CT at the terminal they would not release it unless I paid $2300. Yes, thats not a typo. They said it was not classified correctly and as a piece of motorized machinery the classification code changed. And yes, they didn't feel a need to contact me. They took it upon themselves to re-classify it, inflate the rate, and still push it through. After three days of non-stop arguing I finally had to pay $1000 to release the tractor or face storage fees. My attorney said to chalk it up as a learning experience but I refused. I ended up filing a lawsuit against them in CT court and they agreed to settle outside of court. Never again. I use Fastenal.
-
1 pointThe biggest variable on the value of a Wheel Horse seems to be geographic, if they are scarce in your area they can command a strong price. The other primary factor is the quality of the "restoration". Some people consider a quick repaint to be a restoration.
-
1 pointHow about one of those cheap Harbor Freight fold up 4 X 8 trailers. Add some more wheels or camper jacks for stability. You can tow it around with another horse and fold it up when not in use?
-
1 pointJust walked in the door. 14 hours in a torrential rain. Good to be home. Glad you are enjoying the popcorn. Great seeing you all at the show. See you all next year.
-
1 pointDo a search for 42 inch Auger, Deer Whisper had to replace one. It's a good post about just replacing the sprocket.
-
1 pointI am waiting on a text from Santa for Craig
-
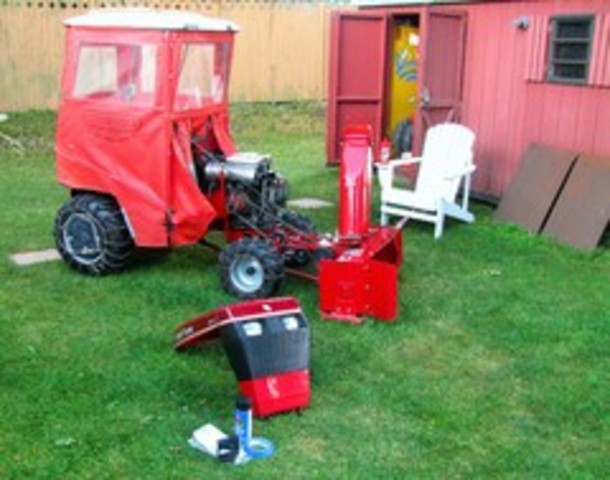
1 pointHave been meaning to post some pictures of my snow setup on the C160 for a while but hadn't got around to it. Finally have gotten to use it the past week or so, although after last winter I am certainly not complaining about having fewer opportunities to push snow so far this year. My setup for snow is some old Firestone "Town & Country" 6-12's that came with my 854 on the rear, and some surplus snow blower tires on the front. I've got some Wards wheel weights on the rear and WH weights on the front, plus a couple suitcase weights tucked into the rear for good measure. The blade is actually a newer 48" blade with a 5-position sector I came across, which I much prefer to the 42" / 3 position one I used on my old C120. On the recommendation from someone on here, I bought a pair of Cree 18W LED spot lights for the front (love them!), and put them on a mount I built to attach to the front hitch. I also added a set of LED strobes to make sure I can be seen. After using a Deere 140 H3 last year with a hyd lift/angle blade I was afraid I would regret getting rid of it and choosing the C160 as my snow mover for this year. I'm happy to report that so far, so good. I do wish it could lift the blade as high as the 140 could, but that is the only trade off I have experienced so far. The weights and skinny tires seem to work pretty well. They do spin on slick surfaces, but I think anything short of chains probably would. The tractor is much easier to steer than that 140 was, and so far haven't even come close to running out of power. I've actually been doing the neighbor's driveway to help him out and to get a little more seat time!
-
1 pointSadly, life got in the way and I was unable to work on my little tractor for almost a year. I made the decision, some people say mistake, to buy a 1939 Ford 9N. I won't get that running for a few years. It was a bargain; most of the parts are there and it was only $400. I can put $3000 into restoring it and then sell it for $2000, Back to my C81. All the springs and pullies are in place. The clutch pully cannot take up any more slack. The belt I have is a NAPA 5L820W. Should I get an 81 inch belt instead of the 82?


This leaderboard is set to New York/GMT-04:00