
Leaderboard


Popular Content
Showing content with the highest reputation on 07/14/2015 in all areas
-
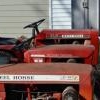
5 pointsWell it's been a while SINCE The Squonk has posted anything much about the Skonkfest 1267. http://www.wheelhorseforum.com/topic/52230-ist-annual-sqonkfest/ After arriving back here to Wheel Horse Plaza from The big show, I was armed with a few needed goodies. Skonk is a cantankerous old dude and was loud and rough around the edges like an old sailor at a SpongeBob film festival so some upgradin was needed. I put skinny ag's on by the way to fit Skonk through a door into my rear shop. Plus I added fine 7/16 bolts and lug nuts for easier tire changes. First big issue was how loud he was. Plowin snow at work with the K 301 echoing off the brick and glass was rather obnoxious. So the First order of business was a different exhaust. It started out with a pancake unit, I got a Gravely style muffler from Napa. I was a bit disappointed. These Napa units used to be a lot heavier construction but now they are light and flimsy like every other mower supplier has. I added a stainless stack from a bathroom handicap rail. Still too loud I had my welder friend billy Bob add a baffle into the stack. Much quieter and with some carb tinkering, quieter yet. Next order of business was adding a mid tach-a-matic so I can use my grader blade Hood hit the steering wheel when opened so the steering shaft was lengthened. Next was the seat. The seat on it looked good but wasn't a WH seat and I hate seats sittin right on the fender pan. Plus it was mounted with wood. So off to TSC on Father's day! Next was the battery box. The L & G battery was bouncing all over.. A block of wood was used to take up space in the battery box. The large box was also hitting the steering gear Used a smaller box. Wil get a better one someday. While I was in there, added a fuse holder to the always hot lighter/light circuit Found a neato front Tach-a-matic adapter for the early tractors at the show so I had to put it on. Now if I put the PTO back on I can run a deck blower or hook up my Generator! As you can see, the hood hinge holes were wallowed out and the shaft was shot along with the hood holes Billy Bob and the welder to the rescue What good are all these changes with out doing the lights? Added new reflectors and LED's from Wally World Gotta bee seen at night plowin so Napa supplied the rear LED tail Multi hitch capability Finally driving it It. With the quieter exhaust You could hear Skonk rattle like that sailor, So back to Billy where he reapaired a missing belt guard mount Don't know what the future will hold for Skonk. Right now it's going to be my primary mode of transport at the Steam Pageant. Still on the fence about a restore. There is about 50 lbs. of Industrial red/ Pink on this tractor. Like it got dropped into a vat. Maybe on it's 50th birthday I 'll do it up for the big show in 17
-
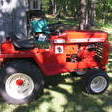
4 pointsPicked up my first 3 seris this weekend, 310-8, runs great and came with a peco vac. Got this from the original owner, had all the manuals also came with a snow blade and a mid grader blade and a set of brand new bags for the vac.
-
4 pointsFinally finished the 417. The seat came back from the upholstery shop late last week. (50 bucks and he did a really nice job on it)! Finished the rims in Rustoleum Metallic. Had to use the old tires though and I found I have two different tires up front and surprisingly, two different rims on it. I need all four tires on it and will wait a while to do it. I added pliable cups to the spindle tops and cut out the area where the cotter pin moves. This will help keep them clean. The governor still revs it up some at idle mid and full throttle so I have to delve into it next. (Not certain what that is all about). I think the PO has a NAPA belt on it and it grabs on the clutch release. It's just a hair too short. It turned out nice but now I have to put it in service! All I do is mow with the rain and temps we have had and the two I alternate with need a little break. (Doing three big lawns).
-
4 pointsPurchased from a Red Square member a few months ago then hauled all the way from the big show by another Red Square member this 1045 serial #21858 is now making it's home in Minnesota. She looks tough but will get the full treatment, new heart is already awaiting to bring this one back to life.
-
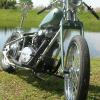
3 pointsFound this in Groveland Fla. got it for $180.00 no motor...so for now I will run the 6.5hp predator from harbor freight for $120.00 till I find the suitable replacement more to stock... 1965 L-105 with Ag tires brand new. It looks pretty small next to the C-81 After mounting the motor on at my shop my daughter couldnt wait long enough for me to get it off the truck before she wanted to jump on and take it for a ride... My daughter mowing her Grandmothers lawn on the 79 c-81
-
3 pointsSteve it may be a 753 front axle is a 1963 Sent from my iPhone using Tapatalk
-
3 pointsI thought it look really cool with The Duke's blower sittin in front of it!
-
2 pointsMeasurements are good too! Have welder, porta band, and lathe, ill make something, lmao
-
2 pointsBert thank you in advance for doing this. Theres a lot of wh around here, not like the mid west, but lots around us. Im a cub guy myself but own one horse. I work with a couple of guys that horse guys. Ill be loking for some pieces to put a tiller on a b80. I have the tiller, need the rest of the brackets. Also Ill ne looking for a steering wheel for my 61 nutroaster. Most of all just meeting other tractor wacos is alot of fun! this was one of 3 fields we did this spring.
-
2 pointsMike, you have been a very busy boy.
-
2 pointsPlow day!?!?!?!? I like Plow days
-
2 pointsSounds good and I will. Drag as many friends as you can Ive been wanting to go to a plow day for awhile now, this could be a good chance to get the word out.
-
2 pointsI'm hoping for some "senior moments" from you during football season. Oh I checked at work today Steve, Your room will be ready Monday!
-
2 pointsNo problem Richard...I really am having more senior moments then I like...it is going with the territory lately. I always have liked trying to figure out what horse someone has...I am probably about 3 wins and 257 losses. I'm looking for that hiding under the chair emoticon and I can't even find that. Yes, there certainly is some tricks to this system...it is not Corvettes. I just learned last week that they used up Clintons on the early 400 suburbans. If you kept track of all the differences between fenders, axles, welded towers, steering wheels, stamped frames, 2 piece gas tanks, foot rests, throttle cables, tool boxes and seats...you would have a 1000 post-it notes and still be wrong...maybe. Here is the deal...all together we are a good team...and right / wrong or close...I know I always learn something...the problem is trying to retain it. BTW...that is an interesting attachment for the rear end of that snow blade...looks like it bolts right on to the rear axle...I think it is home made. I am probably wrong about that not being factory also, but I have not seen anything like that yet.
-
2 pointsThat really does look nice! Might be time for a forward swept with some tri ribs up front and ags out back for my C-165...
-
2 pointsWell it has been a little while since I last posted any pictures of my progress on my C165. Since my last photo update I've pretty much completed my refresh with the exception of the hood. Right now she is wearing a hood from a C125. So a rundown of everything I have done besides paint: 1) Rebuilt the engine, new Kohler rod, stator, and voltage regulator (all not cheap) 2) New carburetor 3) NOS PTO 4) Custom exhaust 5) Ag tires on all four wheels 6) Swept axle w/gear reduction steering 7) New steering wheel 8) New seat 9) Custom dash panels out of aluminum diamond plate - with tachometer, gas gauge, hour meter, and ammeter. 10) 12 volt power outlet and USB outlet to bring her to 21st century standards 11) 85% of the wiring replaced 12) LED lights front and rear 13) Custom 2" receiver I am sure there is more that I cannot think about at the moment. I just have to finish the hood before I install new decals and then I think I will have a great start to another thirty years of life. Not too bad for a worker!
-
2 pointsI only have approximately an acre of grass but the Super C made really quick work of it today. So the beta test is a success. This is thing really is bigger than the standard version. I imagine you guys with the 520's and others with 60 inch decks have same experience. This may end up being more mower than I need but for now, it's great! Here is a after mowing pic.
-
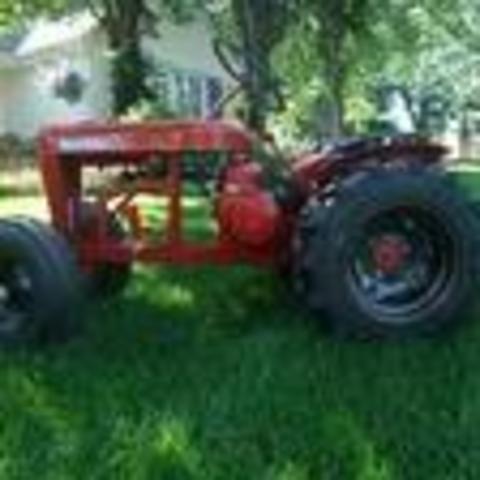
2 pointsJust bought this wheel horse anyone tell me anything about it. It runs and drives has a plow but no mower deck, needs a new rear tire other than that it's in great shape, planning on using it to plow my driveway with
-
2 pointsBrilliant information! * Kelsey runs over to his WH C-100 manual and writes this down.*
-
1 point

155 downloads
7 pages 186.44KB Service assembly SA #107984 replaces the following deck spindles Mower Rotary 1971 36in SD model 5-0710 CW Mower Rotary 1972 36in SD model 5-0711 CW Mower Rotary 1972 36in SD model 5-0720 CW Mower Rotary 1973 36in SD model 5-0721 CW Mower Rotary 1974 36in SD model 5-0721 CW Mower Rotary 1975 36in SD model 5-0722 CW Mower Rotary 1976 36in SD model 65-36MS01 Mower Rotary 1977 36in SD model 75-36MS01 Mower Rotary 1977 36in SD model 75-36MS02 Mower Rotary 1978 36in SD model 85-36MS01 Mower Rotary 1979 36in SD model 95-36MS00 Service assembly SA #107985 replaces the following deck spindles Mower Rotary 1969 36in RD model 5-7365 CW Mower Rotary 1970 36in RD model 5-7366 CW Mower Rotary 1971 36in RD model 5-0600 CW Mower Rotary 1972 36in RD model 5-0601 CW Mower Rotary 1972 36in RD model 5-0620 CW Mower Rotary 1973 36in RD model 5-0621 Mower Rotary 1974 36in RD model 5-0602 CW Mower Rotary 1974 36in RD model 5-0621 Mower Rotary 1975 36in RD model 5-0622 CW Mower Rotary 1976 36in RD model 65-36XR01 Mower Rotary 1977 36in RD model 75-36XR01 Mower Rotary 1977 36in RD model 75-36XR02 Mower Rotary 1978 36in RD model 85-36MR01 Mower Rotary 1979 36in RD model 95-36MR00 Mower Rotary 1979 36in RD model 95-36YR01 Service assembly SA #107986 replaces the following deck spindles Mower Rotary 1976 36in RD model 65-36MR02 - (Blade hole 5/8in.x3/4in. Double-D) Mower Rotary 1976 36in RD model 65-36MR03 - (Blade hole 5/8in.x3/4in. Double-D) Mower Rotary 1977 36in RD model 75-36MR01 - (Blade hole 5/8in.x3/4in. Double-D) Mower Rotary 1977 36in RD model 75-36MR02 - (Blade hole 5/8in.x3/4in. Double-D) Mower Rotary 1978 36in RD model 85-36XR01 - (Blade hole 5/8in.x3/4in. Double-D) Mower Rotary 1979 36in RD model 95-36XR00 - (Blade hole 5/8in.x3/4in. Double-D) - Last 36" RD deck to use these blades Mower Rotary 1976 36in SD model 65-36XS02 - (Blade hole 5/8in.x3/4in. Double-D) Mower Rotary 1976 36in SD model 65-36XS03 - (Blade hole 5/8in.x3/4in. Double-D) Mower Rotary 1977 36in SD model 75-36XS01 - (Blade hole 5/8in.x3/4in. Double-D) Mower Rotary 1977 36in SD model 75-36XS02 - (Blade hole 5/8in.x3/4in. Double-D) Mower Rotary 1978 36in SD model 85-36XS01 - (Blade hole 5/8in.x3/4in. Double-D) Mower Rotary 1979 36in SD model 95-36XS00 - (Blade hole 5/8in.x3/4in. Double-D) Mower Rotary 1979 36in SD model 95-36MR00 - (Blade hole 5/8in.x3/4in. Double-D) - Last 36" SD deck to use these blades Service assembly SA #110986 with metric bearings replaces the above and following deck spindles Mower Rotary 1979 36in RD model 95-36MR01 - (Blade hole 3/4" round) - First 36" RD deck to use these blades Mower Rotary 1979 36in RD model 95-36XR01 - (Blade hole 3/4" round) Mower Rotary 1980 36in RD model 05-36MR01 Mower Rotary 1981 36in RD model 05-36MR01 Mower Rotary 1982 36in RD model 05-36MR01 Mower Rotary 1980 36in RD model 05-36XR01 - (Blade hole 3/4" round) Mower Rotary 1981 36in RD model 05-36XR01 Mower Rotary 1982 36in RD model 05-36XR01 Mower Rotary 1980 36in RD model 05-36YR01 Mower Rotary 1981 36in RD model 05-36YR01 Mower Rotary 1982 36in RD model 05-36YR01 Mower Rotary 1983 36in RD model 05-36YR01 Mower Rotary 1984 36in RD model 05-36YR01 Mower Rotary 1979 36in SD model 95-36MS01 - (Blade hole 3/4" round) - First 36" SD deck to use these blades Mower Rotary 1979 36in SD model 95-36XS01 - (Blade hole 3/4" round) Mower Rotary 1980 36in SD model 05-36MS01 Mower Rotary 1981 36in SD model 05-36MS01 Mower Rotary 1982 36in SD model 05-36MS01 Mower Rotary 1980 36in SD model 05-36XS01 Mower Rotary 1981 36in SD model 05-36XS01Free
-
1 pointGood afternoon everyone, my names Josh, just starting out on here special thanks to the two guys that corrected my improper postings on here. I'm glad to be here I'm hoping I can learn more about my wheelhorse and meet some great people
-
1 pointI need some help identifying this WH. I'm working on learning the details to look for, so here's what I see! The hood stand is solid. The front axle is swept across the width and swept back. The lines on the top of the hood seem to fade out and not go all the way back it has a solid seat pan. The extra frame space in front of the hood looks too long? so would that make it a 1960 Suburban 400 or 401, or could it be an RJ? it's in poor shape, but maybe a parts tractor, or the start of an RJ restore. is the hole to the back left of the hood not factory? it's been for sale for a while, and I'm about ready to check if the price is getting a lot more negotiable
-
1 pointI just bought this wheel horse tractor, it runs and drives great. It came with a plow attachment. I'm planning on using it to plow my driveway. I would like to get a mower deck for it in the future, any help would be greatly appreciate.
-
1 pointLooks like the D-200 has a vacuum operated fuel pump. I wonder if the pump diaphragm is leaking and allowing fuel to be sucked into the crankcase through the vacuum line? I have never had anything to do with this style of pump. Garry
-
1 pointOk, the valve seat is fixed, plus 4 exhaust bolt holes repaired. Cost $110, plus I'm getting gaskets & filter from boomers_influence. another $60. I don't think that's to bad for this fix, I just need to get everything together & hope for the best!
-
1 pointHere are a couple of more pictures. Planing to do a little yard work this fall. A pulverizer I built to plant grass.
-
1 pointAnyone know what model of tractor this kit was designed for? 10" front wheels and 15" rear on a 300, 400 or 500-Series tractor? Looked up a few of the parts to see where they originated and posted the results. http://www.wheelhorseforum.com/files/file/2189-tiller-36in-1987-tilling-kit-82823-tiplpdf/ Garry
-
1 pointLikely a rod came apart After hearing a tapping noise and then you dont feel any exhaust that likely means the piston aint moving. Now for the really bad news! parts for that 18hp are scarce as hens teeth. I'm just finishing up a D-200 and needed a rod and scoured the net for days and days when suddenly one popped up on the bay - whew! Piston and rings will interchange from a K-301 (I'm pretty sure) on my K-532 I'm using piston/rings from a K-321, but head gaskets wont interchange and they too are hard to find. Gaskets and rods will interchange from the K-482, K-532 and the K-582.
-
1 pointThat appears to be the inside top of the case, those holes would be 2 of the upper chassis mounting bolts located under the seat.
-
1 pointOnly (2) Horses bigger is size and weight. D-250 and any of the "XI" line. < Those are big! Anyone who has an "XI" can also chime in. BIG AND ROOMY! Lawn looks nice. RMC
-
1 pointWell worth the effort in getting her looking pretty again
-
1 pointI think it looks great! good luck
-
1 pointThe hood is 1960 400 suburban with an extra hole. The engine is on backwards which is strange - does look like it could hold 2 engines with the frame being that long. It looks like a project that was never finished.
-
1 pointWell I'm the new owner of a 314H with 278 hours on the meter Sent from my XT1080 using Tapatalk
-
1 pointHey guys I'm new here, but I figured I would share my project I have going on. My neighbor was going to take his old c-100 to the land fill and I asked him about it, he said if I wanted it, it was mine. So I picked up for free! I have a 520-H that I'm pulling the onan off of and using it to power the c-100. My later plans are to put the hydrostatic rear end under the c-100 too. Yes the 520 was in perfect running shape, but I never was fond of that body style, so I'm building one!
-
1 pointMyself, I do not believe they are as good. I know people that have used them and have had all kinds of trouble. I have also seen people use them and have had excellent service from them. I have in the past always used OEM parts but now what those parts cost VS. the aftermarket I can no longer justify the price difference. If truth be known Kohler OEM is probably not near the product they use to be. The price of OEM would make you think your getting some magic part that will fix it self and last forever.
-
1 pointFound the problem... belt was installed improperly and also there was an improperly installed bolt and or bushing missing on lift arm. after replacing and double checking everything works great!
-
1 pointI took the piston and connecting rod out before I made the video and when I put it back in I must have put it in backwards but I did NOT run it... If that's what you meant by the was damage already done.
-
1 pointLooks like you have a badly worn Rod. Good thing you caught it before something bad happen. The other noise, not sure of. Could be a broke cam or s well worn cam. Kinda hard for me to tell from video. Kohlers are very forgiving, but when they get way out of tolerance even they will give up and let you know with noises and big bangs.
-
1 point1.) The PTO-to-Deck belt has to be on the INNER-MOST 'V' of the PTO pulley...that is, the V closest to the engine. 2.) Use only the OEM belt (s/b 102742) The aftermarket belts do not EXACTLY match the contour of the Wheelhorse V pulleys leading to drag & premature failure 3.) Either straighten that pulley, or replace it. (I have replacement pulley7s for 42 or 48 " decks). 4.) Check BOTH of the idler pulleys on the MULE DRIVE. If either one drags at all, or wobbles more than little, replace it (I have those too). 5.) Are you CERTAIN that the deck is hung correctly? There is a right and a wrong way to hang it. Check with the DECK manuals on-line in this forum.
-
1 pointI got everything painted and ready to go(except a few small parts are not done yet). I just need 1 more coat of paint on the fenders and hood and we will be in good shape. Transmission is going back together tomorrow and a few other things. I got some amazing lug tires off ebay. They are Carlisle farm specialists 6-12 and the lugs are huge(1" tall). And they are quite thick at 6 ply. Also got some tri rib tires for the front. I ended up using rustoleum farm equipment paint in the quart can and bought some majic paint hardener and they work amazing together. The paint gets extremely hard in just 1 night. Here's a few pics!
-
1 pointSounds like an excellent purchase. Post pic's, we're nosey.
-
1 pointSeat mount/slider is different. Not compatable without re-drilling. Carb on the '97 is that crappy California/EPA approved piece of junk that does not allow mix adjustment. (Ask me how I REALLY feel about it!) Damn near impossible to disassemble and clean. Foot trays are not the same, but can be swapped. Cuts are different if you want to add a hydro pedal. Front axle, drive linkages and cover plates changed when the drive lever moved onto the column in '90. Steering changed to gear reduction in '91. Steering wheel changed in '94.
-
1 pointHi Stuppy! I would try three things right out of the box. First: Your newer EPA carb on that Onan doesn't have an "exposed" Main Jet adjustment but it's there. Do a search under "Engines" on this TOPIC on RedSquare and there is a couple threads with details on how to find, remove & clean the main out. (Plus use Seafoam or carb cleaner to blow out the little orifices in those carbs). Second: Pull your plugs and look at them remembering what was in the rear cyl and what is in the front. If the rear looks black and fouled but the front looks as it should, you should do a compression test on the rear and see if you don't have a loose or hammered valve seat. (Good compression on these Onans would be 90+ PSI in BOTH cyl. You don't want to be off in either cyl by more than 4 or 5 PSI). They will still run down to 30 - 40 PSI but starting is an issue. Third: If your mowing a lot with an Onan, and God knows everyone is from the Ohio Valley through Pennsylvania and the Northeast! You need to keep the chafe/leaves/big grass off the flywheel screen. Wipe it off as much as needed while your mowing or it will over-heat and aid in the early destruction of the valve seats in the already compromised rear cyl. I would tear into the tins on that engine by unbolting it and turning it sideways in the tractor. Blow out the tins and then use a clothes hanger or thinner rod to get between the cooling fins. If you never did this and you mow with the tractor, this can be the problem that leads to the other problems which leads to your wallet bleeding green. The priority is to do the compression test to make sure your no start issue isn't valve seat related. Good Luck!
-
1 pointGot a spare battery with a fair bit of charge in it and a set of booster cables? Clean that cast boss up that the set screw is in so a booster cable clamped to it will make a good electrical connection and the other end to one battery post. Shine up the end of the broken set screw. Place a spare piece of steel rod or flat stock you don't care about in the other booster cable and the other end of the cable to the other battery post. It is going to arc and spark when you hold the steel rod to the set screw for a count of about two. Battery current will try to flow through the set screw, through the rust to the cast iron. The rust is resistance to current flow and will create heat right where you want it. Let it cool because it will be hot. You might be able to thread the set screw out with your fingers because it was loose in the threads when it was installed. You may need to try a second time. Often the rust will blow out as soon as the current hits it. Garry
-
1 pointMY ADVISE IS..... PUT THEM IN THE BOX'S I WILL SEND YOU GET THEM OUT OF THE GARAGE AS SOON AS POSSIBLE.. I WILL TAKE IT FROM THERE..... YOU MIGHT THANK ME LATER..,,,,,,,,,,,,,,,,,,PROBABLY NOT !!!
-
1 pointI'd love to have that tractor the weekend of July 10th. That's when the NYS 2 Clyinder Expo and John Deere consignment auction is held at our local Steam Pageant grounds. I could ride it around and show it off as the best GT JD ever made and reap the profits and sell it at the auction!
-
1 pointI was thinking "Stunt Double" for when the going gets tough!
-
1 pointA lot of Garden tractor lines, made by the various companies, are gone. it's either lawn mower or sub compact tractor. most of the new generation of folks just mow the grass (since they can't afford to pay someone) then go back inside to their virtual world.
-
1 pointPrior to owning a I had a 16 HP Lowe's (Murrey) with a 42" deck that was a couple of years old. My first 953 came with a 48" deck, a 9.6 HP Kohler and would cut circles around the Lowe's. Some how I don't think they are telling the truth about the HP ratings! Long story short I gave the Lowe's lawn tractor to the kids and it died after about eight or nine years, the 953 is 50 years old and going strong, got to love it .


This leaderboard is set to New York/GMT-04:00