
Leaderboard


Popular Content
Showing content with the highest reputation on 07/11/2015 in all areas
-
7 pointsFigured i would start a new thread on this tractor. I gave it a bath the other day and today I figured I would just give it a quick coat of wax to see how it looks before I degrease everything underneath "not that there's a lot under there". I bought this tractor with the intention of cleaning it up and selling it but I am really beginning to like it. At 400 hours it's like a new machine. Really not sure what I will do with it. Storage space is always at a premium so we'll see what happens. I knew it needed a new PTO switch so I ordered an OEM Toro one. The front hood decal has some big scrapes in it and the left side 315-8 sticker is missing half of it so I am going to order new ones. The cup holder has a couple of cracks so I will order a new replacement for that also. The left footrest is just starting to bubble at the edge which I assume is from water sitting under the plastic. New OEM footrests are still available from Toro for $65. Otherwise that's all it needs besides a nice buff job and some detailing. The 48" deck is still in the back of my truck. Going to pull that out and clean the underside then wash and wax it.
-
6 pointsIf you substitute the name Kolher or Briggs or Kawasaki for Tecumseh, your post sounds identical to 90% of the other posts in the engine category, Troubleshoot the symptoms, and ignore the pissing and moaning regarding what name is on the engine.
-
5 pointsHere are a few pictures of the plates I collected from some of you guys at the Big Show and other places. I will be mailing these to Koen ( C-101plowerpower ) in the Netherlands this week. Thanks all that made this possible...it is quite a collection.
-
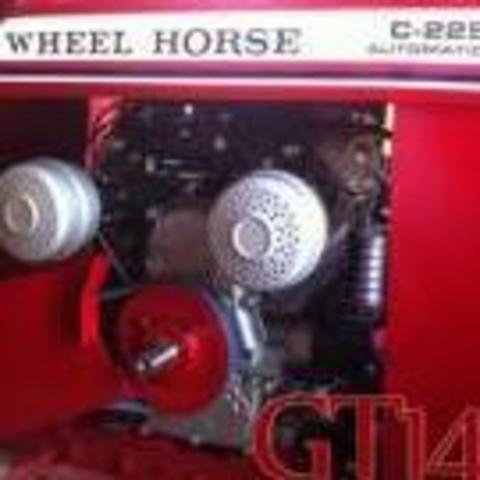
4 pointsI just picked up this gt 14 from another current member its all straight but been repainted many years back . I am going to give it a refresh . Hope you all enjoy my pictures Did some weldinat the shop to both fenders same spots stress cracks . Prep time Paint time . Im happy with outcome !
-
4 pointsHere's the photos the little I've used it. It is in need of a tune up because I think it had been sitting a while it's not bad the deck is a little rough I'll post after pics of it once it's cleaned up Sent from my iPhone using Tapatalk
-
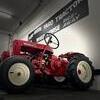
3 pointsKnobs and final engine and deck decals installed. All decals by Denny Clarke and http://www.RedoYourHorse.com! Finally done!
-
3 pointsWell I been looking for a Loader for my Wheel horse D tractor now for awhile and finally found one. Drove 4 hours to Ohio to get it and seems pretty solid with alot of potential for a good project. Little confuse on the rear of the tractor has brakes and foot pedals like the D200 tractor. I have a feeling it is a Mixed D tractor...
-
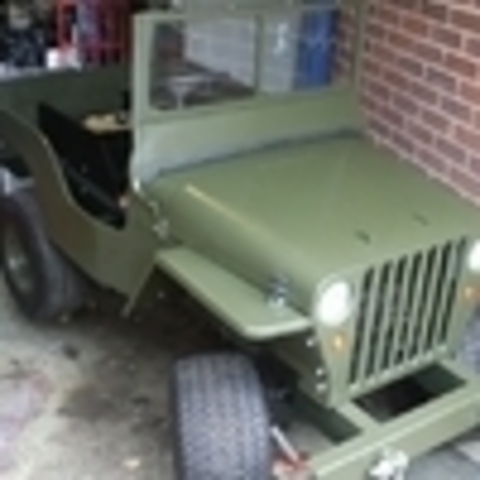
2 pointsJust picked this craftsman up believe it to be a early 60's cannot find any info for sure though, has a strange wind up lever on motor then a release lever to start instead of a pull start but don't see any other tags with the body on it other than 6 hp. pretty cool looking though.
-
2 points
-
2 pointsThat trans actually looks pretty clean. I don't think you have to press out the bearings, just be careful when you rinse them and real careful if you blow them dry with an air hose. Then oil them a little with some 90wt oil. The needles should stay in the shell. On that plug, I would just pull out the fork shafts, detente balls and spring with the stop in it, then just drill it out with a 1/4" drill bit...a 3/16" drill bit just may grab it out for you. Don't put a plug back in, just do a finger of grease or maybe a touch of silicone calk. I think you should put the forks back on the shafts before you pull the shafts out of the case, just to make sure you have them mounted correctly. It is easy to get them turned around wrong.
-
2 pointsI had an Illinois plate the was my Dad's. It had "DBMIGF" on it...it stood for "Don't Bother Me, I'm Going Fishing". My daughter was over here and she spotted it and latched onto it. I'll take them John, If you want to send them to me. Thanks Mike, the Michigan plates used to be those colors. They are pretty heavy...I have a feeling this is going to cost some bucks.
-
2 pointsSurprised the Michigan plates aren't Blue/ yellow/gold Just for the heck of it., Tell us how much all that weighed when you send it.
-
2 pointsI might be able to swing down there as well! Keep us updated as time gets closer.
-
2 pointsThe HH100 is a good engine, don't get discouraged. I have two onans , two kohlers and two tecumsehs. All of them at one time or another have needed a bit of tinkering. I have a diverse herd and usually prefer to use the HH100 powered custom worker. Its reliable powerful and revs like a briggs but will chug down low like a kohler. If you can put up a few pics of your current carb/fuel pump setup Id be happy to try to help. thanks
-
2 points
-
2 pointsGlad to meet another , Linder- And thanks to Bert for posting your picture! Linda
-
2 pointsE30P coil data off an internet search shows primary resistance is 1.30-1.50 ohms and secondary is 7,700-9,500 ohms. Primary coil resistance under 3 ohms DEFINITELY REQUIRES AN EXTERNAL RESISTOR. Measure the primary resistance of the new coil before you buy / install it.
-
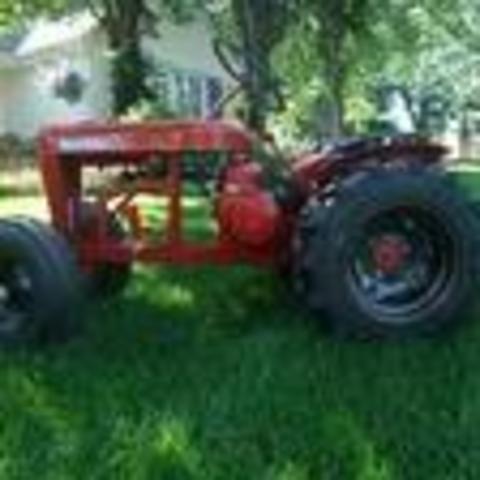
2 pointsI got everything painted and ready to go(except a few small parts are not done yet). I just need 1 more coat of paint on the fenders and hood and we will be in good shape. Transmission is going back together tomorrow and a few other things. I got some amazing lug tires off ebay. They are Carlisle farm specialists 6-12 and the lugs are huge(1" tall). And they are quite thick at 6 ply. Also got some tri rib tires for the front. I ended up using rustoleum farm equipment paint in the quart can and bought some majic paint hardener and they work amazing together. The paint gets extremely hard in just 1 night. Here's a few pics!
-
2 pointsI pay the same amount as anyone else but it isn't bad each blower came out to 12 bucks I'm just lucky enough to get to see them and grab the stuff in time and all the guys I work with help me out if it's wheel horse it gets put to the side for me and I assure you nothing wheel horse will be shredded as long as I can help it who's knows I get too much and I can help out fellow wheel horse lovers on this awesome forum
-
2 pointssome up dates on the db puller
-
1 pointHi all, new to the forum seen but not to wheel horses. I have a B80 with a 14hp kohler swapped from a no name 14 8speed and a C175 with a series 2 replacement engine. They are used almost nonstop on my farm for mowing grading pulling and so on. My son is a member here known as bert, some of yall may know him. He had asked me if we could use the farm for a red square southern meet n greet location and I thought it was a great idea and wanted to join the group and say hello.
-
1 pointSo, I got the transmission gutted. This is my first gear box of any kind that I have cracked open. So my rookie eyes tell me that any rust of any sort in there probably isn't good? I have access to a parts washer at work. I was going to run the transmission casings through once or twice. My main question is, should I press all the bearings out before I run it through? Can I trust a good thorough drying and oiling afterward to keep the needle bearings intact? I'll also have to scrape it out by hand I suppose. Have any of you seen anything like this? worse? Am I over reacting and I should just throw 'er back together? See that attached photos for a bit more clarity. Second thing, I don't have the detent assembly out yet so my shift fork rails are still installed. I just popped out the roll pins to get the forks and their gears out. I posted a picture of the 1/4" press in cap on the outside face of the transmission. How the devil do you get that thing out? I imagine you guys have some creative ways to do it? I'll PM Mike in OH as well. Thanks for any help!
-
1 pointHere is my wheel horse classic GT 315-8.
-
1 pointNice job Mike! Looks great! Job well done! You're getting me excited for when I get my engine back.
-
1 pointSweet . . .fine job
-
1 pointLove the new led lights
-
1 pointYeah, What's up with "The Ohio State" colors?
-
1 pointThat's easy! Just spray it in there.
-
1 pointWelcome... I had met you before but always nice to run into good people again!
-
1 pointWow congratulations. That's one beautiful horse and a great price as well Can't seem to find anything that nice around my parts
-
1 pointThere were over 2 dozen wild ponies on the beach today on Assateague island state park (Maryland) Sent from my iPhone using Tapatalk
-
1 pointI don't see any attach a matics or PTO's on any of them!
-
1 pointAnother week end another update. First the wheels, I had them shot blasted and undercoated, gave them a couple of coats of paint....then scratched it all wrestling the new tyres on. Not a job I would like to do on a regular basis. I am just waiting for the new bearings then i can have a proper drive around I also got the seat finished, back on the metal pan, looks pretty good, only time will tell how it will last.
-
1 pointI'm NOT a Teccy fan but they are not bad engines. The carbs suck. The aftermarket carbs are good...work well right out if the box. Looks like you paid way too much for your carb as they are available for $20-35 Chinese style. Good luck!
-
1 pointVery nice, my next refresh will be my 69 GT14. I changed out the engine to an 18hp Kohler a few years ago and did a minor clean up at that time.
-
1 pointDo you have the belt routed correct? any pictures? I had to replace the disengage lever (49) in the past. Is the pulley inline with the other pulleys? Drive belts do stretch over time and replacing it might might first step after ensuring everything else lines up. hope the picture from my photobucket comes through. but 1988 520 parts break down available on multiple sites
-
1 pointI sold the Napa IC64SB for 10 years to farmers, tractor shops ect. Used on just about every gas powered piece of equp there was around here. Including home made power plants ect. Should work fine.
-
1 pointHEY FLORIDA HORSE GUYS ... PM me and lets start planning a JAN - FEB event here in the SUN!!! Of course it will be open to everyone, but us locals need to plan it!!!
-
1 pointI know I already have one of those horses Sent from my XT1080 using Tapatalk
-
1 pointDon't bring any....then you will have room for me to send 6 home with you!!!.....you pick em'....
-
1 pointSerial 38410 is a 1963 model 33R Lawn Ranger Serial 38482 is yours Serial 38894 is a 1963 model 633 Garry
-
1 pointI'd like to stop in also. I'm in Lenoir. Is anyone planning on bringing their tractors or parts to buy,sell or trade?
-
1 pointThese small metal spring clips are designed to dig into the paint and metal wheel, and they will scratch the paint and slightly damage the metal wheel. Wheels in regular mowing-towing use take a very rough beating/bounce and just a friction grip with plastic or rubber just won't hold them on –– for shows or just display, a friction fit would be OK, but I think we will have to accept the "easy-to-fix" damage the clips will cause. With the Chrome Wheel Covers on, no one sees the scratch under it anyway. Also, important to always use all four clips around each Wheel Cover. .
-
1 pointCount me in too ! I'll bring a Wheel Horse and a Generator
-
1 pointQUOTE: "You may be the most watched UK celebrity after David Tennant So it's Dr. Who, Broadchurch and UKWheelHorseBloke" For me its; 1 UKWheelHorseBloke 2 Benny HIll 3 Dr. Who 4 Fawlty Towers
-
1 pointI am interested also, sounds like a great idea!! Jim
-
1 pointlooking at the engine collour i'd say it's an kohler service engine(replacement) the gray is the factory primer so you could rattle can it the collour of choice when you put it in the machine
-
1 pointGlad you have sorted the running issues. As for the Engine colour, it is probably not the original Engine, as in 1972 they sprayed the Tractor partially assembled. So the Engine would have had red paint all over it and the wiring probably (like mine was). If you have an Engine I.D Label on the Shrouds and you can post the Model, Spec and Serial numbers on here, we can give you some info on it. As for Seat adjustment. The Seat was supplied from UK to the WH Belgium Assembly Plant, rather than Import many Seats from the U.S.(some were imported and fitted) . This meant the Pre drilled Fender Seat Pan spacing (for U.S. seat pattern) did not match the UK Bostrum Seat bolt pattern, so were just drilled to fit (a Belgium Bodge). This results in excessive perforation of the Seat panel area and weakens it considerably. You can drill more holes if you wish, but I would advise adding a strengthening plate of 2 or 3 mm on the area as I have done on both of mine. After late 1973, they added Springs between the higher seat position and Fender Panel, as well as increasing the length of the upper Steering Column to compensate for the need for leg room. Just one observation, and you may have already sorted it, but I see a possible trapped leaf under the Cylinder Head Shroud?. Will be worth taking the Shrouds off and ensuring the Cooling Fins are all clear. Regards.
-
1 pointToday I had time to clean the engine and take the carb off for a check over. I couldn't find anything that stood out other than the float seemed a bit high, reset it lower and reassembled it all. It now runs beautifully, no flooding, knocks or phuts. I ran it backward and forward just fine, gears, clutch and brake all seem to work as they should. I have a couple of questions: The engine is grey and looks as though it has always been grey, is this usual? The seat is a bit too close to the steering wheel, I had a look but there don't seem to be any holes at the correct centers further back, were there adapter feet available in the past?
-
1 pointI bought fuel put some in.....filmed it starting after a couple of turns, or at least I thought I had filmed it...Camera was on pause, I filmed the bit where the carb flooded and it would not restart. I think I need to have a look at the float chamber. The main thing is that my horse lives!


.JPG.ef4f4e37c6517f95bd36dbf5a1dfe0f6.thumb.JPG.2f2f4facf8a15b67d67829dcbaa787c9.JPG)


This leaderboard is set to New York/GMT-04:00