
Leaderboard
.JPG.9f2ecb26065c66527b0730084ab7fc7a.thumb.jpg.7dc8a04d9a53d44ee2b23f26ee94496f.jpg)


Popular Content
Showing content with the highest reputation on 05/09/2015 in all areas
-
12 pointsMy new building arrived almost a month and a half early.Good thing I've been preparing for about 3 weeks.I had to get rid of about 7,000 pounds of scrap metal.Cut down 4 trees and take out 2 of the stumps,take down my garden fence,move my chicken coop,and spread and roll 90 tons of crusher run.The three guys who built the building rolled into my back yard about 9:15 this past Thursday morning and unloaded their truck and trailer and started working.5 minute water break in the late AM.Half hour pizza and wing break about 4 PM.Building was done,mess cleaned up,tools and equipment loaded back up,and they left about 8:30 PM.I never saw 3 guys work so hard and fast.The building is all steel construction,30 ft by 30 ft.12 foot high walls.Two 10 by 10 roll-up doors,36 by 80 inch personel door.I'm going to use the building for equipment storage and to store some of my Horses that have been living outside.I'm going to put some metal shelving that I bought about 10 yrs ago along the side walls.No electric power,no heat,no insulation,just a crusher-run floor.Plain and easy storage.Here's some pics.
-
8 pointsI have one of those 17 cu ft yard trailer/carts from the big box stores and that thing is worth its weight in gold for doodling yard refuse, but I've always wished it had a bit more capacity.... Sooo since I have had it several years and it was needing a 'freshening', I figure while I've got in the 'repair shop' I might as well try and add some to its capacity ability. Of course since it was needing paint it naturally was gonna some RED! put on it! I went to the H depot and looked at what was available, wanted something that was treated because the cart has to live outside and settled on round nose decking, a 2x6 for the uprights. and 6 of those handy support thingys. Construction was pretty straight forward - a drill, handfull of deck screws and a few lag bolts and --- by golly the dang thing looks pretty good! (Course that RED paint is what makes it look REALLY good) Think I just may have to get me a couple 'Wheel Horse' decals from Terry to top it off with.... Thought you guys would like it too and maybe get ideas for your cart....
-
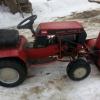
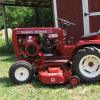
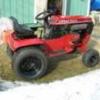
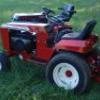
8 pointsI had a listing on ebay for my 96' 520 with 60" deck. Got to taling with a potential buyer and he offered up his C160 plus some cash on top. He is from Rochester NY and I am in CT. He made the trip out to my place today to make the trade. I would think it is about 5 1/2 hours each way...He is a really nice guy and knows his horses for sure. He has traveled around the country buying out many Wheel Horse dealers back in the late 90's. He went to the 2nd annual Wheel Horse show in PA but then life got in the way of his hobby so he sold a lot of his stuff and lost interested. He did manage to restore this one back in 07'. Did a nut and bolt restoration including rebuilt motor and tranny, auto paint, upgraded front end to the HD spindles and all new wiring. Since his restore he tried not to really work it. He also has a 520-8 that he uses as a worker. He and I are both happy and I got some parts to boot. I am not thrilled bringing a tractor to the big show that i did not restore myself however i think this one will be there for sure. I plan on pulling the wheels tomorrow and painting them the correct white. Has a few touch ups to do no the rear end and throw on the wide 10.50 on 520 rims to give it the look I want. Here she is...
-
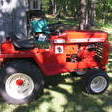
6 pointsCraig, you just needed to find one like I have. A '74 C-160 with a OHV HH160 Tecky. Its got power, class, fuel economy, sound, etc. Can't go wrong Never had a 520, but this thing works hard and loves it.
-
5 pointsNew here from Mi. bought my first rounded nose WH around 18 years ago or so because I thought it was cool looking has been in storage ever since and got buried under stuff and forgot about, last year bought another for same reason and now this week bought this lawn ranger to actually use to mow with to replace my old craftsman, has a newer motor but works great so guess I'm hooked now need to dig out the others for pix
-
5 pointsFor a better idea why a starter relay can intermittently work and then sometimes cause issues, the following are a few images of a dissected relay. If you are interested in more detail, search for "relay autopsy" and it should take you to my original thread posted a few years back. The copper "disk" is forced into the two copper studs when you engage the START switch. After years of use, the disc and the studs become pitted and less conductive. Sometimes the copper disc can be flipped over for a new surface and the terminal posts spun around 180 degrees to use new copper on the bottom of the terminals where they contact the copper disk.
-
4 pointsI know I'll get flamed but I'll take a C-160 over a 520 any day.
-
3 points701 Went to its first show in Jackson County, Indiana - The 6th Annual Jackson Co. Antique Machinery Association Show held in Brownstown , Indiana at the Jackson Co. Fairgrounds . We were asked to be the second garden tractor in the 2:00 PM Show Parade held on Saturday May 9th.
-
3 pointsHumm...I'm thinking the eight foot bed... makes the new decal look too far away.
-
3 pointsFriday features the evening cruise... which makes for an incredible sight to behold. Then Saturday is our parade day.
-
2 pointsPart 1 I rewrote the parts list from an 18 Automatic Parts Manual because it contained errors, and I wanted it to basically be used as a simple checklist. I also began {term used rather loosely} to make what I am referring to as an Assembly Order List. Essentially a list of how I think my tractor should be reassembled in a logical order. In this first part I will commit to complete steps 1-23. The edge trim on the axle openings is my addition not OEM. What I started with, Pics 1-4. The frame, Pics 5-8. Assembly Order List, 9. The front axle, 10-11. Grease fittings, 12-13. Axle Pivot. 14. Washers, 15. Lock-nuts, 16. Hex-Bolts, 17. Edge trim, 18-22. Thrust washer (upper), 23. Thrust bearing, 24. Thrust washer (lower), 25. Left spindle, 26. Left "E" clip, 27. Right "E" clip, 28. AO page 1 Complete, 29. Next update may be awhile as I need to have both some machining and welding done before I can complete AO page #2. P.S. The frame pictured is not original to this tractor, but it is from an 18 Automatic, even though this frame is not equipped with the seat mount spring. I removed it, in order to add a hydro fan. The axle and 1" spindles are from a different tractor as well, and consequently Item # 17 and #22 both have part #'s for the 3/4" "E"-Ring clip. This should be replaced with the part # for the 1" "E"-Ring clip. I just didn't have that part # readily available when I made the AO list. This list also has the part #'s listed for the 3/4" parts in steps 2 and 13-21.
-
2 pointsso, coming back from fishing this morning, saw this with some other steel piled in the front of an old house with a free sign. asked if I had to take it all and was told no, pick what you want. now the question, What do I have? I already have figuered out that it probably is not compatible with my 414-8
-
2 pointshi all, even though this has been done for quite a while now it occurred to me that I haven't actually got a video of my new stack! please excuse the poor quality filming, i was more concerned with getting good audio really. sounds even better in person, far better than the verging on offensively loud stock exhaust. I drew quite the crowd in the end, notice the VERY life-like gnome and his bears stat on the flower bed! http://i896.photobucket.com/albums/ac161/callummcgrory/th_IMG_1557_zpsppzus58b.mp4 hopefully the video has worked, callum
-
2 pointsI got the rear tires mounted on the 520 rims today. Plan on bringing those to the sand blaster this week then I can paint them. The fronts are all done. I used Navajho White I had mixed. Could not find canvas white at the store. I like the stance...I was able to buff the paint and then wax it. Came out real nice.
-
2 pointsMike must be trying to win the "Husband of the Year" contest; A plastic shed for Mother's Day, such a romantic,
-
2 pointsBet my wife could find it.
-
2 pointsWell, nothing went bang so out came the grinder.. Strange baffle thingy.. I guess it's there to stop dirt from entering the carbs.. About to go under the knife grinder After fuel tap pipe enlargement surgery.. I had to lower the fuel tap to give me a fighting chance of getting some sort of air filter fitted! Yes the fuel tap outlet is lower than the carb fuel inlet, but as the tank is above the inlet gravity should still do it's thing and fuel the carbs up. The old fuel tap hole was blocked up by screwing in the end of this bolt and some welding. I still need to make some brackets to bolt the tank down but as it will need to go in and out a lot while I sort the induction side of things out that job can wait a little while.. Speaking of induction, this was the carbs to air filter box pipework.. I only needed the carb ends.. Which were a perfect fit over this 2 inch diameter pipe, or part of a Reliant prop shaft to give it it's full name.. The plan is to plumb this pipe into both carbs and stick and air filter on both ends.... This time I will make sure I get the right size filters
-
2 pointsbeen listening to the Word. killer funk/rock/gospel fusion. https://www.youtube.com/watch?v=mD5vGSLYtyE
-
2 pointsI can't honestly say I have scrutinized the "build quality" as the tractor has had zero failures. The front axle is cast iron, tires are Carlisle, fuel line Goodyear, engine Kohler - all familiar names without any penny pinching seen. All maintenance points like grease fittings are readily accessible.The only items I will have to address are lifting paint around the foot pad area and fraying of the seams at the top of the vac collection bags. Other than that, just 2x a year oil changes and the occasional thorn in the tire, but the build quality has been sufficient to enable what I consider above average homeowner use without experiencing any setbacks. Every time I go to start the thing - it does. When I engage the PTO - it does and provides a quality of cut that surpasses anything I have every used before. Just wish the dang thing had a mower deck larger than the 42" on there now! So figuring purchase price divided by 12 years usage - that equates to about $2 a week for reliable turnkey performance. I'm not a Deere fanboy or a WH detractor but I sincerely cannot understand the "big box" bashing that goes on. It's great to have the talent to troubleshoot a broken wire and tackweld a broken joint on demand for a 40 year old garden tractor, but to give someone with modest lawn care needs the impression they are "throwing your money away - you will be sorry" - nah !
-
2 pointsWow Ian !! Your videos amaze me. I can't wait to see this monster when you get it finished. Thanks for keeping us updated.
-
1 pointFigured this might be a good thread to start... Kinda like we have "what's in your mirror" but this thread will be for those of us who sold our tractor or attachments etc... So......... I will start. I sold my 1976 D250 today with a 72" mower deck and front snow plow. A member here from the eastern part of the state bought it. He was driving a older Ford that was let's just say ......at it's capacity. I did confirm with him that he made it back home tho. Nice meeting you today Jason. Good luck with it. I know at some point I will regret selling that bad boy !! Oh yeah he also took an old 25hp Evinrude outboard I was giving away.
-
1 pointHere it is on my 73 along with the std. tongue hitch. I use it for my single bottom plow
-
1 pointSlot hitch for the older series. You can put it on your 520 though.
-
1 pointParts list Some service bulletins The 1055 on the ID plate is the Julian build date - 55th day of 1981 Garry
-
1 pointI used a linen beige on the rims.
-
1 pointMT Wolf,PA
-
1 pointWhere is this show?
-
1 pointYou shoild have to hammer it in. I would say that if your last roll pin fell out and the time spent with the solid nail, you will probably have to drill this out up to the next size or find someone with a good condition replacement. I had to drill out the holes on my 854 steering roll pins because they had wallowed out the spindle shaft too much.
-
1 pointHad both of 'em... still have the 520. Patiently waiting for the video.
-
1 pointthis may be far fetched but it's possible that your fuel pump is leaking a little gas in to the motor oil and your smell is coming from the vent in the valve cover? also is the float height correct in the carburetor? Brian
-
1 pointThe problem I have is that I have an nos cigar lighter but there is no place to put it in this dash-
-
1 pointThanks Mels Thanks Pullstart. It was just a flash of inspiration one morning really Thanks Jerry, happy you like my videos.. Just uploading the next one as I type this Your welcome to the updates, in fact here's quite a big one The braking system is now finished bar a bit of plumbing and finding somewhere to bolt the reservoirs to. A few photo's of the finished linkages.. WN now has a working throttle pedal. A simple bolt on bracket converted the pedal from push to pull. To stop the clutch and throttle pedals from flopping backwards I made a couple of these anti-flop stopper thingys. Time to move onto a different part of the build, fuel and air. Here's the tank I'm using, I bought it from Nigel long before the workshop move. To make sure the engine gets enough fuel I needed to fit the Honda's fuel tap, which means I need to cut a bit out the Honda's tank.. Even though the tank had been empty for many months with no cap of tap fitted it still had that old petrol smell.. So be be sure it wouldn't blow up when I cut into it I used my old trick involving some rolled up paper and a blow torch.... And yes I did light it outside
-
1 pointMark, is that the corvette checkerd flags I see on the center cap? Cool wheel,,,,,,,,thumbs up. Glenn
-
1 pointYou definitely got the better end of that deal.
-
1 pointStarted another thread (see this link)
-
1 pointThat isn't an Allis Chalmers horse, that's an Industrial Electro. As for the value it would depend on how many others are for sale and if the color isn't a deal breaker. In my area you could probably get $700 to $800 for that package, may be higher or lower in your area.
-
1 pointBeen praying daily and am delighted to hear the prayers are answered, as they always are when we have faith and let God do His work in His own time. Great news, Jim! Best always, ~Duff
-
1 pointThere is still hope for a Hawks / Habs match up! Hope the Hawks don't get rusty. NHL playoffs are to long. By the time they Stanley Cup finals are over, Glen Campell will be in Phoenix and he won't be rising!
-
1 pointhome made wine??? what have i been missing??? Never know.....BIG SHOW is coming up.... im gonnna be there.....and no wheels are gonna fall off?? did he really say home made???
-
1 pointSaw that RJ at Zagray, Good to have you back at the WH stuff again!
-
1 pointAMEN!!!!
-
1 pointI went and looked at a new truck today, so much crap on them no way I could work on it. Ya need to be a computer tech to work on them. what a $62,000 piece of crap
-
1 pointAnd here is a guy who said he is all done with buying tractors...... I was not the seller but was the carrier on this one.
-
1 pointI've heard of the cha cha slide, now there's a dual action slide! good thinking Ian
-
1 pointThanks mate Only a small update guys.. Happy that my strange braking system will work, today I started to refine it a bit. New connecting lever on the left, prototype on the right.. As you can see I decided it needed a bit of shape to it Here it is fitted.. The handbrake lever looked like it had been pulled from an old Marina or something, so I gave it a "Wheel Horse" make over. The bottom half will be covered by the side panel.. I think it looks more the part
-
1 pointGenius, proper hot rod now.
-
1 pointThanks a bunch Steve! I'm gonna enjoy this bad boy! (Cole is gonna die when he see's it!)
-
1 pointWell, I've not managed to get much done this week due to a mixture of illness, visitors and having carpet fitted at home.. Both foot plates are now bolted down, I found some bike mounting brackets with captive nuts which came in handy and are much more fun to use than drilling through steel box.. This bit of box does not carry any weight and is only there to stop the top of the foot plates from vibrating.. I will add a little bit of bracing though. Here's something to make you laugh, it did me... I ordered some air filters which arrived yesterday... I may of got my sizes wrong! The hood stand has had a couple of bit's of box welded to it. Which along with a couple of hefty mounting brackets has put a lot of strength into it, no longer does it wobble when the steering is turned. The n/s foot plate has been fully welded and ground down.. I did for a while yesterday think about having foot gear change and a suicide clutch, but decided I'd rather have both hands on the wheel when the clutch is dropped at 9000rpm This is the mount for the suicide shift made for a bit of thick steel and a cut down bike swing arm bolt.. Shifter mounted and the linkage worked out, though you will have to wait until the linkage is done before you see it. The fender pan has been bolted down, but I thought a photo of 6 bolts would be boring so I didn't take a photo.. And to finish off this update, I needed to work out where the pedals would go so I climbed aboard, at which point Nigel wandered (not waddled ) in and grabbed my camera
-
1 point
-
1 pointthere ya go


This leaderboard is set to New York/GMT-04:00