
Leaderboard

.JPG.9f2ecb26065c66527b0730084ab7fc7a.thumb.jpg.7dc8a04d9a53d44ee2b23f26ee94496f.jpg)


Popular Content
Showing content with the highest reputation on 05/08/2015 in all areas
-
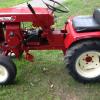
7 pointsPart 1 I rewrote the parts list from an 18 Automatic Parts Manual because it contained errors, and I wanted it to basically be used as a simple checklist. I also began {term used rather loosely} to make what I am referring to as an Assembly Order List. Essentially a list of how I think my tractor should be reassembled in a logical order. In this first part I will commit to complete steps 1-23. The edge trim on the axle openings is my addition not OEM. What I started with, Pics 1-4. The frame, Pics 5-8. Assembly Order List, 9. The front axle, 10-11. Grease fittings, 12-13. Axle Pivot. 14. Washers, 15. Lock-nuts, 16. Hex-Bolts, 17. Edge trim, 18-22. Thrust washer (upper), 23. Thrust bearing, 24. Thrust washer (lower), 25. Left spindle, 26. Left "E" clip, 27. Right "E" clip, 28. AO page 1 Complete, 29. Next update may be awhile as I need to have both some machining and welding done before I can complete AO page #2. P.S. The frame pictured is not original to this tractor, but it is from an 18 Automatic, even though this frame is not equipped with the seat mount spring. I removed it, in order to add a hydro fan. The axle and 1" spindles are from a different tractor as well, and consequently Item # 17 and #22 both have part #'s for the 3/4" "E"-Ring clip. This should be replaced with the part # for the 1" "E"-Ring clip. I just didn't have that part # readily available when I made the AO list. This list also has the part #'s listed for the 3/4" parts in steps 2 and 13-21.
-
7 pointsThis is why reading Craigs list is dangerous. I find another cart yesterday. Just like the one I bought a few months back. This one lead a easy life and lived in a garage. The owner took the dump handle off and bolted the cart and hitch together. He just used it to haul. The bed is very nice. No deep rust pits. Over the years he painted the rims to match his 310-8 wheel horse. I just hit it with the hose to get most of the dust off. The shape is pretty darn good. Needless to say I feel like I struck gold. The best part. Less than a mile away from home. When I pulled in the driveway to smuggle it in. The Mrs. Pulled in right before me. Suprisingly. No reprecussions. Enjoy the pics. Glenn
-
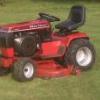
6 pointsI had a listing on ebay for my 96' 520 with 60" deck. Got to taling with a potential buyer and he offered up his C160 plus some cash on top. He is from Rochester NY and I am in CT. He made the trip out to my place today to make the trade. I would think it is about 5 1/2 hours each way...He is a really nice guy and knows his horses for sure. He has traveled around the country buying out many Wheel Horse dealers back in the late 90's. He went to the 2nd annual Wheel Horse show in PA but then life got in the way of his hobby so he sold a lot of his stuff and lost interested. He did manage to restore this one back in 07'. Did a nut and bolt restoration including rebuilt motor and tranny, auto paint, upgraded front end to the HD spindles and all new wiring. Since his restore he tried not to really work it. He also has a 520-8 that he uses as a worker. He and I are both happy and I got some parts to boot. I am not thrilled bringing a tractor to the big show that i did not restore myself however i think this one will be there for sure. I plan on pulling the wheels tomorrow and painting them the correct white. Has a few touch ups to do no the rear end and throw on the wide 10.50 on 520 rims to give it the look I want. Here she is...
-
5 pointsThat,s nice. I drove through a torrential rainstorm to get my cart. It will be making it's first show appearance this year.
-
5 pointsIssues with a starter solenoid can arise when the internals of the solenoid become pitted and vaporized from repeated high current arcing. This is a very easy condition to check by measuring voltage drop across the solenoid terminals. Set your meter on low volts scale (2 volt or 20 volt scale). Connect one lead of the meter to each of the large terminals on the solenoid. Crank the engine with the spark plug temporarily disconnected. Note the voltage reading on the voltmeter. Whatever voltage you see on the meter is indicative of a power loss in the solenoid - power that should be going to the starter but is being dissipated as heat in the solenoid. Typical voltage drop in a solenoid should be much less the 0.5 volts (half a volt). If you see one or two volts dropped across the solenoid, a replacement is needed.
-
4 pointsBig thanks to Ross who sold me his 417-8 Speed without finagling! Made the 140+ mile drive to get the tractor with the Series II KT Twin on it and remembered something else that came on these machines. The 12 volt DC lift for the attachments. (Plus a shiny chrome air cleaner and a little chrome left on the muffler). It needs work but my plans are to bring it back close to it's former self. The carb needs a cleaning and new lines plus plugs, points & condenser. It doesn't run bad considering the condition of the plugs and points! PS....that lift cycles faster than I thought it would. Much easier to pick a height for the deck than the 520 was before it lost it's mowing privileges.
-
3 pointsI know I'll get flamed but I'll take a C-160 over a 520 any day.
-
3 pointsVery nice. The 7-2211 was produced 1968-1974 and they made so much product those years that they used the 493435 serial number in each of them. The 1971-1974 models would have had a -6, -7, -8 or -9 suffix following the model number. That leaves this one a 1968, 1969 or 1970 model. Garry
-
3 pointsCan you guess? Ha. Its been a little cutoff at the knees. Got a nearly complete 80's 520H that was in rough shape. Guy bought it for the engine to use on his Deere. He started parting it out but I was the first buyer and got the whole thing for a real good price. He was a good guy! Much of the tins and the deck were not salvageable so they were donated to his scrap pile. You can also get a peak at the really clean low hour Onan P220 I got from Carl (zieg72) today as well. Oh and the oil is from the tranny filter bracket the guy put in my bed and flipped over . At least now my rubber bed mat, ratchet strap and half of my rented trailer will not rust. AND i know. i know the trailer is the wrong color! Sunbelt can still beat everyone around for a half day trailer rental....
-
2 pointsI don't think a safety switch would stop the lights from working. Thanks for the good news!!!!!!!! Should I jack up the seat and drive a new tractor under it???????
-
2 pointsThat isn't an Allis Chalmers horse, that's an Industrial Electro. As for the value it would depend on how many others are for sale and if the color isn't a deal breaker. In my area you could probably get $700 to $800 for that package, may be higher or lower in your area.
-
2 pointsWow Glenn , that looks pretty much brand new , she is a real beauty . Even sweeter that the Mrs didn't mind the new arrival.
-
2 pointsWell i finally got a little time to try the marker test. You guys were right. I took off the hubs and there was one keyway in one and the other was missing. Thanks for the help!
-
2 pointsWas at Steve's house today looking for some RJ parts. He had a guy coming 5.5 hours to do some horse trading. Just as he was about to leave, Steve remembered he needed to get a picture for this thread but his phone was down in the barn so I took it for him. Steve got a very nice restored C-160 and the other guy got one of his 520s. So here what was in his mirror on the way home:
-
2 pointsprobably not going to chop that one , but i am in the process of chopping the top on my `30 ford coupe project
-
2 pointsIf the welding doesn't work out, send me a PM. I've got some laying around. Depending on where you live, might be a short drive to pick up.
-
2 pointsThe only GTs I can think of out today are deere, cub, simplicity, husq / Dixon / craftsman, and is Ingersoll still around? I think what has happened is that the 5-7k gt has been filled with premium ztrs when the primary job is mowing. The people who want snow and ground work, by a scut with 0% for 72months deals making 20k doable, and you get good machines that can do more with loaders etc. I think the market has gotten small to a point where it is niche now someone that looks at a simplicity might buy a scag. And big box store machines have their place ans price point.
-
2 pointsI have at least 30 wheel lug nut kits to bring. They, along with the brake linings will be available for sale or trade.
-
2 pointsAwesome! Thanks for the information...You know after seeing that last picture I vaguely remember that piece being on there at one point. (I've had this tractor for years). Once I get the rear welded up and repaired, I will go back to looking at the original issue.
-
2 pointsThis is the guide you're missing from your cover.
-
2 pointsIt has been my son's dream since he was twelve years old, to be an Officer in the Marine Corp. Yesterday, my son, Jeff, was promoted from Staff Sargent, to 2nd Lieutenant, USMC. First salute as an officer from his dad. 2nd Lt. Jeffrey Thomas Evans, USMC.
-
2 pointsYep, I think the post above me may be on to something. Scotty, check out your hubs compared to the axles...it does sound like a bad key or keyway. Take a magic marker and draw a line across each hub across the axle...if the axle line moves in relation to the line on the hub, you have found the problem. It does not have to be that both are bad to do this.
-
2 pointsSo, now that I have the trailer I need to put it to use. Today I picked up a 1981 C-145 with a 48" SD deck. It is very original, well maintained, and flawless plastic seat pan (other than being faded.) I'll cut the grass today and polish it up tomorrow for some portrait photos.
-
2 pointsGot me another horse this week, 210-H
-
1 pointWell I started on another project yesterday, really should finish some others first but didn't have anything to do for the day, and this one was on the list of future restorations. I picked up the 400 at the big show from Scott Mehlberg as just a roller, and found most of the parts it needed at the show or already had them. I got it complete and running, and now I'm going to make it nice, the hood and fenders had been repainted, but weren't very nice, they were just rattle can and the hood had fish eyes in the paint. Here's a shot of it as I got it together and complete, not sure if I'm going to use the weight, think I like it better without but that may change down to just a roller and most of the parts are in this pile I won't be using the motor or trans out of this tractor, I already had a motor torn part way apart that will be going in this, don't have any pictures of it yet as its in a couple different locations....and the trans is already done and it was in its own seperate topic in the transmission section Hope to get most everything blasted tomorrow besides wheels, frame and hood, and start on body work, this will probably be a slow project, but should be able to get most of the body work done in the next month or so as its not in too bad of shape.Will add more pictures as I go along. Thanks, Jake
-
1 pointYou know it's spring in Minnesota when you see this coming down your sidewalk. https://youtu.be/69sJrVc7VFE
-
1 pointAfter several years I will make it to the big show! What are you looking to sell? I am looking for a nice 520h or newer 416h. I have a 1990 416 h I'll probably bring as trading Stock that is a nice looking worker with 700ish he's as well as a nos clevis hitch, cast wheel weights and Brinley Coulter plow. Plow.
-
1 pointWill be great to follow along. You sure have talent. Glenn
-
1 pointMuz you can park next to all us CT boys.. Looks like we are the official etc's...
-
1 pointThat poor horse should be red. It probably thinks it's a Allis Chalmers????
-
1 pointNapa 1410. Don't get a Fram!
-
1 pointPretty cool
-
1 pointHawks take game 4 and move to the West Conference finals.
-
1 pointalso check the axle in the hubs Each axle turns the hub via a woodruff key and they tend to shear at the oddest times. You will notice the axle turning within the hub on one side (only one has to break to prevent all movement).
-
1 pointHey ! The Habs decided to play finally!
-
1 pointmy first car was this 1930 Model A Ford 4-door sedan in 1970. it is long gone , but since then i have always owned a Model A Ford of some type this is my current Model A Ford , a 1928 Tudor sedan with a 350 chevy. i have had this one since 1988
-
1 pointMade a trip to the local scrap yard today and found this jem. 20 dollars later and it's all mine. Always amazes me what people throw away.
-
1 pointSorry I haven't been on for awhile folks. Here is an update for ya'll. Surgery went well(6 weeks ago). Started physical therapy yesterday. Just stretching for now. It's funny how the muscles in my arm seem to have disappeared. 1 month of just stretching and then maybe, starting to rebuild the strength in the muscles in my arm. I may be available for light duty work of some kind in a couple of weeks. But, unfortunately still no use of my right arm for at least 6 weeks yet(not even writing). Getting very old. I must say though, I have been pretty humbled by the amount of help people have given me. From the owner of the company that I work for driving all the way out to bring me a few books he thought I may enjoy reading during my recovery to a friend of mine coming out with his new JD tractor and tilling my gardens for me. All without me asking nor charging anything. And, all of the well wishes from everyone have been very nice as well. Thanks everyone. And, I had the ultimate therapy yesterday afternoon. I mowed with my 520. Surprisingly easy to operate with one arm. Could probably have used Matt's foot control conversion. But,it worked very well. One handed seat time, YAY!!! Take care all. Pat
-
1 pointI got a call from The Cleveland Clinic this morning. My latest bone marrow biopsy showed no signs of leukemia. I am officially in remission. Still a long way to go in the treatment regimen but taking things one day at a time. This is a good day for sure. Thank you all for your prayers and good wishes. He is listening.
-
1 pointKen- It is a 2004 Honda CRF 4 stroke. Very quiet for sure. Showed it to him this morning and he got on it and just rode it.
-
1 pointIt is red but only has 2 wheels..... It is a surprise for my son. His 49 cc knock off pretty much is all done.
-
1 pointAny more history you might be able to add here? Put it on blocks and do the usual...turn one hub one way (while in neutral) and see that the other wheel turns in the opposite direction. Take off the belt guard and belt...put it in each gear and turn the input pulley by hand in a counter clock-wise direction. What happens?? Let us know. DO NOT DRIVE IT...YOU COULD DO MORE DAMAGE. How about telling us if it is a 4 speed or an 8 speed...the more information you can give us, the easier AND FASTER it is to give you an answer.
-
1 pointCorrect. 1990 was the first year that it was branded a "Toro" Wheel Horse. The 1990 had the motion control lever on the column and a swept front axle without steering reduction.
-
1 pointBad pic as I snapped it quickly this morning before work. Note the smoke stack on the other side. The will be replaced too. It has a certain cool factor to it, but you choke fumes all day. Love my find. I hope it gives me what I need.
-
1 pointIf it is an H is will have a std front axle the hc had the swept
-
1 pointNot a whole lot of new progress on the 400, been working on other stuff, but did find a couple parts for it at mentone today. Ended up with a nice set of front rims, a correct original belt guard in nice shape, and a nice frame and new reproduction heat shield. Frame is nothing special, but no pitting, and mine had quite a bit of pitting so this will be a lot easier to fix. The heat shields are pretty nice too, very very close to original, same size just a slightly different bend, if you didn't have an original to look at you could never know the difference. If anybody is looking for one I can put you in contact with him, he was selling them very reasonable. edit...Just checked with him again on heat sheilds and at moment he is not quite ready to sell, he is looking into making some more that he thinks may be a little nicer. Will let you guys know if I hear from him about having some ready to sell.
-
1 pointThanks a bunch Steve! I'm gonna enjoy this bad boy! (Cole is gonna die when he see's it!)
-
1 point
-
1 pointYou are all still cracking me up. In fact, while I was in the hospital a package arrived that a certain individual eluded to earlier in the thread. Mike, you have no idea how close I've been to this while reading here and being strapped to Agnes the IV pole, laughing and trying to get in the bathroom at the same time. This will be placed in my garage where I can see it easily keep you and everyone here close.
-
1 pointGot the engine back together as a short block today...Here's a couple pictures of it. Going to let the silicone I used on the gaskets dry and then get it to where I can test run it before painting it.


This leaderboard is set to New York/GMT-04:00