
Leaderboard
.JPG.9f2ecb26065c66527b0730084ab7fc7a.thumb.jpg.7dc8a04d9a53d44ee2b23f26ee94496f.jpg)


Popular Content
Showing content with the highest reputation on 04/13/2015 in all areas
-
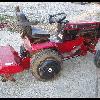
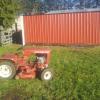
6 pointsMy wife found this tub wagon online and scored it for $75! got it from the original owner since new, even has the original carlisle tires! Think I'm gonna leave this one in patina.[emoji1] [img
-
5 pointsBetween my legs and the "Junk" I haul around.... Now that is hilarious!!!
-
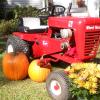
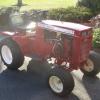
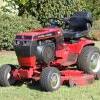
4 pointsSpring time in Texas and my wheel horses are out of the shop for a couple of photos, thought I would share.
-
4 pointsConcrete floor, pressure-treated sole plate with sealant between it and the concrete. Sheathed with 1/2" plywood. All joints caulked. Finished with vinyl siding. The openings at the top and bottom of the vinyl corners are sealed with copper wool. There is no place where any rodent can get in. The door is a standard 8 x 7 steel garage door with a heavy-duty rubber seal on the bottom that extends 3" beyond the width of the door on both sides. When the door is closed, it is sealed at the top and both sides with tight fitting vinyl seals. When I was building it, I waited until dark of night and had my son outside with a 1,000,000 candlepower spot light, and me on the inside looking for any light leakage as he went around the door and perimeter of the building. The shed was built in 2006 and so far there has never been any evidence of anything that took up residence inside the shed. I did leave the door open all day back in 2008 and when I closed it at night, I trapped a chipmunk inside. He gnawed at the rubber door bottom seal, but never got out. So if a determined rodent can't get out, a less determined one can't get in. Another thing that I do when I close it up for the winter is to start my push mower and let it run with the door closed until it runs out of gas. All that carbon monoxide kills any stragglers that may have thought they had found a nice home for the winter. Therefore, rodent-proof.
-
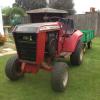
4 pointsFinal update on this project of which I am dedicating to my father he and my mother brought me into this world in 1964 and he left us on 9-29-14. I have always like the hood stand on the 64's and since I did not have a serial number for this one I made my own 92914 this tractor will always be close to my heart, this one is to date the best one I have restored. Dad if you are looking I hope you like this one. Will be taking this one to Pioneer Power this year and every year, as my father had come down to see us for the years I have been going, he loved to people watch and spend some time with the Wheel Horse faithful. Thanks Guys Enjoy and thanks for looking
-
3 pointsHi everyone, I thought I would share a few photos I took while out in Bloomington, MN. I am in charge of equipment repairs for a golf course management company on the east coast, and went out to Toro's headquarters for a week of training. They really are a top notch company, and you feel like your walking through a museum as you go down their halls. They seem to have every product ever built on display! Here are a few to start. Bill
-
3 pointsWell let's bring this back from the ashes. I have been working on it but i have been doing a lot of research on belts and trying to get my pulleys squared away. Finally got my drive system converted to a 5 rib serpentine belt which should be more than enough belt contact to keep from slipping and it flows nicely under the floorboard with two adjustable idlers. Found a guy in washington that built "survivalist" generator pulleys for converting large generators over to a belt driven diesel engine to turn them. Got a 4",8 rib drive pulley with sk bushing for that. Made a pulley "connector" so both the serp and V pulleys are through bolted and hold each other in place on the jackshaft. Got a v belt for driving the jackshaft so now I can get the clutch idler figured out. Finally starting to get somewhere.
-
3 pointsTom- Thanks- Before and after photo.
-
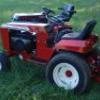
2 pointsI put my Wheel Horse logo tractor umbrella on the Wheel Horse 314 this am. I like it very much. I bought it from Heritage Farm Power online. It is very well made -heavy duty like the big tractors and adjustable to height and pivots side ways, back and forth, etc. The main pole brace attaches to the rear hitch with a 3/4 threaded rod, lock nut and hex nut. Two braces can be attached to the rear snowplow/tiller hitch carriage bolts if the lock nut sides are on the top of the transmission. I like it a lot and look forward to using it this summer for gardening and mowing the lawn! It is very sturdy when the tractor is moving also!
-
2 pointsNothing got in my eyes but I had the strangest situation with a wire wheel strand. I was cleaning some screw threads using a wire wheel in my drill press. Didn't think anything of it. When I was finished working on the project, I went to take a shower and all of a sudden there is something that I can't see sticking in the top of my left shoulder. It actually was facing towards the outside. I got my wife to look and she took a 3/4" piece of wire from the wire wheel out of my shoulder. I can not figure out how it got there as I was wearing a jacket, flannel shirt, and T-shirt while cleaning the screws. I just can't stress enough to wear goggles or wrap-around safety glasses while using anything that rotates.
-
2 pointsThat explains the look from that woman at the bus stop. They have a 6th (sic) cents about things like that...and I know what you mean about the 2-3" in the short cab. Bad thing is...I hit bottom a long time ago. Rock & Rye all. Craig...I love my Silverado...2 whd though.
-
2 pointsMy biggest problem is that I am not equipped with the kind of shop that is required to do what I want to do. I use about 1/3 of one side of a 24 x 24 garage. In the winter, that is all the space I have. In spring, summer and fall, I have the great outdoors, but then everything has to go back in at night. My wife, and rightly so, does not allow me to leave "junk" (her words, not mine) visible in the driveway.
-
2 pointsThe brake shaft seal is easily replaced without a lot of disassembly. Jack up the rear, take off the left rear wheel, remove the brake band, and remove the brake drum. The seal is rather small, but can be removed with simple tools. First clean the area to be able to see the seal. I take a small 1/8" screwdriver with the blade bent at a 90 degree angle, or a dental pick/hook and insert it between the shaft and the seal. You will be depressing the rubber part of the seal. You don't want to go in too far or you will hit the bearing. You want to hook your tool on the metal or plastic outer portion of the seal. Pull toward you. You may have to move around the shaft until you have pulled the seal completely loose, then slide it off the shaft. Clean the area where the seal was removed. Make sure that there are no rough edges on the shaft. Put some lubricant on the shaft and the seal. I use oil or grease. Then slide the new seal into place, making sure that the open side of the seal is in toward the bearing. Once it is against the opening, I use a piece of plastic pipe that just fits over the shaft to push the seal into place. If you don't have that, just carefully tap the seal into place evenly until it is flush with the face of the transmission. Don't use anything sharp that will damage the seal. That should do it.
-
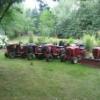
2 pointsBack at it again this spring. 5 gardens done this Sunday.
-
2 pointsOne of my good friends was taken from this Earth this week . Is it possible to be so close to someone to shed a tear even though you've never shaken his hand ? Looked into his eyes ? YEP . My good friend Jay passed away Wednesday at the ripe old age of 39 . My prayers go up to his wife & two young children . I've never talked to a kinder , gentler , more caring person . I will miss you deeply , Jay . So long my brother , we will meet one day .
-
2 pointsWish I had them all back! When I was 13 I took dad's tractor and drug home a 1931 Chrysler sedan for $20. The block was cracked and no red-blooded American teenage boy wanted a flat-head six anyway. Dad was COOL, he let me have a corner of the barn to do my thing. Picked up a '53 Chrysler with the old (331? cu/in) Hemi engine and good transmission for $50. My buddies and I pulled that Hemi and began to fabricate mounts for it; only tools we had were a 1/4"drill and hand tools. When we got it in place I took a pipe cutter and cut the two drive shafts and took them to a welder to have them put together, this was our first adult intervention! Ernie, the welder explained that this would never work. He came down to the barn and laughed himself silly looking at our angle iron motor and transmission mounts! The next day he asked my parents if I could come work for him on Saturdays and learn how to weld, they said yes and within a couple weeks I had stinger in hand. I never finished that car but it paved the way for lots of other successful auto projects. When I went in the Navy at age 17 there were four cars in and around that barn; the '31, a '46 Chevy 1/2 ton, a '47 Dodge Coupe and a '55 Ford Convertible. None of them were derivable and Dad sold them for $50 each, I don't blame him one bit. Since then I have built a few Street Rods and still drive a yellow '48 Ford F1 that I built thirty years ago, it has well over 100,000 miles on it and a few dents and dings, but I'm proud of it.
-
2 pointsMy best friends car we drove the power tour, he asked me to sell for him as he was passing away from Cancer, wish I could have kept it.
-
2 pointsEven the good quality wire wheels will shed. I have now adopted using a full face shield. More protection and if you are wearing a dust mask too, there is no fogging up like you have with only safety goggles. For about $12 at home depot, a full face shield is well worth it. Plus if you are weed whacking and you have a pet, you are fully protected from the inevitable flying poop!
-
1 pointMy new 2015 work truck arrived here today... sitting in my driveway with a total of seven miles on the clock. Wanted the full size bed, as I'm tired of only being able to rustle home one at a time. The only drag being...I'm gonna need a new rear window decal, really hated to see that go.
-
1 pointAbout a year ago scanning my local craigslist, I found a newer Toro / Wheel horse 36" roto tiller for $50. Mounted up to my 74, C-160 after I had to trim off a bit of the rear axle mount locking bracket (it's length was bumping into idler pulley). Now I needed the mid mount belt setup, I have a well equipped shop at home so all I needed was some measurements. Built my drive setup close to member "Lost Pup" and his post here The mostly finished bracket, waiting for 141 x 1/2" belt to arrive, bought off greed-bay. Will tack the set-screw shaft locks in place after belt fitted. Pic from underside, spring is probably from an old bed mattress. It was just in my junk pile and looks close to being correct size. Side pic of my over powered C-160 Tiller mounting shot, the electric lift is getting weak, has to work pretty hard to lift roto tiller. Plans are to remove and sell it off then replace with my own linear actuator setup. Dan
-
1 pointThe plow days have been changed to just a meet-greet-swap. It will be at Williams park in Gibsonburg Ohio. There is a place to fish but need a ohio fishing license. There is a playground. Will be food and snacks available. It will be 8 till ? Any questions please feel to ask.
-
1 pointHow good of a friend? to Condition and location really make a difference in prices.
-
1 pointIf you have a Napa they are a good source for aftermarket blades, belts and bearings. Their green belts are made by Gates specifically for lawn and garden equipment. You need illustrated parts manuals for the equipment you have so you know exactly what the part numbers are. Model numbers are the best way if you have them. Let us know and will try to link you to them. 2-blade deck or 3-blade? Side or rear discharge. Decks are sized by their width of cut. 36", 37", 42" or 48" Garry
-
1 pointHi all, With the recent sale of the Brinly plough for over £600 on that well-known auction site and having no luck finding one and after seeing Marks amazing adaptation of a Barford atom plough I set about adapting a spare Barford atom plough I had. I only have a slot hitch at the moment so I adapted it to suit a slot hitch but no welding or modification was made to the plough I just used the original bolt holes which means it can be reverted back to a plough for a Barford atom or even changed for a sleeve hitch. I cut a part out of some 8" box section we had to make the L-shaped bracket and then used a piece off of an old forklift carriage for the bar which will go in the slot hitch and be welded to the underside of the L-shaped bracket. It's currently only G-clamped. I will cut the bracket down so there is no risk of it hitting the fender and so the adjustment lever has enough space to move. Tom
-
1 pointIt doesn't look like you have any Toro Dealer's near you. You could call a JD Dealer ....Quality Equipment , Albemarle 7049832161 and see if they would cross reference for you. I know my JD dealer, can usually get any part that are common...Belts, oil filters, air cleaners, blades. Or maybe a TSC, may have a variety of blades. Of course Ebay as well. Is it part #93-0241? As far as prep not much, if you took the blades off you probably cleaned the deck. So just grease the bearing's and make sure they turn free.
-
1 pointI just usually snug them up. Not a gasket surface but you sure don't want to over tighten them either. They also require blue Loctite . I would not go more then 10 to 12 ft pounds on those 1/4 inch threads.
-
1 pointThat looks fantastic Tom. Can't wait to see it in person. Where do you put the golf clubs???
-
1 pointSo frustration has set in and thoughts of selling this hunk of metal have creeped in to my mind. Checked the ignition module and it is ok, fluctuates from 12.6 volts to 1.5 volts as I spin the crank with plugs pulled.Ran it again and same thing happens, runs for 5 mins then dies. Pulled plugs and turned over no spark. Hot wired the coil to battery and still no spark........ Anyone want a less then 800 hr 520hc for a decent price?
-
1 pointI like the sound of that shed Bob! I've been considering getting a bigger one, but since it sits hanging over a steep slope, concrete would be prohibitively expensive. One shed-maker I looked at uses tongue and groove treated 2x8's for flooring. That seems similarly rodent proof assuming I take care of all the other joints.
-
1 pointHere's how they look with two coats of color and two coats of clear.
-
1 pointWould of lasted me one mowin' too! After this winter filled with white junque, cold, ice, wind, we need all the sunshine exposure we can get. Lucky my Horses live in a heated barn, not too hot, just a nice temp for sleeping. I do open the barn doors once a week during winter so they can roar and purr for a bit, breathe a little. Grandson used one yesterday, tine dethaching. Next Grandson today, used another Horse mowing. The Horses love grass!
-
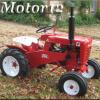
1 pointFound an image of what my '71 300 looked like. Mine was Maroon, then I had a green one. The Green one inherited the 440+6 when the maroon rusted a torsion bar mount out.
-
1 pointI need extended cab. Between my legs and the "Junk" I haul around. A regular cab is about 2-3" too short for me. but I hear ya and the room in the bed.
-
1 pointHe's just busting a new guy...If a human fits through the door, a mouse can....(Unless its a very very very small door.) When you are as busy as Mr.Maynard seems to be in his shed, I'll bet the mice have no time to sleep, so they move up to PA. and find haven in my abode. Where I give the mice month's of quiet time... I can't even keep out Flying Squirrels...
-
1 pointIf I don't have my first cup of strong coffee bt 8am I wake up grumpy . Then she can go and make it
-
1 pointFor most things all you will need is what Squonk showed you... Cheap yet very effective.
-
1 pointOne of these All I've found is the manual But I'm still looking
-
1 pointNice truck,mine has 141,000 miles, 07 gmc
-
1 pointI finished the painting this morning. I am very happy with the paint. Not perfect as a few little bugs decided to land on the wet paint and the darn compressor wanted to spit out some water though the line into the gun. I made a point to drain the water out of the tank prior to painting. Overall looks really nice and hope to get it back together tomorrow. The rear set pan and tunnel need to be connected prior to putting it on the tractor so.......... I am gonna need some help (hint hint)
-
1 pointhere's my mirror this morning and if I look back a little 1970 lawn ranger - which was on an auction site for £0.99 a quick email and offer of not much more I went to collect. No money actually exchanged hands in the end
-
1 pointIf you really don't want even the little mini HVAC Oxy/Act setup another option is a hand trigger Turbo Torch with the Mapp/Propane mix
-
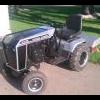
1 pointThis is how it has been sitting for the past couple of years, on a stand and covered up. More recently I have repaired and refitted the wiring. I have fitted marine sealed fuse holders for the 30 and 25a circuits and just need to get one more for the 15a lighting circuit. I also fitted an aftermarket tacho as the original wasn't working and a transmission temperature gauge in lieu of the vacuum gauge which had broken mounting pins. I also fitted a pair of four stud trailer hubs to the front axle, they fitted straight onto the stock stubs without any modifications at all. Next I bolted on some wheels and took the rolling chassis off the stand.
-
1 pointnice setup lane,looks like you got a bunch of weight on her,it helps a lot
-
1 pointhey guys. Yes the kids are Twins. The dog is a boxer...@95lbs. His name is Guinness. Ok so when it comes to the paint codes. We dont have any secret codes. I'm not sure but most of the OEMs have gone to powder coating over the past 10-15 years due largely to VOC regulations and transfer efficiency/cost reasons. Liquid coatings that folks in the field would use are hard to get from the standpoint of VOC regulations (depending on the state). Simple enamel products that would work well out of a gravity fed HVLP spray gun are simply too high VOC and its frowned on to sell without a spray booth. The best product that you could probably use from any SW store now is a product called "Sher Kem" .. Its basically a simple 1k product with a high gloss finish and fast drying properties. You can catalyze it to get better performance properties out of it you want. Any store should be able to get it...they may not have it on the shelf the day you walk in but if you give them a few days they can get it. I would think that the majority of the WH colors being a shade of red, they could take the International Red and "tweak" it ... being a factory red, you'll get better coverage even after its reduced. The Ultradeep base is the other way they may need to go (basically clear and they would dump red colorant into it). I'd say cut it 20% with Xylene and spray using a 1.4 needle setup. Should be pretty smooth. http://www.paintdocs.com/docs/webPDF.jsp?SITEID=STORECAT&lang=E&doctype=PDS&prodno=F75CC2 They'll need something to match...something that isnt faded larger than a quarter. Once they get the match the code can be shared on here and anyone can use the code from that point on. Initial matches are the hardest...then its just a matter of tossing the formula into the computer and having it spit out the colorants. HDPE is a ROUGH one.... Typically I would recommend a wipe down with Isopro Alcohol to remove any debris/dirt/grease etc. After that i would say use an adhesion promoter. UPO7229 is my standard "go to" for really tough plastics. The really hard part with plastics is that they can change from lot to lot of the plastics being used and the surface tension is the key to getting adhesion. Here's a link to the UPO 7229.... http://www.oreillyauto.com/site/c/detail/SHW0/UPO7229QT/N1967.oap?ck=Search_N1967_-1_-1&pt=N1967&ppt=C0171
-
1 pointHere's a dealer's tag that is on a C-160 I just picked up...
-
1 pointThis subject comes up quite often. Everything folks have said here is fine. However, the real trick is to get brand new, hardened, cup point set screws and new woodruff keys. The key word is hardened. Go to a good hardware store. If you don't pay at least $1 per set screw, you are likely not getting the hardened ones. Also, invest in a 3/8, eight point socket so you can really put the torque to those square head set screws. New jam nuts would not hurt either. Your total investment is less the $3 per hub, not including the cost of the eight point socket
-
1 pointI was out and about today and drove into Desoto. I have stopped by Mueller Motors-Olson before and always look to see what's in their yard. But I hadn't been there in a while. So I decided to stop in and say hello. They still have the RJ58 in their building, on a shelf. It's moved from the window as I always seen it before to the adjacent wall. I talked to Tony, who apparently now runs it and we talked about how tractors aren't made as sturdy as they once was. He said whenever they come across an older Wheel Horse that has them stumped on fixing it, they come here to RS for the answers.
-
1 pointI found this pic & im dont know too much about it or where the dealership was but over the front door there is a name Nasy & Kadl
-
1 pointFrom my 520.
-
1 pointHoping that this can be an international project, here's my local dealership D J Scott of Warnford, Hampshire UK. It's a family run business started in the mid 70s and still going today. Sadly from our point of view the WH sign is no longer there and the showroom contains plastic Toro machines but there are a couple of little gems on display as well...... Unusually for the UK they hold a stock of commonly used OEM parts like wheel bearings etc as they still service some WHs from the 70s for local owners. I believe there are some other horses that have been restored by a guy that works there though I haven't actually seen them to get photographs. Here's another bit of UK memorabilia from the 70s with the 'G S Mowers' of Glasgow dealership stamp. Unlike D J Scott, G S Mowers didn't stand the test of time as a little bit of research revealed. (From the Glasgow Herald newspaper Nov 5, 1984) Andy


.thumb.jpg.5b76111d0f3fdfb9109dde3f27d63b3c.jpg)


This leaderboard is set to New York/GMT-04:00