
Leaderboard


Popular Content
Showing content with the highest reputation on 02/02/2015 in all areas
-
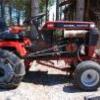
9 pointsThey are saying it is a record snow in Chicago land...the 702 did great...bring it on. Some channels are saying it is the 5th biggest snow on record. This video was taken at the 1/2 way point of the storm.
-
5 pointsI don't need a cab. I need a driver so I can watch it all happen from my window!
-
4 pointsthanks to Cable (Bruce) for his latest file download. A WH Dealer catalog from 1988/89 with WH promotional items. But look ! Steve running in the lake surf!
-
4 pointsOh, you meant the tractor! I was like: "Wait a second! Steve is like 68 or 72 yrs (or something) old!"
-
4 pointsYou didn't do any harm. There's a long dogpoint setscrew that hopefully is still partially screwed into the front of the collar where the shifter goes. First, make sure the shifter forks are as shown. Move them with a screw driver if needed. Put the shifter into the tranny in the neutral position. There's a hole in the front of the ring that's welded to the shifter. The setscrew goes in there. Use a 1/8" allen wrench and run the screw into that hole until it seats. Make sure the jam nut is backed off far enough. It may take some fiddling to get it in the hole but you'll feel it when it goes. Back off just a fuzz until the shifter feels right. Then, holding the screw in place with the allen tighten the jam nut with a 7/16" wrench. Check it out again and fine tune as needed. Note that my picture doesn't show the jam nut.
-
4 points18 degrees 20/30 mph wind and 5 inches of new snow with more coming. Why don't I have a cab yet?
-
4 pointsJake, looking at your work both on the forum and in person, i got to disagree with that statement you made on the details. I think you are right up there with the details on your work as much as anyone on the forum who goes the extra mile on these tractors. Don't ever think that any of us who like to go all out can't see the work and effort you put into your builds. You should be very proud of your accomplishments, especially since you are still of a young age. I put that last line in the quote as it just reinforces what I'm trying to get across, normally you wouldn't look at work like this that is the result of somebody still in school. You also floor me with your knowledge on the round hood tractors. I just thought i needed to mention all of the above as it is truly not the norm for somebody your age to be at the level you are. I think it is very refreshing these days to see such a passion for a hobby from somebody your age.
-
3 pointsHe didn't spin the tires once! No socks, no chains, no problem!
-
3 pointsIts amazing to see a 53 year old machine still doing exactly what it was built for ! Great video. Mike.......
-
3 pointsIf your set screw is broken...it is hardened steel...hard to drill. It may turn out by hand if you can get a hold of it. You can buy them on line, but in lots of 25. If you need one send me a PM and I can mail you one.
-
3 pointsThat's cold Craig. ( get it ? ) That's cold
-
3 pointsOH MAN! Looks like the poster child for the Original Cab Company.
-
2 pointsWHO SAYS YOU CAN'T HAVE FUN ON RED SQUARE??????
-
2 pointsI don't mind saying that I really miss playing in the snow. Three more years and just maybe it's "Back Home Again in Indiana"!
-
2 pointsDamn it Steve -- How do you do that without any socks on -- I froze watching that video
-
2 pointsIn sitting in the eye doctor's chair with my eyes dilated for my annual exam. Can't see s**t. But I think it looks good to me. [emoji41] [emoji102] I'll take another look when I get home cause I can probably use one of those Terry.
-
2 pointsWow, warm welcome. Makes this tractor lark even more exciting - cheers lads. Ok, so here it is... and here's the deck. Will practice on that first!
-
2 pointsMe too. Sent from my tractor seat.
-
2 pointsKiotiken: What you need is an RJ or Suburban "ball burner"/ "nut roaster" ! The heat off the motor will run right up to your beard~! Probably easier and cheaper to find than a CAB too! Plus - it's just a lot more fun!
-
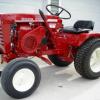
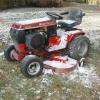
2 pointsThese are the two big additions I will be making to this 1961 Wheel Horse 701: A Hein-Werner hydraulic pump and cylinder setup for the lift and rear hitch. And a headlight bar with led lights and a rear taillight and light switch.
-
2 pointsWell said Martin, i agree totally. Great job Jake!
-
2 pointsEd: The best solution is to drill holes through both sides of the rear hitch on the lock pieces and hitch frame so you can place a push pin cotter key through to lock in place. That should take care of it ! This was a change in the later plows from the early short frame plow I sold you ! This photo shows the push pins placed thru the locks on the rear hitch to lock the plow frame in place!
-
2 pointsI will try to answer everything one at a time Steve. I know there are a lot of questions out there. I didn't build the site to enhance my business. I built it so whoever bought something from me could get help when they needed it from people that could help, especially when I'm not around. When warm weather hits I will be gone a lot. That's why the decal has the site and phone on it and doesn't even mention sales or service. If you concentrate solely on service the sales will follow. I've never advertised in my lifetime, ever. My business has never even had a sign, a name on the building, or the mailbox. It's even pretty much hidden with trees on a hill, and people here who have been to my shop will tell you that it is hard to find even though it's on a main 4 lane highway. I have always said if you treat people right they will beat the door down to get to you. Seems like someone who retired at 52 to play with the Horses has proven that point pretty well. It took me 2 weeks to get the board the way I wanted it, then I wanted about 2 more weeks with the mods to find the obvious bugs, run it through some paces, and do moderator training. Being the Admin, I couldn't even see what other groups could see. It is still member and my customers only now to give it a better shakedown and I'm finding a few more things I have to fix. I'm not new to this board thing either, I owned one over 12 years ago with 60K members. If things stay the way they have been I may never even mention what I have for sale on my site, like I never did here. It's hard to mention what's for sale when I have 14 on a waiting list right now. I can't get them restored fast enough. My CL ad even says the ones pictured are sold and we are getting others ready because we can't keep up... That is what I'm up to as far as sales go, but there is a whole lot more coming. We are also turning a part of the shop it into a fabrication area and going to get much deeper into parts this year We have a shear, roller and brake on the way now. You guys should know by now when I do something I don't mess around...
-
2 pointsToday's update... Beside the new headlight unit, I have braved the cold to just about finish the wiring. Which whilst it's my strongpoint, I get zero enjoyment from! Wired the lower dash panel and used a PC style connector so it's removable. Tested it.... It works! Plus I now have switch on and off able lights
-
2 pointsA change of colour, this came in to have a snow cutter fitted
-
1 pointWell, I finally got started on my project tractor (I have a name picked out but for now we'll just call it CLASSIFIED). I started with a L-155 lawn ranger frame and an 8 speed rear end. The transaxle was split, cleaned, I replaced one outer axle bearing and have new seals that will get installed before final assembly. Because this tractor is being fabricated with parts I had laying around, I thought It best to blast and prime parts before assembly, to keep things clean, then I will tear down, paint and reassemble. So here it is the start: I then took a hood stand/tunnel from a 1257 and decided to modify it so I can install a toolbox , Here is where the cutting begins of course I needed to shorten it Then to make the profile meet the toolbox Then I took the triangle pieces I cut off of the tunnel and welded them into the inside so I can achieve a factory look. and added the tab across the back of the tower so I can tie the tool box to the tower . of course I modified a stock gas tank dash to mount on top of the tower but I forgot to take pictures of that process so I will just take pics of It mounted when I am update my post. I have done some blasting of other parts to get things ready for the next stage, I will be working on the steering setup, I need to shorten a long frame fan gear to fit this short frame. along with moving the steering block back a couple inches. as you can see in the pictures I have moved the tower back further than the stock location, this of course will be to shoe-horn in a 14hp kohler that I will rebuild. I will be using a c- series axle, but I am on the hunt for a swept axle, unfortunately all are expensive, and I am wanting one cheap.
-
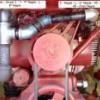
1 pointI'm posting this in "Engines" since it is an Onan P-216G which is the source of my frustration. The first rule of Murphy's Law says: "If anything can go wrong, it will". There have been many variations to that law, one of which is "if you drop something, no matter it's shape, it will roll to the farthest corner of your work area". The distance it goes it directly proportional to the value or availability of a replacement. So my story goes like this. I am in the garage last night doing some more assembly work to the P-216G. All the covers are on and I am completing the repair and reinstallation of the wiring harness. Then I notice that I have failed to install the linkage that runs between the carburetor and the governor. Well that's simple enough. Remove the air cleaner housing, and install the darned thing. All goes well until I attempt to install this. Over the last few years, I have lost sensitivity in my finger tips, so holding on to small objects is a challenge. As I am inserting the rod into the clip, I drop the clip. I grab my LED flashlight and start looking down into the area of the engine where it logically could have gone, but I don't see it. So...off comes the front engine cover, ignition module, etc. Still no luck. Checked the floor, under the shelving, in my shoes, everywhere. So I go on to my local NAPA store this morning and buy a new one. Came home and decided to take one more look, and there it was, stuck between two of the magnets on the back side of the flywheel. So I am creating a new law called Maynard's Law. If you can't find something, just go buy a new one. The old one will show up immediately.
-
1 pointluv the onans. but depending on the hrs and how much maintenance the po did you might want to pull the engine tins and clean the fins real good. adj the valves is not a bad idea either. over half of my herd is onan powered. and i have quite a few motors sitting around. the ones that i bought for parts with blown rods almost always have the block fins all cruded up and were very poorly maintained. i have found several tractors and motors that had loose oil filters. just a couple of thing to look out for. good luck i will double the price you payed for it eric j
-
1 pointI have had some inquiries about the onan 16 and 18 horse air cleaner decals and I finally got them listed. Click the image if this is something you are interested in. I am currently working on more deck decals and id tags and will post for feedback when they are done. Thank you all again for your help with improving the accuracy of my reproduction decals.
-
1 pointYou would need the performance chip to go with it Martin.
-
1 pointLooks like fun!
-
1 pointShould be a simple fix as long as the screw isn't broken off. On the front of the lip, where the shifter sits in the trans, is a dog point set screw or should be one which holds the shfter in place. The tip of the screw goes into the little indent on the ball of the shfter and holds it in place and also allows the shfter to pivot.
-
1 pointYour sprockets should have broad clearly machined tips. If they have sharp ice pick like tips they're shot. My blower is on a 314h. Same blower different mounts. It has a nylon block for chain tension. Some members have replaced that with an idler sprocket. It's also on my list .
-
1 pointNot a bad shade of green.
-
1 pointPost up a pic or two! Make sure to check out the Euro section, great group in there! Mike.........
-
1 pointLol lane ranger. Might have to look into that. But if I could find one as nice as the one in your picture I'm sure it wood be more than a new cab.
-
1 point
-
1 pointI don't experience the same problem...but that is a nice fix for you.
-
1 pointWell add me to the list of nice tractor posters Lane cause she's a beauty. I had a 753 that someone had hinged the hood on and I liked it too. Easy access to maintenance the engine without having to remove the hood and put it somewhere it wouldn't get beat up. If I had a round hood without a hinged hood I probably wouldn't modify it myself though.
-
1 pointRule of thumb for metal...the larger the hole, the slower the drill speed.
-
1 pointDumb question but , is the drill in reverse ? Don't ask how I know .
-
1 pointAnd they said it couldn't be done.....
-
1 pointYour living the dream, Geno. Good for you! All the best buddy! (Now stay the hell out of Pennsylvania you horse rustler!) ​I hate it when my subconscious types when I'm not looking!
-
1 pointDepends what you like Brrly. Our show will have a lot that the Big Show doesn't from what I've heard. We will have 100's of acres to play on and will actually be able to use them. There will be fields surrounding the main show area set apart for mowing, plowing, tilling, etc. If anyone wants to use any equipment we will have a place for it. I can't wait to see all the horses at work. There's more but that's enough spoilers for today...
-
1 pointMy Wheel Horse refrigerator, won at a tractor show, still has not been used. Tom
-
1 pointI have a C-81 with the 8hp Kohler engine that ran perfectly this summer. It would not start in December. Turned out the float needle was stuck and fuel could not get into the carburetor. I had to remove the carburetor from the block in order to drop the bowl to loosen up the float needle. There were also about a 1/4 teaspoon of ethanol particles in the bowl that i dumped out. A little moisture absorbed by the ethanol along with cold weather apparently did it. Once I got the float needle loosened up it ran fine without further cleaning or overhauling the carburetor. Your symptoms are very typical for a dirty 520 carburetor. It is amazing that you have gone 10 years without a problem. Some get away with just taking the top off the carburetor and clean what you can get to without removing the carburetor. The JD manual says you can use crows foot wrenches to remove the carburetor without removing the intake and exhaust manifolds. My 520 HC ran perfectly and then all of a sudden developed the symptoms you described. I removed and cleaned the carburetor and then it ran fine afterwards. I can buy ethanol free fuel in NY state and that is all I use now. I also keep spare carburetors ready to go so I can swap and go and clean later.
-
1 pointI had a bit of spare time one day and a few tiles left over and came up with this tile mosaic
-
1 pointLooking good so far. The only thing better then cheap is free.
-
1 pointIf it snows here this winter I will be once again using my 312-8... No big rear tires on it this year though ..
-
1 pointAhh, I loved this thread last year! I'll try to let you all know in a few days, I'll try to get a picture of the winter assault team!


This leaderboard is set to New York/GMT-04:00