
Leaderboard


Popular Content
Showing content with the highest reputation on 01/14/2015 in all areas
-
11 pointsEver since I won the lottery plowing has been fun.
-
9 pointsThis particular tractor was purchased "just to get me through winter plowing" while I located a new engine for my 520H. I don't know who had it before WHfan74 but Scott cut me a deal and Tom hauled it my way on one of his trips through Indiana. It ran so nice and I found it a very capable machine the more I worked it. Most of you are collectors and I've had my fair share of them over the years but this one really surprised me. I put a 48" deck under it and it cut my lawn with 1/2 the fuel my 520H. Even if the lawn got away from me in the spring it still did a decent job in tall grass situations. I have bad shoulders so I converted the front end to the forward swept axle and gear reduction steering. I put the 8.5" 520H rear rims on it to match. Being a huge fan of the hydro I didn't like the ground speed so after some reading I purchased a 5.5" hydro engine pulley from Kelly. 2nd gear hi and 80% throttle works perfect and I saved additional fuel and got the job done 15 minutes sooner. My ***ONLY*** dislike it reverse is to fast and you really have to watch it. I just plowed some with it today and took a few pictures of it. The charging system works perfectly. This is now my favorite Wheelhorse I've owned since I've started.
-
8 pointsWife was bugging me about how we used to feed the birds (squirrels) so......a little rebar left over from a few projects and.......
-
7 pointsgeometry ... ignore it ! a line and a cat ... these are two different things Enjoy, and welcome to my world.
-
6 pointsActually, that is the best looking green tractor that I have ever seen.
-
6 pointsSteve I think he is simply stating that they should maybe pinned in a help forum. I think that would work much better then the search method because a lot of people potentially helped might not know to search for them specifically or might have issues wording a search to come up with the appropriate results. The search function is a finicky animal anyway.It would also be easier on people who aren't as computer literate.Not everyone that plays with these vintage machines is as good on the PC as the WH.
-
5 pointsMust have wanted it to look like an old Oliver.Don't shoot the tractor........shoot whoever painted it.
-
4 pointsThey all deserve to be saved. And turn that hood emblem around!
-
4 pointsWHATEVER!!!!!! All I got to say is, WHO CALLED THE OSU A POTENTIAL NATIONAL CHAMP< early in the season!!!! I can't hear you!!!! I could have finished on the bottom with Duke and Jackhammer, I'd still be happy. .... I gave OSU the vote of being a candidate for the National Championship early in the season.... I can't recall if anyone else called out OSU as a potential National Champ... . I'll take that victory over all the wins and loses! If I lived in Vegas baby, I'd be a GOZILLIANAIRE! Great fun that everyone contributed to the thread..... Would not have been the same without each of your remarks and pokes! Looking forward to next season... I really do hope that Harbaugh brings some additional recruiting abilities to the Big Ten..... This will help the conference become consistent as a conference, and not just 1 team. But until next year,,,,, Bo-yah, GO BUCK! 8 returning starter on Offense, and a number #1 ranking to boot to start the season off next year........ Put that in your peace pipe and smoke it! Rob
-
4 pointsI really do not deserve this award...but if have to accept this...I have to give total credit to the Big Ten Conference. They have stepped out smartly in the post season and held their own...for a change. Even ESPN will have to deal with the Big Ten as a non fat, slow, big, white guy conference. BTW...their announcers suck... Anyway...congratulations to Ohio St...the team the committee thought did not deserve to be in the final 4 for a while until the Wisconsin game.....and then they won it all. Definitely, a class act all the way thorough...even in the post game they were gentlemen. The Big Ten looks like a class act to me this year...I like that a lot. It is about time. On the other side...I think the Big 12 is right where the Big Ten is...Oklahoma is going to break some hearts next year.. Anyway, I got to do this...
-
3 pointsWhat's worse, that or this? I guess beauty is in the eye of the beholder.
-
3 pointsPut a iv drip in its vein and see if it recovers lol
-
3 pointsVideos should be on the how- to instructional video section. They should however be locked to replies so they do not detract or distract from them. Only post originator should be allowed to edit or add to it. Search feature is inconsistent, time consuming, and frustrating. What could be simpler than if one has for example a RJ-35 and needs to work on it. Go to the instructional video section and there it is. All you need and more. There are so many members here with so much talent and more importantly willing to share their talent that I believe that if this is done properly, we would see a wealth of information on that section. Now what ever we have is just scattered all over forum, many times forgotten or drowned by needless chatter. Not a good incentive or a showing of the proper appreciaton to those members. What would be the difficulty in changing the How-to video section to allow this? At the same time what would be the reason why this cannot be done? We could even have a qualified dedicated moderator such as we have for the files section. I am sure that this is a substantial amount of work, however members who have made videos in question also went though a considerable amount of work and time spent in order to share their knowledge and experience with the rest of us. Isn't that after all the whole purpose of this forum?
-
3 pointsYou know, when you think about it...it was a pretty good Bowl Series. The parity was there, and really for 39 games...only Duke was below .500 Bob, Jackhammer is from Illinois and has 1 OOOPPS thingy going for him. It really was a good Bowl Series. Brandon...man...I like that you got into this thread. I have some good friends in OK that went to that University. Koen...a foot ball is not round...you did good my friend...you tied with Brrly1 and RMCIII And these guys think they know what they are talking about.
-
3 pointsBought out all the 75% off toys at one Rite Aid Drug Store. Two more stores to check in my area. Now, to find a place to store them till next Christmas. Mrs. K suggested I may need to reduce the herd, then I reminded her I did just sell two boats.
-
3 pointsCongrats on the 417 Bob, they're really nice tractors. Here is a pic of an 86, 31-17KE02. Engine # KT17QS / 1602036916
-
2 pointsI wouldn't have minded but when I called Kohler they informed me the part was in stock ... not sure why Jack's kept doing the b/o thing. Not wanting to pay shipping on a single piece maybe?? I didn't care to do it, just wanted the parts to be doing this when I was on vacation ... Oh Well. It's all here now ... I hope to get it together this weekend - make use of the 50 degree day we're supposed to have.
-
2 pointsMine used to have a manual lift, but the Butler strained his left arm to the point that he couldn't shake my martini. I had no option but to upgrade to the Rolls hydro.
-
2 pointsI think I still have a bunch of pictures I took of back then. If I find them I will post them here.
-
2 pointsWHATEVER!!!!!! All I got to say is, WHO CALLED THE OSU A POTENTIAL NATIONAL CHAMP< early in the season!!!! I can't hear you!!!! I could have finished on the bottom with Duke and Jackhammer, I'd still be happy. .... I gave OSU the vote of being a candidate for the National Championship early in the season.... I can't recall if anyone else called out OSU as a potential National Champ... . I'll take that victory over all the wins and loses! If I lived in Vegas baby, I'd be a GOZILLIANAIRE! Im pretty sure I did...lol GO BUCKEYES
-
2 pointsThe 414-8 with the Kohler Magnum. Great machine! Hey, it's red isn't it! Sorry Mr. Greene!
-
2 pointsThat one is my fav also Zieg. The 14 Magnum is not to be under estimated. Mine will be 28 in April and has been in the family since new. I never had anything it wouldn't do and the fuel consumption is pretty beyond belief. That is one you should keep for sure! Here is mine, original paint too. We did upgrade the factory rear tires a few months ago -
-
2 pointsKinda like this
-
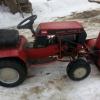
2 pointsNice Job! My 414-8
-
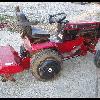
2 pointsMy son's 500 Special......
-
2 pointsCHOOT 'IM!!
-
2 points
-
2 pointsPoor thing didn't do anything wrong-was just in the wrong place at the wrong time!!! Hope it gets saved before it dies of embarassment
-
2 pointsIt would be real nice to have a button at the top labeled "videos". And not all videos, just the instructional videos, maybe approved by a mod or something? just a thought.
-
2 pointsI think this is a given... RJ35...
-
2 points"Expert"...Once was a small drip under pressure
-
2 pointsSteve, If I actually new something about college football there would be dancing Squonks on the screen instead!
-
2 pointsHahahaha.....awesome......sounds like a conversation I have with the sales department's best people.....
-
2 pointsI have a multi colored commando 8 too!
-
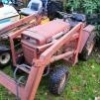
2 pointsI bought my GT 14 without hearing it run; the previous owner did manage to get it started but it ran poorly. The link at the top of the throtte shaft fell off; I put it back on and tightened the screw. This should have been a clue to look at the carb harder; when I got it apart today the float was so high the needle didn't seat, the upper and lower bowl gaskets were blown out, and there was no gasket between the carb and block. There was an electric fuel pump hanging loosely off of the side of the frame on the left side, with a gas line going around the front of the grill. The only factory cable was attached to the carb itself, not the governor. The choke cable looked like it was salvaged off a very cheap mower, was 3 feet too long, and didn't work. The spark plug was finger-tight. All of the steering links were very loose; none had seen grease in years. One tire does not appear to be original; all were low on air. The bolts holding the loader on were loose. I still have to take the whole thing off and reset it. It starts up and runs pretty good now. I have to straighten out the wiring but most of it is done, anyway. I gave it a farmr paint job to stop the rust; next spring I'll be able to do a better job when it isn't cold out. Always something, but it give me something to do!
-
2 pointsI like the mid engine tractors best, but if I had to choose a favorite in my collection currently it would be the 55 rj35 I just picked up.
-
1 pointHeres the process of tearing down a hydro pump from a D. I will do my best to describe everything in detail so that anyone can handle it. I must say with Paul Frederis help we tore it down, cleaned and rebuilt it in 4 hours including tearing it down a second time because of MAJOR rust issues causing binding of the pistons. I will do this in chronological order as best as I can Step #1 Here is the pump before tear down. You need to remove the four 12 point bolts using a 3/8 12 point socket wrench in order to seperate the aluminum housing from the cast steel valve body STEP # 2 shows the bolts out and the pump housings seperated. Be ready to struggle slightly if your pump was never opened. It was necessary for us to put the aluminum part in a vice and hit the steel end with a dead blow hammer and brass punch to get it to sperate from the gasket/adhesive. You must rest the pump on its side or you will lose slippers and other items if you do it in the upright position. Upon opening it a large quantity of rust was found inside formed on the steel end suggesting water infiltration. Step #3 In this photo you can see the rusty liquid on the slippers and the general shape of them. They were scratched but the corners were square and not rounded over, which is very important Step #4In this pic Paul is trying to clean the rust off of the oil pump housing. As you can tell it was pretty rough. The 4 bolts here are 12 point also, you need to use a 5/16 12 point socket socket to remove these. this is another pic of the pump housing and the rust and bolts. Also pay attention to the orientation of the small pin location on the oil pump housing. Its on the botton of the pic and must be that way for reassembly. It is very important for reassembly that this faces the same way. Step #5 Here is the oil pump gear in the housing. You must mark this on the housing and impeller before you take it apart. Every lobe only fits its mating surface 1 way. If you screw it up the pump will bind and not pump oil to feed the cylinder, slippers and swash plate. The o-rings are the same set up as the manifold with a square backer ring and a regular o-ring on top to seal. Step #6 In this step you need to remove the charge valves. They are 5/8 standard socket. It is an O.R.B.( O Ring Boss). These were pretty tight but did come loose. Here are some close ups of the charge valve. We made a legal notebook map so we could be sure it all went back together well. one side has a spring and a ball, the other side has a small tapered shaft and spring. Later models of this pump had balls and springs in both sides. One thing to note is that occasionally you will find shims between the spring and ORB fitting. These were installed when the pumps didnt make enough pressure during testing. The shim increased tension on the spring and therefore raises the oil pressure just like it would in an oil pump for an engine. Step #7Next pics are a close up of the housing showing the accelerator valve removed. There are 2 of these. 1 on each side. They are the large straight head screwdriver tip recessed into the block. They are ORB also but damn were they tight. We needed to use an impact driver to break them loose. All thats inside is a ball and spring. Step #7Next pic is of the push valve. Remove it and check to be sure there are no gouges in the tapered area. If there are, oil will leak by and cause speed to slow and pump to overheat eventually during use. Step #8This is the inside of the aluminum housing. It shows the direction control where the swash plate sits. The can be removed if needed by removing the spring clip on the shaft where it comes through the outside of the housing on the flush side, not the long side that the direction linkage attaches. You then pull the shaft out and the swash plate resting surface will clunk into the bottom of the housing for you to pull out. The only reason to do this would be to replace a bad bearing. Step #9 Here is a close up of the swash plate during polishing. I started with 800 grit, moved to 1200 and then to the crocus cloth as the final step. DO NOT use water to lubricate the crocus cloth. it causes the adhesive to melt and the cloth to become junk. Use oil only for lube. This is a before of the swash plate showing severe rusting from the water that was inside this pump. this is after the three step polishing sequence. As you can see its a mirror now Step #10Here is the brass direction control valve plate showing scratches and oxidation. This also goes throught the 3 step process of polishing. This is the same peice after polishing Step #11 is the polishing of the slippers themselves. We made a diagram so that we could install them back in the bores they came from. After all that work we ended up with my original cylinder too rusty to be used. The slippers bound up and we had to take the pump all apart again and use a different cylinder after we got it all back together and it wouldnt budge. Step #12 is the installation of the slippers back into the cylinder. Be sure to install the slipper retainer BEFORE you install the slippers. They wont fit if you dont. Step #13 is the installation of the swash plate back into the direction control section. This pic shows it cleaned This pic is right before installation of the cylinder and slippers. Use lots of oil on both sides of the swash plate so theres no galling on start up. It will suck to do all this work and wipe it out with a dry start. Step #13 Assemble with the unit on its side. If you dont, you will lose slippers from the cylinder bore as you slide it down over the shaft and then have to start over. Once the cylinder is installed on the shaft, then flip the housing to the vertical position. Step #14 is to reinstall the charge valves, accelerator valves, springs and shims where they came from. A little grease on the springs wont hurt. It will stop them from moving and going caddywhompus when you install them in the bore above the ball at the bottom Step #15 Shows the proper orientation of the oil pump impeller in the housing. Take notice to our marks to be sure we had it right. You then reinstall the pump assembly onto the housing using the four 5/16 12 point cap screws you removed at disassembly. Again be sure the pin is at the bottom when assembling. Step #16 shows the new gasket prior to assembling both halves . I made this one the same way as the motor housing in my original resto post. Using a hammer to cut the material. Step #17 its all back together and ready to go back in my 18 Auto.
-
1 pointInteresting setup, one I haven't seen.
-
1 pointI saw this Wheel Horse tractor umbrella for sale today doing a search on Google. The first time I have seen a new umbrella with Wheel Horse LOGO for sale. 50 years ago Wheel Horse did sell one as an option. A little pricey at $160 but that includes bracket to mount and would be a neat feature on an older Wheel Horse garden tractor! A mounting bracket that attaches to the rear Lawn and Garden tractor hitch/drawbar will be included with each Lawn and Garden style umbrella at no additional charge. Dimensions Each of the umbrella's 4 sides is approximately 46 inches. Approximate maximum opened spread width is 65". Canvas Information Fabric is 8 oz. double stitched water resistant "duck cloth" canvas. Corners are reinforced with heavy steel grommets. Center hole is also reinforced with a heavy steel grommet. Shaft Information Curved Hanger Lawn & Garden Shaft Design employs a Heavy Duty Metal Pole (1.25" o.d). Overall height is 52" http://www.tractorumbrellas.com/files/hfp/imagecache/product_main/files/hfp/WH4CS052814.jpg http://www.tractorumbrellas.com/umbrellas/wh-lawn
-
1 pointHaha....Buzz. great one. Thanka for the laugh. Glenn
-
1 pointYep It's a win for everyone Steve. I (we) enjoy doing it, The store managers like to get rid of the toys as they have to box and ship all the unsold back to the warehouse, and I am sure the real benefactors, the TOTS and their parents love it. Keep up the good work My Friend, and spread the word.
-
1 pointThe 1989 520-H does have individual fuse holders. From 1990 on, Toro used the problematic 4-place fuse block. I know as I have/had both. It may be a chafed wire or just high resistance because of corrosion. Strangely enough though, the same fuse block as the 1990 is used on the 5xi models without a problem. It is mounted vertically though.
-
1 pointPerhaps a sticky with video links in it?
-
1 pointI've scaled back a bit. Lol. This is the only pic I have right now of some of them. I have three with factory brake kits. They're suprisingly very easy and comfortable to ride.
-
1 pointLouvered hoods may or may not tell the year. I have both 85 and 86 417A's Both have solid hoods and I strongly belive that the 86 is the original hood. It was a early one, but if it has a louverd hood it most likely is a 86. The best deciding factor would be the dash! The 85 has no idiot lights and the 86 will have idiot lights That in my opinion would tell you the year as they were only made for 2 years. Great tractors and by far the best for all around use. Great power with good fuel usage! They will run for ever with good maintenance and do all that you ask of them. I love that KT17 so much that I have one rebuilt waiting on my next project and another that need a rebuild. I also have one for just parts. And Geno I might have to come and visit that sweet looking 86!! Don't worry I will bring a friend along to distract you as I load it up in the truck
-
1 pointDuke, are you sure it wasn't Go BUCKS !!!
-
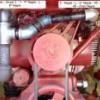
1 pointHey sports fans ... gee, only 70 and rain today ... hee hee!! Dads still in the rehab joint, making good progress, but still has a ways to go. Spending lots of time there, so the horse is taking a back seat. I did finish up the exhaust, so I thought I would share a peek!! I said a "peek"!!! lol
-
1 pointSg drops to near zero when field is removed. 22 steady otherwise. Battery is slowly charging at battery and voltage at battery terminal on regulator are between 13.5 and 14 half throttle not much difference at full still within that spectrum. Battery is sitting around 11.8 to 12.2 currently at half throttle
-
1 point
-
1 pointThe wife asked me to clean the bathroom, so I used the WH to get the pressure washer up to the balcony.


This leaderboard is set to New York/GMT-04:00