
Leaderboard


Popular Content
Showing content with the highest reputation on 01/10/2015 in all areas
-
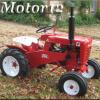
7 pointsI wanted to stack my 854 ever since I restored it, so I did. Here are photos of this bad boy and some of the support bracket I made.
-
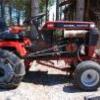
6 pointsDon't worry about that HY-2 unit...there is nothing to rebuilding it if it leaks. I did a thread on that and Indy still has the new seals if you need them. Looks like a 702...I think that is the right deck for it also. That HY-2 unit is selling for over $100 at shows and it looks like all the parts are there. Yes, 500 is too much not running, but if engine is not froze up, I think $150 would be stealing it...$200 to $250 is a good price...I might go as high as $300 (just because I like the 702's), I have a 702 with HY-2 and it is a great starting and running horse. The original rear tires would look like narrow snow tires.
-
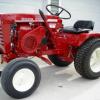
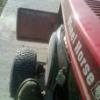
5 pointsHope to go look at this tractor next week. Can any of you round hood experts help me identify what it is and what it may be worth? These are the pictures he texted me. Here's what I know. It hasn't been run in 15 years. Was repainted by the current owner who has owned it for the last 16 years. Has sat inside for the last 15 years. Has rear wheel extenders and wrong rear tires. That's all I know. Sent from my tractor seat.
-
4 pointsHappy Bithday Scott !!! Scott is not only a great guy but an expert PHOTO BOMBER!
-
3 pointsWhat else does a retired guy hafta do with his time but make movies! We Got slammed w 18" last night Chucked this morn and probably will later this Eve. Nothing like more seat time! https://www.youtube.com/watch?v=jQKNiU3fOD4&list=UU7wuEBq4kYyHz0ytg3WDv2g
-
3 pointsOut of my garage and into a work space where I don't park cars. It's got heat and air plus lots of light and lots of electrical outlets. Still needs paint, landscaping, entrance ramp and a whole lot inside.Here's a few photos.
-
3 pointsLooks like a Shriners convention there Lane.
-
3 pointsWho cares... just, get it home.
-
3 pointswhile I do not have a pickup, I do have some folding ramps. find a hill or curb to try to make the ramps less "ramp" like. don't ride the tractor, instead walk it up and cut the throttle after you get it up onto the bed. less chance of earning the coveted Red Square "Whoops!" helmet.
-
3 pointsHappy Birthday Scott! Hope you have a great day! Craig, thats making my eyes hurt!!!!!
-
3 pointsYeah, bombs away! Happy birthday to you Scott.
-
3 pointsI know that it has been awhile since I have returned any tools to Sears for replacement (most of my tools are either Mac or Snap-on) but the times that I did I didn't even have to show any proof of purchase. That type of guarantee has got to hurt a company. One can search for broken Craftsman tools at garage sales and flea markets get them for next to nothing and return them for a nice new one or some people feel free to totally abuse them their tools using them for things they aren't designed to do. I know one time when I was getting a ratchet replaced there was some guy returning a bunch of tools that you could tell were clearly abused. Screw drivers bent like pretzels and others ground down to nothing. He also had wrenches that were bent in half obviously done to get into a tight place. I can remember the salesman questioning him on all of these issues and this guy got real loud. He got all new tools and he didn't deserve them.
-
3 points
-
2 pointsN3PUY brought up a subject that has probably happen to all of us one time or another. What do you do when your horse just quits? Now I am referring to winter operations. I am sure some of you, myself included don't just plow or blow your own driveways but do neighbors whether there right next to you or down the road a bit. There have been times I have been traveling to or from neighbors that are a 1/4 mile away or sometimes a bit farther and wondered what would I do if this thing would just quit. There has been times that I was out in the road with the blower down on a hydro and it quit. When your tractor is dressed up in winter gear you just don't push them with ease. I have rescued them with other tractors, 4x4 pickup, farm tractors, even a snowmobile. Just wondering how many of you have been stranded by breakdown far from home base and what you did to get it home or at least out of the way. No fun when you have a blade full of snow or a blower full and your horse just quits.
-
2 pointsMet up with another Red Square Member -Tristan Wilson of Versailles, Kentucky today. We met in Scottsburg, Indiana at the Hampton Inn (about half way for each of us) to deliver a Wheel Horse 42 inch Snowplow and rear hitch attachment that he purchased from me. Great guy and he has a small engine repair shop in Versailles! I enjoyed the short, very cold visit (about 10 degrees) with Tristan and his friend James
-
2 pointsDrill out the pivot point on the throttle and replace with 1/4 inch bolt and lock nut. Problem fixed.
-
2 pointsHere is a picture of me and my buddy, JimD, trying to pull Horsefixer's horse onto the blacktop. This horse will not start when it is on grass. Picture was taken at the Big Show in 2010. Yes, somebody always has a camera.
-
2 pointsDave looks to be a 702 and yes it has the solid tank $500 is too much in a non-running condition Brian
-
2 pointsIn this extremely cold weather an old battery may not have all the cranking power you need. Gasoline might separate a little too -giving water in fuel a chance to be troublesome. I would change plug just to see it that might be issue also.
-
2 pointsWhat is most embarrassing is when the horse dies and someone else has a camera to record the death - and you are on it! Here are three photos my uncle Don Redding (one of those green tractor collectors) took of me being pulled on my 1967 Lawn Ranger by my brother David with his 633 Wheel Horse at the Winamac, Indiana "Power from the Past Show" in 2013. I don't even recall what the issue was but I think it was gasoline related. When you haul these tractors around 100 miles or so they tend to shake loose a lot of the old stuff -me included!
-
2 pointsThis has the makings of a great thread... My avatar is my 314h with a busted drive belt. It snapped 20' or so outside of my garage. I tried to push or pull it back inside. Quickly found myself getting nowhere. The nearest parts store is 30-40 miles away. Used a piece of 3/8" triple braid rope and weaved a belt. It wasn't pretty but did the job. It ended up snapping just inside the garage after climbing the up the 3-4" high step Since then I've hung a spare belt on the wall. I also keep carb kits and spark plugs on hand. Cheap insurance for those rare "O-sh**" moments.
-
2 pointsI have a rusted one if u need it. = not pretty to look at but it will fit. Gary B...
-
2 pointsthat's what cemented my bad attitude toward "lifetime warranties" - how simple it is for the seller to give you a new one. Not a bad deal if you are returning a screwdriver, but what about an auto starter or alternator? 3 years ago, I replaced a funky OEM starter in my wife's car. Within 6 months I had to return the "lifetime warrantied" reman'd replacement due to poor cranking. Pain in the rear to get out and back in but of course it was "free". Within another few months the first replacement starter began to squeal and I ended up replacing another reman'd replacement for "free". Thankfully, this one is still working 2 years later. The point is even tho the starter replacements were "free", my time isn't and I lost a few nice fishing days to putting "free" parts in my car 3 times over. Same with wrenches, etc. That trip to HF isn't "free" when you swapout your "free" replacement wrenches. In fact, when gas was more expensive and an F350 was the only vehicle around to use - well - I don't want to be reminded how much it cost me to get "free" replacements.
-
2 pointsNo body does it like you Duke! I enjoyed it all, tractor video and the tunes! Hey, come June are we gonna see a pony tail?
-
2 pointsexcept for harbor freight... you know you are buying cheap junk, you break cheap junk, you take it back and get free junk... It will take a long time for that to change...
-
1 pointWhen you increase the throttle speed the cable is pulling on the governor spring. You need enough friction in the lever pivot to overcome that tension so the lever stays where you put it. The bolt and Nylock nut works great because you can reach in there with 2 wrenches and adjust the tension as needed as it will continue to wear with use. Garry
-
1 pointGreat meeting Horse-a-Holics! And for a great cause too!
-
1 pointI agree with Lane, sounds like a fouled spark plug.
-
1 pointThis is a good topic. While the Wheelhorse is a TOUGH tractor, it's sheet metal hood, fenders and steering wheel aren't exactly made for pushing the tractor around like some other color tractors. As I get older, my back is letting me know that one of these days if I lift, push or pull to much, it's going to strike back with long term debilitating pain! If it were my Dad, at the age of 82, and he broke down a couple blocks from the house in deep snow, the walk back to the house could be a challenge. So I limit my snow plowing/blowing to my dead end street these days. The easiest to retrieve is a gear drive. The Eaton hydros with no real bypass are a challenge. Nothing to push on, once y do start pushing, they are hard to push or pull. I guess maybe one could use another tractor to tow the downed tractor - if you had another driver. Perhaps a small trailer with a winch on it where you could load the tractor and bring it home. All of the above is great, but I recommend multi-tractor depth in numbers and just leave the downed tractor in a snow pile until spring and get out #2 or #3 and keep moving the snow..... Bill
-
1 pointGot the wood done during the week. Three nights in a row I sanded all the pieces by hand with 220, wiped with tack cloth and urethaned. I like the aged look with the shine. Good enough for the project and happy to be using the original wood from the swing. The center holes are the original holes and show there wear but the outer holes are all new. Going to try and get the seat frame done today with the extra supports welded in.
-
1 pointI was running the blower on Marvin The C-145 I had last year. doing my neighbor's driveway. I backed up and then started going forward and all of a sudden it just started spinning and things felt kind of strange. The back wheels were off the ground! Turned out the lift bar for the mower deck had come loose from the chain and had wedged into the ground. I was about 100 yds. from my garage and had to drag my 2 ton floor jack through the snow to get the bar out of the ground.
-
1 pointYeah boy, looks so good... I want to like it again.
-
1 pointWarp Speed!!! Nice.
-
1 pointI don't know what's cooler, the tractor or the video... OK, it's the tractor.
-
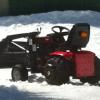
1 pointIt might not be completely done, but it does the job I originally bought it for. It plows snow! We didn't get that much snow, but it was drifting enough that I thought I would try it out and I must say I'm impressed. The loaded tires work great and I might not even need the chains. The only thing I might do different, if there is a next time, is make the step up to hydraulics. Lifting the snow blade is quite the pain. Still need to order some knobs and my decals, but at least I can use it now. Many thanks to everyone who has helped me get this far! I didn't keep track of how much this has cost me, but I am guessing I should be well under $1500 for the total investment. More than I originally planned to spend, but I think it's a worthwhile investment.
-
1 pointAbsolutely nothing Jeff. I was just referring to the two years they were identical in regards to the 77 Bob mentioned. I type too slow to list all the great choices. I believe it was 71 or 72 when they changed to the front mule drive setup which I feel would be a better choice than the older style based on what nrowles is looking for. The earlier C's are an outstanding choice as well. I'm thinking the only difference in the 74-75 was that you got the cool little hood ornament that didn't come on them in 76.
-
1 pointBefore & After photos.
-
1 pointWell, I got a bit ahead of myself again, but I just had to see SOMETHING that resembled a tractor!!
-
1 pointI don't use anything on the inside or outside. I use the correct size chain for the tire, and fit them so they are tight without the need for anything extra.
-
1 pointPersonally, I have at least a dozen different soldering stations and each one has advantages and drawbacks. For a hobby level user, I would have you check out this station and its accessories. http://www.mpja.com/Solder-Station-with-LED-Display-ZD-929C/productinfo/15845%20TL/ If I had to guarantee satisfaction with a product used in more professional settings with 8 hour a day 5 days a week reliability needs http://www.ebay.com/itm/Hakko-FX888D-23BY-Digital-Soldering-Station-FREE-SHIPPING-WIRE-SOLDER-SAMPLE/261527253272?_trksid=p2054897.c100204.m3164&_trkparms=aid%3D222007%26algo%3DSIC.MBE%26ao%3D1%26asc%3D20140407115239%26meid%3D43baececa86947daaae30f07041e635a%26pid%3D100204%26prg%3D20140407115239%26rk%3D3%26rkt%3D30%26sd%3D380911584152
-
1 pointOne from Orlando, Florida. and one from Ocala, Florida. This one is kind of faded though. Midway Tractor
-
1 pointlets see 8 btu needed to raise 1 gallon of water 1 degree 2o gallon tank needs 20 x 8 or 160 btu per 1 degree temp rise at 22f outside temp you need 160 x 10 or 1600 btu to maintain 32f in tank 1600 btu / 3.4 watts per btu equals about a 500 watt heater Steve is right, extra washing soda does not help the electrolysis action but it does lower the freeze point of the water even further i imagine a 26 f freeze point would not be unreasonable with additional wash soda added. a 6 degree rise in temp would only require a 250 watt heater. subtract another 5o watts contributed by the electrolysis action and a 200 watt heater may keep your 20 gallon tank operational down to around 20F the passive techniques of added washing soda and ping pong balls only work to a certain degree Uno pun intendedO
-
1 pointI was talking to my cousin "Eight Ball" Iron about my E tank experiences. With all that's cooking around Old Iron's house lately, it seems like I'm always spending time cleaning up the re- bar anode rods in my e-tanks. "Eight Ball" said give the lads a challenge - have them design a re bar cleaner !! Soooo.. think of this - design a box, with a hole in it, a hole that you could put a dirty rebar into and have it scrubbed clean. I'm thinking a box with a cheap angle grinder spring loaded against a hole in which you would insert the corroded rebar. Turn on the grinder. inset and twist the rebar and the corrosion on the rebar would be scrapped off the rod and deposited in the attached trash container. Sounds simple. But for several projects all going on at once and all involving E cooking . this could be a great addition to our tool arsenal.
-
1 pointThe iron will be in one of two "rust states"- ferrous or ferric- depending on the amount of oxygen attached to each molecule of iron Ferric (red rust) has 3 oxygen molecules and the electrolysis process changes the red rust to ferrous (black) iron (having only 2 oxygen molecules). Ferrous (black) iron is soluble in water. That is why you can wipe the black rust off a finished part with a wet rag but couldn't wipe off the red rust from the same part before you put it in the tank. Ferric (red) iron is insoluble and will precipitate (form a solid) as an orange/yellow compound called yellowboy ( this I know from growing up in mining town USA, Scranton Penna). Yellowboy causes the orange sludge coatings on the bottom of the electrolysis tank. and finally ... When the red rust is all changed to black rust, the reaction stops (current decreases) I have no idea how rust converter paint works - or if it actually does work well. :thumbs:
-
1 pointNO STAINLESS Stainless contains chrome which will break down in the water and form a toxic chromium solution not compatible with long human lifespan. Is the "arm and hammer" you used washing soda or baking soda ?? Washing soda is better. The solution you create should never wear out - just top off any evaporation with plain water. The rods you use for anodes need to be cleaned VERY WELL to keep up the current flow in the tank. Make sure all the electrical connections to the rods and your rusty part are clean. You would be amazed to see all the gunk that falls to the bottom of these tanks, but the buildup does not slow down your reaction - it just looks bad. :notworthy:
-
1 pointJust found a great source of 50 amp battery clips for a reasonable price ordered these from http://www.mpja.com/prodinfo.asp?number=16445+BC obviously available in black too. For .59 cents - you can't lose considering these clips may need to be replaced on a regular basis if you have an electrolysis tank. Great grip and just the right size to place over rebar.
-
1 point64s, don't know but I would say you'll have to take them out of the electrolysis tank first !! :scratchead:
-
1 pointYep, passed down thru the generations from my uncle, Benjamin Franklin. :scratchead:
-
1 pointJerry, this wasn't a post for "only real men use digital voltmeters". Just trying to get some perspective if someone asks for help troubleshooting the electrics of the tractor , generally speaking, what tools do they have available to do the troubleshooting. Thanks for your perspective tho - valid as anyone else's.
-
1 pointNow if you could only mount some of those high powered LED's under your mower deck - you would look like a UFO taking off when you mow at dusk - too cool !! :scratchead:


.JPG.9f2ecb26065c66527b0730084ab7fc7a.thumb.jpg.7dc8a04d9a53d44ee2b23f26ee94496f.jpg)


.thumb.jpg.08e05c7c9fdbe24021fc286c2094cf8e.jpg)


This leaderboard is set to New York/GMT-04:00