
Leaderboard


Popular Content
Showing content with the highest reputation on 01/05/2015 in all areas
-
15 pointsI don't need to tell you folks about the quality of Terry's decals. I've had my eye on this set for a long time and I finally pulled the trigger. It didn't take long this morning to put them on. I also picked up some wheel weight decals for a set that I'll be putting on this tractor shortly. Thanks for the outstanding decals Terry!
-
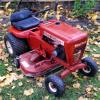
8 pointsSo I picked this up Thursday and was going to post it earlier for your viewing pleasure but Christmas parties and such got in the way a bit. So here it is my new Charger 10 Auto.
-
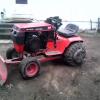
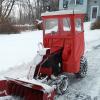
7 pointsHad the family upstate for the weekend. 6" of ice and snow was already on the ground. Pretty solid 2' high plow banks around the house. It was an unwelcoming winter wonderland. When I bought the blower the PO told me it would throw 4" rocks. Well that's not to far off.... I broke up several plow banks with the loader and followed with the blower. It sounded like a refrigerator making crushed ice. Wasn't pretty but she got it done. Happy New Year everyone!!!
-
7 pointsThanks for the kind words Bob. Wish I were in Florida right now. Getting pretty chilly here in the Midwest this week.
-
4 pointsHave used several sets of Terry's decals. Great, artistic, beautiful! Couldn't restore any Horse without Terry's help!
-
4 pointsHello to the board, I'm new to the board but have been watching for a few months now. Last summer I acquired a 416-8 Toro Wheel Horse with a recycler mowing deck, two stage snow blower and rototiller attachment. I usually plow snow with my pickup truck but I had to try the snowblower out. So here is a short video of me and the Toro. Hope you enjoy. https://www.youtube.com/watch?v=iZTM640L608
-
3 pointsStickers came today . This will be the only one on my completely "de badged" Renegade . Thank you Sir , A quality job . -Gene
-
3 pointsTerry is no doubt the best there is. Everything I have gotten from him couldn't be any better.
-
3 pointsThanks for the compliments guys. I saw the forecast for South Bend. Single digits That same front will make it down here and Our highs will be in the 50's a couple days. Believe me, I'm not complaining one bit. I saw those on your beautiful restoration Nick. That was the first time I saw them on a tractor except for the video on Terry's site. I showed my wife your 416 and she loved it too. We also need to mention that these decals are crazy easy to work with. They seem to defy those little air bubbles.
-
3 pointsI put that same set on my 416-H and they really set it off. Terry is the man and always gets it right. I liked them so much I bought two more sets for other tractors I have to refurbish.
-
3 pointsLooks nice Bob.
-
3 points
-
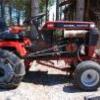
2 pointshere are a few pictures of my first collector tractor that i picked up around 16 or so years ago... it turns alot of heads when it comes out of the shed and makes it to a show. i got it out of a garage sale, at the time for my son to drive. my son is 18 yo and is building a 654 to carry on the tradition
-
2 pointsThe C81 that I just recently got only really had one issue,a funny looking hub repair. As I leaving the shop this evening,I thought I would take a look. Which then led to a quick hub swap. Once the tractor was jacked up I could turn the hub 2 inches or so back and fourth on the axle before it would stop. The hub was held in place with a collar and set screw on each side. I had a older set of hubs on the shelf so it doesn't match the other side but it has good hubs on both sides now. I was amazed when I got the hub off,the axle and key were both fine.
-
2 pointsFrom a newbie with an RJ-58 and a few questions. I’m the new guy on the block and have just about completed my first attempt at a rebuild, of sorts, of a 1958 RJ-58. It had been sitting outdoors under a tree for many years in the mountains of Colorado. When I first saw it I thought it was a peddle toy. Then I saw the engine and I thought this would be a fun restoration project, something that I’ve never attempted before. After completely dissembling it, I realized a professional restoration was out of my league. I needed access to a machine shop and a professional body shop. So I just decided to clean it up as best as I could, get a few of the real rusty parts sandblasted with AL oxide, paint it, and put it back together. After tightening up a few magneto wires under the Kohler K91 flywheel and reassembling everything, the motor started right up – amazing. I’ve been looking through the Q & A forums to see if anyone has had the same problems as I have. No luck, so hopefully someone can help me out. I’ve found that a 29†drive belt is “about†the right size. However, when the motor is running, it’s spinning the belt and the transmission pulley, even with the clutch peddle depressed. So, I need to start the engine in gear with the clutch peddle depressed. My neighbor said if I ran the Horse up and down the driveway several times (0.4 miles for one round trip) the belt would stretch enough so that it would probably slide over the transmission pulley without spinning it. So far, I’ve completed only one trip without any signs of improvement. My second problem is with the very loosy-goosy steering. If I turn all the way to the right or left, the front wheels lock up and I can only go in circles until I stop and kick the wheels back into the forward position. I’m guessing this is because of very worn parts. Short of welding some stops somewhere to prevent over steering, does anyone have some other suggestions as to how to deal with the funny steering? Jon
-
2 pointsI will as soon as the dealer is finished with the EFI diagnostics & it's back home safe & sound in MY garage .
-
2 pointsBob, the decals are the icing on the cake. Looks superb. Glenn
-
2 pointsIf it ever snows this winter I will be using this 314 H. In all honesty I don't want the snow unless its on a weekend. Work day snow storms no good.
-
2 pointsIve got 2 sets of Terry's and quality is superb! Looks great Bob!!
-
2 pointsBrian, here are three pics of the steering pieces before I cleaned them up. The tie rod (part # 12) was bent and I straightened it before re-assembling. I'm just assuming it was straight when it was new. The steering link (part #78) is also bent, somewhat. Don't know if it's supposed to be that way but I left the slight bend in it. Maybe that's where the problem lies. Jon
-
2 pointsdrool, slobber
-
2 pointsWITHOUT DECK
-
2 pointsWonder, can you take down the Christmas decorations for me too?
-
2 pointsWe got the snow today.
-
2 pointsI love that RJ Craig! Glad you got some snow to play in! :-P
-
2 points
-
1 pointOk, I think it is time that my C-165 get a fresh change of work clothes. I've had her since I was thirteen, and seventeen years later I feel that she has deserved a makeover: rebuilt engine, new ag tires on all four corners, new paint and decals, new Hobbs hour meter, and a custom hitch I made from an extra hitch off my Crown Victoria.
-
1 pointhttp://www.classickitchensandmore.com/wheel-horse-345-lawn-tractor-wiring-harness-fuse-block-wterm-p-1509.html?zenid=q8mi97v4193ie2r38ncgo2oaq4 http://www.classickitchensandmore.com/wheel-horse-34520-lawn-tractor-9-pin-wiring-harness-connector-p-1508.html
-
1 pointThe Wheel Horse Collector’s Club had its first meeting June 5th, 1999. At first Don, Cindy, and Jeff Kane intended this small group to meet at their home but the meeting was moved to South Mountain Fair grounds, Arendtsville, PA, when the anticipated group size increased. What started out as Don and Jeff Kane’s father-son hobby soon turned into an effort to start a Wheel Horse garden tractor restorers’ club. This gathering was the first in the country exclusively for Wheel Horse products. A total of sixty Wheel Horses were present and about forty-nine people including wives and children. People from Florida, Connecticut, Alabama, Maryland, Minnesota, Ohio, South Carolina, Virginia, and Indiana attended. The Toro Corporation supported the event in several ways including supplying door prizes. Ed Cole of Toro Corporation, brought a number of Wheel Horse branded items and everyone who attended to the end got something. During later shows, these items went into the raffle. Ed said, "I think a hat was passed around to help the Kane's with all the expenses they had, as they bought everything out of their pocket. I went back and got a check from Toro to cover the expense. This continued for several years until the club became self-sustaining. Toro also helped in later years by covering all/half the cost of hats sold at the show." Forty-nine of Ed Cole's photos of the meeting are at:
-
1 pointBoy! That looks familiar!
-
1 point6-12 in rear and some white paint all around
-
1 pointLooks good 312, the smaller tires should do better than the bigger ones.
-
1 pointWhen you say you have no power, what do you mean? When turning the key do any of the gages move. Do the lights work?
-
1 pointlooks good
-
1 pointHi Jon, Firstly Welcome to Redsquare! You have a great looking RJ58 and have done an excellent job on restoring it, it looks brilliant. It's nice to see another RJ saved. Do you have a belt guard on it? I had a similar problem with my suburban 400 regarding it not stopping when depressing the clutch and I solved it by adding belt guides, do you have any on your RJ? I have also ordered a reproduction belt guard because this will also help guide the belt. Tom
-
1 pointAwesome looking rig! Would love to see a video of that monster at work.
-
1 pointWhen you replace the screws for the clips that hold the cam in place, I recommend you use allen screws. An allen wrench is much easier to get in there to adjust the pressure on the cam plate. I had to partly remove the control lever on my 1076 to get the old screws out, then reassemble the control lever, then reassemble the cam and clips. And those screws are an odd length, so had to grind down longer ones to fit. Take pictures before you take it all apart so you know where everything belongs. And have fun. Jim
-
1 pointNice one AJ, a little tlc and it'll be good as new.
-
1 point
-
1 pointMine doe the same thing when I turn the key off. What do you guys think? LOl
-
1 pointHow about 3/8 or 1/2 inch plywood from the floor to 4 foot above the floor, then peg board the rest of the way up? I love peg board.
-
1 pointNeed a few more details. Because you posted in "electrical" I assume you think it's an electrical problem, but are you sure? Have you checked fuel? What were you doing when it stopped running?
-
1 pointIt is illegal to transport Horses out of the Commonwealth of Pennsylvania. Sorry.
-
1 pointWell I picked upi the saw this morning as planned. Boy oh Boy was I ever impressed with the way this saw is built! Thank goodness it has a decompression lever on it as the engine has some serious compression. I was not able to put it to work today due to the rainy weather, but certainly will the first chance I get. I did let it run under roof in the carport for about 20 minutes. I could feel the engine begin to break in. Its revs clean and crisp. Very smooth and powerful. The chain oiler is adjustable, and in the factory setting the chain gets plenty of oil on the 24" bar. Here is a pic of it on the workbench at my Dealers shop.
-
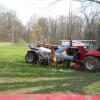
1 pointHere are some more pictures. The 520H found it's way home but needs a little love in the engine department.
-
1 pointground to the base of the solenoid or frame, thick wire from starter to one side of solenoid , thick wire from battery and thin wire to 20 amp fuse to other side of solenoid, and wire from "s" terminal on ignition switch to small post on solenoid. I think that's it if I understood you correctly. you should have no ground wire going to any terminal on the 3 post solenoid.
-
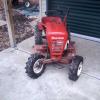
1 pointHey Tim, That gt14 has had some interesting mods done to it. Nice big quiet muffler. The front tach-o-matic. Newer style mower deck with scalp wheels. Manual PTO, original would have been an electric PTO. PLUS a three point . All some nice upgrades that I have thought about doing to mine to open up to more versatility. If everything was done right , should make for a nice little tractor! Good Luck
-
1 pointTrainman, Woodham's in Wayland is a full service repair shop. Everything from the biggest to small engine. Nice shop. 1110 133rd Ave. Wayland Mi 269-792-0060.
-
1 pointOr are you referring to the PTO brake. If so, be sure that the internal spring (104841) is good and pushing the pulley out when the PTO lever is released. Those springs will get weak or sometimes break. Then with the PTO engaged, tighten the brake pad against the pulley with a .012" feeler gauge between the pulley surface and the pad. That should be all it takes to get the pulley to stop when the PTO is released. If that doesn't work, try .010". If that doesn't work, scuff up the brake pad or get a new one.
-
1 pointGlenn. the manufacturer dips the boards in a rubbery conformal coating that comes off fairly well by mechanical means. Tugging, snipping and scraping yields a clean pcb. Dental picks, Isopropyl alcohol and a toothbrush complete the task.


This leaderboard is set to New York/GMT-04:00