
Leaderboard


Popular Content
Showing content with the highest reputation on 09/20/2014 in all areas
-
8 pointsold pic but same view but with different occupant Brian
-
7 pointsHi Folks, Here are some pictures from today's show in Haddam CT. There were more horses there than I thought. They were all around the park lol.
-
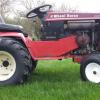
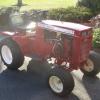
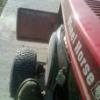
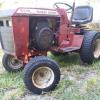
5 pointsAll loaded up and going to look for some junkie ol' yardsales. Saw red beside the shed. How much for the "old mower"? Got the Wheel Horse with rotted deck and snowplow. And a seat. I didn't know what I bought for $80 until I got it home and found a decal in the toolbox. "800Special". Yep.... it's different. Motor turns over ... no spark. All gears work running it off the starter. PTO clutch works. Needs tires and battery. It's covered with patina. Here's the pics .................................
-
4 pointsHome made 7235 spring... hand worked spring steel , hardened and tempered.
-
4 pointsFinally had time to set up my dually rear end on the FEL 520-H. It was very unstable with a heavy load and the bucket at or elevated above the tractor's hood. I simulated an issue I had at my neighbor's house with a load of wet modified stone on his inclined area and with the duals, it was a hundred times more stable. No issues at all plus I had a better "bite" into the stone pile with the added traction. Too bad the tires extend beyond the bucket's width. It would be cool to see how it would do removing snow but not as I run over and pack snow on either side of me. Some pics of the setup right after I installed them. (Not the same tread but close enough for a worker tractor)!
-
3 pointsWell a couple weeks ago I broke a couple ribs, so rather than clearing brush or taking on more significant chores that are piling up, I decided I might as well prep for Fall/Winter, Took my Cub 3XHD Snow Blower in for warranty service last weekend. Last week I also located a Snow Plow which is cosmetically challenged but really only needs some sanding and new paint. Figured my ribs could suffer the discomfort of removing the deck and swapping on the plow on My C-161. I picked it up last year and Bought some Decals from Terry but I have not yet gotten to tearing it down just yet. Maybe llate Winter or Spring. Anyway, A couple pics. The Wheel Weights are off my Massey MF12 which I need to get a Plaow for so until I do, I like the look of these over the generic looking black plastic ones I have for the horse. Now that I am being fully pro-active prepping for Snow, perhaps we will have an easy winter what with the way things usually work. For instance, I reseeded my new Lawn 2 weeks ago and we went into an abnormally cool period and had a frost........Kinda of like waskhing the car. Almost always brings on monsoon rains:-) This is my first wheel horse. I have no prior experience with the Kohlers. Once I got the Electrical issues worked out, Starter, New Solenoid, Rewired the starting circuit and Lights, I have to say I am very happy with this Briggs. One of these days I will add a Kohler powered C160 or a 1054 or GT14. But I have a hard time justifying to wife the two I alreay have. LOL
-
3 pointsLast night my son and I (mostly me. He turned a few screws here and there, but most were so frozen it took a can of WD-40 to unlock them!) removed the mower deck and took the hood, fenders, seat, belt guard and other miscellaneous parts off the tractor. I was out there about an hour and a quarter before it got to be too dark. There is so much crud and whatever else stuck to the frame. I am going to pick up some degreaser and a bottle of dawn and go to town next week. My plan for tonight is to get a new battery and turn over the engine and see how well it runs, if it smokes, etc. I also noticed that the leak seems to be coming from the axle not the main seal in the tranny, so I am hoping just replacing the axle seal works. I am going to pull the transmission off while I am dismantling this thing, but I can hook it up to an electric motor to run it while I am flushing it (I think). I have a motor from an old dryer I can hook up to a dimming switch to control the power. Pictures to follow.
-
3 pointsDoes anyone on this forum have the ability to decipher when exactly this tractor was made from the serial number that I posted? I know much about the story of this tractor as it has affected our lives but there are many questions about tyhe production of this tractor that I have little to no info on. I would appreciate it greatly if you guys would and could help me by adding to the story by filling in these details as you can. Back to the story... This is where the story is just a little fuzzy! My dad is now in his early 60's and in all fairness to him, these details are nearly 40 years old! So, he was convinced that the tractor came without a muffler which makes no sense to me. However, when I showed him the snow pics, he could clearly see that it had a canister muffler on it at the time. For reasons unclear to me, dad decided to take the canister muffler off the next spring and replace it with a long straight pipe! Now that is loud! Any of you that have ever run a single lung Kohler with a straight pipe, know what I'm talking about. For those of you from the midwest and old enough to remember, we had some wicked cold and snowy winters back in the mid 1970's. Dad said he thought the winter would never end and the Iron Horse got a workout. It's just too bad that he wouldn't have had the correct snowthrower for his tractor. He probably would have been much happier with the outcome. Spring time finally came and with it, garden work... Dad picked up some spring tooth shanks that were extras at work and got busy building himself a "digger". He wanted a disk too but that never came to fruition. He had to make do with what he had or could get his hands on cheap back in those days. He made it a five tooth setup and he could obviously remove the center "tooth" for cultivating which he did every summer to keep the weeds at bay. We still have this digger and it works just as good as it did back then. They had a sizeable garden for just him and mom but it wouldn't have been possible without this hardworking tractor. Dad didn't know that he was driving and working a piece of history so hard! He just knew that there was a job to be done, and this machine was up to the task of taking care of business. How tough did dad build this thing. Here is the Horse and the digger working my garden 36 years later!!! Some things are just built to last but dad tested his Iron Horse to the very limits. In the upcoming posts, you will read of blown motors, busted rear ends, dented sheetmetal, and several over hauls. But that is what needs to be done sometimes when you ride a "horse" to its limits!
-
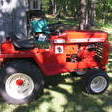
2 pointshi, its been awhile but just got back w my new c-160 auto w/ 36" tiller. its not perfect but runs good. heres some pics. its missing a hood, not sure its oem motor...base of motor hangs over frame.. it has right motor shrod but bolt holes extend past frame ...so have to investigate.
-
2 pointsWH algebra...... PB blaster + carb cleaner + starting fluid + Sea Foam = Happy Horse
-
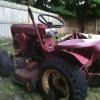
2 pointsPicked up the poor Work Horse just before dark. The Horse hasn't been used in eight years, parked in a barn. At the time the little Stallion did not have any mechanical issues. The owner had health problems, a groundskeeping crew took over while the Horse stayed in the barn till I convinced the owner, "Geeze, I've always wanted a Work Horse. Please, please, please ". The Work Horse was purchased new and, so I'm told, only mowing (one acre) turf. The Redbone (as in Leon Redbone) gave it to me, "Just pick it up." My son, grandson and I did. Original destination was scrap yard. Oh No! Not that! The poor Horsey needs a lovin' home! Here's how she looks, we stopped under gas station lights for this picture, for our "love at first sight". . PS. No dial-a-height, might add one during the restore.
-
2 pointsYou did not say what model tractor. If it is a 1978 or later C series or 300/400/500 it is any easy fix, but not quick-a minimum of 1 hour, maybe 2. You have to take off the drive belt cover on the right side and the lift lever cover on the left side. You have to pull two large clevis pins which fix the rock shaft to the lift lever. There is a very large "C"-clip on the right side of the hood tower. Remove it and unbolt the detent on the left side and the lift lever will come out the left side. You may have to use PD blaster to free up the rock shaft. Once the lever is out, the bushings pretty much fall out of the hood tower. Use antisieze when you reinstall everything. The PDF that you looked at for the parts is enough to show you how it comes apart and goes back together. When in doubt take lots of pictures!
-
2 pointsDo you have an actual spark tester, other than yourself that is.
-
2 pointsI am going to ask the same question Gino asked. This is very important, so pay attention. Turn the ignition switch to the on position. Now using a test light, from negative side of battery to the positive side of the coil. Does it light and is the light bright? You can also use a volt meter from negative battery to positive side of the coil. Looking for 12 volts. Please run this test before you ask anymore questions.
-
2 points2 weeks until show time!!! Get those Horses ready and let's fill this place up! This is the biggest thing to come to this community each year! See you all real soon!
-
2 pointsI like that dryer motor bench drive idea. Perfect way to flush and drain a tranny. Don't forget to run it through all the gears. Perfect time to listen for any strange noise in the tranny.
-
2 pointsRemember, What the Squonk said made cents...ers..scents..er..sense .
-
2 pointsFill the tires. Cheap weight!
-
2 pointsHow 'bout just one of 'em this time, not all of 'em? Remember? LOL! Geno has trouble multi-tasking.
-
2 pointsSomali SOI I may need to confine my pillaging to the Great Lakes
-
1 pointIf you can leave the plug out, plug wire connected, and ground it with a jumper wire like Nick mentioned this will free your hands up for the next test. You will need another jumper or wire. Take that wire and ground it. With the key on quickly touch the neg - terminal on the coil and see if you have spark. You can do this several times.
-
1 pointSince I need to wait for the foot pedal from Matt, I decided to put a few decals on the old girl. I am going to get an Exacto knife tomorrow to make good clean cuts for the holes. I can't do the hood yet as I need to wait for the paint to dry and then paint the black. But I am liking what I see so far. I really like what Terry did on the decal for the gage plate. Top line says Restored by Nick Caprinolo. Nice touch and much appreciated. He does an outstanding job on these decals. I am glad I picked the Patriotic decals for this one.
-
1 pointNicely done, Don - its responses/descriptions like that make this forum the bestest
-
1 pointOOOOH! I always wondered.
-
1 pointI searched for it too Chris and got nowhere. It might have been lost in the transfer. Oh by the way, mine is first name last initial. Sometimes I still forget it..
-
1 pointLast people must not have taken care of it. If you rering it it should last you a long time.
-
1 pointBeen scratching my head the last few days trying to figure where parts go and in which direction they go in what holes. I took a lot of photos when I tore it down and they are a valuable asset to me but nothing takes the place of see exactly how each piece fits. Yesterday I put the Battery floor in that tractor at least 4 times before I got everything put in the right order. So I think I found a great solution. All you need to do a perfect job of reconstructing a Wheel Horse 416-H, is to have another one just like it setting around doing nothing important. I stripped the sheet metal off and gave it a good power washing, which it needed anyway and now I won't be wondering around with my finger you know where looking for a place to put a part. I called Matt today to get a clarification of what parts I need to leave out until I install the foot pedal. He told me that he shipped the order this morning and I should get it on Tuesday. That's good because I need to take a break and watch some football tomorrow and Monday night. Go Ravens. This is going to be the year the Orioles go to the World Series and the Ravens go to the Super Bowl. Wouldn't that be something.
-
1 pointCan't wait to see what you do with this. Maybe a stainless Wisconsin?
-
1 pointWhat kind of scents do Dino's make?
-
1 pointSmall update... New Fuel Line, Cleaned the area around the Fuel Tank. And put it back together. New Hydro Filter and Drain Plug & fluid. Currently planning to change the filter and Fluid again in the Spring to flush out the remainder of that nasty black liquid that drained out. Still want to strangle the PO!!!! Picture ... I know it stinks... but I'm focused on the Kohler at the moment. Just a reminder, this isn't a restoration at this point ...I'm simply cleaning it up, and making sure she's fit and healthy. Restoration will come in time. For now, She gets to be my primary tractor while I restore my B80 that finally suffered a engine issue (rod knock).
-
1 pointHow do you know Red? Hahaha Where can I get this stuff? Thanks, Nate
-
1 pointI thought about rebuilding the keyway with the MIG using a copper key for a mold. Any opinions on using copper? The seal needs replaced anyway, that's why I pulled the hub off. I have read some successful reports on using Devcon , Metalite, and JB weld.
-
1 pointStay away from the Sodus Point Sand Bar ya mangey buck -toothed critter!
-
1 pointSounds nice! Looks even better!
-
1 pointI said it once and I'll say it again, they ARE STALKING ME!
-
1 pointFinally, progress!!! Got my stainless steel hardware and have start the reassembly process. I'm still waiting for a couple of parts to come back from the paint shop. Had a slight problem painting some with Rustoleum spray cans and some with Rustoleum quarts. They don't match exactly, so I had some of the more major parts repainted by my paint guy. Hope it turns out so that it is not noticeable.
-
1 point
-
1 pointThanks chaps, glad you like the vid's.. Here's the 3rd vid so you can see the tumb nail plus the next vid..
-
1 point
-
1 pointIf $$$'s is tight, you could load your tires with fluid for weight. I typically run weights and ag tires year round - mowing grass or blowing snow duties.
-
1 pointAll that I have seen have been flush with the outer edge of the axle.
-
1 pointJeesh! Tough crowd! Can't a girl get a break for burning her hand? It's tough to produce a video with one hand! So, here it is. Ed, it probably still wasn't worth getting up early for https://www.youtube.com/watch?v=plLoCF6tJpw
-
1 point
-
1 pointNot sure what you had in mind when you went to restore this tractor. If you just wanted to restore it you succeeded. If you wanted to bring it back mechanically you have succeeded. If you just wanted to make it all shiny you have succeeded. If you just wanted to restore with your own twist on it you have succeeded. If you wanted to see how much money you could spend, not knowing but I imagine you succeeded there too. If you wanted to make me jealous you have succeeded. Now if you wanted to make it look like it came from the factory you have failed miserably beyond compare. They never looked that good coming straight out of the factory. You have something there to be real proud of and I am sure you have set the bar for the rest of us and have succeeded in being a motivator to some. Have enjoyed the ride along on this project thanks for taking the time to take pictures and share your restore.
-
1 pointcouple more items installed. footrest grip and new original equipment supplier hood latches, same as oem without the price ...(there is a story on how i found these floating around somewhere in this thread) and also a couple changes to the decals, Thanks Terry! not sure whether to paint the rivet heads black to help them blend in or not. I'm not even sure what finish they had, some searching is in order i think..... even though all the hood and seat pan decals are different from oem, i wanted to do this on the front instead of the horse head.
-
1 pointSteve... give that man a camera, a lawn chair and a lemonade! Wish I wasn't so far away, I'd love to help. Sounds like an awesome project and a lot of fun to be had. Like the old Wheel Horse ads say.... Get more done-Have more fun!
-
1 pointWhere in the he*# did he store those machines!? In a pond or underground? WOW! Bravo for restoring them! Very commendable and a great job so far!
-
1 pointI've also been meaning to get pics of my e-tank up here.
-
1 pointOK just a few more pics and you'll be caught up to current status.
-
1 pointwell i guess that didnt happen the way i planned, i tinkered all day with the 160 and at the end of the day jammed everything back in there anyway i could............ :ROTF:


.thumb.jpg.08e05c7c9fdbe24021fc286c2094cf8e.jpg)


This leaderboard is set to New York/GMT-04:00