
Leaderboard


Popular Content
Showing content with the highest reputation on 08/13/2014 in all areas
-
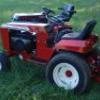
5 pointsHeres a little project I've been working on. I have been looking for a xi for some time on the cheap I finally picked up a very well used 520xi. It had issues from one end to the other. One axel/ hub was bad, all the linkage was loose/ worn, steering plate was loose, front axle pin was severly worn, one engine coil was bad, throttle linkage was rigged,engine was flopping around and some other stuff. FIrst was to get it running, it did! Next was to tear into the rearend. I knew I was putting a 3pt on it so it got all new bearings and axles, I tried D series, C195 finally GT14 axles were the ticket for the 6 lug hubs. I wanted to install the limited slip diff also but the diff offset is different so that was a no go. Next was to fab up the 3pt which is controled by rebuilt 82 C195 hyd valves so it has float. Had to raise the gas tank and seat pan 3 inches and modify the hi/lo selector also to get everything stuffed in there. But if I ever want to go back to stock, the only thing needed would be the hi/lo selector and gas tank mount, everything else is bolted on. Toro should of had this option cause it was a pain!
-
5 pointsWe had this pedal cart laying around that spent a few years sitting in the woods before we got it. The kids used it for a few years and the steering finally gave up the ghost after being fixed a few times so it sat for a while. I was about to cut it apart and haul it to the scrap metal dumpster at work when I had a vision. With the sawzall already in hand I started cutting. Next thing you know the welder came out. Cut down the length and made it so it can be taken apart for transport. Had to cut down the front sides so it doesn't hit the tractors rear tires when turning. That was two weeks ago. I started vacation Monday and since it was nice got to painting it. I think it came out pretty good for something I didn't pay a dime for and was on it's way to the scrap yard. Now I'm contimplating making a removable rear shelf for hauling any treasures I may find at the shows etc. Here's how it started life: And Now!
-
3 pointsTecky??
-
3 pointsIn 3 years , take your tractor for a spin by his place . Then compare the two , giggle & ride off into the sunset . My neighbor was the same way with my 66 Ariens snowblower , he laughed when he saw it when i moved into my new house . He's going on his 4th "big-box'er" in the last 17 years & my old girl keeps on throwin . Now who's laughin ?
-
3 pointsAnd so it began...
-
3 pointsI don't want you to take this the wrong way, but when you are working with a part that is not correct, it makes the whole long-distance troubleshooting process that much harder. So go and get the right solenoid. It should only cost you about $10.00, and it will take one of your problems out of the equation. The following precautions should be in place before attempting the following tests: Transmission in neutral. Ignition switch in the OFF position. Heavy cable from solenoid to starter disconnect at the solenoid. With the solenoid in place, and the (+) battery cable connected to one of the large lugs, and nothing connected to the other large lug, with the key off, take your multimeter, put it in the DC volts mode, connect the black probe to ground, then touch the red probe to the large lug connected to the battery. You should have 12 volts. There should be no voltage at the other large lug, or at the small lug. Now with the key still in the off position, connect a small jumper wire to the SMALL lug of the solenoid. Next, momentarily touch that jumper wire to the LARGE lug that is connected to the (+) battery. The solenoid should give you a loud click, indicating that it is closing the contacts on the inside. When those contacts close, the other large lug becomes hot (meaning that it has 12 volts as well). That is where the starter gets it's voltage from. If the cable from the starter was connected to that lug, the starter would engage. Once you have established that you have a working solenoid, remove the small jumper wire. Now look at where the (+) battery wire is connected to the solenoid, There should also be a small 14 or 16 gauge wire connected there going to the (+) side of the ammeter. From the other side of the ammeter, a wire should go to the B terminal of the ignition switch. With your multimeter in the DC voltage testing position, securely connect the black probe to ground, and touch the red probe to the B terminal of the ignition switch. You should have 12 volts. If you don't you may have a bad ammeter, or bad connections to the back of the ammeter. If you do have 12 volts at the B terminal, then remove the red probe, turn the ignition switch to ON or RUN. You should now be able to place the red probe on the (+) terminal of your ignition coil and have 12 volts. Now find the end of the wire that should connect to the small terminal of your solenoid. Connect the red probe to that wire and turn and hold the ignition switch in the start position. You should have 12 volts. If you do, then connect that wire to the small lug, turn the ignition switch to start and the solenoid should click. Reconnect the starter cable to the unoccupied large lug, and start your tractor.
-
2 pointsPronounced 'em DOA at Squonks house.
-
2 pointsC'mon, ain't no way it took you all night to drink six beers.
-
2 pointsOh Yah!!! Well once my brother and I sat up all night and drank a 12 pack of beer!!
-
2 pointsI'll be there Friday and Saturday.
-
2 pointsWhen I purchased my first Wheel Horse project a few months back, I was a little bummed to find out that a previous owner attempted to repaint the entire tractor with spray cans. It was obvious that there was no care taken to prevent overspray or any regard for taping things off, it was a quick down and dirty paint job. While some of the painted parts I could strip and clean, one problem I ran into was the serial number plate riveted on the dash tower. I completely dissassembled the tractor to have the parts sandblasted back to bare metal, so I removed the serial number tag for safekeeping. Once removed I began my attempt at restoring it. I tried soaking it in a few different solvents with no real success. I combined soaking the plate in solvents and gently scrubbing with fine steel wool, but still little to no success. Only with some fine grit sandpaper did I start to get through the layer of red paint. Unfortunatley the coat of paint was uneven and required more sanding in some areas than others, partially removing the underlying black printed part of the tag. As I thought about how to restore this I first considered using waterslide decal paper as it was thin and I could easily recreate the graphic for on the serial plate (I am already setup to make waterslide decals as I do it frequently for custom model cars and fire trucks). My only concern was that the waterslide decal film was very thin and could scratch easily, so I concluded that the durability just wouldn't be there. Then I got an idea to try making a dry transfer. I had never tried this before, but I found a kit online that only required an inkjet printer (most kits require a lamination machine which I didn't have). After ordering a starter kit to try this out, I designed the graphic with some imaging software and then followed the directions provided with the kit. Suprisingly the dry transfers came out very well, though I will admit I probably went through about a half a dozen before I finally perfected the placement and was satisfied with how it looked. The transfer paper isn't much thicker than the decal film, but I think that it seems a little more durable and shouldn't come off it I ever spray the tractor with water to clean it. I did attempt clear coating the plate, but didn't like how it looked, so this final version is just the dry transfer on top of the original serial number plate that I had sanded down to bare metal and polished to a nice shine. The grainy look of the tag in the last picture is exacerbated quite a bit by the flash from the camera (it looks much better in person), but I am well pleased and think it looks as good as new. The only downfall to the dry transfer kit is that seems you can't just make the transfers and let them sit. I tried using one that had sat for a day and it didn't work out as well as the freshly made ones did; therefore I think offering to make some for other people and shipping them is not really an option. I do have the original artwork that I came up with and if someone wants to try this I would be more than happy to share my files. Hopefully this post can help someone else out who is looking to restore their original serial number plate and if there are any questions feel free to contact me. - Seth
-
2 pointsAnd this is the reason why if you have any interest in Wheel Horses you must be a member of this forum, where you not only find individuals with the same passion as you, but are also great people who are willing to take time out of their lifes and provide such a concise and detailed sharing of their knowledge with the rest of us who are not so knowledgeable. Knowledge is something which is not our own, merely passed on to us and it is our responsibility to improve on it and pass it on to others so it van also improve their lives.Too many people miss that point. Thank you so much Vin, you have made what was already a great experience in getting this tractor even better by bringing to light some of its misteries. This video should be permanently moved to the "How-to" section.
-
2 pointsWere the right foot ones light green?
-
2 pointsEd, if you ever have to come up to the north side of York for a bread and milk run, you won't have to worry about any of my horses following you home. I keep them locked in my shed so they don't get out and run away. Nice find you got there.
-
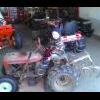
2 pointsHere is my overview of how to set up a RJ35 Veri-Drive.... I know the muffler is missing, LOL!... I have a new ceramic coated muffler to install...
-
2 pointsIll know friday if im coming for sure
-
2 pointsMy condolences to the family. I think it would be proper and a nice gesture to establish a separate member section for the ones that have left us. It would be a little memorial to them and at the same time inform other members of their passing.
-
2 pointsMy 857 was painted with New Ford Tractor Red. I think it's a very close color to the original paint on the under side of the hood.
-
1 pointJust got a 1997 Wheel Horse 520H. the very nice young man even delivered it from up state New Jersey tonight at about 10:00 PM. Metal work is in pretty good shape but there may be a problem with the engine. He told me it was locked up. someone butchered the wiring and that will need some repair. He was on his way to North Carolina and I only live 2 miles from US 95, so he stopped by and dropped it off. I will have more photos as soon as I learn how to get them off this new IPhone I got yesterday. This makes the fourth Wheel Horse I picked up in two months. I am done this year. I think.
-
1 pointFeet go up on the front portion. The seat is adjustable forward and back.
-
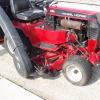
1 pointHad the 856 out grading the driveway today. amazing how well these little boogers will push stonecrete around. I call this one #2 because it's the 2nd 856 I have owned. Just sold #1 a few weeks ago. I think I'll keep this one in the herd. need to put a new wear bar on before winter.
-
1 pointHow much to make another three point for another "XI" series tractor?
-
1 pointThe great warrior chief Tah-cum'-sah.
-
1 pointI welded one of mine. Marvin
-
1 point
-
1 pointIt's got a very good shot at being the points champion for the 4th consecutive year. Leading by a good margin with 5 pulls left in the season.
-
1 point1995 Treasure Hunt #3 Camaro (white with orange racing stripes)... got that one?
-
1 pointYou sat up all night in the bathroom!
-
1 pointNo worries Steve. Even at my ripe old age and and having done things a certain way for years because it made sense to me, I certainly don't mind being set straight when the facts are presented. this old dog can actually learn new tricks as long as it isn't my wife trying to teach them. You did make me recheck the Suburban and my 2005 Classic GT. That one calls for 2 quarts and that's what I used but it also has a dipstick so I knew it was filled properly. I had it tipped in all four directions when I drained it to do the best I could to get all the old lube out and the two quarts took it right to the full mark so I guess it worked. T1257....it depends on the pull of the moon, much like the tides............ I
-
1 pointFirst...3 pints is 1 1/2 qts. Here is what I would do, and I think the 2 Bob's would agree. Once drained...fill until it comes out the fill hole...put in the plug. Use 90 wt oil for the horse you are talking about. If you want to add a little more...like 3 or 4 oz...go a head...if it makes you feel better. I know in the transmissions that I have opened...if there is no water in them...they look like new...and they were filled according to the manual. If the trans takes less then what you think it should, then you did not get all the oil out. All of these transmissions are basically the same capacity...some like the 10 pinion/limited slip may require more oil which is why the 6 speeds have the extension at the fill hole. Hope that makes sense.
-
1 pointBob, never think that your 2 cents is not appreciated. You brought up a great point and that deserves to be in this conversation. Actually, I look at a trans and where the fill plug is and wonder how that is enough oil. I still can't imagine how those detente balls get any oil. I really think that RMaynard and I are on the same plane, I'm just sitting toward the front. :ychain:
-
1 pointWell, I don't know about that but I do know I can get it in your hands . The gear on the right is the one I replaced from my transmission. At the time I bought the NOS gear I didn't think the original would work. But Steve felt it would be fine in a non-worker and, after attending the Stevasaurus Transmission University, I think so as well. Keep in mind, I didn't say I graduated....I just attended . I had another issue involving the engagement and once that was resolved the original gear probably would have been fine.
-
1 pointHere is the thing that bothers me about this. Every transmission that I take apart and put back together (and it is quite a few now & different kinds) gets a bench test with a 1/3 hsp electric motor for about 20 to 30 minutes...in all of the gears. The speed of the input pulley seems comparable to full throttle when mounted on a horse. I look down into the shift hole with a flashlight while running to see what is going on. i can tell you that it is a war zone in there with the oil getting "slung" around. I actually get a few drops getting thrown out the shifter hole...which means that the shifter ball is getting lubricated also. It actually rains oil in the transmission. My concern is that too much oil in the trans will hamper the gears, somewhat, in performing that function. Some of the changes that Bob talks about in that chart are about changing from 10W-30 to 90-140 oil. I do not really see much difference in the change of amounts of oil. Yes, both the manuals and the chart say when dry...and there is really no way to know if it is dry when you drain the oil, unless you open the trans. The thing that is really important here...it you open the fill plug and no oil comes out...you need to add oil until it does. If you want to add another 1/2 pint...I would say fine, but more then that...I am not sure. Bob...the only gears doing a low RPM thing in there are the differential and the 11/44 toothed gear. The cluster gear, fork gears and reverse idler are rotating as fast as the input pulley or close to it depending on what gear you are in. You are still lubing the trans enough if you are mowing in 1st gear for over an hour at 3/4 throttle. They would not last 40 or 50 years and still look like new if they weren't.
-
1 pointits always good to see that the horses are a family afair, i think i may be more hooked than my dad though!! james
-
1 pointYeah light red works for me.
-
1 pointI could see a pair of these on a puller That would be fun I love the sound of a troit running hard
-
1 pointMy wife's mother stopped in to visit with the patient yesterday. So I took advantage of the relief nurse and went on a bread and milk run. This followed me home. Now, what do I do with it .... Full restore, redo , keep original rust and unique throttle lock ?? It runs and sounds good, but needs some attention. What Ya think ?
-
1 pointHad a couple out today getting ready for Edgar steam show.
-
1 pointI have an RJ-58 from when I was a kid. Just looking for more information on this...would appreciate anything you could tell me! Someone said having the original seat and cover guards over the rear tires is rare? Have not run it for many, many years...there is still compression in the motor though... That's all I know...other than I ran it all the time 35 years ago...
-
1 pointIt's got a stack and weights too, she's cool.
-
1 pointLove it...even if it is pink.
-
1 pointMy Thought's are with the families and friends ,including there extended Wheel Horse Family here at the Red Square. As we all grow older we seem to learn how short the time it that we are here on this earth. Enjoy your families and the little things that we all seem to take for granted until it's gone I haven't been part of the Red Square Family but I wish we all lived closer, so we could share more. Have a Good evening All.
-
1 pointI also wanted to add that I use mine for grass aroma therapy. I work at a circus....I mean...a manufacturing facility. When I get off the mower, i can hold up my hands and say, "Look what I, MAN, has accomplished!"
-
1 point
-
1 pointAs I go to about a dozen shows a year,the $5 fee is way too low.This year I have paid between $15 Jones,MI and $170 Greenville,OH.Most are $25 to $50.This been said I will donate at least $25 plus something for the fund raiser.I don't want to see this great show disapear because of funding.I think we can help can all help Gene and Richard out by making a little bigger donation.It takes a lot of work to put this on ,lets show them our appreation.
-
1 pointOh... I'm so ashamed ...sniff...sniff.
-
1 point
-
1 pointNoise Makers, Chewing Gum, Poison Worms, All that stuff doesn't work. I know cause I've done everything and spent more money than you can shake a stick at. I had 6 of those Sweeney Mole Stakes that give off a shrill buzz. After I seen mole runs within inches of them I figured all the MOLES were doing was dancing! What I found that works is a Nash Mole Trap. I have 6 of them and have used with GREAT results EVERYTIME within 48 hrs or less. You want to know you killed em, using all that other non sense leaves you guessing. I killed 37 last year at different locations and made a few bucks at it too which has kinda taken the sting outta the crap I bought over the years that didn't work. Anyways After I catch em if they aren't dead I reward them by giving them Free swimming & diving lessons by dropping the trap in a 5 gal bucket "O" water! Jeesh I have yet to have one pass my swimming test! Then I hang them on a stick in the front yard so all their friends can see what happens if they show up at The Duke 'O' minium! ~Duke http://youtu.be/_SuqoKt06yg
-
1 pointI very much agree about that leather shift boot. I'm very fortunate that my early original RJ 58 still has its leather boot still in excellent condition. Don't toss or lose it!
-
1 pointI agree, looks great! And nice looking Wheel Horse too.


This leaderboard is set to New York/GMT-04:00