
Leaderboard


.JPG.9f2ecb26065c66527b0730084ab7fc7a.thumb.jpg.7dc8a04d9a53d44ee2b23f26ee94496f.jpg)

Popular Content
Showing content with the highest reputation on 04/26/2014 in all areas
-
3 pointsJust received a slot to sleeve adapter for my Brinly plow.
-
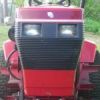
2 pointsA friend asked me about doing a custom tractor for his daughter. She came up with the idea of a fish tank tractor and this may be a custom that hasn't been done to a Wheel Horse before. It started out as a beat up Lawn Ranger but now has a C hood to completely cover the tank. Runs with a starter generator motor to keep down vibration. You can kind of see the horizontal tube inside the tank which a strong LED light shines through. Mirrors on both ends really reflect the light and it's even visible in the daylight. Air bubbles use a 110v pump powered using a small inverter. Clutch pedal will loosen the belt like normal operation and when pushed all the way, it will shut off the motor. Didn't get any pics of the top of the tank but it's rigged so the water will not splash out but also allows access to the inside. I don't know how long it will drive using the large capacity deep cycle battery but I'm sure she'll find out tonight after they get home. They plan to have it at the Zagray show in CT next weekend, complete with the tank decorated and live fish. Here's a couple pics of the Wheel Horse Sea-01 and the new owner.
-
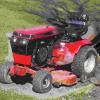
2 pointsHello all, I am new here and today I bought my 1st Wheel Horse, a 1990 312 Hydro in fair condition, 42 " deck and snow plow, new rear tires, a friend of wanted to sell and I think I got a good deal, $500.00. He owned it since 1991 and has always had it serviced at the dealership, starts great and runs strong, a little over a 1000hrs on it, with a lot of TLC this summer, I will have it looking almost like new, I hope. I will post some pics as soon as I can figure out how to resize them.
-
2 pointsHad a good time today at the mentone swap meet, got to meet some new faces and see many others. I picked up a new aftermarket carb for the 57, and ended up scoring a brake kit for it from buckrancher....didn't think I'd ever find one...Thanks Brian! I need a gasket set and some ignition stuff for the motor and its ready to be put back together, I beadblasted it and had the valves done a couple weeks ago. Also started straightening the hood and bondo on it during spring break a couple weeks ago, it just needs a little more work on the front and it will be ready for primer, I don't have any pictures of it because its at the shop. Here's my brake kit and carb I got today....thanks, Jake
-
2 pointsThe tines are starting to "point" on the end but they still have the full curve. I've used this tiller more than Wheel Horse probably intended so I'd say it's holding up fine. I have a brand new tiller that I had been considering selling but decided to keep it because of the cost of the tines. I should be good for another 10 years.
-
2 pointsOn a serious note...you better get an attorney and fight it...why?...because you are probably on a federal "watch list" now because of the explosives....the next time you go to an airport be prepared for more trouble....and don't even think about crossing the border into Canada...(jail time for sure) Yep, few appreciate the years we vets served for 64 bucks a month for what we know as FREEDOM....its slowly slipping away.....I don't care where our politicans were born, its where they live now is the problem.
-
2 pointsI can't believe you passed up a chance to play on there forklift
-
1 pointThe title say''s it all really. I hope some of you will find this video handy.
-
1 pointI took a short trip up to Chambersburg, PA for the annual CVAEMA show where Wheel Horse was the featured Garden Tractor. Beautiful day and a lot of nice machines.
-
1 pointWalmart sells kolher tractor oil in the garden section
-
1 pointI plan on going but the busy season is starting at work. Hopefully enough windows fly out of the plant during the week so production doesn't run Saturday. No production means no maintenance and I can give the guys off. No guys means no need for a boss and then I get to go to Mansfield and hopefully find me a damn tiller before its too late to put the new garden in....lol
-
1 pointA few more of the other brands.
-
1 pointNo pictures from me...I am so sorry guys. I did see Marvin though...and it was looking really good. It was parked between the satellites, so everybody got to check it out. Seriously, it was a fantastic swap meet and it was so great to walk around and shoot the breeze with everyone. I was like Squonk walking back and forth to the truck. A special thinks to Shorts and his wife (Sharon), Buckrancher and Jo, Racinfool40 (Mike), a special thanks to Funengineer (Dave), Scott Wheelhorse and his dad Dave, Jake and Doug Kuhn. What a great day...I hope lane got some pics.
-
1 pointScott...I've got a parking brake handle for you. Actually, I found 3...I am going to check them out on my 857 tomorrow. They are all a little different, but I think they will all work. Let know tomorrow...mail Monday
-
1 pointTo wet to mow today so I got some garage time. Got the short block together and all the numbers were good. I see what Bob means about them pesky keepers. They were easier on a Chevy because they were headed down hill !! I got my forceps off my fishin vest and it made life a lot easier.
-
1 pointIt is not a garden tractor, and in my humble opinion, that's the main reason.
-
1 pointYeah, the piece for the sleeve hitch had a bit of an angle to it....same as this piece. and yes, this plow has the depth gauge wheel.
-
1 pointAlso had a visitor over night. Our grand daughter Lyla. First night away from her Mom.
-
1 pointEven more proof that the country is slipping away into a more of a communist state. Your only as free as the almighty dollar.
-
1 pointcollecting wheel horses is a good sickness
-
1 pointAlright, I got to where I did as suggested and sprayed gas into the carb. Still died. So that got back to thinking how can it be a fuel problem when it's getting plenty of fuel manually. Now even though I was still leaning toward a fuel problem I got out my test light and checked a few things. Short story come to find out it was loosing power to the coil. The Prior Owner had used a wire tie off of the choke cable to tie up some of the wiring harness. When I would try and save it form dieing the movement of the choke cable would move the wiring harness just enough and would temporarily keep juice going to the coil. Found a problem with the juice going to the coil way up in the harness. So I will just do a rewire job. Thanks for all the help guys.
-
1 pointJames, Great video thanks for posting it. If they had video cameras 40 years ago I would have been doing the exact same thing. The experience you are getting by working on your Wheel Horse is "priceless". The pride in your work shows. Keep us posted on your updates, I really like following your work. Rick
-
1 pointWhat Matt said, Martin. Just take your time and look at it, I bet in a day or two it'll look just the way you want it to.
-
1 pointMartin, I think it looks great myself, but in the end, there is only one person that has to be happy with the final results. As much time and work as you've put into this amazing machine, I'd say, do whatever you have to do to make it look exactly the way you want it too. Matt
-
1 pointBoth cool tractors...as is.
-
1 pointDefinitely bringing up the past, really some fine work, and several of us are workin' on em now. Needed to save and only way I know how.
-
1 pointDave, So glad your happy with it. It is a very nice tractor. Looks great!
-
1 pointMy leak was coming from a couple places. There is a red colored metal hose running below the fan that was misting out oil. I put a white liquid teflon paste on it, took care of it immediately. The other leak was coming from a black hose behind the fan that was on a swivel type adapter. That was fixed I believe by replacing the rubber o-ring with a nitrile o-ring I bought a box from Harbor Freight. I am still finding some areas I may be misting past the seals, but the leaks are gone. Just have to know I need to routinely clean the pump fans and fan so it stays cool
-
1 pointI'm ready...got my lawn chair, camera and the home made wine...life is good. Really looking forward to the start of the show season...be nice to see you guys again.
-
1 pointWent to Idaville Indiana today to pick up my new 1965 110 John Deere. I'm staying at the campground in Winamac Indiana driving to Mentone tomorrow morning. Looking forward to seeing everyone. Have a safe trip. Sent from my iPhone using Tapatalk 2
-
1 pointBased on experience, I think Terry M's idea is great. I have mine bolted to a work bench which is bolted to the wall. The two issues that I experienced that Terry's setup eliminates or makes easier is: It's lower so you can get more leverage on the bar when necessary (and it will be) there are no clearance issues, so you can get a full 360 degree spin on the bar Nice job Terry, thanks for sharing it.
-
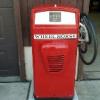
1 pointJust Finish up my Wheel Horse pump. I like the patina look but this will do. Sent from my LG-D800 using Tapatalk
-
1 pointHad a big project to do. This was all an overgrown yard that hadn't been tended to in 10 years. My brother in law is flipping the house and needed me to till the yard to restart the lawn.
-
1 pointDoes anyone have a picture of this "assembled" on a tractor. Curious as to what it's worth also. Thanks
-
1 pointThanks for all the wonderful compliments! I really appreciate it! You never know...a live performance could be at hand! Haha
-
1 pointLoading the trailer today. Can't wait to escape the northern Michigan cold. Staying in a heated cabin at Broken Arrow Campground in Winamac See you there.
-
1 pointAll you need to do is copy and paste the link (see below).
-
1 pointThanks for the compliments guys- I know a lot of you are following me on Facebook. I hope this is enough Red to tide everyone over for a while. I have to move onto some other interesting colors for a change of pace. Red and Green have been fun but its about time to try something new. Hoping someday I can actually build one for myself in Red to keep, but for now I'm having fun helping others achive their dream machine!
-
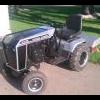
1 pointWell I just got a few more pictures this morning from Bob, which is very much appreciated. Pictures mean alot!! So I am going to add a few more. I think the video you may have to go to Bob's Facebook page. Totally Articulating Tractors by Rock & Son
-
1 pointI planning on making it, my first time this year to Mentone, 3 hours, will bring almost everything I have. Glen
-
1 pointNever use aluminum next to steel. From a corrosion standpoint, aluminum is sacrificial to steel (iron). If you use aluminum hardware, it will be gone quickly. Stainless is the way to go. I have been using loctite blue on the bolts. While never seize will prevent galling I do not think is has any vibration resisting qualities. Never seize for spindle and pulleys is a must. The idler pulley can flop around if the plastic washers under the idler bar are worn or because the idler pulley bearings are shot. I have rebuilt/refurbished 4 mower decks in the last year. After all the effort you put in taking them apart, it is worth spending the $ to put it together right so it will last another 20 years.
-
1 point
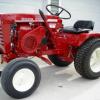
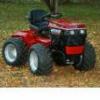
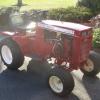
 My 1965 model 1054. My grandpa bought this when it was a year old. Its my favorite one of the bunch. I just swapped a transaxle out of a 953 into it and still have the 953 rims and tires on it.
 -
1 pointJust a bunch a crazy RED NECKS
-
1 pointI never see the moles here either. They are obviously here, but the only ones I have seen have been body parts left by the cats. Sorry no help with your windmill...
-
1 pointSo here's what I ended up with.
-
1 pointYes..... and that's also the reason why some lift levers are angled more towards the operator.
-
1 point1976 and 1977 Model C-160 and C-120 require a dedicated under-seat lift arm that will NOT fit other models. This two-leg arm is about 8" wide and a single arm lift to fit the 300 400 500 series and other model years C-160 and C-120 are only about 6" wide. These lift arms are mutually exclusive as shown in these few pics. There are 2 or 3 variations of the one-leg lift arm and it will fit most every model, except for 1976 -77 C-120 and C-160. Either arm fits in the same way, between the two fuel tank supports with a chain to the tiller, and a cable threads to the lift control.
-
1 pointWelcome to Red Square! Where are you in NJ? No prob. The most important part is lining up with the pto. These are all the photos I have at the moment. Its sitting in NY state so it'll be a bit before I'm back there. Once I had the mule drive on I propped some wood under it to get it level. And then set the mid hitch attachment in place. I had to cut one side of the 1/4" round bar shorter to accomodate the shipper. Good luck Kevin
-
1 pointFinished the other items, Mid Mount Pulleys, Rear Rockshaft Setup and some PTO work so I am set to strip and refinish the entire tiller gear setup this winter. Unit work great, Neighbors are impressed.........Hey Neighbor can you do this next spring....Nothing like a Wheel horse Tiller to make friends. I tilled up our original garden plot and then widened it in no time at all, no sod removal at all. Placed the 417-8 in low and rolled right thru the tough turf. The travel height is 5 inches and when tilling this is about a half depth cut. Perfect for the first pass thru the turf. I just dropped it a link or two on the chain connected to the lift plate at the tiller end and then it goes to full depth when tilling. I doubt I will ever touch the chain link shackle under the tank on the rockshaft.
-
1 point


This leaderboard is set to New York/GMT-04:00